Montageanleitung (de)
744 378 / 2010-02NH
†‡
Justierbausatz
HMVE
Festo SE & G Co. K
Postfach
D-73726 Esslingen
++49/(0)711/347-0
www.festo.com
1. Justierbausatz
1a. HMVE
14583d_2
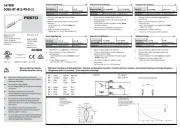
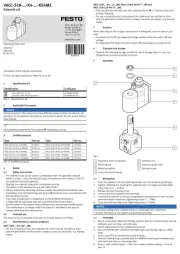
1 Justierbausatz
HMVE
(A) U-Scheibe
(B) Kontermutter
(C) Schraube
(D) Bolzen
1a. Montagebeispiel
14583d_1
2 Grundbausatz
HMVD-LP-DL63
Bestimmungsgemäß dient der
Justierbausatz HMVE 1 dazu,
das Linienportal in der
Z-Richtung zu justieren und in
eine waagrechte Position zu
bringen.
Hinweis
Befestigen Sie je einen Bausatz 1 am linken und rechten Grundbausatz
HMVD-LP-DL63. Falls mehr als 2 Grundbausätze verwendet werden, blei-
ben die mittleren ohne Justierbausatz.
Beachten Sie, dass nur Befestigungskombinationen aus der Tabelle zu-
lässig sind.
Halten Sie die zulässigen Anziehdrehmomente ein ( Tabelle).
Info
Beachten Sie die Montagereihenfolge
Montageübersicht für HM...63... (HMVS-DL63).
Wählen Sie die Befestigungselemente (Schrauben, usw.) für Ihre Kombi-
nation ( Tabelle).
Beachten Sie die Bildzuordnung für Ihre Kombination ( Tabelle).
2. Vormontage
14179d_3
Pressen Sie den Bolzen (D)
bis auf Anschlag in den
Grundbausatz 2.
14179d_4
Drehen Sie die Schraube (C)
mit der Kontermutter (B) und
der Scheibe (A) in den Justier-
bausatz 1.
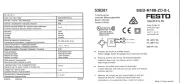
3. Montage
14179d_5
Fixieren Sie das Linienportal
an Ihrer Konstruktion über
die Grundbausätze 2.
Drehen Sie die Schrauben (E)
jedoch noch nicht fest.
14179d_6
Platzieren Sie den Justier-
bausatz 1 unterhalb dem
linken und rechten Grund-
bausatz 2, so dass die
Schraube (C) mit dem Bol-
zen (D) fluchtet.
Befestigen Sie den Justier-
bausatz 1 an Ihrer Konstruk-
tion mit den Schrauben (F).
14179d_7
Drehen Sie die Schraube (C)
am linken und rechten Jus-
tierbausatz 1 heraus, bis
diese am Bolzen (D) anliegen.
14179d_8
Drehen Sie die Schrauben (C)
weiter heraus, bis das Li-
nienportal leicht angehoben
wird.
Justieren Sie das Linienportal
in der Z-Richtung waagerecht
aus.
14179d_9
Drehen Sie die Schrauben (E)
an den Grundbausätzen 2
fest.
14179d_10
Drehen Sie die Kontermut-
ter (B) gegen den Justierbau-
satz 1 fest.
1)
1) Toleranzen für nicht tolerierte Anziehdrehmomente MA
MA > 1 Nm: ± 20%