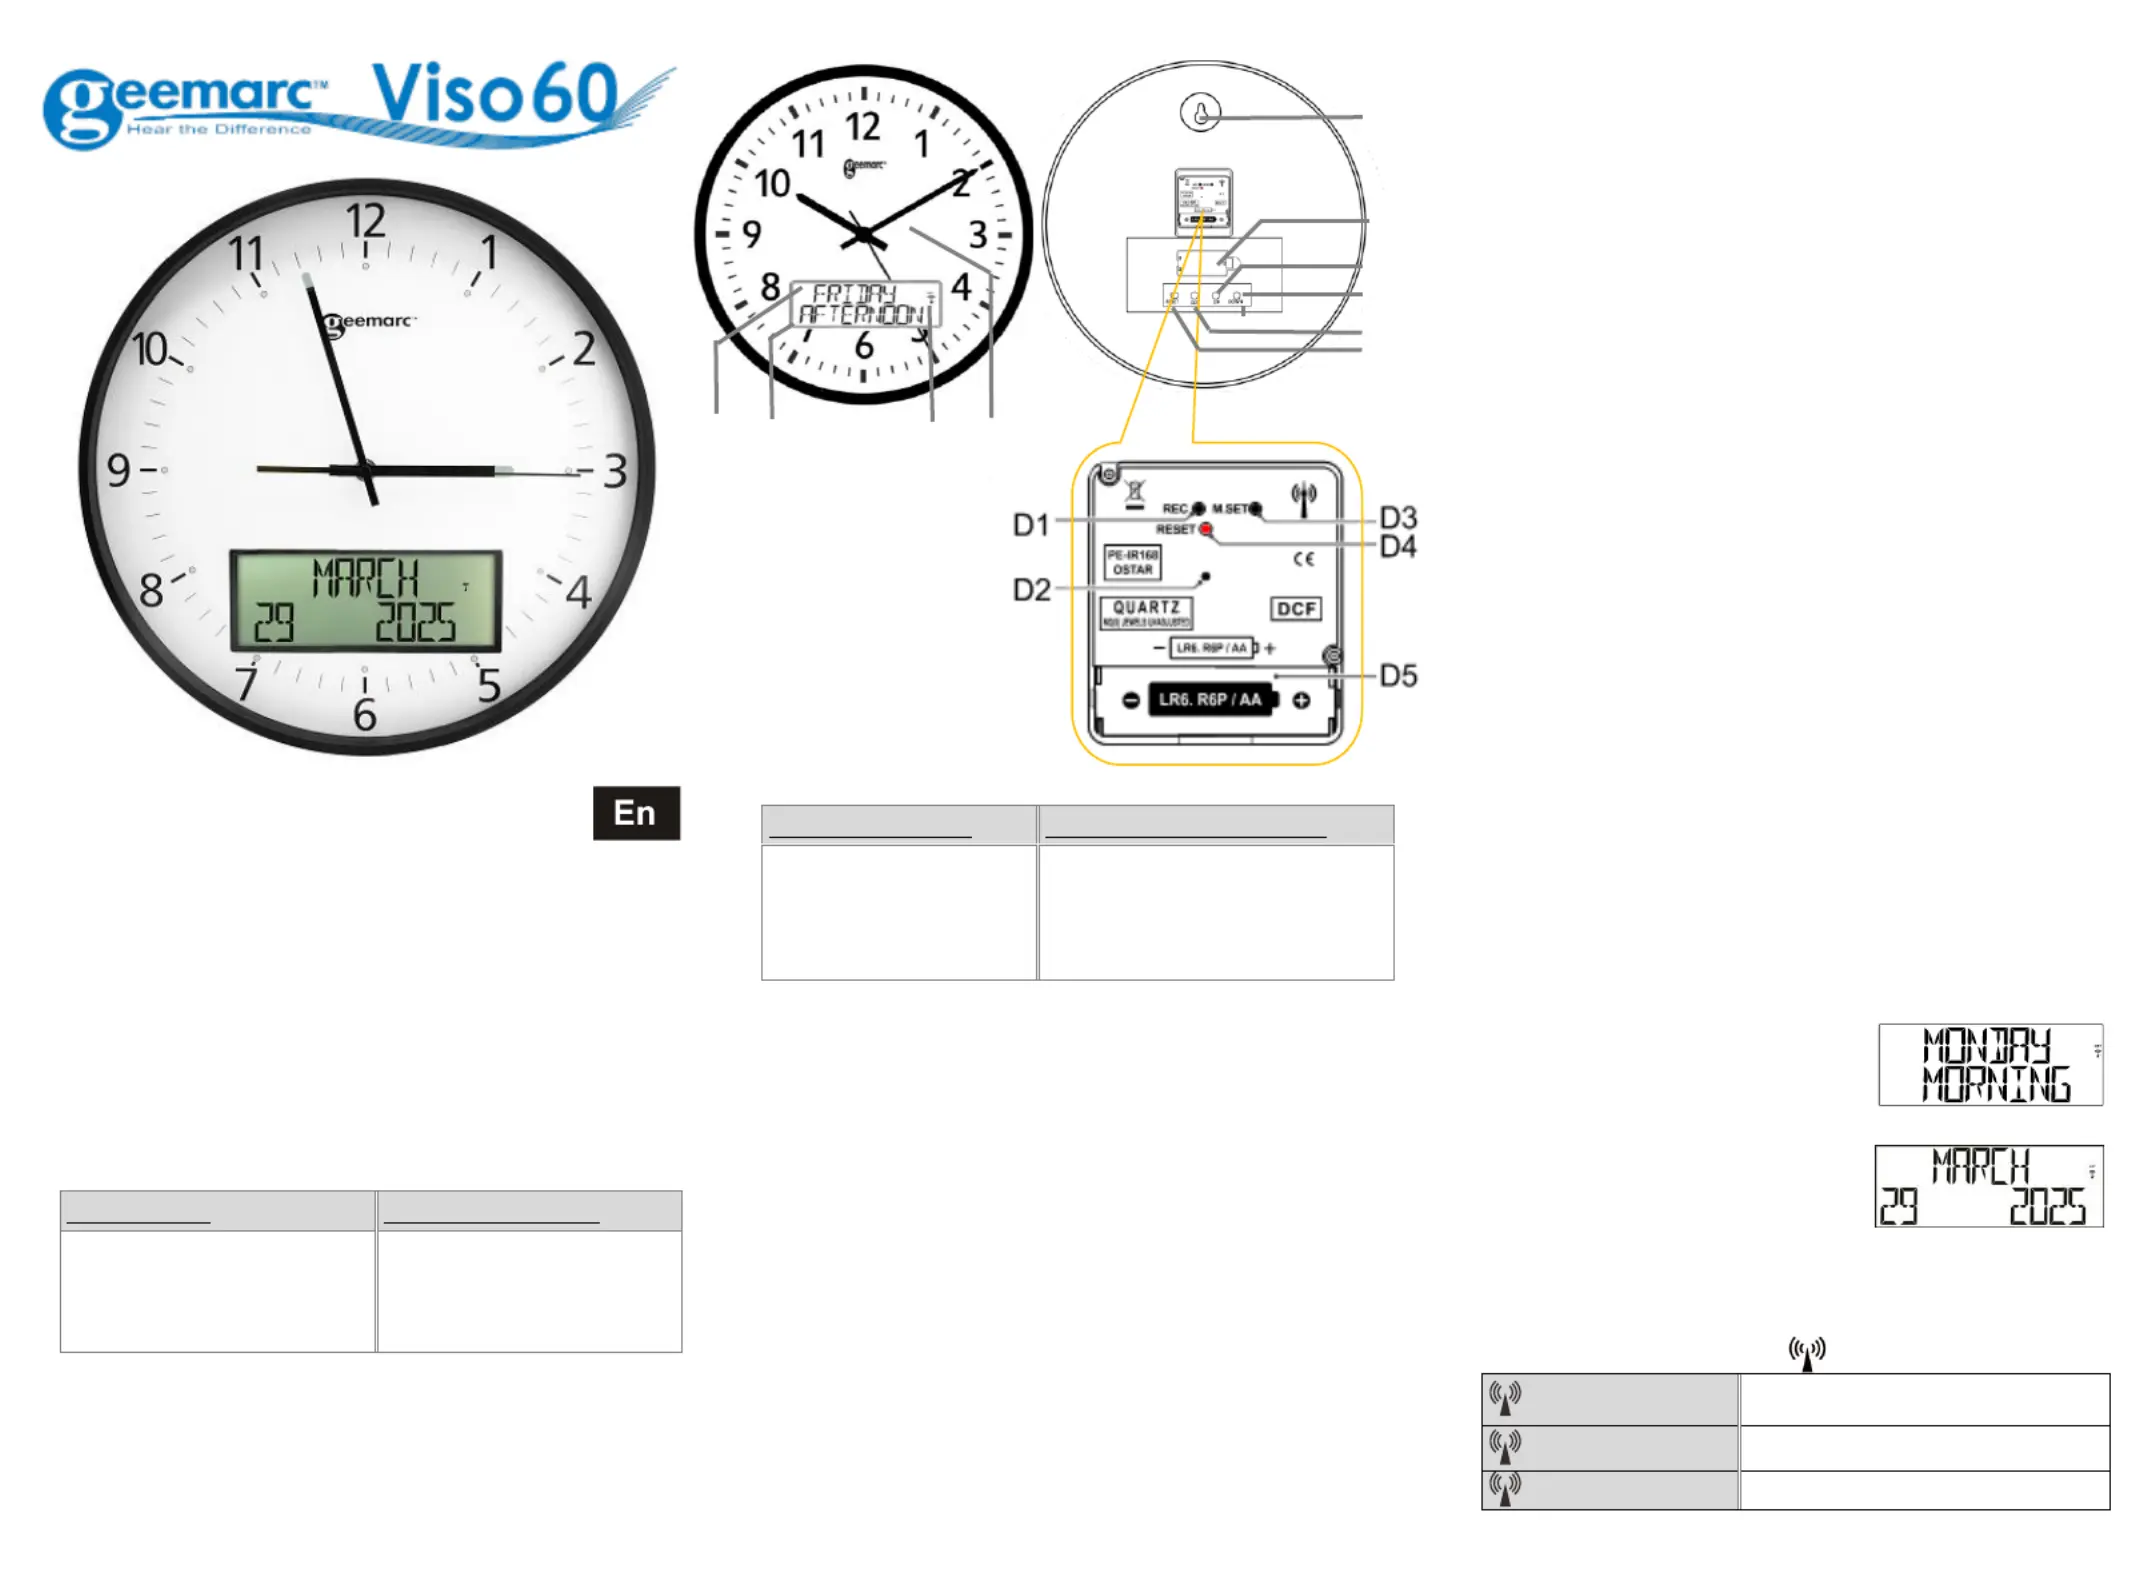
⚫ The clock can be set to scan the radio signal manually by holding
“ ” (▼B3) button for 3 seconds. Each reception takes around several
minutes. If the reception fails, scanning stops ( ) on LCD . (“ ” A4
disappear) and repeats again on next full hour. E.g. scanning failed at
8:20a.m. It will scan again at 9:00a.m.
⚫ Summer and winter time change (and reverse) is set automatically.
You must wait 10 min to check the clock is set automatically (see chapter
4.2) before you proceed to the setting, press and hold ) for 3 “▼”(B3
seconds to turn off the automatic clock setting (icon ( ) disappears). A4
Note that during the set up process, a long press “ ” or” ” can ▼▲
▲
▲
▲▲
(a) Calendar and Time Set
⚫ In normal pattern, press butto ) to display the time on the n “ ” (SET B1
⚫ To change the time format, press “ ” (▼B3) to pass between 12H
⚫ Press button “SET” (B1) for 2 seconds to enter date and time setting,
⚫ Set the TIME ZONE (2), press” ” ( or” ▲B2) ▼”(B3) to set the time
zone and press button “SET”(B1) to confirm.
⚫ Set the YEAR, press” ” ( ▲B2) or” ” ( ▼B3) to set the and YEAR
press button “SET”(B1) to confirm.
⚫ Set the ) to set the MONTH, press” ” ( ▲
▲
▲
▲▲ B2) or” ▼”(B3 Month
and press button “ ”SET ( ) to confirm. B1
⚫ Set the DAY, press” ▲
▲
▲
▲▲” (B2) or” ” ( ▼B3) to set the Day and press
button “SET”(B1) to confirm.
⚫ Set the ) to set the and HOUR, press” ” ( ▲
▲
▲
▲▲ B2) or” ” ( ▼B3 Hour
press button “ ” (SET B1) to confirm.
⚫ Set the MINUTE, press” ▲
▲
▲
▲▲” ( or”B2) ▼”(B3) to set the and Minute
press button “SET”(B1) to confirm and exit.
(1) All Setting modes will automatically exit in around 15 seconds without
(2) For Time Zone: If you do not receive -DCF frequency signal, the a RC
time zone should be set to 0. Time Zone is used in countries which
can receive the DCF frequency signal but the time zone is different
from German Time (i.e. MT+1).
Note: Default time for stage of
⚫ In standby mode, press button “ ” (SET B1) for 2 seconds to enter stage
⚫ Set the hour of the ) to set MORNING, press” ” ( ▲
▲
▲
▲▲ B2) or” ▼”(B3
the HOUR and press button “SET”(B1) to confirm.
⚫ Set the hour of the press ( ) ) to AFTERNOON, “▲
▲
▲
▲▲” B2 or” ” ( ▼B3
set the HOUR and press button “SET”(B1) to confirm.
⚫ Set the hour of the EVENING, press” ” ( or” ▲
▲
▲
▲▲ B2) ▼”(B3) to set
the HOUR and press button “ ” (SET B1) to confirm.
⚫ Set the hour of the NIGHT, press” ” ( or” ▲
▲
▲
▲▲ B2) ▼”(B3) to set the
HOUR and press button “ ” (SET B1) to confirm.
(c) Language set & Display set
In standby mode, press button “ ” (
▲
▲
▲
▲▲ B2) for 2 seconds to enter the
language setting, press” ” ( or” ▲
▲
▲
▲▲ B2) ▼”(B3) to select your language
(14 languages available: English, French, German, Netherland, Italian,
Spanish, Portuguese, Swedish, Norwegian, Danish, Finnish, Polish,
Czech, Hungarian ), press “SET”(B1) to confirm.
⚫ After the language is confirmed, it will auto jump to display mode.
Press ) to select “ ” (
▲
▲
▲
▲▲ B2) or” ” (▼B3 DP DP-1 / -2 or DP-3, press
Note: In set up display -3, user can set how many seconds they DP
require between displays. When the display selection is blinking
DP-3 press and hold the button for longer ) for 2 seconds “ ” (SET B1
until this is active and ) to increase or press” ” ( ▲
▲
▲
▲▲ B2) or” ” ( ▼B3
decrease the seconds. Default setting is 5 seconds, and it will be 5s
as a unit maximum to 60s, which means you can set 05s, 10s, 15s,
20s 60s up to . Press “ ” (SET B1) to confirm and exit.
⚫ different display methods
-DP- isplay day and stage of the day. 1 d
-DP-2 display Month, date and year.
-DP- display day and time for XX seconds as above, then display day 3
and stage of the day for XX seconds then display month, day and
(if you do not set the time between seconds this will default to 5 seconds)
If there is no response from the wall clock by the moving 2
any other malfunction occurs perform the following steps:
- With these procedures all received data will be deleted.
(1 Press RESET button (D4) with a pointed instrument (e.g. pen). )
(2) The clock hands will move to the start position (12:00 a.m.) and the
wall clock then tries to receive the signal.
(3 Wait approx. 2-5 minutes until the current time is displayed. )
For Digital clock, press RESET button ( ) to restart the setting from B4
6 MOUNTING / POSITIONING .
Make sure you have mounted or placed the device in a safe position. If
not the device may fall down and heavy damages can occur for which
the manufacturer is not liable.
7 CLEANING AND MAINTENANCE .
Before cleaning the device, disconnect it from the power supply (remove
Only use dry cloth to clean the exterior of the device to avoid damaging
the electronics, do not use any cleaning fluid.
For product support and help visit our website at www.geemarc.com
E-mail : help@geemarc.com
lines are open 09h00 to 16h00 Mon to Fri
Parc de l’Etoile, 2 Rue Galilée, 59760 Grande-Synthe, France
This product is made in China To Geemarc Telecom
UGViso60_DCF(VDE)_En_A4_V 0 1.
8 Radio controlled time reception range: up to .
1500km from DCF77 transmitter.
From the moment your Geemarc Viso 60 product is purchased,
Geemarc guarantee it for the period of two years. During this time,
all repairs or replacements (at our discretion) are free of charge.
Should you experience a problem then contact our helpline or visit
our website at . The guarantee does not cover www.geemarc.com
accidents, negligence or breakages to any parts. The product must
not be tampered with or taken apart by anyone who is not an
authorised Geemarc representative. The Geemarc guarantee in no
way limits your legal rights.
IMPORTANT: YOUR RECEIPT IS PART OF YOUR GUARANTEE AND MUST
BE RETAINED AND PRODUCED THE EVENT OF A WARRANTY CLAIM.IN
CE Declaration: Hereby Geemarc Telecom SA declares that this
Viso60 is in compliance with the essential requirements and other
relevant provisions of the Radio and Telecommunications Terminal
Equipment Directive 2014/53/U E.
The declaration of conformity may be consulted at www.geemarc.com
Caution: Radio frequency interference may cause discernible sound
on the unit. The sound will end when the interference stops.
The WEEE (Waste Electrical and Electronic Equipment) has been put in
place for the products in end of life are recycled in the best way.
When this product is out of order, please do not put it in your
Please use one of the following sposal options: di
- Remove the batteries and deposit them in an appropriate WEEE skip.
Deposit the product in in a appropriate WEEE skip.
- Or hand the old product to the retailer. If you purchase a new one,