Hatco RHW-2 Manual

Hatco Kedel RHW-2

Læs gratis den danske manual til Hatco RHW-2 (24 sider) i kategorien Kedel. Denne vejledning er vurderet som hjælpsom af 49 personer og har en gennemsnitlig bedømmelse på 4.1 stjerner ud af 25 anmeldelser. Har du et spørgsmål om Hatco RHW-2, eller vil du spørge andre brugere om produktet?

Side 1/24
© 2015 Hatco Corporation
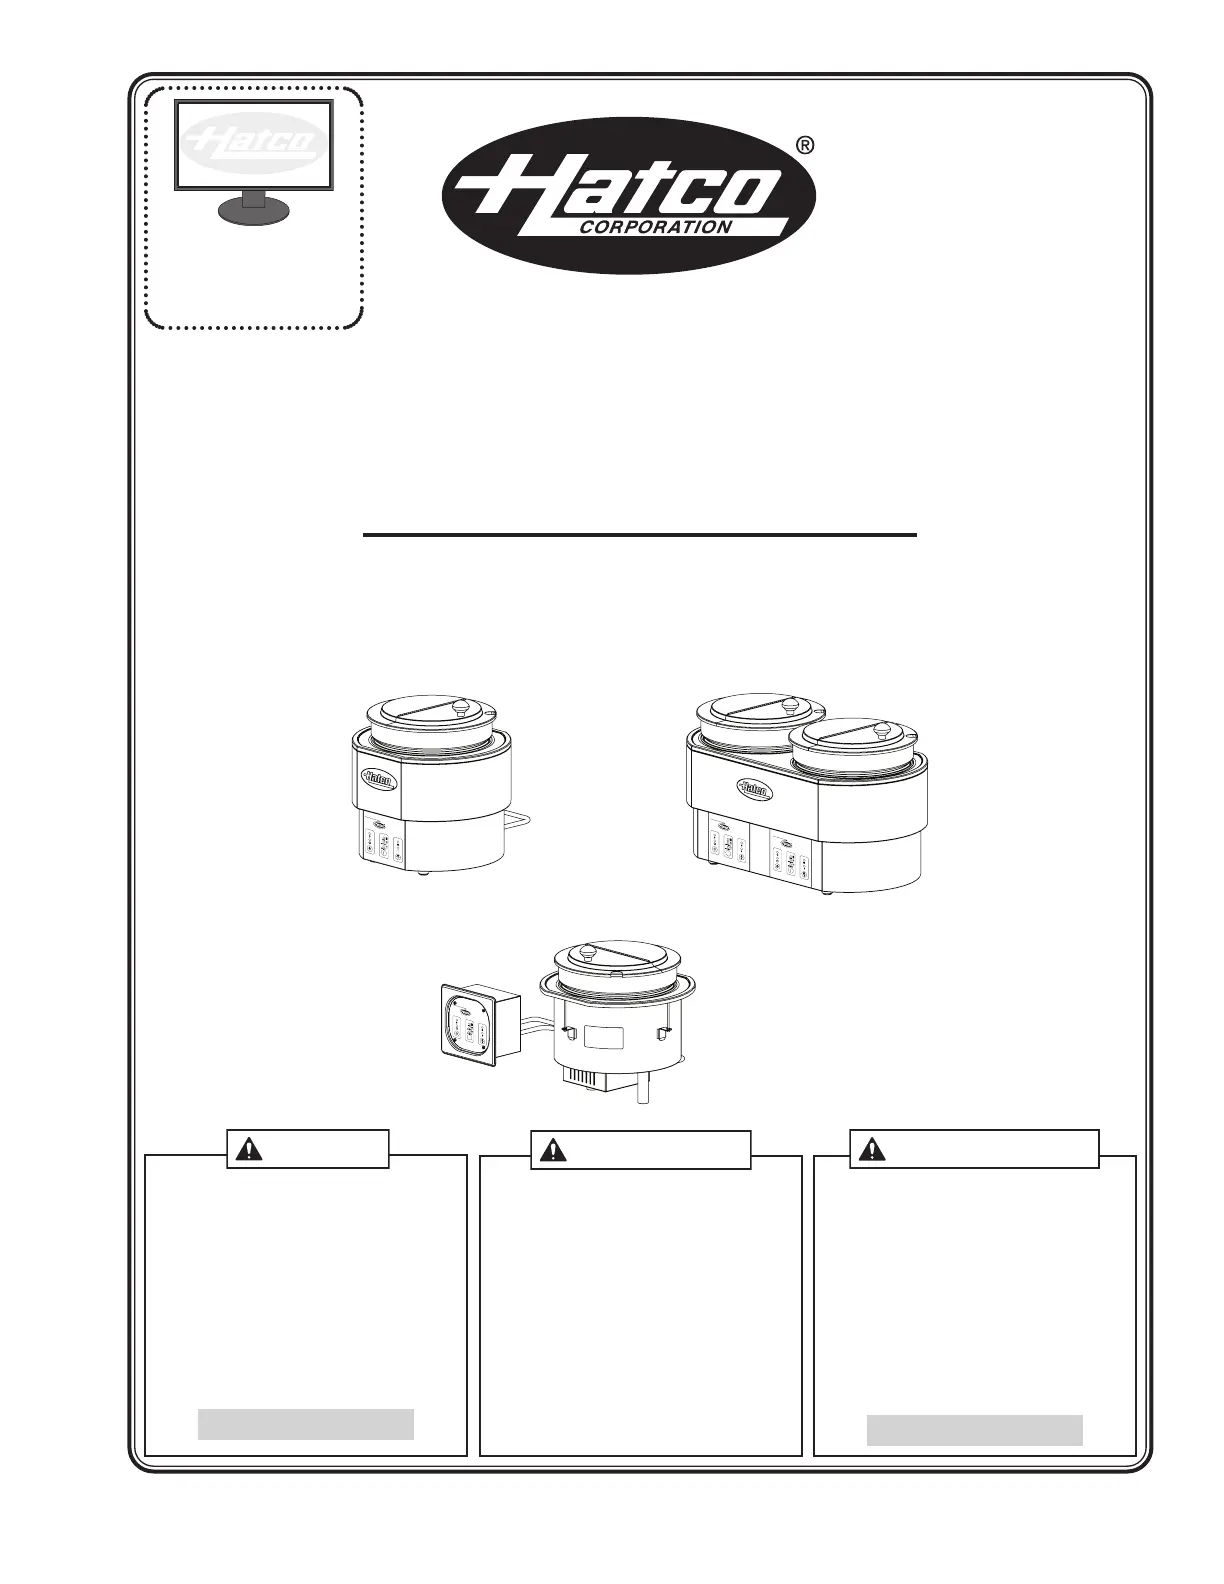
Round Heated Wells
Puits Chauffants Ronds
RHW Series/Série
Installation and Operating Manual
Manuel d'installation et d'utilisation
P/N 07.04.752.00
H
E
A
T
E
D
W
E
L
L
H
A
T
C
O
C
O
R
P
O
R
A
T
I
O
N
M
I
L
W
A
U
K
E
E
,
W
I
U
.
S
.
A
.
w
w
w
.
h
a
t
c
o
c
o
r
p
.
c
o
m
H
E
A
T
E
D
W
E
L
L
H
A
T
C
O
C
O
R
P
O
R
A
T
I
O
N
M
I
L
W
A
U
K
E
E
,
W
I
U
.
S
.
A
.
w
w
w
.
h
a
t
c
o
c
o
r
p
.
c
o
m
H
E
A
T
E
D
W
E
L
L
H
A
T
C
O
C
O
R
P
O
R
A
T
I
O
N
M
I
L
W
A
U
K
E
E
,
W
I
U
.
S
.
A
.
w
w
w
.
h
a
t
c
o
c
o
r
p
.
c
o
m
H
E
A
T
E
D
W
E
L
L
H
A
T
C
O
C
O
R
P
O
R
A
T
I
O
N
M
I
L
W
A
U
K
E
E
,
W
I
U
.
S
.
A
.
w
w
w
.
h
a
t
c
o
c
o
r
p
.
c
o
m
Register Online!
(see page 2)
S'inscrire en ligne!
(voir page 12)
hatcocorp.com
Do not operate this equipment unless you
have read and understood the contents of
this manual! Failure to follow the
instructions contained in this manual may
result in serious injury or death. This
manual contains important safety
information concerning the maintenance,
use, and operation of this product. If
you’re unable to understand the contents
of this manual, please bring it to the
attention of your supervisor. Keep this
manual in a safe location for future
reference.
English = p 2
No opere este equipo al menos que haya
leído y comprendido el contenido de este
manual! Cualquier falla en el seguimiento
de las instrucciones contenidas en este
manual puede resultar en un serio lesión
o muerte. Este manual contiene
importante información sobre seguridad
concerniente al mantenimiento, uso y
operación de este producto. Si usted no
puede entender el contenido de este
manual por favor pregunte a su
supervisor. Almacenar este manual en
una localización segura para la referencia
futura.
Ne pas utiliser cet équipement sans avoir
lu et compris le contenu de ce manuel !
Le non-respect des instructions
contenues dans ce manuel peut entraîner
de graves blessures ou la mort. Ce
manuel contient des informations
importantes concernant l'entretien,
l'utilisation et le fonctionnement de ce
produit. Si vous ne comprenez pas le
contenu de ce manuel, veuillez le signaler
à votre supérieur. Conservez ce manuel
dans un endroit sûr pour pouvoir vous y
référer plus tard.
Français = p 12
WARNING
ADVERTENCIA
AVERTISSEMENT
Form No. RHWM-1215
2
English
Th
is ma
n
u
a
l p
r
o
vid
e
s th
e
in
sta
lla
tio
n
, sa
fe
ty, a
n
d
o
p
e
r
a
tin
g
in
str
u
ctio
n
s
fo
r
R
o
u
n
d
H
e
a
te
d
We
lls.
H
a
tco
r
e
co
mme
n
d
s
a
ll
i
ns
tal
l
ati
on,
operati
ng,
and
s
afet
y
i
ns
truc
ti
ons
appeari
ng
i
n
t
hi
s
m
anual
be read pri
or to i
ns
tal
l
ati
on or operati
on of the heat
ed
wel
l
s
.
Safety information that appears in this manual is identified by
the following signal word panels:
WARNING indicates a hazardous situation which, if not
avoided, could result in death or serious injury.
CAUTION indicates a hazardous situation which, if not
avoided, could result in minor or moderate injury.
NOTICE is used to address practices not related to personal
injury.
WARNING
NOTICE
CAUTION
INTRODUCTION
Hatco Round Heated Wells are specially designed to cook or
hold a wide variety of foods including soups, curry, gravies and
a variety of toppings. Products for cooking or holding are placed
in a pot which is heated or warmed by a heating plate. The
heating element temperature is monitored by an electronic
controller for optimum results. Heat is evenly distributed
throughout the unit to hold foods at desired temperatures and
the insulated stainless steel design provides easy maintenance
and durable performance.
All units are equipped with a control panel featuring three
temperature setpoints from 120°F (49°C) to 212°F (100°C) and
an energy saving low power mode that saves electricity during
off-peak hours.
Hatco Round Heated Wells are quality built to meet
the demands of foodservice operations and provide years of
trouble-free performance. The heating elements are
guaranteed against breakage and burnout for 1 year.
Round Heated Wells are products of extensive research and
field testing. The materials used were selected for maximum
durability, attractive appearance, and optimum performance.
Every unit is inspected and tested thoroughly prior to shipment.
Important Owner Information ..............................................2
Introduction...........................................................................2
Important Safety Instructions..............................................3
Model Description.................................................................4
Model Designation................................................................4
Specifications........................................................................5
Plug Configurations .............................................................5
Electrical Rating Chart.........................................................5
Dimensions ..........................................................................5
Installation .............................................................................6
General ................................................................................6
Installing a Built-In Model.....................................................6
Operation...............................................................................8
General ................................................................................8
Maintenance ..........................................................................9
General ................................................................................9
Daily Cleaning......................................................................9
Options and Accessories.....................................................9
Troubleshooting Guide ......................................................10
Limited Warranty.................................................................11
IMPORTANT OWNER INFORMATION
Record the model number, serial number, voltage, and
purchase date of the unit in the spaces below (specification
label located on the back of the unit). Please have this
information available when calling Hatco for service assistance.
Model No. ________________________________________
Serial No. ________________________________________
Voltage __________________________________________
Date of Purchase __________________________________
Register your unit!
Completing online warranty registration will prevent delay in
obtaining warranty coverage. Access the Hatco website at
www.hatcocorp.com, select the Parts & Service pull-down
menu, and click on “Warranty Registration”.
Business
Hours: 7:00
AM to 5:00 PM Central Standard Time (CST)
(Summer Hours: June to September
7:00
AM to 5:00 PM CST MondayThursday
7:00
AM to 4:00 PM CST Friday)
Telephone: 800-558-0607; 414-671-6350
e-mail: partsandservice@hatcocorp.com
Fax: 800-690-2966 (Parts and Service)
414-671-3976 (International)
Additional information can be found by visiting our web site at
www.hatcocorp.com.
24 Hour 7 Day Parts and Service
Assistance available in the United States
and Canada by calling 800-558-0607.
CONTENTS
Form No. RHWM-1215
3
IMPORTANT SAFETY INFORMATION
English
Ma
i
n
t
a
i
n
p
r
o
p
e
r
c
l
e
a
n
l
i
n
e
s
s
o
f
th
e
u
n
i
t.
P
r
o
p
e
r
c
l
e
a
n
l
i
n
e
s
s
a
n
d
s
a
n
it
a
t
io
n
is
c
r
it
ic
a
l
f
o
r
f
o
o
d
-
s
a
f
e
o
p
e
r
a
t
io
n
.
R
e
f
e
r
t
o
t
h
e
M
AI
NTE
NANCE
s
e
c
t
i
on
f
or
c
l
e
a
ni
ng
pr
oc
e
dur
e
s
.
Thi
s
uni
t
ha
s
no
us
e
r
-s
e
r
v
i
c
e
a
bl
e
pa
r
t
s
.
I
f
s
e
r
v
i
c
e
i
s
r
e
q
u
i
r
e
d
o
n
t
h
is
u
n
it
,
c
o
n
t
a
c
t
a
n
A
u
t
h
o
r
iz
e
d
H
a
t
c
o
Se
r
v
ic
e
A
g
e
n
t
o
r
c
o
n
t
a
c
t
t
h
e
H
a
t
c
o
Se
r
v
ic
e
D
e
p
a
r
t
me
n
t
a
t
8
0
0
-
5
5
8
-
0
6
0
7
o
r
4
1
4
-
6
7
1
-
6
3
5
0
;
f
a
x
8
0
0
-
6
9
0
-
2
9
6
6
;
o
r
I
nt
e
r
na
t
i
ona
l
f
a
x
4
1
4
-
6
7
1
-
3
9
7
6
.
BURN
HAZARD:
S
o
me
e
x
t
e
rio
r
s
u
rf
a
c
e
s
o
n
u
n
it
will
g
e
t
h
o
t
.
U
s
e
c
a
u
t
io
n
w
he
n
t
ouc
hi
ng
t
he
s
e
a
r
e
a
s
.
Hot
w
a
t
e
r
i
n
uni
t
m
a
y
c
a
us
e
s
c
a
l
di
ng
i
nj
ur
y
.
Al
l
ow
uni
t
t
o
cool
bef
or
e
dr
ai
ni
ng
or
cl
eani
ng.
L
o
c
a
te
u
n
it a
t th
e
p
r
o
p
e
r
c
o
u
n
te
r
h
e
ig
h
t in
a
n
a
r
e
a
th
a
t is
convenient
f
or
use. The locat
ion should be level t
o pr
event
t
he
u
n
it o
r it
s
c
o
n
te
n
t
s
fro
m fa
llin
g
a
c
c
id
e
n
t
a
lly
a
n
d
s
tro
n
g
e
n
o
u
g
h
t
o
suppor
t
t
he
w
ei
ght
of
t
he
uni
t
and
cont
ents.
Do
not
m
ove
or
rel
ocat
e
uni
t
w
hen
i
t
contai
ns
f
ood
product
.
T
u
r
n
o
ff
u
n
it,
r
e
mo
v
e
fo
o
d
p
r
o
d
u
c
t,
a
n
d
a
llo
w
to
c
o
o
l
com
pl
et
el
y
bef
or
e
m
ovi
ng
or
cl
eani
ng.
S
t
a
n
d
a
rd
a
n
d
a
p
p
ro
v
e
d
ma
n
u
fa
c
tu
rin
g
o
ils
ma
y
s
mo
k
e
u
p
to
3
0
m
i
nut
es
duri
ng
i
ni
t
i
al
start
up.
Thi
s
i
s
a
t
em
porary
condi
t
i
on.
Op
e
ra
te
u
n
it with
o
u
t fo
o
d
p
ro
d
u
c
t u
n
til s
mo
k
e
d
is
s
ipa
te
s
.
Use non-
abr
asi
ve cl
eaner
s and cl
ot
hs onl
y.
Abr
asi
ve cl
eaner
s
and cl
ot
hs coul
d scr
at
ch f
i
ni
sh of
uni
t
,
m
ar
r
i
ng i
ts appear
ance
and
m
aki
ng
i
t
suscept
i
bl
e
t
o
soi
l
accum
ul
at
i
on.
Do not
l
ay uni
t
on t
he si
de w
i
t
h t
he cont
r
ol
p
anel
.
Dam
age t
o
t
he
uni
t
coul
d
occur
.
Re
mo
te
mo
u
n
te
d
c
o
n
tr
o
l pa
n
e
ls
mu
s
t h
a
v
e
a
min
imu
m
6
(1
5
2
mm) c
le
a
ra
n
c
e
fro
m u
n
it (n
o
t to
e
x
c
e
e
d
5
6
[1
4
2
0
mm]).
Mo
u
n
tin
g
c
o
n
tr
o
l pa
n
e
l c
lo
s
e
r
ma
y
c
a
u
s
e
h
e
a
t d
a
ma
g
e
to
el
ect
r
i
cal
syst
em
i
n
cont
r
ol
p
anel
.
Do not locate unit in an area subject to excessive temperatures
or grease from grills, fryers, etc. Excessive temperatures could
cause damage to the unit.
Unit is designed and recommended for use in or on metallic
countertops. Damage to any countertop material is not
covered under the Hatco warranty. For other surfaces, verify
with manufacturer that material is suitable for prolonged
temperatures up to 212°F (100°C).
Do not use excessive force when tightening mounting screws on
built-in units. This may damage unit and/or countertop.
Do not locate unit in area with excessive air movement around
unit. Avoid areas that may be subject to active air movements
or currents (i.e., near exhaust fans/hoods, air conditioning
ducts, and exterior doors).
Do not operate unit without food product/water in well.
Damage to unit could occur.
NOTICE
C
A
U
TIO
N
WA
R
N
IN
G
ELECTRIC SHOCK HAZARD:
Plug unit into a properly grounded electrical receptacle of
the correct voltage, size, and plug configuration. If plug
and receptacle do not match, contact a qualified electrician
to determine and install the proper voltage and size
electrical receptacle.
Turn OFF power switch, unplug power cord, and allow unit
to cool before performing any cleaning, adjustments, or
maintenance.
DO NOT submerge or saturate with water. Unit is not
waterproof. Do not operate if unit has been submerged or
saturated with water.
Unit is not weatherproof. Locate unit indoors where
ambient air temperature is a minimum of 70°F (21°C).
Do not steam clean or use excessive water on unit.
This unit is not “jet-proofconstruction. Do not use jet-
clean spray to clean this unit.
Do not pull unit by power cord.
Discontinue use if power cord is frayed or worn.
Do not attempt to repair or replace a damaged power cord.
Cord must be replaced by Hatco, an Authorized Hatco
Service Agent, or a person with similar qualifications.
DO NOT use unit to melt or hold ice. Doing so may cause
condensation, creating an electrical hazard and causing
personal injury and/or damage to unit. Damage caused by
condensation is not covered by warranty.
Use only Genuine Hatco Replacement Parts when service
is required. Failure to use Genuine Hatco Replacement
Parts will void all warranties and may subject operators of
the equipment to hazardous electrical voltage, resulting in
electrical shock or burn. Genuine Hatco Replacement
Parts are specified to operate safely in the environments in
which they are used. Some aftermarket or generic
replacement parts do not have the characteristics that will
allow them to operate safely in Hatco equipment.
FIRE HAZARD:
Locate unit a minimum of 1″ (25 mm) from combustible
walls and materials. If safe distances are not maintained,
discoloration or combustion could occur.
Do not use harsh chemicals such as bleach (or cleaners
containing bleach), oven cleaners, or flammable cleaning
solutions to clean this unit.
Make sure food product has been heated to the proper food-
safe temperature before placing in the unit. Failure to heat
food product properly may result in serious health risks. This
unit is for holding pre-heated food product only.
Hatco Corporation is not responsible for actual food product
serving temperature. It is the responsibility of the user to
ensure that food product is held and served at a safe
temperature.
Make sure all operators have been instructed on the safe and
proper use of the unit.
This unit is not intended for use by children or persons with
reduced physical, sensory, or mental capabilities. Ensure
proper supervision of children and keep them away from the
unit.
WARNING
Read the following important safety information before using this equipment to avoid serious
injury or death and to avoid damage to equipment or property.
Form No. RHWM-1215
4
MODEL DESCRIPTION
English
All Models
All Round Heated Wells are reliable and versatile. In addition for
use as a Heated Well to keep food hot for serving, food also
can be steamed when used with an optional adapter kit.
NOTE: Do not add cold food to the unit for re-thermalization
while hot food is being held.
Model RHW-1
Model RHW-1 is equipped with a single heating element for
holding food or cooking soups or sauces. It is supplied with a
specially-designed, stainless steel 11 qt (10 liter) round pot and
hinged lid.
Model RHW-1
Model RHW-1B
Model RHW-1B is equipped the same as the RHW-1 but is a
built-in model equipped with a remote mounted control panel.
Model RHW-1B
H
E
A
T
E
D
W
E
L
L
H
A
T
C
O
C
O
R
P
O
R
A
T
I
O
N
M
I
L
W
A
U
K
E
E
,
W
I
U
.
S
.
A
.
w
w
w
.
h
a
t
c
o
c
o
r
p
.
c
o
m
H
E
A
T
E
D
W
E
L
L
H
A
T
C
O
C
O
R
P
O
R
A
T
I
O
N
M
I
L
W
A
U
K
E
E
,
W
I
U
.
S
.
A
.
w
w
w
.
h
a
t
c
o
c
o
r
p
.
c
o
m
Model RHW-2
Model RHW-2 is equipped with two individually controlled
heating elements for holding food or cooking soups or sauces.
It is supplied with two specially-designed, stainless steel 11 qt
(10 liter) round pots and hinged lids.
Model RHW-2
H
E
A
T
E
D
W
E
L
L
H
A
T
C
O
C
O
R
P
O
R
A
T
I
O
N
M
I
L
W
A
U
K
E
E
,
W
I
U
.
S
.
A
.
w
w
w
.
h
a
t
c
o
c
o
r
p
.
c
o
m
H
E
A
T
E
D
W
E
L
L
H
A
T
C
O
C
O
R
P
O
R
A
T
I
O
N
M
I
L
W
A
U
K
E
E
,
W
I
U
.
S
.
A
.
w
w
w
.
h
a
t
c
o
c
o
r
p
.
c
o
m
R H W - 1 B
Round
Heated Well
B = Built-In w/Remote Control
No Character = Countertop
1 = Single Unit
2 = Dual Unit
MODEL DESIGNATION
Model Voltage Watts Amps Plug Configuration Shipping Weight
RHW-1 120 1250 10.4 NEMA 5-15P 21 lbs. (10 kg)
RHW-1B 120 1250 10.4 NEMA 5-15P 21 lbs. (10 kg)
RHW-2 208240 20452725 9.811.3 NEMA 6-15P 36 lbs. (17 kg)
Model
Width
(A)
Depth
(B)
Height
(C)
Footprint
Width
(D)
Footprint
Depth
(E)
RHW-1
14-1/8″
(359 mm)
13″
(330 mm)
13-1/2″
(343 mm)
7″
(179 mm)
8-7/8″
(224 mm)
RHW-1B
14-1/8″
(359 mm)
13″
(330 mm)
13-1/2″
(341 mm)
N/A N/A
RHW-2
24-3/4″
(630 mm)
13″
(330 mm)
13-1/2″
(343 mm)
15-3/8″
(389 mm)
9-7/8″
(249 mm)
Form No. RHWM-1215
5
SPECIFICATIONS
English
Plug Configurations
Units are supplied from the factory with an electrical cord and
plug. Plugs are supplied according to the application.
ELECTRIC SHOCK HAZARD: Plug unit into a properly
grounded electrical receptacle of the correct voltage, size,
and plug configuration. If plug and receptacle do not
match, contact a qualified electrician to determine and
install the proper voltage and size electrical receptacle.
WARNING
Plug Configurations
NOTE: The specification label is located on the back of the unit.
See label for serial number and verification of unit
electrical information.
NEMA 5-15P NEMA 6-15P
Electrical Rating Chart
NOTE: Shipping weight includes packaging.
P
O
W
E
R
F
A
U
L
T
1
0
0
°
C
7
0
°
C
-9
0
°
C
5
0
°
C
-7
0
°
C
T
E
M
P
O
N
/
O
F
F
o
_
F
U
L
L
P
O
W
E
R
E
N
E
R
G
Y
S
A
V
E
M
O
D
E
~
~
~
~
P
O
W
E
R
F
A
U
L
T
1
0
0
°
C
7
0
°
C
-9
0
°
C
5
0
°
C
-7
0
°
C
T
E
M
P
O
N
/
O
F
F
o
_
F
U
L
L
P
O
W
E
R
E
N
E
R
G
Y
S
A
V
E
M
O
D
E
~
~
~
~
H
E
A
T
M
A
X
HE
A
T
E
D
W
E
L
L
RHW-1 RHW-1B RHW-2
B
E
D D
E
B B
C
A
C
A
C
A
Dimensions
Form No. RHWM-1215
6
INSTALLATION
English
General
Round Heated Wells are shipped from the factory with most
components assembled and ready for use. Care should be
taken when unpacking shipping carton to avoid damage to unit
and the components enclosed.
ELECTRIC SHOCK HAZARD: Unit is not weatherproof.
Locate unit indoors where ambient air temperature is a
minimum of 70°F (21°C).
FIRE HAZARD: Locate unit a minimum of 1″ (25 mm) from
combustible walls and materials. If safe distances are not
maintained, discoloration or combustion could occur.
Locate unit at the proper counter height in an area that is
convenient for use. The location should be level to prevent
the unit or its contents from falling accidentally and strong
enough to support the weight of the unit and contents.
Do not move or relocate unit when it contains food
product. Turn off unit, remove food product, and allow to
cool completely before moving or cleaning.
Do not lay unit on the side with the control panel. Damage
to the unit could occur.
Do not locate unit in an area subject to excessive
temperatures or grease from grills, fryers, etc. Excessive
temperatures could cause damage to the unit.
1. Remove the unit from the carton.
2. Remove the information packet.
3. Remove tape and protective packaging from all surfaces of
the unit and any accessories.
4. If the unit is a countertop model, place the unit in the
desired location.
Locate the unit in an area where the ambient air
temperature is constant and a minimum of 70° F
(21° C). Avoid areas that may be subject to active air
movements or currents (i.e., near exhaust fans/hoods,
air conditioning ducts, exterior doors).
Make sure the unit is at the proper counter height in an
area convenient for use.
Make sure the countertop is level and strong enough to
support the weight of the unit and food product.
Make sure all the feet on the bottom of the unit are
positioned securely on the countertop.
5. If the unit is a built-in model, perform the “Installing a Built-
In Model” procedure in this section.
WARNING
NOTICE
CAUTION
Installing a Built-In Model
1. Cut the appropriate opening in the countertop for the unit
being installed (see below).
Countertop Cutout Dimensions
NOTE: The countertop must be level to ensure proper draining
of the rectangular well.
Remote mounted control panels must have a minimum
6″ (152 mm) clearance from unit (not to exceed 56
[1420 mm]). Mounting control panel closer may cause heat
damage to electrical system in control panel.
The remote mounted control box should be installed outside
of heat zone. Locating the control box inside heat zone will
cause the control(s) to overheat, malfunction, and fail.
2. Cut the appropriate opening for the control box in a vertical
surface at least 6″ (152 mm) from the unit, but no more
than 56″ (1420 mm) (see below).
Control Box Cutout Dimensions
NOTE: The electrical cord between the unit and the control box
is 56″ (1420 mm) in length.
11-7/8″
(300 mm)
RHW-1B
NOTICE
5-1/8″
(132 mm)
5-9/16″
(144 mm)
2-9/16″
(65 mm)
1-5/16″
(33 mm)
6″
(154 mm)
Ø 3/16″
(4,5 mm)
Form No. RHWM-1215
7
INSTALLATION
English
6. Install the control box in the control box cutout:
a. Remove the four screws that secure the front cover to
the control box. Remove the front cover and pass it
through the cutout to the front of the installation surface.
b. Pass one of the mounting flanges on the control box
housing through the cutout. Tilt and slide the other
flange through the cutout.
c. Align the holes on the mounting flanges with the screw
holes in the installation surface, and secure the control
box housing to the surface using four screws (not
supplied).
d. Install the front cover on the control box using the four
front cover screws.
Installing the Remote Mounted Control Box
7 Plug the power cord into a properly grounded electrical
outlet of the correct voltage, size, and plug configuration.
See the SPECIFICATIONS section for details.
H
E
A
T
E
D
W
E
L
L
H
A
T
C
O
C
O
R
P
O
R
A
T
I
O
N
M
I
L
W
A
U
K
E
E
,
W
I
U
.
S
.
A
.
w
w
w
.
h
a
t
c
o
c
o
r
p
.
c
o
m
Front
Cover
Control Box
Housing
Mounting Flange
Front Cover
Screws
3. Guide the control box with the front cover removed and the
electrical cords through the countertop cutout, and then
lower the unit into the cutout.
Installing the Unit
4. Assemble the L-brackets to the
underside of the unit.
5. Tighten the L-bracket screws until
the top flange lies flat on the
countertop.
Do not use excessive force when
tightening mounting screws on
built-in units. This may damage unit
and/or countertop.
H
E
A
T
E
D
W
E
L
L
H
A
T
C
O
C
O
R
P
O
R
A
T
I
O
N
M
I
L
W
A
U
K
E
E
,
W
I
U
.
S
.
A
.
w
w
w
.
h
a
t
c
o
c
o
r
p
.
c
o
m
Countertop
Cutout
Control Box
Cutout
ScrewControl
Box
Front
Cover
ScrewScrew
Top Flange
Countertop
L BracketL Bracket
NOTICE
Form No. RHWM-1215
8
English
General
Use the following procedure to operate the Round Heated
Wells.
Read all safety messages in the IMPORTANT SAFETY
INFORMATION section before operating this equipment.
Do not operate unit without food product/water in well.
Damage to unit could occur.
NOTE: For proper heat transfer, operate the RHW series,
(Round Heated Wells), with the special pan supplied.
This pan has a curved bottom to match the shape of
the heating element.
1. Plug the unit into a properly grounded electrical outlet of
the correct voltage, size, and plug configuration. See the
SPECIFICATIONS section for details.
The Power Indicator ( ) will glow red when the unit
has power.
2. Place a pan/pot filled with food product or water into the
unit.
NOTE: Do not operate the unit without a food pan or with an
empty/dry pan. The unit will overheat and go into
FAULT mode.
3. Press the On/Off Button ( ) to turn on the unit.
The Power Indicator ()will glow green when the unit
is on and heating.
NOTE: The Fault Indicator ( ) will illuminate and the unit will
beep when the unit is overheated or if the temperature
sensor short circuits. When this happens, power is cut
off automatically until the temperature returns to normal
range or the temperature sensor functions normally.
BURN HAZARD: Some exterior surfaces on unit will get
hot. Use caution when touching these areas.
CAUTION
WARNING
NOTICE
4. Press the Temperature Button ()to scroll through and
select the desired temperature setting. The indicator above
each temperature setting will glow when that setting is
selected. There are three temperature settings:
195–212°F (91–100°C)—Steaming and rethermalizing
160–195°F (71–91°C)—Food warming/holding
120–160°F (49–71°C)—Food warming/holding
5. Press the Mode Button ( ) to scroll through and select
the desired heating mode. The indicator above each mode
will glow when that mode is selected. There are two heating
modes:
FullPower Mode ( )—Unit operates at 100% power.
Low Power Mode ( )—Unit operates at 50% power for
food warming and to avoid burning.
Control Panel
HEATED WELL
H
ATCO CORPORATION MILWAUKEE, WI U.S.A.
w
ww.hatcocorp.com
Temperature
Button
Power
Indicator
ON/OFF
Button
Mode
Button
Fault
Indicator
OPERATION
Form No. RHWM-1215
9
English
Daily Cleaning
To preserve the bright finish of the unit it is recommended that
the exterior surfaces be cleaned daily.
Use non-abrasive cleaners and cloths only. Abrasive
cleaners and cloths could scratch finish of unit, marring its
appearance and making it susceptible to soil accumulation.
1. Turn off the unit, unplug the power cord, and allow the unit
to cool.
2. Remove food pans and any accessories for proper
cleaning in a dishwasher or wash sink.
3. Wipe down all metal surfaces using a soft, damp cloth.
Stubborn stains may be removed with a good non-abrasive
cleaner. Hard to reach areas should be cleaned with a
small brush and mild soap.
4. Wipe dry the entire unit using a dry, non-abrasive cloth.
NOTICE
General
Round Heated Wells are designed for maximum durability and
performance with minimum maintenance.
ELECTRIC SHOCK HAZARD:
Turn OFF power switch, unplug power cord, and allow
unit to cool before performing any cleaning,
adjustments, or maintenance.
DO NOT submerge or saturate with water. Unit is not
waterproof. Do not operate if unit has been submerged
or saturated with water.
Do not steam clean or use excessive water on unit.
This unit is not “jet-proof” construction. Do not use jet-
clean spray to clean this unit.
Use only Genuine Hatco Replacement Parts when
service is required. Failure to use Genuine Hatco
Replacement Parts will void all warranties and may
subject operators of the equipment to hazardous
electrical voltage, resulting in electrical shock or burn.
Genuine Hatco Replacement Parts are specified to
operate safely in the environments in which they are
used. Some aftermarket or generic replacement parts
do not have the characteristics that will allow them to
operate safely in Hatco equipment.
FIRE HAZARD: Do not use harsh chemicals such as bleach
(or cleaners containing bleach), oven cleaners, or
flammable cleaning solutions to clean this unit.
This unit has no user-serviceable” parts. If service is
required on this unit, contact an Authorized Hatco Service
Agent or contact the Hatco Service Department at
800-558-0607 or 414-671-6350; fax 800-690-2966; or
International fax 414-671-3976.
WARNING
OPTIONS AND ACCESSORIES
RHW-SP.....................6-Basket Round Steam Plate
RHW-11QT-LID-HG ...11 qt (10 liter) round hinged lid with
plastic knob
RHW-11QT-POT ........11 qt (10 liter) round pan
8-11/16dia x 8″H (221 x 203 mm)
RHW-11QT-LID..........11 qt (10 liter) round lid with plastic knob
RHW Accessories
RHW-11QT-LID
RHW-11QT-LID-HG
RHW-11QT-POT
RHW-SP
MAINTENANCE
Symptom Probable Cause Corrective Action
Food well not hot enough. Temperature setting too low. Use Mode Button to change from Low Power to Full
Power setting.
Use Temperature Button to change to higher
temperature setting.
Wrong pot installed in unit. Use specially-designed round pots for RHW models
from Hatco only. Other pots may not provide the
proper contact between the unit and the pot.
Heating element not working. Contact Authorized Service Agent or Hatco for
assistance.
Temperature Control not working properly. Contact Authorized Service Agent or Hatco for
assistance.
Voltage supplied is incorrect. Verify correct voltage is supplied to unit. Low supply
voltage will cause improper heating.
Food well too hot. Temperature setting too high. Use Mode Button to change from Full Power to Low
Power setting.
Use Temperature Button to change to lower
temperature setting.
Temperature Control not working properly. Contact Authorized Service Agent or Hatco for
assistance.
Voltage supplied is incorrect. Verify correct voltage is supplied to unit. High supply
voltage will cause unit to overheat and my damage
the unit.
No heat. Unit turned off. Use On/Off Button to turn on unit. Follow procedure
in OPERATIONsection.
Circuit breaker tripped. Reset circuit breaker. If circuit breaker continues to
trip, contact Authorized Service Agent or Hatco for
assistance.
Temperature Control not working properly. Contact Authorized Service Agent or Hatco for
assistance.
Heating element not working. Contact Authorized Service Agent or Hatco for
assistance.
High-limit switch tripped. Make sure pot is properly placed in the well.
Form No. RHWM-1215
10
English
This unit must be serviced by trained and qualified
personnel only. Service by unqualified personnel may lead
to electric shock or burn.
WARNING
ELECTRIC SHOCK HAzARD: Turn OFF power switch,
unplug power cord, and allow unit to cool before
performing any cleaning, adjustments, or maintenance.
WARNING
Troubleshooting Questions?
If you continue to have problems resolving an issue, please
contact the nearest Authorized Hatco Service Agency or Hatco
for assistance. To locate the nearest Service Agency, log onto
the Hatco website at www.hatcocorp.com and click on
Find Service agent, or contact the Hatco Parts and Service
Team at:
Telephone: 800-558-0607 or 414-671-6350
e-mail: partsandservice@hatcocorp.com
Fax: 800-690-2966 or 414-671-3976
TROUBLESHOOTING GUIDE
Form No. RHWM-1215
11
English
1. PRODUCT WARRANTY
Hatco warrants the products that it manufactures (the
“Products”) to be free from defects in materials and
workmanship, under normal use and service, for a period of
one (1) year from the date of purchase when installed and
maintained in accordance with Hatco’s written instructions or
18 months from the date of shipment from Hatco. Buyer must
establish the Product’s purchase date by registering the
Product with Hatco or by other means satisfactory to Hatco in
its sole discretion.
Hatco warrants the following Product components to be free
from defects in materials and workmanship from the date of
purchase (subject to the foregoing conditions) for the period(s)
of time and on the conditions listed below:
a) One (1) Year Parts and Labor PLUS One (1) Additional
Year Parts-Only Warranty:
Conveyor Toaster Elements (metal sheathed)
Drawer Warmer Elements (metal sheathed)
Drawer Warmer Drawer Rollers and Slides
Strip Heater Elements (metal sheathed)
Display Warmer Elements (metal sheathed air heating)
Holding Cabinet Elements (metal sheathed air heating)
Heated Well Elements — HW and HWB Series
(metal sheathed)
b) One (1) Year Parts and Labor PLUS Four (4) Years
Parts-Only Warranty:
3CS and FR Tanks
c) One (1) Year Parts and Labor PLUS Nine (9) Years
Parts-Only Warranty on:
Electric Booster Heater Tanks
Gas Booster Heater Tanks
d) Ninety (90) Day Parts-Only Warranty:
Replacement Parts
THE FOREGOING WARRANTIES ARE EXCLUSIVE AND IN
LIEU OF ANY OTHER WARRANTY, EXPRESSED OR
IMPLIED, INCLUDING BUT NOT LIMITED TO ANY IMPLIED
WARRANTY OF MERCHANTABILITY OR FITNESS FOR A
PARTICULAR PURPOSE OR PATENT OR OTHER
INTELLECTUAL PROPERTY RIGHT INFRINGEMENT.
Without limiting the generality of the foregoing, SUCH
WARRANTIES DO NOT COVER: Coated incandescent light
bulbs, fluorescent lights, heat lamp bulbs, coated halogen light
bulbs, halogen heat lamp bulbs, xenon light bulbs, LED light
tubes, glass components, and fuses; Product failure in booster
tank, fin tube heat exchanger, or other water heating equipment
caused by liming, sediment buildup, chemical attack, or
freezing; or Product misuse, tampering or misapplication,
improper installation, or application of improper voltage.
2. LIMITATION OF REMEDIES AND DAMAGES
Hatco’s liability and Buyers exclusive remedy hereunder will be
limited solely, at Hatco’s option, to repair or replacement using
new or refurbished parts or Product by Hatco or a Hatco-
authorized service agency (other than where Buyer is located
outside of the United States, Canada, United Kingdom, or
Australia, in which case Hatco’s liability and Buyer’s exclusive
remedy hereunder will be limited solely to replacement of part
under warranty) with respect to any claim made within the
applicable warranty period referred to above. Hatco reserves
the right to accept or reject any such claim in whole or in part.
In the context of this Limited Warranty, “refurbished” means a
part or Product that has been returned to its original
specifications by Hatco or a Hatco-authorized service agency.
Hatco will not accept the return of any Product without prior
written approval from Hatco, and all such approved returns shall
be made at Buyer’s sole expense. HATCO WILL NOT BE
LIABLE, UNDER ANY CIRCUMSTANCES, FOR
CONSEQUENTIAL OR INCIDENTAL DAMAGES, INCLUDING
BUT NOT LIMITED TO LABOR COSTS OR LOST PROFITS
RESULTING FROM THE USE OF OR INABILITY TO USE THE
PRODUCTS OR FROM THE PRODUCTS BEING
INCORPORATED IN OR BECOMING A COMPONENT OF
ANY OTHER PRODUCT OR GOODS.
LIMITED WARRANTY
Français
SOMMAIRE
Formulaire n° RHWM-1215
12
Ce
m
a
n
u
e
l fo
u
rn
it le
s
in
s
tru
c
tio
n
s
d
'
in
s
ta
lla
tio
n
, d
e
s
é
c
u
rité
e
t
d
e
fo
n
ctio
n
n
e
me
n
t d
u
le
s p
u
its ch
a
u
ffa
n
ts r
o
n
d
s. N
o
u
s vo
u
s
rec
om
m
andons
de
l
i
re
toutes
l
es
i
ns
t
ruc
ti
ons
d'
i
ns
tal
l
ati
on,
de
s
éc
uri
t
é et
de fonc
ti
onnem
ent av
ant l
'
i
ns
tal
l
ati
on et
l
a m
i
s
e en
m
arc
he de v
otre pui
ts
c
hauff
ants
ronds
.
Les consignes de sécurité qui apparaissent dans ce manuel sont
identifiées par les mots indicateurs suivants :
AVERTISSEMENT indique une situation dangereuse qui, si
elle n’est pas évie, peut provoquer la mort ou des
blessures graves.
ATTENTION indique une situation dangereuse qui, si elle
n’est pas évitée, peut provoquer des blessures légères ou
moyennes.
AVIS est utilisé pour des questions sans rapport avec des
blessures corporelles.
AVIS
ATTENTION
AVERTISSEMENT
INTRODUCTION
Les puits chauffants ronds d'Hatco sont spécialement cous pour
cuire ou contenir une grande variété d'aliments tels que les
soupes, les plats au curry, les sauces et différentes garnitures.
Les aliments devant être cuits ou maintenus au chaud sont plas
dans un récipient qui est chauffé par une plaque chauffante. La
température de l'élément chauffant est surveillée par un contrôleur
électronique pour des sultats optimums. La chaleur est repartie
uniforment à travers l'appareil afin de garder les aliments aux
températures désies, et le design isolant en acier inoxydable
permet un entretien facile ainsi qu'une performance durable.
Tous les appareils sont équipés d'un tableau de contrôle
comprenant trois consignes de températures de 49°C (120°F)
a 100°C (212°F), et d'un mode d'économie d'énergie qui
économise l'électricité pendant les heures creuses.
Les puits chauffants ronds d'Hatco sont d'une quali leur
permettant de répondre aux exigences du secteur de la
restauration et de fournir des années de fonctionnement sans
incident. Les éléments de réchaud sont garantis un an contre
la casse et le surmenage électrique.
Les puits chauffants ronds est un produit issu d'une recherche
intensive et de tests sur terrain. Les matériaux utilisés ont été
sélectionnés pour une longévité maximum, une présentation
attrayante ainsi qu'une performance optimum. Chaque appareil
est entièrement inspecté et testé avant livraison.
Informations Importantes pour le Propriétaire ................12
Introduction.........................................................................12
Consignes de Sécurité Importantes .................................13
Description du Modèle .......................................................14
Désignation du Modèle ......................................................14
Caractéristiques Techniques.............................................15
Configuration des Fiches...................................................15
Tableau des valeurs nominales électriques.......................15
Dimensions ........................................................................15
Installation...........................................................................16
Généralités.........................................................................16
Installation d'un modèle intégré .........................................16
Mode d'emploi.....................................................................18
Généralités.........................................................................18
Maintenance ........................................................................19
Généralités.........................................................................19
Nettoyage quotidien...........................................................19
Options et accessoires ......................................................19
Guide de Dépannage..........................................................20
Garantie Limitée..................................................................21
INFORMATIONS IMPORTANTES POUR LE PROPRIÉTAIRE
Noter le numéro de modèle, le numéro de série (L'étiquette des
caractéristiques techniques se situe au dos de l'appareil), le
voltage et la date d’achat de votre appareil ci-dessous. Veuillez
avoir cette information à portée de la main si vous appelez
Hatco pour assistance.
Modèle No. ______________________________________
Numéro de série __________________________________
Voltage __________________________________________
Date d’achat ______________________________________
Enregistrez Votre Appareil!
Remplissez la garantie en ligne pour éviter les retards pour
faire jouer la garantie. Accédez au site Web Hatco
www.hatcocorp.com, sélectionnez le menu déroulant Parts
& Service, puis cliquez sur Warranty Registration.
Horaires
ouvrables: 7h00 à 17h00
Heure du Centre des États-Unis (CST)
(Horaires d’été : juin à septembre—
7h00 à 17h00 CST du lundi au jeudi
7h00 à 16h00 CST le vendredi)
Téléphone : 800-558-0607; 414-671-6350
Courriel : partsandservice@hatcocorp.com
Télécopieur : 800-690-2966 (Pièces et Service après-vente)
414-671-3976 (International)
Des renseignements supplémentaires sont disponibles sur
notre site Web à www.hatcocorp.com.
Service d'assistance et de pièces de
rechange disponible 7j/7, 24h/24 aux
États-Unis et au Canada en composant
le 800-558-0607.
Français
Formulaire n° RHWM-1215
13
CONSIGNES DE SÉCURITÉ IMPORTANTES
Assurez-vous que tous les opérateurs ont été formés à
l'utilisation sûre et correcte de l'appareil.
Cet appareil ne doit pas être utilisé par des enfants ou des
personnes avec des capacités physiques, sensorielles ou
mentales diminuées. Assurez-vous que les enfants sont
bien surveillés et tenez-les à l'écart de l'appareil.
DANGER DE BRÛLURE :
Certaines surfaces extérieures de l’appareil deviennent
chaudes. Toucher ces zones de l’appareil avec précaution.
L'eau chaude dans l'appareil pourra causer des brûlures.
Laisser refroidir l'appareil avant de le vider ou de le nettoyer.
Placer l’appareil sur un plan de travail de hauteur correcte
à un endroit qui convient pour son utilisation. Le support
doit être de niveau pour éviter toute chute accidentelle du
grille-pain ou de son contenu et suffisamment solide pour
résister au poids de l’appareil et de son contenu.
Ne pas déplacer l'appareil quand il contient des aliments.
L'éteindre, enlever les aliments et laisser complètement
refroidir avant de déplacer ou nettoyer.
Les huiles de fabrication standard et approuvées pourront
fumer pendant 30 minutes après l'allumage initial. C'est un
problème temporaire. Utiliser l'appareil à vide jusqu
dissipation de la fumée.
Utiliser seulement des nettoyants non abrasifs et des
chiffons doux. Les chiffons et nettoyant abrasifs pourraient
érafler la finition de l'unité, entachant son apparence et la
rendant susceptible à l'accumulation de saleté.
Ne pas poser l’appareil sur le côté du panneau de
commande sous peine de l’endommager.
Les panneaux de commande mons à distance doivent
être au minimum à 152 mm (6) de l'appareil (1 420 mm [56]
maximum). Toute installation plus proche risque d'abîmer
le système électrique du panneau de commande sous
l'effet de la chaleur.
Ne pas utiliser l'appareil à un endroit exposé à des
températures excessives ou de la graisse de grils,
friteuses, etc. Les températures excessives risquent
d'abîmer l'appareil.
L'unité est conçue et recommandée pour fonctionner
encastrée ou posée sur un comptoir en métal. La garantie
Hatco ne couvre pas les dommages faits au comptoir. Pour
les autres surfaces, vérifier auprès de leurs fabricants que
le matériau peut supporter de façon durable des
températures atteignant 100 °C (212 °F).
Ne pas utiliser de force excessive pour serrer les vis sur
les modèles encastrés. Risque d'endommagement de
l'appareil et/ou du comptoir.
Ne pas faire fonctionner l'unité à vide (sans nourriture ni
eau dans le puits). L'unité pourrait être endommagée.
AVIS
ATTENTION
AVERTISSEMENT
DANGER DE DÉCHARGE ÉLECTRIQUE :
Brancher l’appareil sur une prise de courant avec terre de
tension, de format et de configuration des broches corrects.
Si la fiche et la prise ne se correspondent pas, sadresser à
un électricien qualifié pour terminer et installer une prise
de courant de format et de tension corrects.
Mettre hors tension en utilisant l'interrupteur,
débrancher le cordon d'alimentation et laisser l'uni
refroidir avant d'effectuer tout nettoyage, tout réglage
ou tout entretien.
NE PAS immerger l’appareil ni le saturer d’eau.
Lappareil n’est pas étanche à l’eau. Ne pas le faire
fonctionner s’il a été immergé ou saturé d’eau.
L’appareil n’est pas à l’épreuve des intempéries. Placer
l’appareil à l’intérieur à une température ambiante de
21°C minimum.
•Ne pas nettoyer à la vapeur ni utiliser trop deau sur lappareil.
Cet appareil n’est pas étanche aux jets. Ne pas utiliser
de jet sous pression pour nettoyer l’appareil.
Ne pas tirer l’appareil par son cordon électrique.
Ne pas utiliser l’appareil si le cordon est endommagé
ou usé.
Ne pas tenter de parer ni de changer un cordon
électrique endommagé. Ce cordon doit être changé par
Hatco, par un parateur Hatco agé ou par une
personnes de qualifications comparables.
Ne pas utiliser l'appareil pour y faire fondre ou y mettre
des glaçons. Risque de condensation qui posera un
danger électrique et causera des blessures et/ou
endommagera l'appareil. Les dégâts causés par la
condensation ne sont pas couverts par la garantie.
Pour les réparations, utiliser exclusivement des pièces
de rechange Hatco d’origine. Utilisez des pièces
détachées Hatco authentiques sous peine d'annuler
toutes les garanties et d'exposer l’utilisateur à des
tensions électriques dangereuses pouvant entraîner
une électrocution ou des brûlures. Les pièces de
rechange Hatco d’origine sont conçues pour
fonctionner sans danger dans les environnements
dans lesquels elles sont utilisées. Certaines pièces de
rechange génériques ou de second marché ne
présentent pas les caractéristiques leur permettant de
fonctionner sans danger dans la matériel Hatco.
DANGER D’INCENDIE :
Placer l’appareil à un minimum de 25 mm des parois et
matières combustibles. Si une distance sûre n’est pas
maintenue, la chaleur peut provoquer une combustion
ou une altération de couleur.
Ne pas utiliser de produits chimiques puissants tels que
de l'eau de Javel (ou des nettoyants contenant de l'eau de
Javel), des nettoyants pour four ou des solutions
nettoyantes inflammables pour nettoyer cet appareil.
Cet appareil ne contient aucune pièce réparable par
l’utilisateur. Si cet appareil doit être réparé, contacter un
réparateur Hatco agréé ou le Service après-vente Hatco au
800-558-0607 ou 414-671-6350 ; télécopieur 800-690-2966;
télécopieur internationale 414-671-3976.
AVERTISSEMENT
Lisez l'information de securite importante suivante avant d'utiliser cet équipement pour éviter
des dommages ou la mort sérieux et pour éviter d'endommager l'équipement ou la propriété.
Français
DESCRIPTION DU MODÈLE
Formulaire n° RHWM-1215
14
R H W - 1 B
Rond
Compartiment Chauffant
B = Intègrè avec Tèlècommande
Aucun caractère = Comptoir
1 = Modèle Simple
2 = Modèle Double
Tous les modèles
Tous les puits chauffants ronds sont fiables et polyvalents. En
plus de garder les aliments au chaud avant service comme le
fait le Heated Well, les aliments peuvent aussi être cuits à la
vapeur grâce a un kit optionnel à adapter.
NOTE: Lorsque l'unité contient déjà des aliments chauds, ne
pas ajouter d'aliments froids à l'unité pour les
réchauffer.
Modèle RHW-1
Le modèle RHW-1 est équipé d'un seul élément de chauffage
qui garde les aliments au chaud ou permet la cuisson de
soupes ou de sauces. L'appareil est fourni avec un couvercle
à charnière et un bac rond de 10 litres (11 qt) en acier
inoxydable spécialement conçus pour celui-ci.
Modèle RHW-1
H
E
A
T
E
D
W
E
L
L
H
A
T
C
O
C
O
R
P
O
R
A
T
I
O
N
M
I
L
W
A
U
K
E
E
,
W
I
U
.
S
.
A
.
w
w
w
.
h
a
t
c
o
c
o
r
p
.
c
o
m
Modèle RHW-1B
Le modèle RHW-1B est équipé comme le RHW-1, la différence
étant que ce modèle est un appareil d'assemblage équipé d'un
tableau de contrôle a distance.
Modèle RHW-1B
Modèle RHW-2
Le modèle RHW-2 est équipé de deux éléments chauffants à
commande individuelle pour garder la nourriture au chaud ou
cuisiner des soupes ou des sauces. L'appareil est fourni avec
deux couvercles à charnière et bacs ronds de 10 litres (11 qt)
en acier inoxydable spécialement conçus pour celui-ci.
Modèle RHW-2
H
E
A
T
E
D
W
E
L
L
H
A
T
C
O
C
O
R
P
O
R
A
T
I
O
N
M
I
L
W
A
U
K
E
E
,
W
I
U
.
S
.
A
.
w
w
w
.
h
a
t
c
o
c
o
r
p
.
c
o
m
H
E
A
T
E
D
W
E
L
L
H
A
T
C
O
C
O
R
P
O
R
A
T
I
O
N
M
I
L
W
A
U
K
E
E
,
W
I
U
.
S
.
A
.
w
w
w
.
h
a
t
c
o
c
o
r
p
.
c
o
m
H
E
A
T
E
D
W
E
L
L
H
A
T
C
O
C
O
R
P
O
R
A
T
I
O
N
M
I
L
W
A
U
K
E
E
,
W
I
U
.
S
.
A
.
w
w
w
.
h
a
t
c
o
c
o
r
p
.
c
o
m
DÉSIGNATION DU MODÈLE
Configuration Poids
Modèle Tension Intensité Amps de Fiches d’embarquement
RHW-1 120 1250 10.4 NEMA 5-15P 10 kg (21 lbs.)
RHW-1B 120 1250 10.4 NEMA 5-15P 10 kg (21 lbs.)
RHW-2 208240 20452725 9.811.3 NEMA 6-15P 17 kg (36 lbs.)
Modèle
Largeur
(A)
Profondeur
(B)
Hauteur
(C)
Empattement
Largeur
(D)
Empattement
Profondeur
(E)
RHW-1
359 mm
(14-1/8″)
330 mm
(13″)
343 mm
(13-1/2″)
187 mm
(7-3/8″)
232 mm
(9-1/8″)
RHW-1B
359 mm
(14-1/8″)
330 mm
(13″)
330 mm
(13″)
N/A N/A
RHW-2
630 mm
(24-3/4″)
330 mm
(13″)
343 mm
(13-1/2″)
397 mm
(15-5/8″)
257 mm
(10-1/8″)
Français
CARACTÉRISTIQUES TECHNIQUES
Formulaire n° RHWM-1215
15
Tableau des valeurs nominales électriques
Configuration des fiches
Les appareils sont livrés avec un cordon électrique avec fiche.
Différentes fiches sont fournies selon les applications.
DANGER DE DÉCHARGE ÉLECTRIQU : Brancher l’appareil
sur une prise de courant avec terre de tension, de format
et de configuration des broches corrects. Si la fiche et la
prise ne se correspondent pas, s’adresser à un électricien
qualif pour terminer et installer une prise de courant de
format et de tension corrects.
NOTA : L'étiquette des caractéristiques techniques se situe au
dos l'appareil. Se reporter à l'étiquette du numéro de
série et des données électriques de l'appareil.
AVERTISSEMENT
Configuration des fiches
NOTA: Prise non fournie par Hatco.
NEMA 5-15P NEMA 6-15P
NOTA: Le poids d'embarquement comprend l'emballage.
Dimensions
P
O
W
E
R
F
A
U
L
T
1
0
0
°
C
7
0
°
C
-9
0
°
C
5
0
°
C
-7
0
°
C
T
E
M
P
O
N
/
O
F
F
o
_
F
U
L
L
P
O
W
E
R
E
N
E
R
G
Y
S
A
V
E
M
O
D
E
~
~
~
~
P
O
W
E
R
F
A
U
L
T
1
0
0
°
C
7
0
°
C
-9
0
°
C
5
0
°
C
-7
0
°
C
T
E
M
P
O
N
/
O
F
F
o
_
F
U
L
L
P
O
W
E
R
E
N
E
R
G
Y
S
A
V
E
M
O
D
E
~
~
~
~
H
E
A
T
M
A
X
HE
A
T
E
D
W
E
L
L
RHW-1 RHW-1B RHW-2
B
E
D D
E
B B
C
A
C
A
C
A
Français
INSTALLATION
Formulaire n° RHWM-1215
16
Généralités
Les puits chauffants ronds sont expédiés de l'usine avec la
plupart des composants assemblés et prêts à l'emploi. Faire
attention lors du déballage pour éviter d’endommager l’appareil
et ses composants.
DANGER DE DÉCHARGE ÉLECTRIQUE : L’appareil n’est
pas à l’épreuve des intempéries. Placer l’appareil à
l’intérieur à une température ambiante de 21°C minimum.
DANGER D’INCENDIE : Placer l’appareil à un minimum de
25 mm des parois et matières combustibles. Si une
distance sûre n’est pas maintenue, la chaleur peut
provoquer une combustion ou une altération de couleur.
Placer l’appareil sur un plan de travail de hauteur correcte
à un endroit qui convient pour son utilisation. Le support
doit être de niveau pour éviter toute chute accidentelle du
grille-pain ou de son contenu et suffisamment solide pour
résister au poids de l’appareil et de son contenu.
Ne pas déplacer l'appareil quand il contient des aliments.
L'éteindre, enlever les aliments et laisser complètement
refroidir avant de déplacer ou nettoyer.
Utiliser uniquement des produits nettoyants non abrasifs.
Les produits nettoyants abrasifs peuvent rayer la finition
de l’appareil, ce qui altère son apparence et le rend plus
susceptible d’accumuler la saleté.
Ne pas utiliser l'appareil à un endroit exposé à des
températures excessives ou de la graisse de grils,
friteuses, etc. Les températures excessives risquent
d'abîmer l'appareil.
1. Retirer l'appareil de sa boîte.
2. Retirer la pochette d'informations.
3. Retirer le ruban et le film de protection de toutes les
surfaces de l'appareil.
4. Si l'appareil est un modèle sur comptoir, le placer à
l'endroit souhaité.
Placer l’appareil à un endroit la température
ambiante est constante et de 21 °C (70 °F) minimum.
Éviter les endroits susceptibles d’activer les
mouvements ou les courants d’air (proximité des
ventilateurs ou hottes aspirantes et conduites de
climatisation).
S’assurer que l’appareil est sur un plan de travail de
hauteur correcte à un endroit qui convient pour son
utilisation.
S’assurer que le plan de travail est de niveau et
suffisamment solide pour résister au poids de l’appareil
et des produits alimentaires.
Vérifier que tous les pieds sous l’appareil reposent
solidement sur le plan de travail.
5. Lorsque l'appareil est un modèle intégré, suivez les
procédures indiquées au chapitre « Installation d'un
modèle intégré » de cette section.
AVIS
ATTENTION
AVERTISSEMENT
Installation d'un modèle intégré
1. Découper dans le comptoir l'ouverture appropriée pour
l'appareil installé (voir ci dessous).
Dimensions des Découpes de Comptoir
NOTA: Le comptoir doit être horizontal pour garantir la vidange
correcte du compartiment rectangulaire.
Les panneaux de commande montés à distance doivent
être au minimum à 152 mm (6) de l'appareil (1 420 mm [56]
maximum). Toute installation plus proche risque d'abîmer
le système électrique du panneau de commande sous
l'effet de la chaleur.
Le boîtier de commande à distance doit être instalen
dehors de la zone de chauffe. Le positionnement du boîtier
de commande à l'intérieur de la zone chauffée entraînera la
surchauffe, le dysfonctionnement et la panne des
commandes.
2. Découper l'ouverture appropre pour le boîtier de
commande dans une surface verticale à au moins 152 mm
(6″) de l'appareil, mais pas à plus de 1 420 mm (56″).
Dimensions des Découpes du
Boîtier de Commande
NOTA: Le cordon électrique entre l'appareil et le boîtier de
commande mesure 1 420 mm (56″) de longueur.
300 mm
11-7/8″
RHW-1B
AVIS
132 mm
(5-1/8″)
144 mm
(5-9/16″)
65 mm
(2-9/16″)
33 mm
(1-5/16″)
154 mm
(6″)
Ø 4,5 mm
(3/16″)
Français
INSTALLATION
Formulaire n° RHWM-1215
17
6. Installer le boîtier de commande dans sa découpe :
a. Enlever les quatre vis qui fixent le couvercle avant sur le
boîtier de commande. Enlever le couvercle avant et
l'enfiler par la coupe jusqu'à l'avant de la surface
d'installation.
b. Enfiler une des brides de montage sur le boîtier de
commande par la découpe. Basculez l'autre rebord et
faites-le glisser dans la découpe.
c. Aligner les trous de montage des brides de montage sur
ceux des vis de la surface d'installation, et fixer le boîtier
de commande à la surface par deux vis M4 (non
fournies).
d. Installer le couvercle avant sur le boîtier de commande
à l'aide des quatre vis du couvercle.
Installing the Remote Mounted Control Box
7. Brancher le cordon d'alimentation sur une prise électrique
correctement mise à la terre du type, de la taille et de la
tension corrects. Pour des détails, voir la section
CARACTÉRISTIQUES TECHNIQUE.
H
E
A
T
E
D
W
E
L
L
H
A
T
C
O
C
O
R
P
O
R
A
T
I
O
N
M
I
L
W
A
U
K
E
E
,
W
I
U
.
S
.
A
.
w
w
w
.
h
a
t
c
o
c
o
r
p
.
c
o
m
Couvercle
Avant
Boîtier de
Commande
Bride de Montage
Vis du couvercle avant
3. Guidez les cordons électriques et le boîtier de commande
dépourvu de son panneau avant dans la découpe du
comptoir, puis appuyez pour que le dispositif s'enclenche
dans la découpe.
Installation de l'appareil
4. Assemblez les L-braquets sous
l'appareil.
5. Serrez les vis des L-braquets
jusqu'à ce que les collerettes du
dessus s'aplatissent sur le
comptoir.
Ne pas utiliser de force excessive pour
serrer les vis sur les moles
encastrés. Risque d'endommagement
de l'appareil et/ou du comptoir.
H
E
A
T
E
D
W
E
L
L
H
A
T
C
O
C
O
R
P
O
R
A
T
I
O
N
M
I
L
W
A
U
K
E
E
,
W
I
U
.
S
.
A
.
w
w
w
.
h
a
t
c
o
c
o
r
p
.
c
o
m
Découpe du
Comptoir
Découpe Pour
Boîtier de Commande
ScrewPanneau avant
du boîtier
de commande
ScrewVis
Bride
supérieure
Comptoir
L Bracket
L-Braquets
AVIS
Français
MODE D'EMPLOI
Formulaire n° RHWM-1215
18
Généralités
Procéder comme suit pour utiliser les puits chauffants ronds.
Lire tous les messages de curi de la section
Consignes de sécurité importantes avant d’utiliser ce
matériel.
Ne pas faire fonctionner l'unité à vide (sans nourriture ni
eau dans le puits). L'unité pourrait être endommagée.
NOTA: Pour un transfert de chaleur adapté, faites fonctionner
les séries RHW (puits chauffants ronds), avec la poêle
spécialement fournie. Cette poêle est creuse afin de
correspondre a la forme de l'élément chauffant.
1. Brancher l’appareil sur une prise électrique correctement
mise à la terre du type, de la taille et de la tension corrects.
Voir des détails à la section CARACTÉRISTIQUES
TECHNIQUES.
L'indicateur de Puissance ( ) s'allume en rouge
lorsque l'alimentation est disponible à l'appareil.
2. Placer un récipient/un faitout rempli d'aliments ou d'eau
dans l'appareil.
NOTA: Ne pas utiliser l'appareil sans récipient à aliments ou
récipient vide/sec. L'appareil surchauffera et passera
en mode Faille.
3. Appuyer sur le Bouton marche/arrêt ( ) pour allumer
l'appareil.
L'indicateur de Puissance ( ) s'allume en vert lorsqu'il
est sous tension et chauffe.
NOTA: l'indicateur de Faille ( ) sera en marche et l'appareil
sonnera lorsqu'il sera en surchauffe, ou si le détecteur
de température court circuit. Lorsque cela se produit
l'alimentation est automatiquement coupée jusqu'à ce
que la température retourne à la normale ou jusqu'à ce
que le détecteur de température fonctionne
normalement.
AVERTISSEMENT
AVIS
DANGER DE BRûLURE : Certaines surfaces extérieures de
l’appareil deviennent chaudes. Toucher ces zones de
l’appareil avec précaution.
4. Appuyer sur le Bouton température ( ) pour faire défiler
les températures et en choisir une. Le voyant au-dessus
du réglage de température choisi s'allume. Trois réglages
de température sont proposés :
91–100°C (19521F) Réchauffage à la vapeur et
remise en température
71–91°C (160–195°F) — Chauffage/maintien de la
nourriture
49–71°C (120–160°F) — Chauffage/maintien de la
nourriture
5. Appuyer sur le Bouton mode ( ) pour faire filer les
modes de chauffe et en choisir un. Le voyant au-dessus
du mode choisi s'allume. Deux modes de chauffe sont
proposés :
Mode pleine puissance ( ) L'appareil fonctionne à
puissance maximale.
Mode de faible puissance ( ) — L'appareil fonctionne à
50 % de sa puissance maximale pour réchauffer les
aliments et éviter des les brûler.
Panneau de commande
ATTENTION
HEATED WELL
HATCO CORPORATION MILWAUKEE, WI U.S.A.
www.hatcocorp.com
Bouton
Température
Indicateur
de
Puissance
Bouton
Marche/
Arrêt
Bouton
Mode
Indicateur
de Faille
Formulaire n° RHWM-1215
19
Français
MAINTENANCE
Généralités
Les puits chauffants ronds sont conçus pour une durabilité et
une performance maximum et un minimum d'entretien.
DANGER DE DÉCHARGE ÉLECTRIQUE :
Mettre hors tension en utilisant l'interrupteur,
débrancher le cordon d'alimentation et laisser l'uni
refroidir avant d'effectuer tout nettoyage, tout réglage
ou tout entretien.
NE PAS immerger l’appareil ni le saturer d’eau.
Lappareil n’est pas étanche à l’eau. Ne pas le faire
fonctionner s’il a été immergé ou saturé d’eau.
Ne pas nettoyer à la vapeur ni utiliser trop d’eau sur
l’appareil.
Cet appareil n’est pas étanche aux jets. Ne pas utiliser
de jet sous pression pour nettoyer l’appareil.
Pour les réparations, utiliser exclusivement des pièces
de rechange Hatco d’origine. Utilisez des pièces
détachées Hatco authentiques sous peine d'annuler
toutes les garanties et d'exposer l’utilisateur à des
tensions électriques dangereuses pouvant entraîner
une électrocution ou des brûlures. Les pièces de
rechange Hatco d’origine sont conçues pour
fonctionner sans danger dans les environnements
dans lesquels elles sont utilisées. Certaines pièces de
rechange génériques ou de second marché ne
présentent pas les caractéristiques leur permettant de
fonctionner sans danger dans la matériel Hatco.
DANGER D’INCENDIE: Ne pas utiliser de produits
chimiques puissants tels que de l'eau de Javel (ou des
nettoyants contenant de l'eau de Javel), des nettoyants
pour four ou des solutions nettoyantes inflammables pour
nettoyer cet appareil.
Cet appareil ne contient aucune pièce parable par
l’utilisateur. Si cet appareil doit être réparé, contacter un
réparateur Hatco agréé ou le Service après-vente Hatco au
800-558-0607 ou 414-671-6350 ; télécopieur 800-690-2966;
télécopieur internationale 414-671-3976.
AVERTISSEMENT
Nettoyage quotidien
Pour préserver la finition de l'appareil et maintenir la
performance, il est recommandé de nettoyer tous les jours
l'appareil.
Utiliser seulement des nettoyants non abrasifs et des
chiffons doux. Les chiffons et nettoyant abrasifs pourraient
érafler la finition de l'unité, entachant son apparence et la
rendant susceptible à l'accumulation de saleté.
1. Pour éteindre l'appareil, débrancher le cordon
d'alimentation et laisser refroidir.
2. Enlever les récipients et autres accessoires pour les
nettoyer correctement au lave-vaisselle ou dans l'évier.
3. Essuyer toutes les surfaces métalliques à l'aide d'un chiffon
doux humide. Les taches tenaces s'enlèvent avec un bon
nettoyant non abrasif. Les zones difficiles d'accès doivent
être nettoyées avec une petite brosse et du savon doux.
4. Essuyer l'unité entière à l'aide d'un chiffon sec non abrasif.
AVIS
OPTIONS ET ACCESSOIRES
RHW-SP ......................Plaque vapeur rondes à six paniers
RHW-11QT-LID-HG......Couvercle rond pour bac de 10 litres
(11 qt) avec bouton en plastique
RHW-11QT-POT ..........Bac rond de 10 litres (11 qt.) —
221 x 203 mm (8-11/16 x 8)
RHW-10QT-LID ............Couvercle rond pour bac de 10 litres
(11 qt.) avec bouton en plastique
Accessoires RHW
RHW-11QT-LID
RHW-11QT-LID-HG
RHW-11QT-POT
RHW-SP
Symptôme Cause Probable Solution
Appareil pas assez chaud. Point de consigne de température de la base trop
bas.
Utiliser le Bouton température pour monter la température.
Utilisez le Bouton mode pour passer du mode faible puissance
au mode pleine puissance.
Mauvais pot installé dans l'appareil. Utiliser seulement les pots ronds Hatco spécialement conçus
pour les modèles RHW. Les autres pots risquent de ne pas
procurer le contact adéquat entre l'appareil et le pot.
L'élément chauffant ne fonctionne pas. Contactez votre agent de maintenance agréé ou Hatco pour
assistance.
Le thermostat ne marche pas correctement. Contactez votre agent de maintenance agréé ou Hatco pour
assistance.
Tension fournie incorrecte. Vérifier si la tension correcte est fournie à l'appareil. Une basse
tension d'alimentation engendrera une chauffe insuffisante.
Appareil trop chaud. Point de consigne de température de base trop
élevé.
Utiliser le Bouton température pour baisser la température.
Utilisez le Bouton mode pour passer du mode pleine puissance
au mode faible puissance.
Contrôle de température ne fonctionne pas
correctement.
Contactez votre agent de maintenance agréé ou Hatco pour
assistance.
Tension fournie est incorrecte. Vérifier si la tension correcte est fournie à l'appareil. Une haute
tension d'alimentation engendrera la surchauffe et
l'endommagement possible de l'appareil.
Pas de chaleur. Appareil hors tension. Appuyer sur le Bouton marche/arrêt pour allumer l'appareil.
Suivre la procédure à la section MODE D'EMPLOI.
Le coupe-circuit a disjoncté. Réarmer le coupe-circuit. Si le coupe-circuit continue à se
déclencher, contacter un agent technique agréé ou Hatco pour
assistance.
Régulateur de température numérique
défectueux.
Contactez votre agent de maintenance agréé ou Hatco pour
assistance.
Élément chauffant de la base grillé. Contactez votre agent de maintenance agréé ou Hatco pour
assistance.
Interrupteur de sécurité déclenché. S'assurer que le compartiment est propre et rempli d'eau
jusqu'au niveau adéquat. Un dépôt très important et/ou le
fonctionnement de l'uni sans eau peut entraîner une
surchauffe et déclencher l'interrupteur de sécurité.
Français
GUIDE DE DÉPANNAGE
Formulaire n° RHWM-1215
20
La réparation de cet appareil doit être confiée
exclusivement à du personnel qualifié. Les réparations par
des personnes non qualifiées peuvent provoquer des
décharges électriques et des brûlures.
AVERTISSEMENT
DANGER DE DÉCHARGE ÉLECTRIQUE: Mettre hors
tension en utilisant l'interrupteur, débrancher le cordon
d'alimentation et laisser l'unité refroidir avant d'effectuer
tout nettoyage, tout réglage ou tout entretien.
AVERTISSEMENT
Vous avez des questions en ce qui concerne les pannes?
Si le problème persiste, veuillez contacter l'agence d'entretien agréée Hatco la plus proche ou Hatco pour obtenir une assistance.
Pour trouver l'agence d'entretien la plus proche, rendez-vous sur le site Internet de Hatco (www.hatcocorp.com) et cliquez sur
Trouver un agent d'entretien, ou contactez l'équipe d'entretien et de pièces détachées de Hatco :
Numéro de
téléphone: 800-558-0607 ou 414-671-6350
Courriel: partsandservice@hatcocorp.com
Télécopie: 800-690-2966 ou 414-671-3976
Français
GARANTIE LIMITÉE
Formulaire n° RHWM-1215
21
1. GARANTIE DU PRODUIT
Hatco garantit que les produits qu'il fabrique (les « Produits »)
sont exempts de défauts de matériel et de fabrication, dans des
conditions normales d'utilisation et de maintenance, pour une
période d'un (1) an à partir de la date d'achat à condition que
l'appareil soit installé et entretenu conformément aux
instructions écrites de Hatco ou 18 mois après la date de
l'expédition par Hatco. L'acheteur doit prouver la date d'achat
du Produit par l'enregistrement du produit auprès de Hatco ou
par d'autres moyens satisfaisants pour Hatco, à sa seule
discrétion.
Hatco garantit que les composants du Produit suivants sont
exempts de défauts de matériel et de fabrication à partir de la
date d'achat (sous réserve des conditions précédentes) pour
la ou les périodes de temps et en fonction des conditions listées
ci-dessous :
a) Garantie d'un (1) an pour les pièces et la main-d'œuvre
PLUS un an (1) supplémentaire pour les pièces
uniquement :
Éléments du grille-pain à convoyeur (enveloppe métallique)
Éléments des tiroirs chauffants (enveloppe métallique)
Tiroirs, roues et glissières des tiroirs chauffants
Éléments des rampes chauffantes (enveloppe métallique)
Éléments des vitrines chauffantes
(enveloppe métallique, air chauffant)
Éléments des armoires de stockage
(enveloppe métallique, air chauffant)
Éléments des compartiments chauffants —
série HW et HWB (enveloppe métallique)
b) Garantie d'un (1) an pour les pièces et la main-d'œuvre
PLUS quatre (4) ans pour les pièces uniquement :
Cuves 3CS et FR
c) Garantie d'un (1) an pour les pièces et la main-d'œuvre
PLUS neuf (9) ans pour les pièces uniquement :
Cuves des appareils de chauffage d'appoint électriques
Cuves des appareils de chauffage d'appoint à gaz
d) Garantie de quatre-vingt-dix (90) jours pour les
pièces uniquement :
Pièces de rechange
LES GARANTIES PRÉCÉDENTES SONT EXCLUSIVES ET
REMPLACENT TOUTES AUTRES GARANTIES, EXPRESSES
OU IMPLICITES, COMPRENANT, MAIS NE SE LIMITANT PAS
À, TOUTES GARANTIES IMPLICITES DE QUALI
MARCHANDE OU DE FINALITÉ PARTICULIÈRE OU TOUS
BREVETS OU TOUTES AUTRES ATTEINTES AUX DROITS DE
LA PROPRIÉ INTELLECTUELLE. Sans restreindre la portée
rale des énons précédents, CES GARANTIES NE
COUVRENT PAS : Ampoules d'éclairage à incandescence
enduites, lumières fluorescentes, ampoules de lampes chauffantes,
ampoules d'éclairage à halogène enduites, ampoules de lampes
chauffantes au non, tubes d'éclairage DEL, composants en verre
et fusibles ; défaut de produit dans la cuve d'un appareil de
chauffage d'appoint, dans un échangeur de chaleur à tubes à
ailettes ou tout autre équipement de chauffage d'eau causé par la
calcification, l'accumulation de sédiments, la action d'un produit
chimique ou le gel ; ou une mauvaise utilisation, une manipulation
ou une mauvaise application, une installation inappropriée du
Produit ou l'utilisation d'une tension inappropriée.
2. LIMITES DES RECOURS ET DES DOMMAGES
La responsabilité de Hatco et la seule voie de recours de
l'Acheteur prévues par les présentes seront limitées
exclusivement, au gré de Hatco, à la réparation ou au
remplacement à l'aide de pièces ou de Produits nouveaux ou
remis à neuf par Hatco ou un centre de paration agé par Hatco
(sauf si l'Acheteur se situe hors des États-Unis, du Canada, du
Royaume-Uni ou de l'Australie, auquel cas la responsabilide
Hatco et la seule voie de recours de l'Acheteur seront limitées
exclusivement au remplacement des pièces concernées par la
garantie) à l'égard de toute revendication effecte dans les lais
de garantie applicables mentionnés ci-dessus. Hatco se réserve
le droit d'accepter ou de rejeter toute réclamation en partie ou
dans son intégralité. Dans le cadre de cette Garantie limitée, «
remis à neuf » signifie une pièce ou un Produit dont les
caractéristiques techniques d'origine ont été restaurées par Hatco
ou un centre de réparation agréé par Hatco. Hatco n'acceptera
aucun retour de Produits sans qu'il n'ait auparavant donné son
accord écrit, et tous ces retours approuvés doivent être effectués
aux seuls frais de l'Acheteur. HATCO NE SERA PAS TENU
RESPONSABLE, DANS AUCUNE CIRCONSTANCE, DES
DOMMAGES CONSÉCUTIFS OU INDIRECTS, COMPRENANT,
Formulaire n° RHWM-1215
22
Français
NOTAS
Form No. RHWM-1215
23
English
NOTES
Printed in U.S.A. December 2015 P/N 07.04.752.00 Form No. RHWM-1215
HATCO CORPORATION
P.O. Box 340500
Milwaukee, WI 53234-0500 U.S.A.
800-558-0607 414-671-6350
Parts and Service Fax 800-690-2966
International Fax 414-671-3976
partsandservice@hatcocorp.com
www.hatcocorp.com
AUTHORIZED PARTS DISTRIBUTORS • AUTORISÉS DISTRIBUTEURS DE PIÈCES
Register your unit online!
See IMPORTANT OWNER INFORMATION
section for details.
S'inscrire en ligne!
Lisez la section INFORMATIONS IMPORTANTES
POUR LE PROPRIETAIRE pour plus de informations.
A
LABAMA
Jones McLeod Appl. Svc.
Birmingham 205-251-0159
ARIZONA
S
ervice Solutions Group
P
hoenix 602-234-2443
Byassee Equipment Co.
Phoenix 602-252-0402
C
ALIFORNIA
Industrial Electric
Commercial Parts & Service, Inc.
Huntington Beach 714-379-7100
C
hapman Appl. Service
S
an Diego 619-298-7106
P & D Appliance
Commercial Parts & Service, Inc.
S. San Francisco 650-635-1900
C
OLORADO
Hawkins Commercial Appliance
Englewood 303-781-5548
FLORIDA
W
haley Foodservice Repair
J
acksonville 904-725-7800
Whaley Foodservice Repair
Orlando 407-757-0851
B.G.S.I.
Pompano Beach 954-971-0456
C
omm. Appliance Service
T
ampa 813-663-0313
G
EORGIA
TWC Services
Mableton 770-438-9797
Heritage Service Group
Norcross 866-388-9837
Southeastern Rest. Svc.
Norcross 770-446-6177
HAWAII
Burney’s Comm. Service, Inc.
Honolulu 808-848-1466
Food Equip Parts & Service
Honolulu 808-847-4871
ILLINOIS
Parts Town
Lombard 708-865-7278
Eichenauer Elec. Service
Decatur 217-429-4229
Midwest Elec. Appl. Service
Elmhurst 630-279-8000
Cone’s Repair Service
Moline 309-797-5323
INDIANA
GCS Service
Indianapolis 800-727-8710
I
OWA
G
oodwin Tucker Group
D
es Moines 515-262-9308
KENTUCKY
S
ervice Solutions Group
L
exington 859-254-8854
Service Solutions Group
Louisville 502-451-5411
L
OUISIANA
Chandlers Parts & Service
Baton Rouge 225-272-6620
MARYLAND
Electric Motor Service
Baltimore 410-467-8080
GCS Service
Silver Spring 301-585-7550
M
ASSACHUSETTS
Ace Service Co., Inc.
N
eedham 781-449-4220
MICHIGAN
Bildons Appliance Service
Detroit 248-478-3320
Commercial Kitchen Service
Bay City 989-893-4561
Midwest Food Equip. Service
Grandville 616-261-2000
MINNESOTA
GCS Service
Minnetonka 800-822-2303
x20365
MISSOURI
General Parts
Kansas City 816-421-5400
Commercial Kitchen Services
St. Louis 314-890-0700
Kaemmerlen Parts & Service
St. Louis 314-535-2222
NEBRASKA
Anderson Electric
Omaha 402-341-1414
NEVADA
Burney’s Commercial
Las Vegas 702-736-0006
Hi. Tech Commercial Service
N. Las Vegas 702-649-4616
NEW JERSEY
Jay Hill Repair
Fairfield 973-575-9145
Service Plus
Flanders 973-691-6300
N
EW YORK
Acme American Repairs, Inc.
Brooklyn 718-456-6544
A
lpro Service Co.
B
rooklyn 718-386-2515
Appliance Installation
Buffalo 716-884-7425
Duffy’s Equipment Services, Inc.
Buffalo 800-836-1014
3Wire Northern
Plattsburgh 800-634-5005
D
uffy’s Equipment Services, Inc.
S
auquoit 800-836-1014
J.B. Brady, Inc.
Syracuse 315-422-9271
N
ORTH CAROLINA
Authorized Appliance
Charlotte 704-377-4501
OHIO
Akron/Canton Comm. Svc. Inc.
Akron 330-753-6634
Service Solutions Group
Cincinnati 513-772-6600
Commercial Parts and Service
Columbus 614-221-0057
E
lectrical Appl. Repair Service
B
rooklyn Heights 216-459-8700
E. A. Wichman Co.
Toledo 419-385-9121
OKLAHOMA
Hagar Rest. Service, Inc.
Oklahoma City 405-235-2184
Krueger, Inc.
Oklahoma City 405-528-8883
OREGON
Ron’s Service, Inc.
Portland 503-624-0890
PENNSYLVANIA
Elmer Schultz Services
Philadelphia 215-627-5401
FAST Comm. Appl. Service
Philadelphia 215-288-4800
Appliance Installation & Service
Pittsburgh 412-809-0244
K & D Service Co.
Harrisburg 717-236-9039
Electric Repair Co.
Reading 610-376-5444
RHODE ISLAND
Marshall Electric Co.
Providence 401-331-1163
SOUTH CAROLINA
Whaley Foodservice Repair
Lexington 803-996-9900
TENNESSEE
Camp Electric
Memphis 901-527-7543
T
EXAS
GCS Service
Fort Worth 800-433-1804
A
rmstrong Repair Service
H
ouston 713-666-7100
Cooking Equipment Specialist
Mesquite 972-686-6666
Commercial Kitchen Repair Co.
San Antonio 210-735-2811
U
TAH
L
a Monica’s Rest. Equip. Service
M
urray 801-263-3221
VIRGINIA
Daubers
Norfolk 757-855-4097
Daubers
Springfield 703-866-3600
WASHINGTON
3Wire Restaurant Appliance
Seattle 800-207-3146
WISCONSIN
A.S.C., Inc.
Madison 608-246-3160
A.S.C., Inc.
Milwaukee 414-543-6460
CANADA
A
LBERTA
Key Food Equipment Service
Edmonton 780-438-1690
BRITISH COLUMBIA
Key Food Equipment Service
Vancouver 604-433-4484
Key Food Equipment Service
Victoria 250-920-4888
MANITOBA
Air Rite, Inc.
Winnipeg 204-895-2300
NEW BRUNSWICK
EMR Services, Ltd.
Moncton 506-855-4228
ONTARIO
R.G. Henderson Ltd.
Toronto 416-422-5580
Choquette - CKS, Inc.
Ottawa 613-739-8458
QUÉBEC
Choquette - CKS, Inc.
Montreal 514-722-2000
Choquette - CKS, Inc.
Québec City 418-681-3944
UNITED KINGDOM
Marren Group
Northants +44(0)1933 665313


Produkt Specifikationer

Mærke: Hatco
Kategori: Kedel
Model: RHW-2

Har du brug for hjælp?

Hvis du har brug for hjælp til Hatco RHW-2 stil et spørgsmål nedenfor, og andre brugere vil svare dig