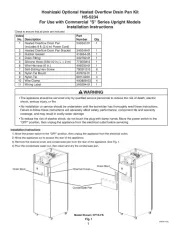
Hoshizaki Heated Condensate Pan Kit
For Use with the Following Commercial and Steelheart Series:
A. CPT and PR Models: 46, 67, and 93
B. Freezer and Prep Table Models: 48, 60, and 72
Check to ensure that all parts are included:
1 Heated Condensate Pan 3B0185-01 1 5 Condensate Drain Hose 4A0658L01 1
2 Condensate Pan Bracket 2A9087-01 1 6 8911-0200 4Nylon Ties
3 Wire Harness Receptacle 4A6049-01 1 7 Bell Connector 8101-14CE 3
4 Self-Drilling Hex Screw 7B03I1210 4 8 Wiring Label 3B0188-01 1
• Only qualied service technicians should install and service the appliance to reduce the risk of death, electric
shock, serious injury, or re.
• No installation or service should be undertaken until the technician has thoroughly read these instructions.
Failure to follow these instructions will adversely affect safety, performance, component life and warranty
coverage, and may result in costly water damage.
• See the instruction manual included with the appliance for installation instructions and safety information not
covered in this instruction sheet. If an instruction manual is not available, visit www.hoshizaki.com or contact
your Hoshizaki distributor.
• Appliance is heavy. Use care when lifting or positioning. Work in pairs when needed to prevent injury or
• To reduce the risk of electric shock, do not touch the plug with damp hands. Unplug the appliance from the
electrical outlet before servicing.
• Protect the oor when moving the appliance to prevent damage to the oor.
• Wear proper personal protection equipment (PPE) when executing these procedures.
A. Installation Instructions for CPT and PR Models
1) On existing models, unplug the appliance from the electrical outlet, then remove all product from the appliance.
2) Move the appliance out to access the rear of the appliance, then lock the casters.
3) On new appliance installation, from the instruction manual, follow and complete all of the installation instructions up to section
"II.E. Door/Drawer Reversal".
4) Remove the front, left side, and rear louver panels. See Fig. 1. Next, remove the current condensate pan and condensate pan
brackets as shown in Fig. 2 and discard, then remove the condensate drain hose. Note: Remove elbow from condensate drain hose
for re-use, then discard condensate hose.