Hotpoint HCW6O7HTS Manual

Hotpoint Magnetron HCW6O7HTS

Læs gratis den danske manual til Hotpoint HCW6O7HTS (14 sider) i kategorien Magnetron. Denne vejledning er vurderet som hjælpsom af 3 personer og har en gennemsnitlig bedømmelse på 3.8 stjerner ud af 2 anmeldelser. Har du et spørgsmål om Hotpoint HCW6O7HTS, eller vil du spørge andre brugere om produktet?

Side 1/14
EN
Owner's Manual
THANK YOU FOR BUYING A HOTPOINT PRODUCT
In order to receive a more complete assistance, please
register your product on www . register10 . eu
PLEASE SCAN THE QR CODE ON
YOUR APPLIANCE IN ORDER TO
REACH MORE INFORMATION
Instruction.
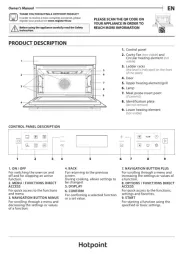
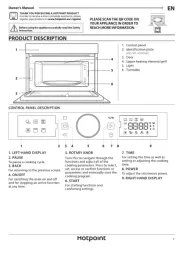
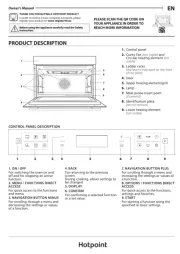
PRODUCT DESCRIPTION
1. Control panel
2. Cavity Fan
(not visible) and
Circular heating element
(not
visible)
3. Ladder racks
(the level is indicated on the front
of the oven)
4. Door
5. Upper heating element/grill
6. Lamp
7. Meat probe insert point
(if present)
8. Identification plate
(do not remove)
9. Lower heating element
(not visible)
CONTROL PANEL DESCRIPTION
1 2 3 4 5 76 8 9
1. ON / OFF
For switching the oven on and
off and for stopping an active
function.
2. MENU / FUNCTIONS DIRECT
ACCESS
For quick access to the functions
and menu.
3. NAVIGATION BUTTON MINUS
For scrolling through a menu and
decreasing the settings or values
of a function.
4. BACK
For returning to the previous
screen.
During cooking, allows settings to
be changed.
5. DISPLAY
6. CONFIRM
For confirming a selected function
or a set value.
7. NAVIGATION BUTTON PLUS
For scrolling through a menu and
increasing the settings or values of
a function.
8. OPTIONS / FUNCTIONS DIRECT
ACCESS
For quick access to the functions,
settings and favorites.
9. START
For starting a function using the
specified or basic settings.
1
2
3
4
5
6
7
8
9
ACCESSORIES
Before purchasing other accessories that are available
on the market, make sure that they are heat-resistant
and suitable for steaming.
Make sure that there is a gap of at least 30 mm
between the top of any container and the walls of the
cooking compartment in order to allow steam to ow
suciently.
Accessories during microwave function may raise in
temperature. It is recommended to use protection to
handle accessories at the end of the cycle.
WIRE SHELF BAKING TRAY CRISP PLATE
HANDLE FOR CRISP
PLATE
The wire shelf is suitable
for all cooking modes, also
in Microwave cooking.
When using microwaves
place the wire shelf always
on level 1 (the lower one).
You can place food directly
on the wire shelf or use it
to support baking trays
and tins or other oven-
ware resistant to heat and
microwaves.
The baking tray is suitable
for all cooking modes
except for “Microwave
functions. Can be used
to cook all kind of foods
without container. Use it
to collects the cooking
juices, placing it below
the wire shelf.
Only for use with the
designated functions.
The Crisp plate must always
be placed in the center of
the wire shelf and can be
pre-heated when empty,
using the special function
for this purpose only. Place
the food directly on the
Crisp plate. Place the silicone
feet between the bars of the
wire shelf for added stability.
Useful for removing the
hot Crisp plate from the
oven.
STEAMER*
(ONLY IN SOME MODELS)
3
2
1
To steam foods such as fish or vegetables, place these in the basket (2) and pour
drinking water (100 ml) into the bottom of the steamer (3) to achieve the right
amount of steam. To boil foods such as potatoes, pasta, rice or cereals, place these
directly on the bottom of the steamer (the basket is not required) and add an
appropriate amount of drinking water for the amount you are cooking.
For best results, cover the steamer with the lid (1) provided.
Always place the steamer on the wire shelf at level 1 and only use it with the
appropriate cooking functions, or with microwave function.
The number of accessories may vary depending on which model is purchased.
*Other accessories can be purchased separately from the After-sales Service.
INSERTING THE WIRE SHELF AND OTHER
ACCESSORIES
Insert the wire shelf onto the level you require by
holding it tilted slightly upwards and resting the
raised rear side (pointing upwards) down first.
Then slide it horizontally along the runners as far as
possible.
Other accessories, like the baking tray, are to be
inserted horizontally, letting them slide on the
runners.
Push the accessories all the way in, making sure, that
it does not touch the appliance door.


Produkt Specifikationer

Mærke: Hotpoint
Kategori: Magnetron
Model: HCW6O7HTS

Har du brug for hjælp?

Hvis du har brug for hjælp til Hotpoint HCW6O7HTS stil et spørgsmål nedenfor, og andre brugere vil svare dig


Magnetron Hotpoint Manualer
Magnetron Manualer

Nyeste Magnetron Manualer