Indesit IFW 6340 WH UK Manual

| Mærke: | Indesit |
| Kategori: | Ovn |
| Model: | IFW 6340 WH UK |
| Vekselstrømsindgangsspænding: | 220-240 V |
| Vekselstrømsindgangsfrekvens: | 50/60 Hz |
| Bredde: | 595 mm |
| Dybde: | 551 mm |
| Højde: | 595 mm |
| Vægt: | 26400 g |
| Produktfarve: | Hvid |
| Kontroltype: | Dreje |
| Indbygget skærm: | Ja |
| Strøm: | 13 A |
| Ledningslængde: | 1 m |
| Placering af apparat: | Indbygget |
| Indvendig belysning: | Ja |
| Dørhængsel: | Ned |
| Integreret ur: | Ja |
| Urtype: | Elektronisk |
| Installationsrum dybde: | - mm |
| Installationsrum højde: | - mm |
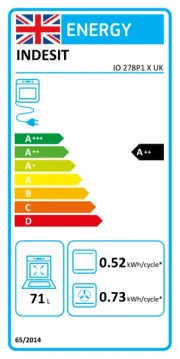
| Energieffektivitetsskala: | A+++ til D |
| Kontrolposition: | Front |
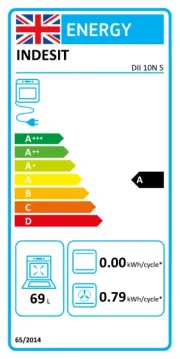
| Energieffektivitetsklasse: | A |
| Ovn - størrelse: | Medium |
| Ovntype: | Elektrisk ovn |
| Samlet indvendig ovn kapacitet: | 66 L |
| Strøm for samtlige ovne: | - W |
| Antal ovne: | 1 |
| Ovn nettokapacitet: | 66 L |
| Energiforbrug (konventionel): | - kWh |
| Energiforbrug (tvungen konvektion): | 0.79 kWh |
| Antal bageplader: | 1 |
Har du brug for hjælp?
Hvis du har brug for hjælp til Indesit IFW 6340 WH UK stil et spørgsmål nedenfor, og andre brugere vil svare dig
Ovn Indesit Manualer
25 August 2025
3 Juli 2025
1 Juli 2025
30 Juni 2025

30 Juni 2025
30 Juni 2025
30 Juni 2025
29 Juni 2025

29 Juni 2025
29 Juni 2025
Ovn Manualer
- Defy
- Oster
- Camry
- Falmec
- Tefal
- Medion
- Corbero
- Scarlett
- Master Kitchen
- Lenoxx
- Toshiba
- Aurora
- New.Up!
- Kambrook
- Boretti
Nyeste Ovn Manualer
5 November 2025

5 November 2025

5 November 2025
5 November 2025
5 November 2025

5 November 2025

5 November 2025
4 November 2025

3 November 2025

3 November 2025