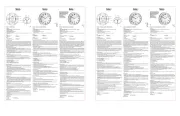
Irox ORA-4 Manual
| Mærke: | Irox |
| Kategori: | Vækkeur |
| Model: | ORA-4 |
| Type: | Digital bordur |
| Bredde: | 70 mm |
| Dybde: | 16 mm |
| Højde: | 85 mm |
| Antal pr. pakke: | 1 stk |
| Produktfarve: | Sort, sølv |
| Formfaktor: | Rektangulær |
| Kalender: | Ja |
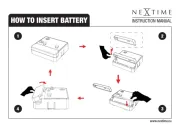
| Batterier inkluderet: | Ingen |
| Vækkeur: | Ja |
| Antal understøttede batterier: | 2 |
| Baggrundslys: | Ja |
| Snooze funktion: | Ja |
| Projektion, funktion: | Date, Time |
Har du brug for hjælp?
Hvis du har brug for hjælp til Irox ORA-4 stil et spørgsmål nedenfor, og andre brugere vil svare dig
Vækkeur Irox Manualer

9 Marts 2025
5 Oktober 2024

19 August 2024
17 August 2024

15 August 2024

15 August 2024

5 August 2024

2 August 2024
1 August 2024
31 Juli 2024
Vækkeur Manualer
- Lexon
- Elro
- Technoline
- Metronic
- Brandson
- Techno Line
- PPLEE
- Bellman
- Lenovo
- NeXtime
- Profile
- Theben
- Leitz
- Aiwa
- Global Tronics
Nyeste Vækkeur Manualer
5 November 2025

3 November 2025

3 November 2025

3 November 2025
3 November 2025

2 November 2025

2 November 2025

2 November 2025

1 November 2025

1 November 2025