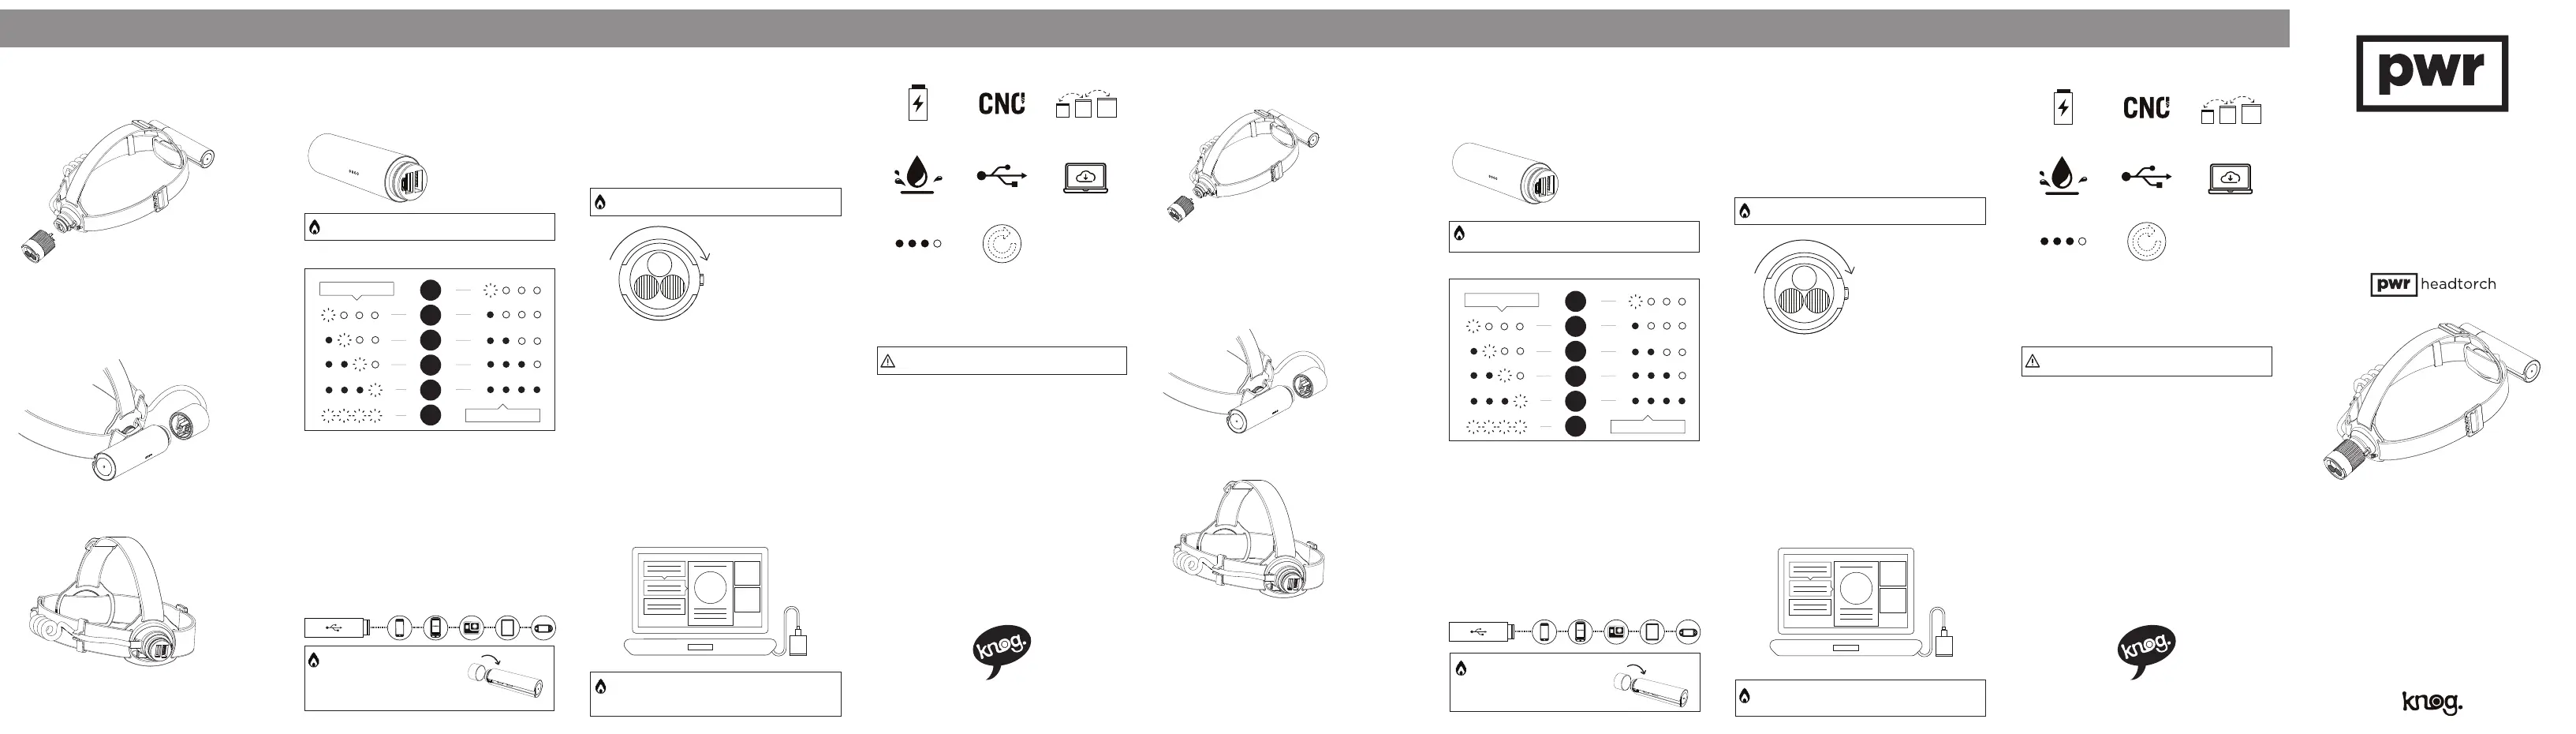
PWR BANK
CHARGING YOUR PWR BANK OPERATIONCONNECT LIGHTHEAD TO
HEADTORCH
PWR FEATURES
CONNECT PWR BANK TO
HEADTORCH
BATTERY INDICATOR
CHECKING THE BATTERY STATUS
CHARGING DEVICES WITH YOUR
PWR BANK
PWR LIGHTHEADEN QUICK START
PWR Banks use a micro USB input to charge, this can be found
by pressing the red cap release button and removing the cap on
PWR Bank. Using the Micro USB cable provided, you can plug this
into any powered USB port or USB wall plug charger.
The PWR headtorch has no buttons! Instead we use rotation to
switch the light on and between modes.
To turn light on / off
Rotate the lighthead until it
stops and hold in place for 1
second or until the headtorch
turns on / off.
To change the modes
Once the headtorch is on, you
can simply change the mode
by rotating the light head until
it stops. It will spring back into
position.
If your PWR Bank is not connected to a device, you can check the
battery status by pressing your finger on the base of the PWR
Bank, the red status LED’s will illuminate for 10 second to display
the charge status.
Charge times are as follows:
PWR Small: 3.5hr
PWR Medium: 5hr
PWR Large 7hr
Note: charge time can vary.
Do not charge below 10°C
HOT TIP: USING AN IPAD CHARGER IS FAST! (12W USB
POWER ADAPTER). OR TRY OUR PWR DOCK.
HOT TIP: YOUR HEADTORCH WILL TURN ON IN THE
SAME MODE YOU SWITCHED IT OFF.
PLEASE NOTE: LARGE PWR BANK NOT
RECOMMENDED WITH PWR HEADTORCH
HOT TIP: KEEP A CAP ON IT! PWR
BANKS ARE NOT WATERPROOF
WITHOUT EITHER A LIGHTHEAD OR
CAP ON. CAP CAN BE FOUND IN
THE BACK OF THE FOAM PACKAGING.
To charge a device:
Connect the device’s charge cable to the female USB port on the
front of the PWR Bank. If all four LED’s flash during charge, this
means that the plugged in device is not compatible.
Twist head for modes (and
hold for on/off)
PROGRAM YOUR MODES -
MODEMAKER APP
Knog’s ModeMaker app allows you to update the modes for
any PWR lighthead. Simply download the software from
knog.com.au, plug your light in, then select and tailor modes
from the menu.
GETTING STARTED
1. Download the app from knog.com.au
2. Plug the light in and follow on-screen prompts to register
your product.
3. Follow tutorial to update your modes.
HOT TIP: IF YOU WANT A LONGER RUNTIME, REDUCE THE
SPOT INTENSITY. SETTING A BRIGHTER LIGHT WILL REDUCE
THE RUN TIME.
Plug the lighthead onto the front plate of the headstrap, aligning
the PWR logo on the lighthead with the red button.
Slide the butt of the PWR Bank onto the T-slot of the back plate
of the headstrap. When you are happy it’s centered, tighten
thumbwheel. Plug the cable cap onto the PWR Bank. The
lighthead will flash once to confirm you’re connected.
CHARGES YOUR
DEVICES
WATER RESISTANT
(WHEN IN USE)
BATTERY
INDICATOR
USB RECHARGE
TWIST OPERATION
PROGRAMMABLE
MODES
MACHINED
INTERCHANGEABLE
LIGHTHEADS
OPERATION
Once the lighthead and battery are connected, twist the lighthead
and hold to turn on, twist and release to change flashlight mode.
KNOG.COM.AU/PWR
CRITICAL
Battery Indicator can vary depending on operational conditions.
MODES
Your light comes with
6 modes as standard:
• Max
• Mid
• Stamina
• Pulse
• Strobe
• Eco flash
WARRANTY INFO
Adjust the size of the headstrap.
Angle of lighthead can also be adjusted. To alter, use allen
key to loosen screw and tilt lighthead to preferred angle, then
tighten screw to lock into place.
This light is guaranteed for 2 years against manufacturing
defects only. The battery is guaranteed for 6 months against
manufacturing defects only. See the website for more details.
3%
<25%
25-50%
50-75%
75+%
100%
WHEN CHARGING
WHEN IN USE
CONNECTER LA TETE D’ECLAIRAGE
A LA FRONTALE
CONNECTER LA PWR BANK A LA
LAMPE FRONTALE
FR DEMARRAGE RAPIDE
Branchez la tête d’éclairage sur la partie avant du bandeau, en
prenant soin d’aligner le logo PWR de la tête d’éclairage avec le
bouton rouge.
Glissez l’arrière de la PWR Bank dans les 2 encoches en T situées
au dos du bandeau. Lorsque celle-ci est bien en place, branchez
le câble à la PWR Bank. La tête d’éclairage émet un flash dès
qu’elle est connectée. Tournez la molette pour maintenir la
batterie en place.
FONCTIONNEMENT
Lorsque la tête d’éclairage et la batterie sont connectées, faites
tourner et maintenez la tête d’éclairage pour l’allumer / l’éteindre,
faites tourner et relâchez pour changer de mode.
Ajustez la taille du bandeau.
L’angle de la tête d’éclairage peut aussi s’ajuster. Pour le modifier,
utilisez la clé allen pour desserrer la vis et incliner l’éclairage dans
la position qui vous convient, puis serrer la vis pour verrouiller la
position.
PWR BANK
CHARGER VOTRE PWR BANK
TEMOIN BATTERIE
VERIFIER L’ETAT DE LA BATTERIE
CHARGER UN AUTRE APPAREIL AVEC
VOTRE PWR BANK
Les PWR Banks se chargent par un port micro-USB. Pour y
accéder, appuyez sur le bouton rouge afin de déconnecter la tête
d’éclairage de la batterie. Utilisez le câble micro-USB fourni et
branchez-le directement sur le port USB d’une alimentation ou
d’un chargeur de secteur.
Si votre PWR Bank n’est pas connectée à un appareil, vous pouvez
vérifier l’état de la batterie en appuyant avec votre doigt à son
extrémité. Les LED’s rouges de témoin de charge vont s’éclairer
pendant 10 secondes pour afficher l’état de charge de la batterie.
Les durées de charge sont les
suivantes :
PWR Small: 3.5hr
PWR Medium: 5hr
A noter: le temps de charge
est variable. Ne pas charger
à une température inférieure
à 10°C.
Le témoin de charge de la batterie peut varier selon les conditions d’utilisation.
BON A SAVOIR: L’UTILISATION D’UN CHARGEUR D’IPAD EST
RAPIDE! (Adapteur secteur USB de 12W)
BON A SAVOIR: PROTEGEZ VOTRE
BATTERIE ! LES PWR BANKS NE SONT
PAS ETANCHES SANS UNE TETE
D’ECLAIRAGE OU UN CAPUCHON
DESSUS. LE CAPUCHON SE TROUVE
AU DOS DU PACK EN MOUSSE
Pour charger un appareil:
Branchez le câble de charge de l’appareil au port USB femelle
située à l’avant de la PWR Bank. Si les quatre LED’s clignotent
pendant la charge, cela signifie que l’appareil branché n’est pas
compatible. Consultez le guide d’utilisation de votre appareil pour
obtenir de l’aide.
3%
25%
25-50%
50-75%
75+%
100%
EN CHARGE
EN UTILISATION
IMPORTANT
Tournez la tête d’éclairage pour
changer de modes (maintenez
appuyé pour allumer/éteindre)
MISE EN MARCHE
TETE D’ECLAIRAGE PWR
Les têtes d’éclairage PWR n’ont pas de boutons ! Au lieu de cela,
nous utilisons une rotation pour naviguer d’un mode à l’autre et
pour allumer/éteindre l’éclairage.
Allumer / Eteindre l’éclairage
Faites tourner la tête
d’éclairage jusqu’à la butée et
maintenez pendant 1 seconde
ou jusqu’à ce que la lumière
s’allume / s’éteigne.
Changer de modes
Une fois l’éclairage allumé,
vous pouvez changer de mode
en toute simplicité en faisant
pivoter la tête d’éclairage jusqu’à
la butée, puis relâcher. La tête
revient automatiquement dans sa
position initiale.
BON A SAVOIR: EN ALLUMANT VOTRE LAMPE, VOUS
RETROUVEZ LE MODE DANS LEQUEL VOUS ETIEZ AVANT
DE L’ETEINDRE.
PROGRAMMER VOS MODES –
APP MODEMAKER
L’Appli ModeMaker de Knog vous permet de mettre à jour les
modes de chaque éclairage vélo PWR. Téléchargez le logiciel
sur knog.com.au, branchez votre éclairage puis sélectionnez et
configurez des modes sur-mesure à l’aide du menu.
DEMARRAGE
1. Téléchargez l’appli pour PC sur knog.com.au
2. Connectez l’éclairage au PC et suivez les indications qui
s’affichent à l’écran afin d’enregistrer votre produit.
3. Consultez notre tutoriel pour mettre à jour vos modes.
BON A SAVOIR: SI VOUS SOUHAITEZ + D’AUTONOMIE,
REDUISEZ L’INTENSITE D’ECLAIRAGE. CONFIGURER UN
ECLAIRAGE + LUMINEUX REDUIRA SON AUTONOMIE.
MODES
Votre éclairage est fourni
avec 6 modes standards:
• Max
• Mid
• Stamina
• Pulse
• Strobe
• Eco flash
CARACTERISTIQUES PWR
CHARGE VOS
APPAREILS
ETANCHE AUX
ECLABOUSSURES
(DURANT LEUR
UTILISATION)
TÉMOIN
BATTERIE
RECHARGEABLE
USB
MISE EN MARCHE
PAR ROTATION
MODES
PROGRAMMABLES
USINÉ CNC TÊTE D’ÉCLAIRAGE
INTERCHANGEABLE
INFO GARANTIE
VEUILLEZ NOTER: IL EST DECONSEILL2 D’UTILISER
LA PWR BANK ‘LARGE’ AVEC LA FRONTALE PWR
HEADTORCH.
KNOG.COM.AU/PWR
Cet éclairage est garanti 2 ans contre les défauts de fabrication
uniquement. La batterie est garantie 6 mois contre les défauts de
fabrication uniquement. Rendez-vous sur le site internet pour de
plus amples détails.
KNOG.COM.AU/PWR