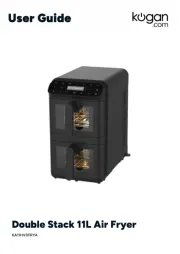
Kogan KA11HVDFRYA Manual
Læs gratis den danske manual til Kogan KA11HVDFRYA (20 sider) i kategorien Fryser. Denne vejledning er vurderet som hjælpsom af 20 personer og har en gennemsnitlig bedømmelse på 4.7 stjerner ud af 10.5 anmeldelser. Har du et spørgsmål om Kogan KA11HVDFRYA, eller vil du spørge andre brugere om produktet?
Side 1/20

Double Stack 11L Air Fryer
KA11HVDFRYA

2
Safety & Warnings 3
Components 7
Overview 8
Before First Use 10
Operation 11
Cleaning & Care 16
Troubleshooting 17
Notes 19

3
Safety & Warnings
Symbols
Danger: These symbols indicate possible dangers. Read the associated
safety notices carefully and follow them.
Supplementary information.
Read the operating instructions before use.
Caution: Hot surfaces.
Suitable for use with food.
Alternating current.
Signal Words
Signal words indicate potential hazards if the associated instructions are not followed.
• Danger: Indicates a high risk situation that may result in serious injury or death.
• Warning: Indicates a medium risk situation that may result in serious injury or death.
• Notice: Indicates a risk of material damage.
Intended Use
• This product is designed for grilling, baking, defrosting, and warming up food.
• The product operates exclusively with hot air. Do not pour oil or fat into the product, as
you would with a conventional fryer.
• Not suitable for preparing liquid dishes such as soups, sauces, or stews.

4
• This product is intended for personal use only and is not suitable for commercial or
commercial-like applications, such as in:
• Hotels.
• Bed and breakfasts.
• Offices.
• Staff kitchens.
• Similar environments.
• Use the product only for its intended purpose as described in the operating
instructions. Any other use is considered improper.
Safety Notices
• Follow all safety notices, instructions, illustrations, and technical data provided with
this product. Failure to do so may result in electric shock, fire, and/or injury.
• This product may be used by children aged 8 and older, as well as individuals with
reduced physical, sensory, or mental abilities or those lacking experience and/or
knowledge, provided they are supervised or have received proper instruction on safe
use and understand the associated risks.
• Children must not play with the product.
• Cleaning and user maintenance must not be performed by children unless they are
older than 8 years and under supervision.
• Children younger than 8 years and animals must be kept away from the product and its
power cable.
• Inspect the product and power cord for damage before each use. Do not use the
product if it is damaged or malfunctioning.
• Never place the product on a soft surface. The ventilation openings on the bottom
must remain uncovered.
• Only plug the product into a properly installed electrical outlet that matches the
technical specifications. Ensure the outlet remains accessible for quick disconnection.
• Do not use extension cords or power boards with other high-wattage devices, as this
may cause overloading or a short circuit.
• Ensure the power cord is not a trip hazard and does not hang over the edge of the
surface.
• Prevent damage to the power cord:
• Do not squash, bend, or lay it over sharp edges.
• Keep it away from hot surfaces, including those of the product.

5
Caution: Hot Surfaces!
• The product and accessories become extremely hot during use. Do not touch heated
parts while the product is in operation or immediately after use. Only touch the handles
and control panel.
• Wait until the product has fully cooled down before transporting, cleaning, or storing it.
• Use oven gloves when handling hot accessories.
• Never immerse the product or its power cord in water or any other liquid and ensure
they do not come into contact with water. Risk of electric shock!
• Do not pour liquids (e.g., oil or water) directly into the product, its drawers, or place a
liquid-filled container inside. This product operates exclusively with hot air.
• Always unplug the product from the power when left unattended, before transporting,
or before cleaning.
• Do not modify the product or attempt to replace the power cord yourself.
• If the product, power cord, or accessories are damaged, cease use immediately and
contact help.Kogan.com or support.
• This product must not be operated with an external timer or a remote control system.
• Follow the instructions in the ‘Cleaning and Care’ section.
Danger: Electric Shock Hazard
• Use and store the device indoors only.
• Do not use or store the device in humid environments.
• If the device falls into water while connected to the power, unplug it immediately
before retrieving it. Never attempt to remove it while plugged in. Before using the
product again, contact help.Kogan.com for support.
• Never touch the device or power cord with wet hands while connected to power.
Warning: Fire Hazard
• Do not operate the device near combustible materials such as cardboard, paper, or
plastic.
• Do not cover the device while in operation and keep its ventilation openings clear to
prevent fire.
• In case of fire: Do not use water to extinguish! Smother the flames with a fireproof
blanket or a suitable fire extinguisher.

6
Warning: Injury Hazard
• Keep packaging materials away from children and animals to prevent suffocation risk.
• Ensure the power cord is always out of reach of children and animals to prevent
strangulation hazards.
• Hot steam may escape when the product is in operation or when opening the drawers.
Keep your head and hands away from steam vents to avoid scalding from heat, steam,
or condensation.
• Do not move the product while it is operating, as there is a risk of burns.
Notice: Risk of Damage to Material and Property
• Ensure steam does not come into direct contact with electronic devices or equipment
with electrical components.
• If a malfunction occurs, switch off the product and unplug it immediately.
• Disconnect the product from the power before a thunderstorm or in case of a power
outage.
• Always unplug the product by holding the plug, not by pulling the cord.
• Do not pull or carry the product by its power cord.
• Keep the product away from heat sources, open flames, moisture, direct sunlight, and
impacts.
• Store the product in a dry place with temperatures between 0°C and 40°C.
• Do not place objects on the product or its power cord.
• Use only original accessories from Kogan.com to ensure compatibility and avoid
potential damage.
• Do not use metal utensils or sharp objects to handle food inside the product, as they
may damage the non-stick coating of the drawers and racks.

7
Components
• Air Fryer
• Drawer (x2)
• Rack (x2)
• User Guide

8
Overview
1 Control Panel
2 Cooking Zone 1
3 Cooking Zone 2
3
2
1

9
Control Panel
4 Program Buttons 11 Time/Temperature Button
5 Temperature Indicator 12 Decrease Button
6 Power Button 13 Sync Button
7 Start/Stop Button 14 Cooking Zone 2 Button
8 Dual Button 15 Cooking Zone 1 Button
9 Time Indicator 16 Display Screen
10 Increase Button
4
5
7
6
11
10
9
8
13
12
14
16
15

10
Before First Use
• Wipe the exterior of the product with a clean, damp cloth.
• Clean the drawers and racks with warm water and detergent or place them in the
dishwasher.
• Before using the product for cooking, run it once without food. It may produce smoke
or odours due to coating residues from manufacturing. To do this, follow the steps
outlined in the ‘Operation’ section.
• Set the product to the highest temperature and let it run for approximately 10 minutes
with no food inside.
• Once completed, clean the product again before regular use.
• Before using the product, ensure proper setup and connection.
• Ensure sufficient clearance around the product:
o At least 20 cm on the sides.
o At least 50 cm above.
o Do not place under kitchen wall units or cupboards, as rising steam may
cause damage.
• Place the product on a dry, clean, flat, and heat-resistant work surface. Ensure
proper clearance as described above.
• Fully unwind the power cord and insert the plug into an electrical outlet.

11
Operation
Before Use
• Ensure the product and outside of the drawers are clean and dry before use.
• Do not use the product for more than 4 hours continuously without a break.
• Do not operate the product when empty, except for the initial burn-off process before
first use.
• Never place food wrapped in cling film or plastic bags inside the product.
• Ensure food does not touch the heating elements.
• Do not overfill the drawers - fill only up to 1/3 capacity to allow proper airflow.
• Avoid overheating food that contains oils or fats, as they may ignite.
• Always place hot drawers on a heat-resistant surface after use.
Cooking Steps
1. Prepare the food for cooking.
2. To use circulating air, insert the racks into the drawers, ensuring they rest on their
silicone feet.
3. Place food inside the drawers, separating different types of food.
• If cooking a smaller quantity of one type of food, use only one drawer.
• A small baking tin (not provided) may be used.
• For dehydrating, place one layer directly on the bottom of the drawer, insert the
rack, and place a second layer on the rack.
4. Insert the drawer(s) into the chamber(s).
5. Press the ‘Power’ button to activate the control panel. Cooking Zone 1 will be selected
by default. To switch to Cooking Zone 2, press the corresponding button.
6. Select a cooking program and, if necessary, adjust the temperature and cooking time
using the ‘+’ and ‘–’ buttons.
Note:
Preheating is not necessary for this product.

12
7. If using only one drawer, skip to Step 9. If using both drawers, set the temperature
and cooking time for Cooking Zone 2 in one of 2 ways:
• To copy the settings from Cooking Zone 1 to Zone 2, press the ‘Dual’ button.
• Otherwise, press the ‘Coking Zone 2’ button, then choose a program and adjust
settings as needed.
8. If both cooking zones have different settings but should finish at the same time, press
the ‘Sync’ button. Otherwise, skip this step.
9. Press the ‘Start/Stop’ button to begin cooking.
• If Sync is activated, the longer cooking cycle starts first. The second cycle will
begin later, when both cycles have the same remaining time.
• Until then, ‘Hold’ will appear on the display.
10. The remaining cooking time is displayed. When the cycle finishes, a beep will sound,
and ‘End’ will appear.
11. Remove the drawer(s) and place them on a heat-resistant surface. Do not place on
the product.
12. Press the ‘Power’ button to turn off the product and unplug it.
13. Remove the food from the drawer(s).
14. Allow the drawer(s) and rack(s) to cool before cleaning. Refer to the ‘Cleaning and
Care’ section.
Pausing and Stopping Cooking
Pausing Cooking
• To pause the cooking process (e.g., to mix food or add ingredients), pull out the drawer.
• The cooking time countdown stops and resumes when the drawer is reinserted.
Stopping a Cooking Zone Manually
To stop a specific cooking zone:
1. Press the button for the corresponding zone.
2. Press ‘Start/Stop’.
3. The display for that zone will flash, while the other zone continues cooking.

13
Preparation Quantity
The following table provides an overview of portion sizes for various foods:
Food Specified Quantity per Portion
Chips 125g
Potato wedges 150-200g
Vegetables 200g/1 handful
Fish 250g or 6 pieces
Mini spring rolls 160g or 6 pieces
Nuggets 120g or 6 pieces
Chicken thighs 370g/1-2 pieces
Chicken wings 480g or 6 pieces
Programs
To select a program, press the respective button. The product has the following programs:
Program Temperature Range Cooking Time Range
FRIES 200°C 120-200°C 20min 1-60min
WINGS 200°C 120-200°C 20min 1-60min
STEAK 200°C 120-200°C 13min 1-60min
FISH 180°C 120-200°C 20min 1-60min
VEG 190°C 60-200°C 10min 1-60min
PIZZA 180°C 120-200°C 20min 1-60min
BAKE 170°C 120-200°C 15min 1-60min
BBQ 200°C 150-200°C 20min 1-60min
DIY 200°C 60-200°C 15min 1-60min

14
Adjusting the Temperature and Cooking Time
After selecting a program:
• Press the ‘Time/Temperature’ button to toggle between time and temperature settings.
The corresponding indicator will flash.
• Use the ‘+’ and ‘-’ buttons to adjust the cooking time or temperature. Hold the ‘+’ or ‘-’
button to scroll through values more quickly.
Cooking Zones and Synchronisation
• This product features two cooking zones, which can be operated independently or
synchronised using one of two functions:
• Dual function: Both cooking zones will have identical temperature and cooking
time settings. This is ideal for cooking larger quantities of the same food or
different foods that require the same temperature and time.
• Sync function: Each cooking zone can have different temperature and cooking
time settings, but both will finish cooking simultaneously. This is useful when
preparing different types of food that need to be ready at the same time.
• Alternatively, only one cooking zone can be used when preparing smaller quantities of
food.
Note:
The cooking zones cannot be synchronised after cooking has started.

15
Auto Reminder Function
This model features an auto reminder function, alerting you when it is time to shake or stir
food for even cooking.
• When the program reaches 1/4 of the remaining cooking time, the selected zone
button (1 or 2) will flash, and the display will show ‘SHA’.
• The product will beep twice (5 beeps per alert) to indicate that the food should be
shaken or stirred.
• Removing the drawer will pause the cooking process, and the control panel will turn
off.
• Once the food is stirred and the drawer is placed back, the air fryer automatically
resumes cooking from where it left off.
• If you do not wish to stir the food, simply leave the drawer inside, and the air fryer will
continue cooking until the set time is completed.
Stand-By Mode
• Pressing the ‘Power’ button activates the control panel.
• If the product is not in use and no buttons are pressed for 10 minutes, it will
automatically enter stand-by mode.
Tips for Best Results
• In general, no oil or only a small amount (2 to 3 teaspoons) is required.
• Lightweight foods may be moved by the circulating air. If necessary, secure them
together using toothpicks or a similar method.
• Cooking time depends on food size, quantity, and temperature. However, it is generally
shorter than in a conventional oven. Start with a shorter cooking time and increase as
needed.
• Shake or stir food occasionally using plastic or wooden tongs to ensure even cooking.
• Check food periodically. If it is fully cooked before the program ends, turn off the
product manually.
Note:
The ‘VEG,’ ‘PIZZA,’ and ‘BAKE’ cooking programs do not include the automatic
reminder function.

16
Cleaning & Care
• Clean the racks and drawers with warm water and detergent or place them in the
dishwasher. To preserve their quality, handwashing is recommended. For stubborn dirt,
soak the parts in warm water with detergent before cleaning.
• Wipe the exterior, chambers, and heating elements with a clean, damp cloth as needed.
• Do not immerse the product in water or clean it in the dishwasher.
• Ensure all parts are completely dry before storing.
• When not in use for an extended period, store the product in a clean, dry location, out
of reach of children and animals.
Specifications
Power Supply 220-240V~50-60Hz
Power 2050W
Protection Class I
Capacity Maximum 11L (5.5L per drawer)
Temperature Range 60-200°C
Cooking Time 1-60min
Note:
Avoid using sharp or abrasive cleaning agents or pads, as they may damage the
surfaces.

17
Troubleshooting
If the product is not functioning properly, check if you can resolve the issue using the
steps below. If the problem persists, contact help.Kogan.com for support. Do not attempt
to repair an electrical product yourself.
Problem Possible Cause Solution
The product
does not work.
The power plug is not
inserted correctly.
Ensure the power plug is securely
fitted into the outlet.
The electrical outlet is
defective.
Try plugging the product into
another electrical outlet.
There is no power. Check the fuse box.
The drawers are not
inserted correctly.
Ensure the drawers are fully
pushed into the chambers.
The fuse in the
fuse box is
triggered.
Too many products
connected to the same
circuit.
Reduce the number of devices
plugged into the same circuit.
The food has
not been
cooked evenly.
The drawer is overloaded.
Reduce the amount of food. Fill the
drawer no more than 1/3 full.
Food items are stacked on
top of each other.
Spread the food evenly and mix it
occasionally during cooking.
Different foods with
different cooking times or
temperatures were placed
in the same drawer.
Separate different types of food
and distribute them across both
drawers. Adjust the temperature
and cooking time accordingly. Use
the Sync function to ensure they
finish at the same time.
The set cooking time was
too short or the
temperature too low.
Increase the cooking time or
temperature as needed.
Chips made
from fresh
potatoes are
not crispy.
The potatoes contain too
much water.
1. Cut the potatoes into thinner
pieces.
2. Pat them dry with kitchen paper
before cooking.
3. Drizzle a small amount of oil over
them.
4. Spread the potato pieces evenly
on the rack.

18
During use, an
unpleasant
smell is
detected, or
smoke
emerges from
the product.
The product is dirty.
Follow the instructions in the
‘Cleaning and Care’ section.
The product is being used
for the first time.
A slight odour is normal when
using a new appliance for the first
few times. This should disappear
with repeated use.
Too much oil or fat has
been used.
Remove excess oil or fat before
cooking.
Disposal
This marking indicates that this appliance should not be disposed with
other household wastes. To prevent possible harm to the environment or
human health from uncontrolled waste disposal, recycle it responsibly to
promote the sustainable reuse of material resources.

19
Notes

20
Need more information?
We hope that this user guide has given you the
assistance needed for a simple set-up.
For the most up-to-date guide for your product, as well
as any additional assistance you may require, head
online to help.Kogan.com.
Produkt Specifikationer
Mærke: | Kogan |
Kategori: | Fryser |
Model: | KA11HVDFRYA |
Har du brug for hjælp?
Hvis du har brug for hjælp til Kogan KA11HVDFRYA stil et spørgsmål nedenfor, og andre brugere vil svare dig
Fryser Kogan Manualer
9 Juli 2025
28 Juni 2025
16 Juni 2025
30 Oktober 2024
23 Oktober 2024
5 September 2024
5 September 2024
5 September 2024
5 September 2024
5 September 2024
Fryser Manualer
- Kalorik
- CRUX
- Tognana
- OBH Nordica
- GoClever
- Prixton
- Inventum
- AEG
- Campomatic
- Nordland
- Tomado
- Parmco
- Snaigė
- Faure
- Vestfrost
Nyeste Fryser Manualer
29 Juli 2025
28 Juli 2025
28 Juli 2025
27 Juli 2025
27 Juli 2025
27 Juli 2025
27 Juli 2025
27 Juli 2025
27 Juli 2025
27 Juli 2025