• Please ensure that all knobs, handles, and legs are
secured properly before mounting your camera on
this tripod.
• Never transport, carry, or store this tripod while your
camera is attached.
• Do not use solvents, grease, or oil on any of the tripod
components. Use only a mild soap solution to clean,
and wipe dry with a lint-free cloth.
• Do not exceed the maximum load capacity.
• All images are for illustrative purposes only.
mini
series
Owner’s
Manual
Precautions
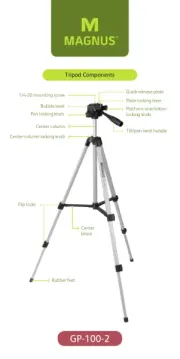
DuraPod PX Mini Tripod Components
Index pin
Bubble level
Mounting screw
locking knob
Pan locking
knob
Leg extensions
Center column
locking collar
Leg lock
Center column
Platform
locking knob
1/4 in. mounting screw
Pan handle/
tilt lock
Thank you
for choosing
Magnus.
TM-11P
DuraPod PX
Mini Tripod
Make
A Better
Picture™
www.magnustripods.com
ONE-YEAR LIMITED WARRANTY
This Magnus product is warranted to the original purchaser to be free
from defects in materials and workmanship under normal consumer use
for a period of one (1) year from the original purchase date or thirty (30)
days after replacement, whichever occurs later. The warranty provider’s
responsibility with respect to this limited warranty shall be limited solely to
repair or replacement, at the provider’s discretion, of any product that fails
during normal use of this product in its intended manner and in its intended
environment. Inoperability of the product or part(s) shall be determined by the
warranty provider. If the product has been discontinued, the warranty provider
reserves the right to replace it with a model of equivalent quality and function.
This warranty does not cover damage or defect caused by misuse, neglect,
accident, alteration, abuse, improper installation or maintenance. EXCEPT
AS PROVIDED HEREIN, THE WARRANTY PROVIDER MAKES NEITHER ANY
EXPRESS WARRANTIES NOR ANY IMPLIED WARRANTIES, INCLUDING BUT
NOT LIMITED TO ANY IMPLIED WARRANTY OF MERCHANTABILITY OR
FITNESS FOR A PARTICULAR PURPOSE. This warranty provides you with specific
legal rights, and you may also have additional rights that vary from state to state.
To obtain warranty coverage, contact the Magnus Customer Service
Department to obtain a return merchandise authorization (“RMA”) number,
and return the defective product to Magnus along with the RMA number and
proof of purchase. Shipment of the defective product is at the purchaser’s
own risk and expense.
For more information or to arrange service, visit www.magnustripods.com or
call Customer Service at 212-594-2353.
MAGNUS
A Gradus Group Brand
T M
Product warranty provided by the Gradus Group. www.gradusgroup.com
MAGNUS is a registered trademark of the Gradus Group. © 2016 Gradus
Group LLC. All Rights Reserved.
GG1