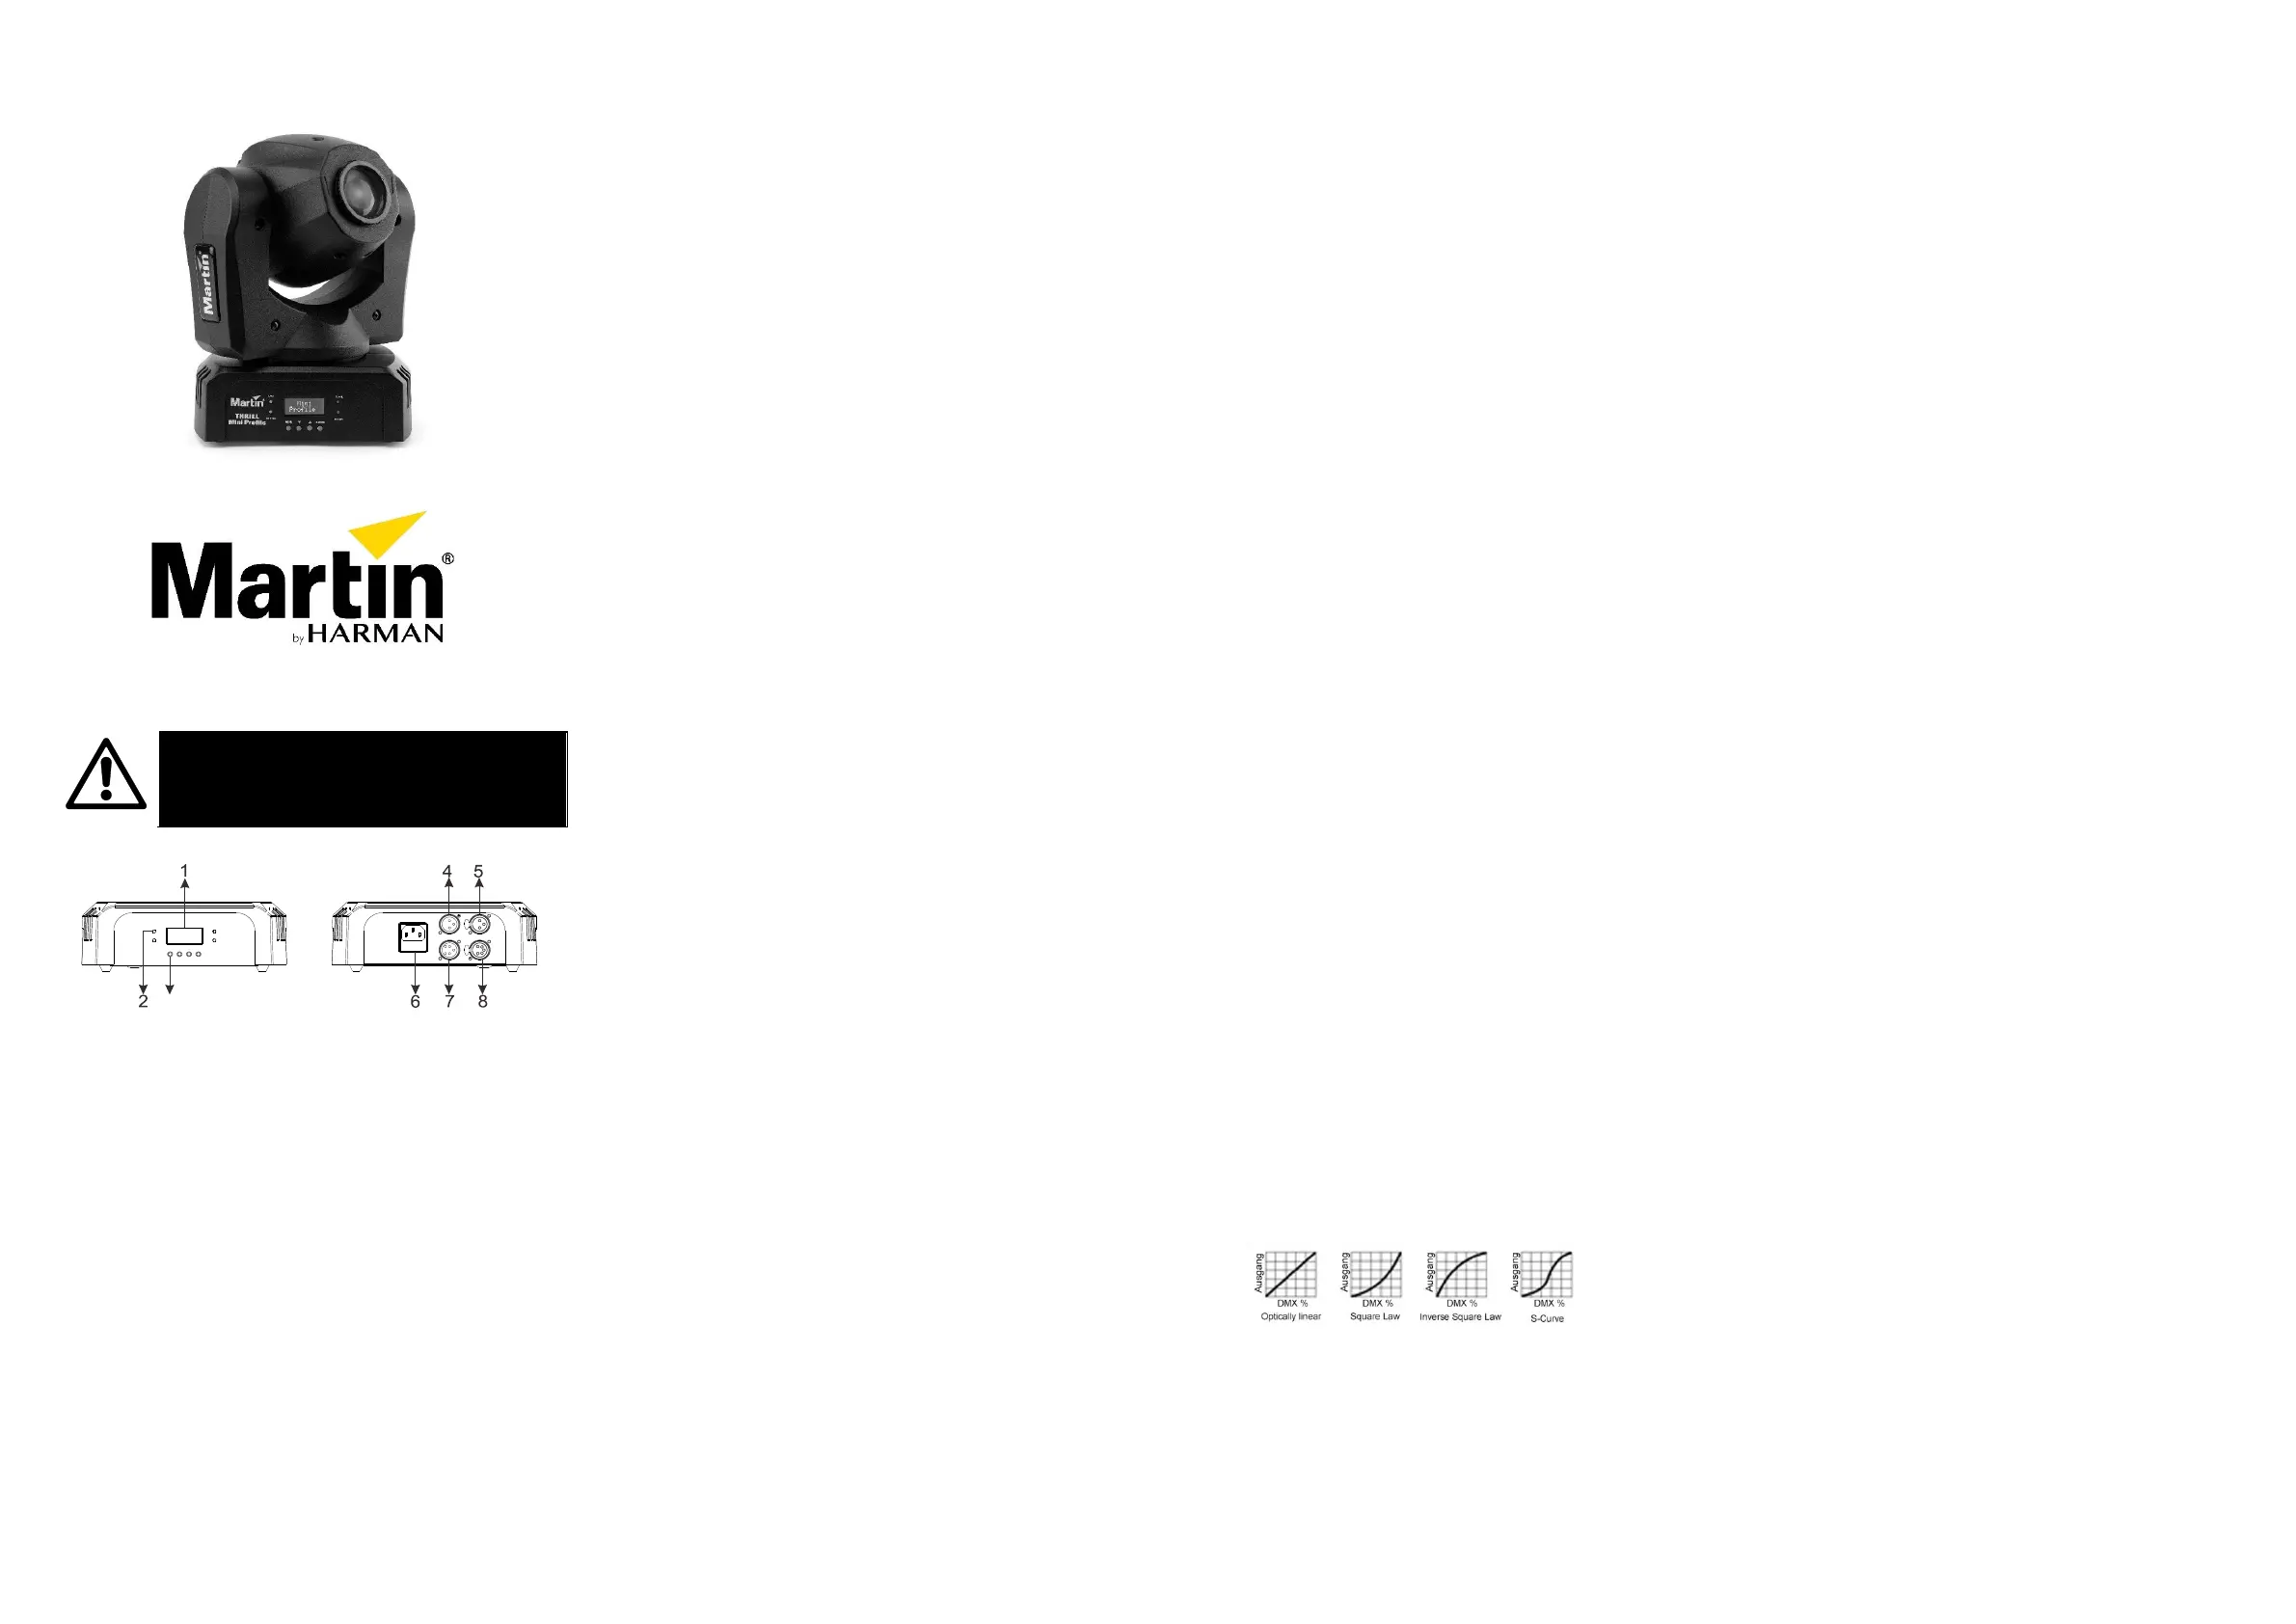
Martin Thrill Mini Profile Manual

Martin Lys Thrill Mini Profile

Læs gratis den danske manual til Martin Thrill Mini Profile (2 sider) i kategorien Lys. Denne vejledning er vurderet som hjælpsom af 2 personer og har en gennemsnitlig bedømmelse på 4.9 stjerner ud af 1.5 anmeldelser. Har du et spørgsmål om Martin Thrill Mini Profile, eller vil du spørge andre brugere om produktet?

Side 1/2
THRILL Mini Profile
User Guide
Fixture overview
1 Display
2 LEDs
DMX: Valid DMX signal present.
SLAVE: Fixture operating as a stand-alone slave.
MASTER: Fixture operating as the stand-alone master.
SOUND: Audio signal triggering stand-alone sequence.
3 Control buttons
MENU: Press to activate the menu. Within the menu, press
to escape and return to the previous level. Press and hold
to exit the menu.
DOWN: Press to scroll down through menu options.
UP: Press to scroll up through menu options.
ENTER: Press to confirm and save the menu selection.
4, 5 3-pin XLR DMX input/output
6 AC mains power socket and primary fuse holder
7, 8 5-pin DMX input/output
Fixture settings
Using the control menu
To access the control menu, press MENU. Scroll through the
menu options using the DOWN and UP buttons. Press ENTER
to select an option. To return to a higher level in the menu
without making a change, press MENU. To exit the control
menu, press and hold MENU.
DMX addressing
A DMX controller uses ten (10) DMX channels to control the
THRILL Mini Profile. The DMX address is the first channel used.
If the first Mini Profile`s DMX address is set to 1, then it receives
instructions on DMX channels 1, 2, 3, 4, 5, 6, 7, 8, 9, and 10.
The next Mini Profile could then be set to a DMX address of 11.
For independent control, each fixture must have its own unique
control channels. Two or more THRILL Mini Profiles may be set
to the same address and share control channels for diagnostic
purposes or if symmetric control is desired. See also Error!
Reference source not found..
To set the DMX address:
Press MENU to enter the control menu.
Press the UP or DOWN buttons to scroll to DMX ADDRESS.
Press ENTER to confirm.
The address will blink in the display. Use the UP and DOWN
buttons to scroll to any desired address from 1 to 503.
Press ENTER to save your selection.
Behavior without DMX (DMX State)
The DMX STATE setting determines how the Mini Profile
responds when there is no DMX signal. The fixture can enter
Show Mode (SHOW MODE), black out (BLACKOUT), or hold
the effect it was displaying when the DMX signal stopped
(HOLD). BLACKOUT is the default setting. For stand-alone
operation without a controller, set DMX STATE to
SHOW MODE.
To set the fixture`s behavior when there is no DMX:
1. Press MENU to enter the control menu.
2. Scroll to DMX STATE and press ENTER.
3. The currently set option will blink in the display. Scroll to the
desired option.
4. Press ENTER to save your selection
Stand-alone operation
To operate the fixture in stand-alone mode, set DMX STATE
to SHOW MODE (see above), or select SHOW MODE in the
control panel. Note that if present, DMX control takes
precedence over stand-alone control.
Stand-alone show selection (Show Mode)
Four pre-programmed stand-alone shows are available.
To select the show:
1. Press MENU to enter the control menu.
2. Scroll to SHOW MODE and press ENTER.
3. The currently selected show will blink in the display. Scroll
to the desired show.
4. Press ENTER to save your selection.
Master/slave operation
THRILL Mini Profiles in Show Mode can be linked in a chain and
set to master/slave operation, where one Mini Profile (the
master) controls the behavior of other Mini Profiles (the slaves).
Two slave modes are available:
In SLAVE 1 mode, slaves fully copy the master.
In SLAVE 2 mode, slaves synchronize with the master but
have slight variations in behavior.
There must be no more than one master. Configure all other
connected fixtures as slaves.
To operate fixtures in master/slave mode:
1. Before connecting the fixtures, select one to be the master.
- Enter the selected fixture`s control menu and scroll to
MASTER SLAVE. Press ENTER.
- Scroll to MASTER and press ENTER.
- Select one of the four stand-alone shows as described
above.
- Set DMX STATE to SHOW MODE as described above.
2. Set up each of the slaves.
- Enter each slave`s control menu and scroll to MASTER
SLAVE. Press ENTER.
- Select SLAVE 1 or SLAVE 2 and press ENTER.
- Set DMX STATE to SHOW MODE
3. Link THRILL Mini Profiles in a chain, using DMX cable to
connect one fixture`s DMX OUT socket to the next fixture`s
DMX IN socket as described in the Safety and Installation
Guide.
4. Apply power to the fixtures. If they do not run a stand-alone
routine, make sure that they are not connected to the output of
a DMX controller.
Sound activation in show mode
The built-in microphone triggers scene changes in sync with
a music beat when SOUND MODE is enabled (ON).
To enable sound activation:
1. Press MENU to enter the control menu.
2. Select SOUND MODE and press ENTER.
3. Scroll to ON or OFF (sound activation disabled).
4. Press ENTER to save your selection.
To adjust microphone sensitivity for the volume of the music:
1. Turn on the music source and set it to the desired volume.
2. Select SOUND SENSE and press ENTER.
3. Press UP or DOWN buttons to change the sensitivity level.
4. When the fixture responds to the beat as desired, press
ENTER.
Pan/tilt inversion
The PAN INVERSE and TILT INVERSE settings can be used
to reverse the direction of pan and tilt. These settings are useful
for symmetrical effects with multiple Mini Profiles, or when
coordinating the movement of Mini Profiles that are floor
mounted and rigged upside down.
To reverse pan direction:
1. Select PAN INVERSE from the control menu and press
ENTER.
2. Scroll to select YES (tilt inversion) or NO (normal) mode.
3. Press ENTER to save your selection.
To reverse tilt direction:
4. Select TILT INVERSE and press ENTER.
5. Scroll to select YES (tilt inversion) or NO (normal) mode.
6. Press ENTER to save your selection.
Dimmer settings
Dimming curve
There are four dimming control modes:
MODE 1
LINEAR: dimming control is even at all light levels.
MODE 2
SQUARE LAW: dimming control is finer at low light
levels and coarser at high levels.
MODE 3
INVERSE SQUARE LAW: dimming control is
coarser at low light levels and finer at high levels.
MODE 4
S-CURVE: dimming control is finer at low and high
light levels and coarser at medium levels.
The default setting is MODE 2. To change dimming control:
1. Press MENU to enter the control menu.
2. Select DIMMER CURVE and press ENTER.
3. Scroll to the desired mode.
4. Press ENTER to save your selection.
Dimmer speed
There are two dimmer speed options:
SNAP is the default setting. It sets the dimmer to exactly
follow changes in dimming level sent from the controller.
This gives the fastest response.
FADE adds an approximate two second smooth fade to
changes in dimming level sent from the controller. This
gives the smoothest fading.
To set the dimmer speed:
1. Press MENU to enter the control menu.
2. Select DIMMER SPEED and press ENTER.
3. Press DOWN or UP to select SNAP or FADE.
4. Press ENTER to save your selection.
Reset
The Mini Profile resets each time it powers on, but it can also be reset
from the control panel or remotely by DMX. To carry out a reset from
the control panel, scroll to RESET and press ENTER (or press
MENU to exit without resetting). A reset takes approx. 20 seconds.
After this, the Mini Profile returns to its state before the reset.
Home position adjustment (offsets menu)
If the head, gobo wheel, or color wheel does not return to its
home position, even after a reset, you can adjust the home
position from the control panel as follows:
1. Reset the Mini Profile as described above.
2. Press and hold ENTER for at least 3 seconds to enter Offset
mode.
3. Use the DOWN and UP buttons up to choose a function to
adjust: PAN, TILT, GOBO, or COLOR. Press ENTER
4. Use the DOWN and UP buttons to adjust the effect`s home
or open position.
Effects
Pan and tilt
The Mini Profile`s head pans through 540° and tilts through
230°. Coarse and fine control channels allow precise
positioning. Direction can be reversed using the PAN INVERSE
and TILT INVERSE menu settings.
The light can be blacked out automatically when the head
moves using the “Auto blackout = ON” command. To turn this
feature off, use the “Auto-blackout = OFF” command. Pan and
tilt speed can also be set to slow, medium, or fast. See channel
10 of the DMX protocol for command values.
The pan and tilt home position, as well as the open gobo
position, can be adjusted from the controller. To make
adjustments via DMX:
1. Select the Mini Profile on the controller.
2. Enable calibration on the fixture`s Fixture Control Settings
channel (channel 10) with a DMX value of 55- 59.
3. Adjust the effect`s position from the controller.
4. Store the effect`s calibration value on DMX channel 10.
Store both pan and tilt calibration with DMX value 165-169,
gobo wheel calibration with DMX value 210-214, pan
calibration only with DMX value 235-249, or tilt calibration
only with DMX value 240-244.
5. When finished calibrating effects, set channel 10 to “No
function” to resume normal DMX control.
Strobe effects
The Mini Profile electronically provides instant open and
blackout, variable speed flash from 3 to 20 flashes per second,
random strobe effects, and pulsing effects.
Electronic dimming
Overall intensity can be precisely adjusted from 0 to 100% using
2-channel coarse and fine dimming control.
Four dimming control modes are available (see „Dimmer
settings‟). The dimming mode can be selected from the control
menu or by DMX commands on channel 10.
Colors
The color wheel provides eight colors plus an open white position.
Colors can be individually selected or scrolled to give split colors.
The wheel can be rotated at varying speeds, both clockwise and
3
WARNING!
Read the Safety and Installation Guide supplied with
this product before installing or using this product.


Produkt Specifikationer

Mærke: Martin
Kategori: Lys
Model: Thrill Mini Profile
Kode for international beskyttelse (IP): IP20
Bredde: 155 mm
Dybde: 237 mm
Højde: 338 mm
Vægt: 4300 g
Produktfarve: Sort
Kontroltype: Knapper
Lampe type: LED
Indbygget skærm: Ja
Skærmtype: LCD
Produkttype: Disco stroboscope
Ledningslængde: 1.9 m
Antal: 1
Strømkilde: Vekselstrøm
Certificering: EU safety: EN 60598-2-17, EN 61000-3-3, EN 62471, EN 62493\nEU EMC: EN 55015, EN 55032, EN 55103-2, EN 61000-3-2, EN 61547\nUS safety: UL 1573\nUS EMC: CFR Title 47 Part 15 Class A\nCanadian safety: CSA C22.2 No. 166\nCanadian EMC: ICES-003 Class A\nAustralia/NZ (pending): RCM
Pæreeffekt: 18 W
Antal lamper: 1 Lampe( r)
Lysfarve: Flere
Indgangsspænding: 100 - 240 V
Strålevinkel: 14 °
Pære levetid: 50000 t
Højdejustering: Ja
Hældningsvinkelområde: 0 - 230 °
Indgangsfrekvens: 50/60 Hz
Panoreringsområde: 0 - 540 °
Rotation: Ja
Monteringssæt: Ja
Velegnet til indendørsbrug: Ja
Belysningstilstande: DMX, Master/slave, Sound activated, Stand-alone
Belysningskontrol protokoller: DMX
Antal DMX kanaler: 10 kanaler
DMX udgang: Ja
Antal stifter: 3
Bold diameter: - "
XLR indgang: Ja
Impulsfunktion: Ja
DMX indgang: Ja
Hældningsindstilling: Ja
Omgivelsestemperatur (maks): 40 °C
Antal gobo-mønstre: 8

Har du brug for hjælp?

Hvis du har brug for hjælp til Martin Thrill Mini Profile stil et spørgsmål nedenfor, og andre brugere vil svare dig