Montagehinweise
Um alle Möglichkeiten des Produktes optimal ausschöpfen zu
können, lesen Sie bitte sorgfältig die nachfolgenden Installations-
hinweise.
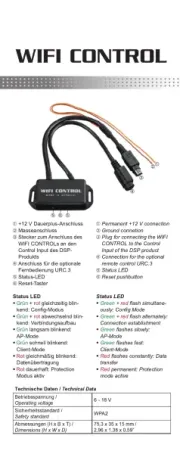
1. Stecken Sie den Rundstecker des WIFI CONTROL in den Multi-
funktionsanschluß (Control Input) des DSP-Produkts.
2. Verbinden Sie die Masseleitung des Anschlusskabels (Ground /
braun) mit einem Massepunkt am Kfz-Chassis oder Massean-
schluss eines DSPs / Verstärkers.
3. Schließen Sie den +12 V Dauerplus-Anschluss (orange) an eine
+12 V Spannungsquelle an.
Achtung: Achten Sie auf eine korrekte Polung, um Beschädi-
gungen am WIFI CONTROL und / oder dem DSP / Verstärker / der
Kfz-Elektronik zu vermeiden.
4. Optional: Schließen Sie die separat erhältliche URC.3 Fernbedie-
nung an den MiniDIN-Anschluss des WIFI CONTROL.
Hinweis: Die Bedieneinheit DIRECTOR ist nicht kompatibel mit
dem WIFI CONTROL.
Konguration des WIFI CONTROLs
Zur Inbetriebnahme des Gerätes muss zuerst der Betriebsmodus
(AP- oder Client-Mode) konguriert werden. Hierzu bendet sich das
WIFI CONTROL im Auslieferungszustand im Cong-Modus und baut
ein eigenes WLAN auf. Der Cong-Modus kann auch durch das drü-
cken des Reset-Tasters für 5 Sekunden aktiviert werden.
1. Schalten Sie Ihr Soundsystem ein.
2. Önen Sie das WLAN-Menü Ihres PCs / Tablets / Smartphones
und stellen eine Verbindung mit dem Netzwerk „WIFI CONTROL
Cong“ her.
3. Laden Sie die WIFI CONTROL-App (ab iOS 11 / Android 7) aus
dem App Store oder Google Play auf Ihr Mobilgerät und installieren
diese. Nach erfolgreicher Installation starten Sie die App. Alterna-
tiv önen Sie Ihren Webbrowser und geben „192.168.4.1“ in die
Adresszeile ein. Nun önet sich die Web-App des WIFI CONTROL.
4. Kongurieren Sie das WIFI CONTROL als Access Point (AP-Mo-
de / empfohlene Konguration) oder als Client (Client-Mode).
AP-Mode: Im AP-Mode erstellt das WIFI CONTROL ein eigenes
WLAN-Netzwerk. Der Vorteil ist, dass jederzeit und überall auf das
DSP-Gerät zugegrien werden kann. Zur Konguration gehen Sie
wie folgt vor:
1. Legen Sie unter SSID einen Namen für das Netzwerk fest.
2. Legen Sie ein Passwort fest und speichern die Einstellung durch
klicken auf den „Save“-Button.
3. Önen Sie erneut das WLAN-Menü Ihres PCs / Tablets / Smart-
phones und stellen eine Verbindung mit dem neu erstellten
Netzwerk her. Nun können Sie Ihr DSP-Produkt über das WIFI
CONTROL kongurieren und steuern.
Client-Mode: Im Client-Mode verbindet sich das WIFI CONTROL
mit einem bestehenden Netzwerk und nutzt dieses. Der Vorteil die-
ser Konguration besteht darin, dass das WIFI CONTROL einma-
lig konguriert werden muss und an verschiedenen DSP-Geräten
genutzt werden kann. Gehen Sie zur Konguration wie folgt vor:
1. Wählen Sie unter dem Punkt „SSID“ das Netzwerk aus, in
welches sich das WIFI CONTROL einbinden soll.
2. Geben Sie das Passwort des Netzwerks ein.
3. Schließen Sie den Kongurationsvorgang durch klicken auf den
WIFI CONTROL
lish a connection to the network “WIFI CONTROL Cong”.
3. Download the WIFI CONTROL app (as of iOS 11 and Android 7)
from the App Store or Google Play to your mobile device and in-
stall it. After the installation process has been successfully com-
pleted, start the app. Alternatively open your web browser and
enter “192.168.4.1” in the address bar. The Web-App of the WIFI
CONTROL will open up.
4. Congure the WIFI CONTROL as access point (AP-Mode / rec-
ommended conguration) or as client (Client-Mode).
AP-Mode: The WIFI CONTROL opens up its own WiFi network
in AP-Mode. This mode lets you access the DSP anywhere and
anytime. Proceed as follows:
1. Specify a name for the network in the SSID input eld.
2. Set a password and save the settings by clicking on the “Save”
button.
3. Reopen the WiFi menu of your PC / tablet / smartphone and
connect to the newly created network. Now you are able to con-
gure and control your DSP product via the WIFI CONTROL.
Client-Mode: In client mode the WIFI CONTROL connects to an
existing WiFi network. This mode allows you to connect the con-
gured WIFI CONTROL to any DSP within the range of your exist-
ing WiFi. Proceed as follows:
1. Select the network from the “SSID” drop-down list in which the
WIFI CONTROL should be integrated.
2. Enter the password of the network.
3. Complete the conguration process by clicking on the “Save”
button. The WIFI CONTROL now always automatically con-
nects to the selected network.
Connecting the DSP PC-Tool
1. Start the DSP PC-Tool software (as of version 4.50)
2. Toggle the button to “WIFI” which is displayed in the launcher.
The software now automatically detects the device which is con-
nected to the WIFI CONTROL. Important: The computer and the
WIFI CONTROL needs to be in the same network.
3. Select the device which should be congured and click the “Con-
nect Button”. You can now start your conguration.
Starting the remote control function
Note: The remote control feature is only available for devices with
ACO platform. To activate the remote control function select the
“WIFI CONTROL” option in the remote control adjustments of the
DSP PC-Tool.
1. Connect your PC / Tablet / Smartphone to the network of the WIFI
CONTROL (name and password as determined during the WIFI
CONTROL`s conguration process).
2. Start your WIFI CONTROL app. Alternatively start your web
browser and open the web site “192.168.4.1”. You can now re-
motely control your device.
Reset pushbutton
If the button is pressed for 5 seconds the WIFI CONTROL activates
its Cong Mode. Pressing the button longer than 10 seconds will
reset the unit.
*Android is a trademark of Google LLC. Google Play and the Google Play logo
are trademarks of Google LLC.
„Save“-Button ab. Das WIFI CONTROL verbindet sich nun im-
mer automatisch mit dem ausgewählten Netzwerk.
Verbinden mit dem DSP PC-Tool
1. Starten Sie die DSP PC-Tool Software (ab Version 4.50)
2. Stellen Sie auf der Startseite den Button auf „WIFI“. Die Software
erkennt nun automatisch das mit dem WIFI CONTROL verbun-
dene Gerät. Wichtig: Beide Geräte müssen sich im gleichen Netz-
werk benden.
3. Wählen Sie das zu kongurierende Gerät aus und bestätigen die
Auswahl durch das Klicken auf den „Connect Button“. Sie können
die Konguration jetzt starten.
Starten der Fernbedienungs-Funktion
Hinweis: Die Fernbedienungs-Funktion ist nur bei Geräten mit ACO-
Plattform verfügbar.
Zusätzlich muss die Fernbedienungs-Funktion zuerst noch einmalig
im DCM-Menü der DSP PC-Tool Software aktiviert werden. Dazu ak-
tivieren Sie bitte die „WIFI CONTROL“ unter den Fernbedienungs-
einstellungen.
1. Stellen Sie mit Ihrem PC / Tablet / Smartphone eine Verbindung
mit dem Netzwerk des WIFI CONTROL her (Name und Passwort
wie zuvor bei der Konguration des WIFI CONTROL festgelegt).
2. Önen Sie die WIFI CONTROL-App. Alternativ önen Sie den
Webbrowser und rufen die Seite „192.168.4.1“ auf. Nun können
Sie ihr Gerät fernsteuern.
Reset-Taster
Wird der Reset-Taster 5 Sekunden gedrückt, wechselt das WIFI
CONTROL in den Cong-Modus; ab 10 Sekunden wird es resettet.
Installation instructions
To secure a proper function of the device read this manual carefully
and follow all installation instructions.
1. Insert the circular plug of the WIFI CONTROL into the multi-func-
tional input (Control Input) of the DSP product.
2. Connect the ground wire of the connection cable (Ground / brown)
to a ground terminal of the vehicle or ground connector of a DSP /
amplier.
3. Connect the permanent +12 V wire of the connection cable
( orange) to a +12 V source.
Attention: Check the polarity prior to the installation in order to
prevent damages of the WIFI CONTROL and / or DSP / amplier /
battery or other equipment.
4. Optional: Connect the separately available remote control URC.3
to the WIFI CONTROL`s MiniDIN connector.
Note: The remote control DIRECTOR is not compatible with the
WIFI CONTROL.
Conguring the WIFI CONTROL
After the rst start-up the operating mode (AP- or Client-Mode) needs
to be congured. Therefore the WIFI CONTROL is initially setup in
Cong Mode and opens an own WiFi network. The Cong-Mode can
also be activated by pushing the reset pushbutton for 5 seconds.
1. Start your sound system.
2. Open the WiFi menu of your PC / Tablet / Smartphone and estab-