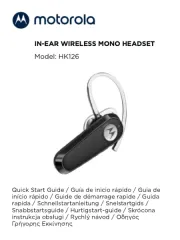
Model No.: MOTO BUDS 600 ANC
Frequency Band: 2.402 – 2.480GHz
Working temperature: 0°C - 45°C
Maximum RF power: 8 dBm
FCC ID: 2ARRB-MB600
IC: 20353-MB600
Quick Start Guide / Schnellstartanleitung /
Guide de démarrage rapide / Snelstartgids /
Guía de inicio rápido / Guida rapida
Guia rápido / Snabbstartsguide /
Skrócona instrukcja obsługi / Ghid rapid de pornire /
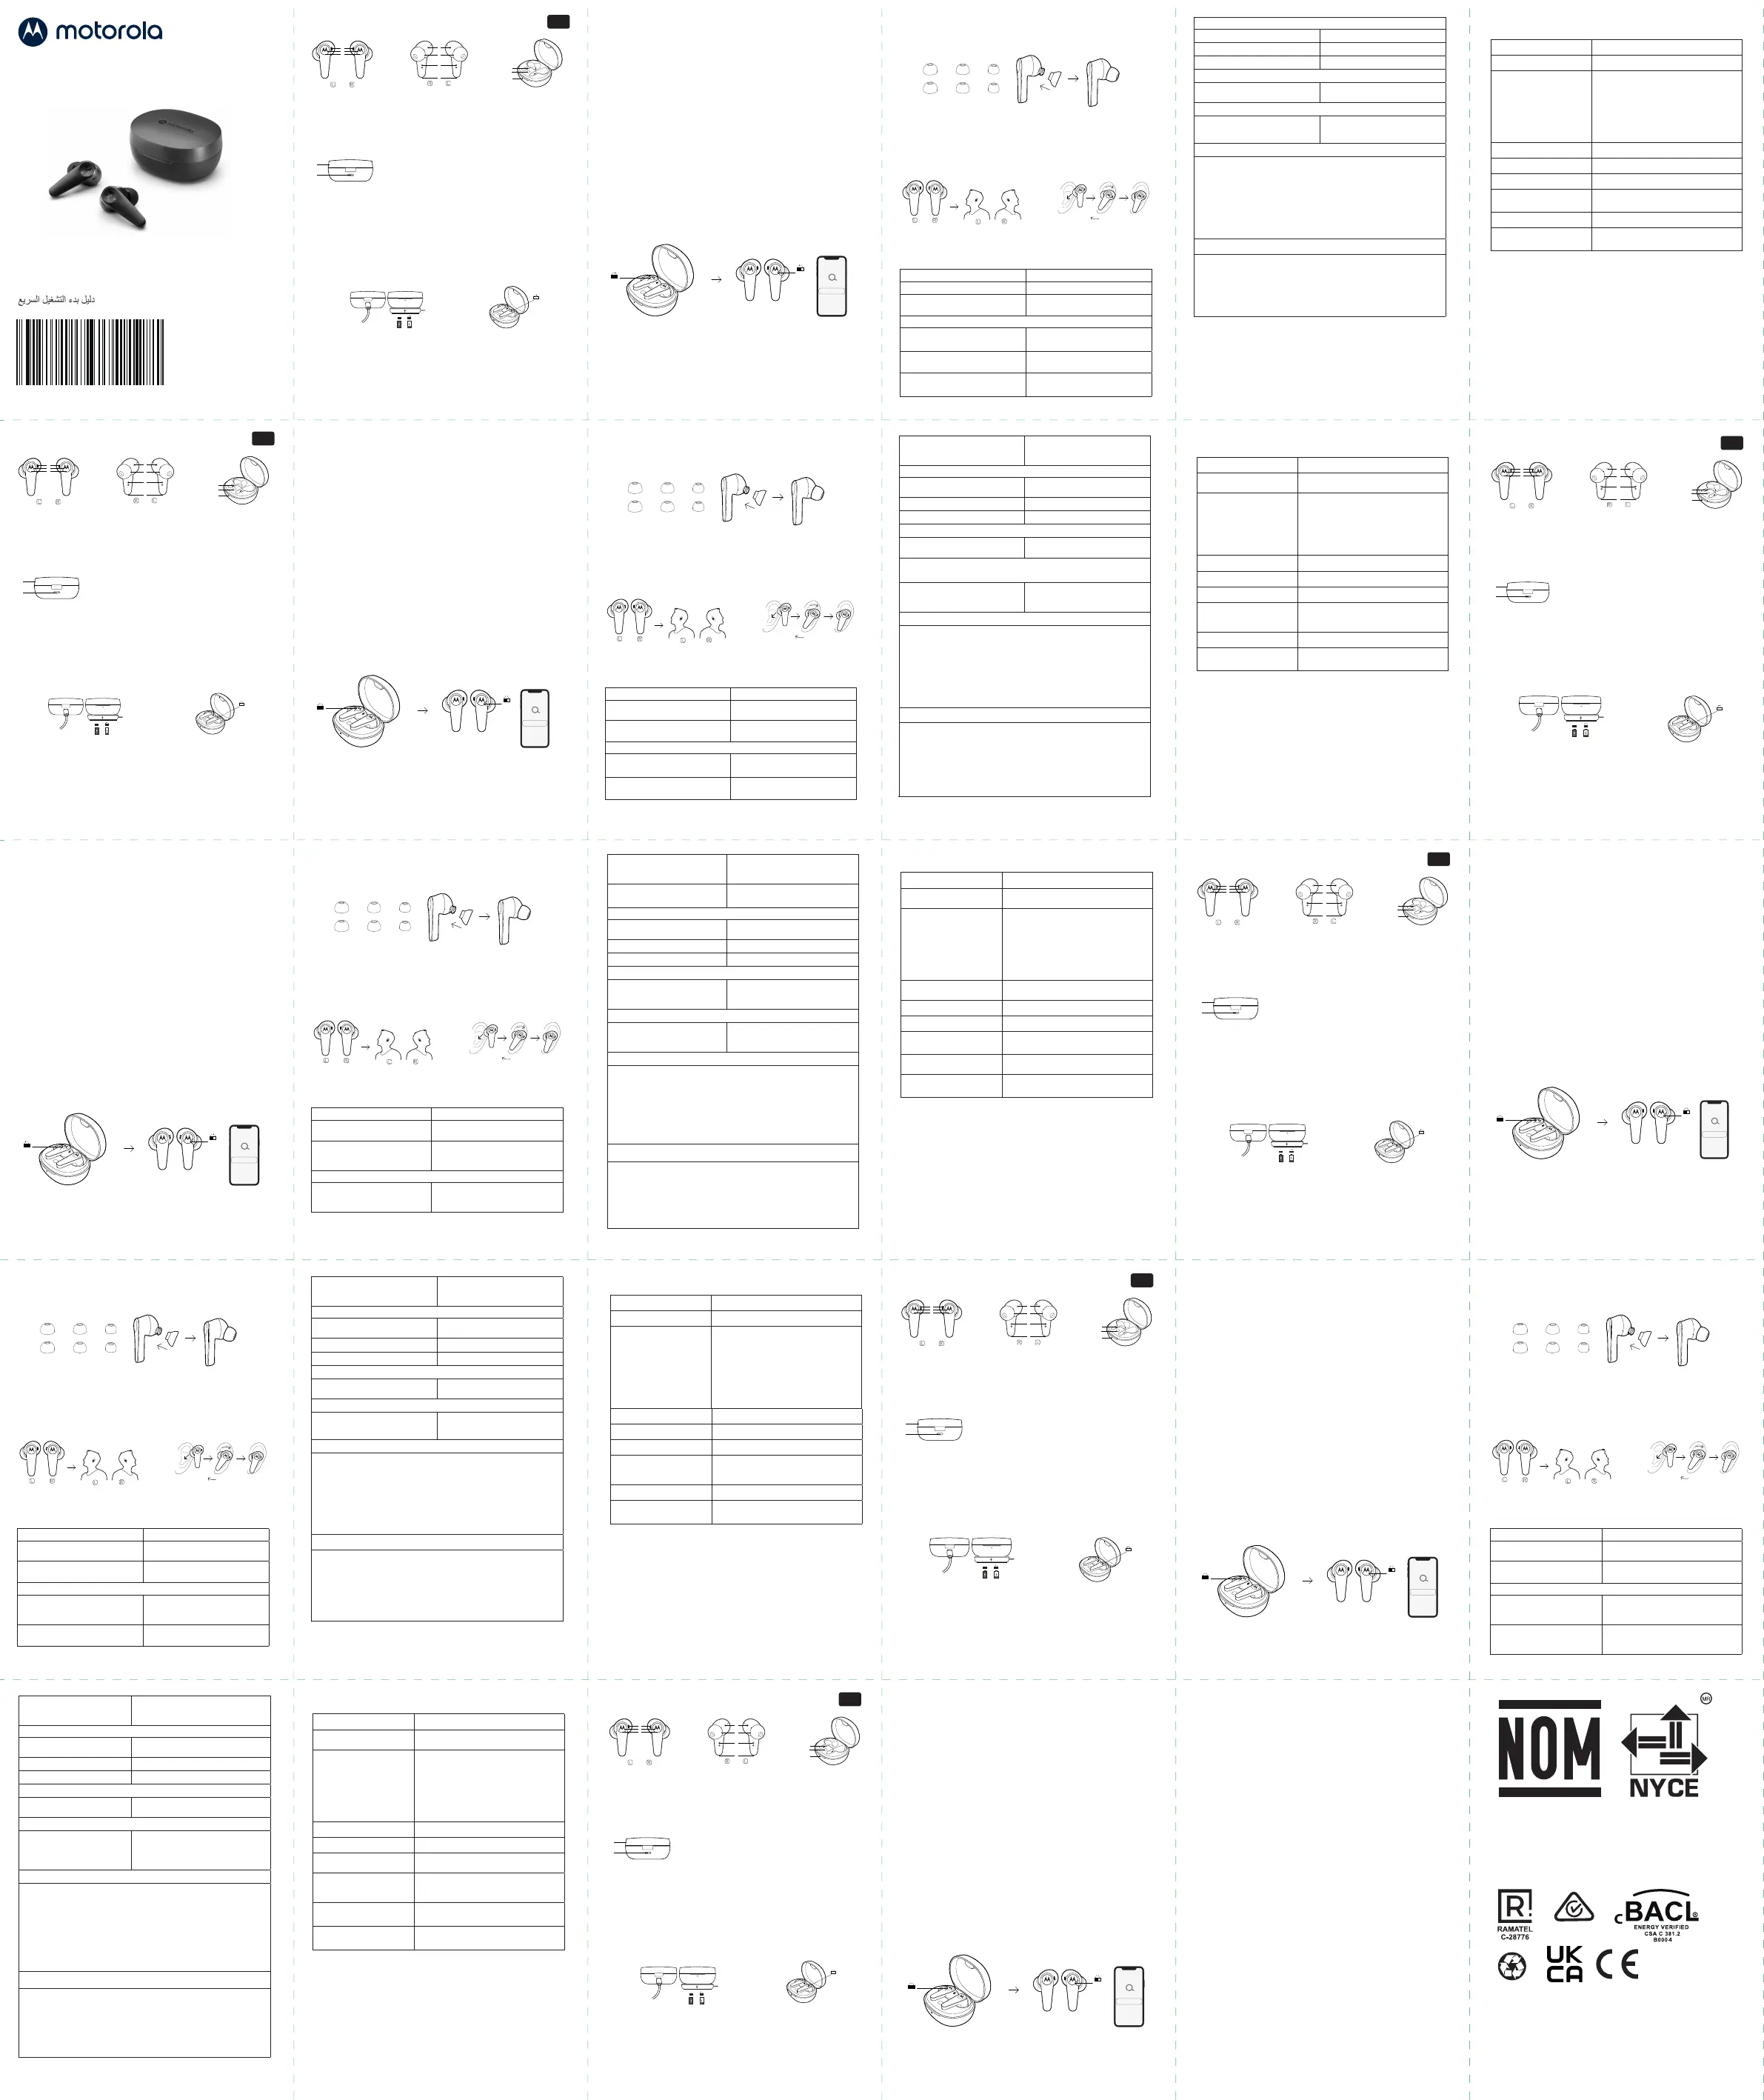
1. At a glance
1. Microphones (for noise cancellation)
2. Multi-function buttons (MFB)
3. LED indicators
4. Infrared (IR) sensor
5. Replaceable earcaps (size M)
6. Charging case charging contacts
7. Microphones (for phone calls)
8. Charging case
9. USB Type-C charging socket
10. Earbud charging contacts
11. Pairing button
12. Battery level indicator
100% <100%
Fig.2a
Charging case
Put into the charging
case and close the
top lid. The pink/light blue*
LEDs on both earbuds turn
on until charging is
complete.
Charging either with the supplied
USB-C charging cable or a wireless
charger (not supplied). The
LED indicator flashes red when
charging the battery. It turns solid
blue when charging is complete.
Fig. 2b
Earbuds
1
2
Fig.1a
3
11
Fig.1d
12
10
Fig .1c
9
8
6
5
Fig. 1b
7
4
2. Charge
Fully charge before use
The device can be powered through a USB-C from any
CE compliant power source that implement the European
interface as requested by EN 301 489-52.
3. On/O/Pair
1. Turn on earbuds: Turn on automatically when opening the
charging case top lid.
2. Turn o earbuds: Put both earbuds into the charging
case and fully close the charging case top lid. Then
earbuds turn o automatically.
3. Pairing: MOTO BUDS 600 supports Google fast pairing.
Open the charging case top lid. For Motorola smart phone
or Android phone with Android version 6.0 or above,
simply confirm MOTO BUDS 600 directly on your device
screen. For other devices, select MOTO BUDS 600 from
the Bluetooth menu of your device. Earbuds will do
pairing automatically. In case of pairing to the 2nd smart
phone, press and hold the pairing button on the charging
case for 4 seconds.
MOTO BUDS 600
Fig.3b
Fig. 3a
2 3
SH38D74753U
4. Fit and comfort
1. Choose the suitable earcap size.
2. Fit into the earbuds.
3. Insert the earbuds into ears and rotate to fit
comfortably.
5. Operation
Call Button
Answer/End a call Left/right MFB: Tap once
Reject a call
Left/right MFB: Press and
hold for 2 seconds
3-way call
Pick up calls/Put calls on
hold/switch calls
Left/right MFB: Tap once
Reject calls/Continue the
current call
Left/right MFB: Press and
hold for 2 seconds
End the current call and
resume on hold calls
Left/right MFB: Tap twice
Fig. 4a
SML
Fig. 4b
Fig. 4c
Music
Play/Pause Left/right MFB: Tap once
Previous track Right MFB: Tap 3 times
Next track Right MFB: Tap twice
Activate voice assistant
Siri, Google
Right MFB: Press and hold for
2 seconds
Active noise cancellation (ANC) / Ambient sound
Toggle between ANC on /
ambient sound / ANC o
Left MFB: Tap twice
Multipoint connection
1. Connect to the 1st mobile device.
2. Switch o the Bluetooth function of the 1st device.
3. Switch on the Bluetooth function of the 2nd device and
follow pairing instructions in section 3 to do pairing.
When connected successfully, switch on the Bluetooth
function of the 1st device. Two devices will be connected
simultaneously.
Factory reset
1. Put both earbuds into the charging case.
2.
Press and hold the pairing button on the charging
case for 10 seconds. The LED indicator flashes blue
and pink/light blue* 3 times.
3. Follow pairing instructions in section 3 to do pairing again.
4 5
6. LED status indicators
Power on Flash blue for 1 second
Power o
Pink/light blue* LED on for 2 s
Pairing
One of the earbuds flashes blue
every 5 seconds and the other
earbud flashes blue and pink/
light blue* alternatively.
In case only one earbud is
powered on, it flashes blue and
pink/light blue* alternatively.
Connected Flashes blue every 5 seconds
Charging
Steady pink/light blue*
Fully charged O
Incoming call/call
waiting
Flashes blue every 1
second
Low battery level
Flashes pink/light blue* every 5 s
Factory reset
Flashes blue and pink/light blue* 3
times
For a full explanation of all features and instructions, please
download the user guide from motorolasound.com.
6
1..
Auf einen Blick
1. Mikrofone (für Geräuschunterdrückung)
2. Multifunktionstasten (MFB)
3. LED-Anzeigen
4. Infrarotsensor (IR)
5. Auswechselbare Ohrkappen (Größe M)
6. Ladekontakte des Ladekoers
7. Mikrofone (für Telefongespräche)
8. Ladekoer
9. USB-C-Ladebuchse
10. Ladekontakte für Ohrstöpsel
11. Pairing-Taste
12. Akkuladeanzeige
100% <100%
Abb.2a
Ladekoer
In den Ladekoer
einlegen und den
Deckel schließen. Die
rosa/hellblau* LEDs an
beiden Ohrstöpseln leuchten,
bis der Ladevorgang
abgeschlossen ist.
Aufladen entweder mit dem
mitgelieferten USB-C-Ladekabel
oder einem kabellosen Ladegerät
(nicht mitgeliefert). Während
des Laden des Akkus blinkt die
LED-Anzeige rot. Sie wechselt
zu stetigem Blau, wenn der
Ladevorgang abgeschlossen ist.
Abb.2b
Ohrstöpsel
1
2
Abb.1a
3
11
Abb.1d
12
10
Abb.1c
9
8
6
5
Abb.1b
7
4
.
Laden
2.
Vor der Verwendung vollständig aufladen
Das Gerät kann über USB-C von jeder CE-konformen
Stromquelle mit Strom versorgt werden, die die europäische
Schnittstelle gemäß EN 301 489-52 implementiert.
3..
EIN/AUS/Pairing
1. Ohrstöpsel einschalten: Automatisches Einschalten beim
Önen des Deckels des Ladekoers.
2. Ohrstöpsel ausschalten: Legen Sie beide Ohrstöpsel
in den Ladekoer und schließen Sie den Deckel des
Ladekoers vollständig. Die Ohrstöpsel werden dann
automatisch ausgeschaltet.
3. Pairing: MOTO BUDS 600 unterstützen Google Fast
Pairing. Önen Sie den Deckel des Ladekoers. Für
Motorola-Smartphones oder Android-Telefone mit
Android-Version 6.0 oder höher bestätigen Sie einfach
MOTO BUDS 600 direkt auf dem Bildschirm Ihres Geräts.
Wählen Sie bei anderen Geräten MOTO BUDS 600 im
Bluetooth-Menü Ihres Geräts. Pairing der Ohrstöpsel
erfolgt automatisch. Halten Sie für Pairing mit einem 2.
Smartphone die Pairing-Taste am Ladekoer 4 Sekunden
lang gedrückt.
MOTO BUDS 600
Abb.3b
Abb.3a
7 8
4..
Sitz und Komfort
1. Wählen Sie die passende Ohrkappengröße.
2. Passt in die Ohrstöpsel.
3. Schieben Sie die Ohrstöpsel in Ihre Ohren und
drehen Sie sie für komfortablen Sitz.
5..
Betrieb
Anruf Taste
Annehmen/Beenden eines
Anrufs
MFB links/rechts: Einmal
tippen
Anruf ablehnen
MFB links/rechts: Drücken
und halten für 2 Sekunden
3-Wege-Gespräch
Anruf entgegennehmen/
Anruf halten/Anruf wechseln
MFB links/rechts: Einmal
tippen
Anruf ablehnen/aktuellen
Anruf fortsetzen
MFB links/rechts: Drücken
und halten für 2 Sekunden
Abb.4a
SML
Abb.4b
Abb.4c
Aktuelles Gespräch beenden
und gehaltenes Gespräch
fortsetzen
MFB links/rechts: Zweimal
tippen
Musik
Wiedergabe/Pause
MFB links/rechts: Einmal
tippen
Vorherige Spur MFB rechts: Dreimal tippen
Nächste Spur MFB rechts: Zweimal tippen
Sprachassistent aktivieren
Siri, Google
MFB rechts: Drücken und
halten für 2 Sekunden
Aktive Geräuschunterdrückung (ANC) /
Umgebungsgeräusche
Umschalten zwischen ANC
EIN / Umgebungsgeräusche
/ ANC AUS
MFB links: Zweimal tippen
Mehrpunktverbindung
1. Verbindung mit dem 1. Mobilgerät herzustellen.
2. Bluetooth-Funktion des 1. Geräts ausschalten.
3. Bluetooth-Funktion des 2. Geräts einschalten und die
Anweisungen zum Pairing in Abschnitt 3 befolgen, um das
Pairing durchzuführen. Nach erfolgreicher Verbindung die
Bluetooth-Funktion des 1. Geräts einschalten. Jetzt sind die
beiden Geräte gleichzeitig verbunden.
Zurücksetzen auf Werkseinstellungen
1. Stecken Sie beide Ohrstöpsel in den Ladekoer.
2.
Halten Sie die Pairing-Taste am Ladekoffer 10 Sekunden
lang gedrückt. Die LED-Anzeige blinkt 3 mal blau und
rosa/hellblau*.
3. Befolgen Sie die Anweisungen zum Pairing in Abschnitt 3,
um Pairing erneut durchzuführen.
9 10
6..
LED-Statusanzeigen
Einschalten 1 Sekunde lang blau blinken
Ausschalten
Die rosa/hellblau* LED leuchtet
2 Sekunden lang
Pairing
Ein Ohrstöpsel blinkt alle 5 s blau
und der andere blinkt abwechselnd
blau und rosa/hellblau*.
Wenn nur ein Ohrstöpsel
eingeschaltet ist, blinkt er
abwechselnd blau und rosa/hellblau*.
Verbunden Blinkt blau alle 5 Sekunden
Beim Aufladen
Stetig rosa/hellblau*
Voll geladen Aus
Eingehender Anruf/
Anklopfen
Blinkt blau alle 1
Sekunde
Niedriger Batteriestand
Blinkt rosa/hellblau* alle 5 Sekunden
Zurücksetzen auf
Werkseinstellungen
Blinkt 3 mal blau und rosa/hellblau*
Laden Sie für eine vollständige Erklärung aller Funktionen
und Anweisungen bitte die Bedienungsanleitung von
motorolasound.com herunter.
11
1..
Aperçu
1. Microphones (pour la suppression de bruit)
2. Touches multifonctions (TMF)
3. Indicateur DEL
4. Capteur sensoriel infrarouge (IR)
5. Mini-écouteurs remplaçables (taille M)
6. Étui de charge avec contacts de
chargement
7. Microphones(pour les appels téléphoniques)
8. Étui de chargement
9. Prise de charge USB de type C
10. Contacts de charge des mini-écouteurs
11. Bouton de jumelage
12. Indicateur du niveau de batterie
100% <100%
Fig.2a Étui de chargement
Mettez ceux-ci dans l’étui
de charge et refermez-le.
Les LED roses/bleu clair*
sur chaque oreillette
s’activeront jusqu’à ce
que la charge soit
terminée.
Le rechargement se fait à l’aide
du câble USB C fourni ou un
chargeur sans fil (non fourni). La
LED clignote en rouge lors du
chargement de la batterie. Elle
reste allumée en bleu fixe lorsque
le chargement est terminé.
Fig.2b Mini-écouteurs
1
2
Fig.1a
3
11
Fig.1d
12
10
Fig .1c
9
8
6
5
Fig. 1b
7
4
2..
Chargement
12
Chargez complètement avant l’utilisation
L’appareil peut être alimenté par un port USB-C provenant
d’une source d’alimentation CE conforme à l’interface
Européenne tel que requis selon EN-301 489-52.
3..
Activé/Désactivé/Jumelage
1. Activez les mini-écouteurs : S’activeront
automatiquement dès que vous ouvrez le couvercle de
l’étui de charge.
2. Désactivez les mini-écouteurs : Placez les deux
mini-écouteurs dans l’étui de charge et refermez le
couvercle de celui-ci. Les mini-écouteurs s’éteindront
automatiquement.
3. Jumelage : Les écouteurs MOTO BUDS 600 permettent la
connexion rapide à Google. Ouvrez le couvercle de l’étui
de charge. Pour un smartphone Motorola ou Androïd
version 6.0 ou plus, confirmez simplement MOTO BUDS
600 directement sur l’écran de votre appareil. Pour les
autres appareils, sélectionnez MOTO BUDS 600 à partir
du menu Bluetooth de votre appareil. Les écouteurs se
jumèleront automatiquement. Dans le cas d’un jumelage
avec un deuxième appareil, appuyez et maintenez
enfoncé le bouton de jumelage sur l’étui de chargement
pour 4 secondes.
MOTO BUDS 600
Fig.3b
Fig. 3a
4..
Confort et réglage
1. Choisir la taille appropriée pour le mini-écouteur.
2. Ajustez sur le mini-écouteur.
3. Insérez les mini-écouteurs dans les oreilles puis
tournez-les afin qu’ils soient bien ajustés.
5..
Fonctionnement
Appeler Touche
Répondre/terminer un appel
TMF gauche/droite : Tapez
une fois
Rejeter un appel
TMF gauche/droite : Appuyez
et maintenez enfoncé pendant
2 secondes
Appel à 3
Prendre l’appel/Mettre un
appel en attente/commuter
un appel
TMF gauche/droite : Tapez
une fois
Fig. 4a
SML
Fig. 4b
Fig. 4c
13 14
Rejeter des appels/
continuer l’appel en cours
TMF gauche/droite : Appuyez
et maintenez enfoncé pour 2
secondes
Terminer l’appel en cours et
poursuivre l’appel en attente
TMF gauche/droite : Tapez
deux fois
Musique
Lecture/Pause
TMF gauche/droite : Tapez
une fois
Plage précédente TMF de droite : Tapez 3 fois
Plage suivante TMF de droite : Tapez deux fois
Activer l’assistant vocal
Siri, Google
TMF de droite : Appuyez et
maintenez enfoncé pendant 2
secondes
La suppression du bruit (ANC) / Son ambiant
Commutez entre ANC
active / son ambiant / ANC
désactivé
TMF de gauche : Tapez deux
fois
Connexion multipoints
1. Connectez le premier appareil.
2. Éteignez la fonction Bluetooth sur le 1er appareil.
3. Activez la fonction Bluetooth sur le 2e appareil et suivez
les directives de jumelage dans la section 3 afin d’eectuer
le jumelage. Lorsque vous êtes jumelé avec succès, activez
la fonction Bluetooth sur le 1er appareil. Les deux appareils
seront jumelés en simultané.
Réinitialisez les réglages d’usine
1. Mettez les deux mini-écouteurs dans l’étui de chargement.
2.
Appuyez et maintenez le bouton de jumelage sur l’étui
de chargement pendant 10 secondes. La LED clignotera
bleu et rose/bleu clair* 3 fois.
3. Suivez les directives de jumelage dans la section 3 pour
eectuer le jumelage à nouveau.
6..
Indicateurs DEL de l’état de l’appareil
Activé Clignotera en bleu pour 1 seconde.
Désactivé
La LED rose/bleu clair* s’activera
pendant 2 secondes.
Jumelé
Un des écouteurs clignotera en
bleu à chaque 5 secondes et
l’autre écouteur clignotera en bleu
et rose/bleu clair* en alternance.
Dans le cas où un seul écouteur est
activé, celui-ci clignotera en bleu
et rose/bleu clair* en alternance.
Connecté
Clignote en bleu à chaque 5
secondes
Chargement
Rose/bleu clair* fixe
Complètement chargé Éteint
Appel entrant/appel
en attente
Clignote en bleu à chaque 1
seconde
Niveau des piles faible
Clignote en rose/bleu clair*
toutes les 5 secondes
Réinitialisation des
paramètres d’usine
Clignote en bleu et rose/bleu clair*
3 fois
Pour une explication complète de toutes les fonctions et
directives, veuillez télécharger le guide de l’utilisateur sur le
site motorolasound.com
15 16
.
In een oogopslag
1.
1. Microfoons (voor ruisonderdrukking)
2. Multifunctionele knoppen (MFB)
3. LED-indicatoren
4. Infrarood (IR)-sensor
5. Verwisselbare oorkappen (maat M)
6. Oplaadcontacten van oplaadhouder
7. Microfoons (voor telefoongesprekken)
8. Oplaadhouder
9. USB Type-C-oplaadaansluiting
10. Oplaadcontacten van oordopjes
11. Koppelknop
12. Batterijniveau-indicator
100% <100%
Afb. 2a
Oplaadhouder
Stop in de oplaadhouder
en sluit de bovenklep. De
roze/lichtblauw* LED’s
op beide oordopjes gaan
branden totdat het
opladen is voltooid.
Opladen met de meegeleverde
USB-C-oplaadkabel of een
draadloze oplader (niet
meegeleverd). De LED-indicator
knippert rood bij het opladen van
de batterij. Het wordt continu
blauw als het opladen voltooid is.
Afb. 2b
Oordopjes
1
2
Afb. 1a
3
11
Afb. 1d
12
10
Afb. 1c
9
8
6
5
Afb. 1b
7
4
.
Opladen
2.
17
Laad volledig op vóór gebruik
Het apparaat kan worden gevoed via USB-C van elke
CE-conforme voedingsbron die de Europese interface
ondersteunt zoals vereist door EN 301 489-52.
3. Aan/Uit/Koppelen
1. Oordopjes aanzetten: Schakel automatisch in bij het
openen van de bovenklep van de oplaadhouder.
2. Oordopjes uitzetten: Stop beide oordopjes in de
oplaadhouder en sluit de bovenklep van de oplaadhouder
volledig. Dan gaan de oordopjes automatisch uit.
3. Koppelen: MOTO BUDS 600 ondersteunt snelkoppelen
van Google. Open de bovenklep van de oplaadhouder.
Voor Motorola smartphone of Android telefoon met
Android versie 6.0 of hoger, bevestigt u simpelweg
MOTO BUDS 600 direct op het scherm van uw toestel.
Voor andere apparaten selecteert u MOTO BUDS 600
in het Bluetooth-menu van uw apparaat. De oordopjes
zullen automatisch koppelen. In geval van koppelen
met de 2e smartphone, houdt u de koppelknop op de
oplaadhouder 4 seconden ingedrukt.
MOTO BUDS 600
Afb. 3b
Afb. 3a
18
4. Pasvorm en comfort
1. Kies de geschikte maat oorkapjes.
2. Bevestig op de oordopjes.
3. Steek de oordopjes in de oren en draai om
comfortabel te passen.
5. Bediening
Oproep Knop
Oproep beantwoorden/
beëindigen
Linker/rechter MFB: Tik
eenmaal
Oproep te weigeren
Linker/rechter MFB: Houd 2
seconden ingedrukt
3-weg gesprek
Oproepen aannemen/
oproepen in wacht zetten/
gesprekken wisselen
Linker/rechter MFB: Tik
eenmaal
Oproepen weigeren/
doorgaan met huidige oproep
Linker/rechter MFB: Houd 2
seconden ingedrukt
Afb. 4a
SML
Afb. 4b
Afb. 4c
Huidige oproep beëindigen
en oproepen in de wacht
hervatten
Linker/rechter MFB: Tik
tweemaal
Muziek
Afspelen/Pauze
Linker/rechter MFB: Tik
eenmaal
Vorig nummer Rechter MFB: Tik 3 keer
Volgend nummer Rechter MFB: Tik tweemaal
Spraakassistent activeren
Siri, Google
Rechter MFB: Houd 2
seconden ingedrukt
Actieve ruisonderdrukking (ANC)/Omgevingsgeluid
Schakel tussen ANC aan/
omgevingsgeluid/ANC uit
Linker MFB: Tik tweemaal
Meerpuntsverbinding
1. Maak verbinding met het 1e mobiele apparaat.
2. Schakel de Bluetooth-functie van het 1e apparaat uit.
3. Schakel de Bluetooth-functie van het 2e apparaat in en
volg de koppelinstructies in hoofdstuk 3 om te koppelen.
Wanneer de verbinding met succes is gemaakt, schakelt
u de Bluetooth-functie van het 1e apparaat in. Twee
apparaten worden gelijktijdig verbonden.
Fabrieksreset
1. Stop beide oordopjes in de houder.
2.
Houd de koppelknop op de oplaadhouder 10 seconden
ingedrukt. De LED-indicator knippert 3 keer blauw en
roze/lichtblauw*.
3. Volg de koppelinstructies in hoofdstuk 3 om opnieuw te
koppelen.
19
20
6. LED-statusindicatoren
Inschakelen Knippert blauw voor 1 seconde
Uitschakelen
Roze/lichtblauw* LED aan voor 2 s
Koppelen
Eén van de oordopjes knippert elke
5 seconden blauw en het andere
oordopje knippert afwisselend
blauw en roze/lichtblauw*.
Als er slechts één oordopje is
ingeschakeld, knippert het
afwisselend blauw en roze/
lichtblauw*.
Verbonden Knippert blauw elke 5 seconden
Opladen Constant roze/lichtblauw*
Volledig opgeladen Uit
Inkomende oproep/
oproep in wacht
Knippert blauw elke 1
seconde
Laag batterijniveau
Knippert roze/lichtblauw* elke 5 s
Fabrieksreset
Knippert blauw en roze/lichtblauw*
3 keer
Voor een volledige uitleg van alle functies en instructies kunt
u de gebruikershandleiding downloaden van
motorolasound.com.
21
1. Resumen
1. Micrófonos (para cancelación de ruido)
2. Botones de múltiples funciones (MFB)
3. Indicadores LED
4. Sensor infrarrojo (IR)
5. Orejeras reemplazables (tamaño M)
6. Contactos de carga del estuche de carga
7. Micrófonos (para llamadas telefónicas)
8. Estuche de carga
9. Conector de carga USB Tipo C
10. Contactos de carga de auriculares
11. Botón de emparejamiento
12. Indicador de nivel de batería
100% <100%
Fig.2a Estuche de carga
Póngalos en el estuche
de carga y cierre la tapa
superior. Los LED rosa/
azul claro* de ambos
auriculares se
encienden hasta que se
completa la carga.
Se carga con el cable de carga
USB-C suministrado o un cargador
inalámbrico (no suministrado). El
indicador LED parpadea en rojo
cuando se está cargando la batería.
Se vuelve azul fijo cuando se
completa la carga.
Fig.2b Auriculares
1
2
Fig.1a
3
11
Fig.1d
12
10
Fig .1c
9
8
6
5
Fig. 1b
7
4
2. Carga
22
Carga completa antes del uso
El dispositivo puede cargarse a través de un USB-C desde
cualquier fuente de corriente que cumpla con CE que
implemente la interfaz europea, como lo requiere EN 301
489-52.
3. Encendido/Apagado/Emparejar
1. Encienda los auriculares: Encienda automáticamente al
abrir la tapa superior del estuche de carga.
2. Apague los auriculares: Ponga ambos auriculares en el
estuche de carga y cierre la tapa superior del estuche de
carga completamente. Después los auriculares se apagan
automáticamente.
3. Emparejamiento: MOTO BUDS 600 es compatible
con el emparejamiento rápido de Google. Abra la
tapa superior del estuche de carga. Para teléfonos
inteligentes Motorola o teléfonos Android con la versión
de Android 6.0 o superior, simplemente confirme
MOTO BUDS 600 directamente en la pantalla de su
dispositivo. Para otros dispositivos, seleccione MOTO
BUDS 600 en el menú Bluetooth de su dispositivo. Los
auriculares se emparejarán automáticamente. En caso
de emparejamiento con el segundo teléfono inteligente,
mantenga presionado el botón de emparejamiento en el
estuche de carga durante 4 segundos.
MOTO BUDS 600
Fig.3b
Fig. 3a
4. Adaptación y comodidad
1. Elija un tamaño de auricular apropiado.
2. Adáptese los auriculares.
3. Introduzca los auriculares en los oídos y gírelos para
que se adapten cómodamente.
5. Funcionamiento
Llamar Botón
Responder/Terminar una
llamada
MFB izquierdo/derecho: Toque
una vez
Rechazar una llamada
MFB izquierdo/derecho: Presione
y sostenga por 2 segundos
Llamada de 3 vías
Tomar llamadas/Poner
llamadas en espera/
cambiar llamadas
MFB izquierdo/derecho: Toque
una vez
Rechazar llamadas/
Continuar con la llamada
actual
MFB izquierdo/derecho: Presione
y sostenga por 2 segundos
Fig. 4a
SML
Fig. 4b
Fig. 4c
23 24
Terminar la llamada actual
y retomar las llamadas en
espera
MFB izquierdo/derecho: Toque
dos veces
Música
Reproducir/Pausar
MFB izquierdo/derecho: Toque
una vez
Pista anterior MFB derecho: Toque 3 veces
Nueva pista MFB derecho: Toque dos veces
Activar asistente de voz
Siri, Google
MFB derecho: Presione y
sostenga por 2 segundos
Cancelación activa de ruido (ANC) / Sonido ambiental
Alternar entre ANC
activado/sonido
ambiental/ANC
desactivado
MFB izquierdo: toque dos veces
Conexión multipunto
1. Conectar al primer dispositivo móvil.
2. Apague la función Bluetooth del primer dispositivo.
3. Encienda la función Bluetooth del segundo dispositivo
y siga las instrucciones de emparejamiento en la
sección 3 para realizar el emparejamiento. Cuando se
conecte correctamente, encienda la función Bluetooth
del primer dispositivo. Se conectarán dos dispositivos
simultáneamente.
Restablecimiento de fábrica
1. Ponga ambos auriculares en el estuche de carga.
2.
Mantenga presionado el botón de emparejamiento en el
estuche de carga durante 10 segundos. El indicador
LED parpadea en azul y rosa/azul claro* 3 veces.
3. Siga las instrucciones de emparejamiento en la sección 3
para volver a emparejar.
6. Indicadores de estado LED
Encendido Parpadeo azul durante 1 segundo
Apagado
LED rosa/azul claro* encendido
durante 2 segundos
Emparejando
Uno de los auriculares parpadea
en azul cada 5 segundos y el
otro parpadea en azul y rosa/
azul claro* alternativamente.
En caso de que solo un auricular
esté encendido, parpadea en azul y
rosa/azul claro* alternativamente.
Conectado Parpadea en azul cada 5 segundos
Cargando
Rosa/azul claro* fijo
Completamente
cargado
Apagado
Llamada entrante/
llamada en espera
Parpadea en azul cada 1 segundo
Nivel bajo de batería
Parpadea en rosa/azul claro* cada
5 segundos
Restablecimiento de
fábrica
Parpadea en azul y rosa/azul claro*
3 veces
Para obtener una explicación completa de todas las
funciones e instrucciones, descargue la guía del usuario de
motorolasound.com.
25 26
1. In breve
1. Microfoni (per la cancellazione del rumore)
2. Pulsanti multifunzione (MFB)
3. Indicatori LED
4. Sensore a infrarossi (IR)
5. Auricolari sostituibili (taglia M)
6. Contatti di ricarica della custodia di ricarica
7. Microfoni (per telefonate)
8. Custodia di ricarica
9. Presa di ricarica USB di tipo C
10. Contatti per la ricarica degli auricolari
11. Pulsante di associazione
12. Indicatore del livello della batteria
100% <100%
Fig.2a
Custodia di ricarica
Mettere nella custodia di
ricarica e chiudi il
coperchio superiore. I LED
rosa/azzurro* su entrambi
gli auricolari si accendono
fino al completamento
della ricarica.
Ricarica con il cavo di ricarica
USB-C in dotazione o con un
caricabatterie wireless (non in
dotazione). L’indicatore LED
lampeggia in rosso durante la
carica della batteria. Diventa blu
fisso quando la carica è completa.
Fig. 2b
Auricolari
1
2
Fig.1a
3
11
Fig.1d
12
10
Fig .1c
9
8
6
5
Fig. 1b
7
4
2. Ricarica
Caricare completamente prima dell’uso
Il dispositivo può essere alimentato tramite USB-C da
qualsiasi fonte di alimentazione conforme CE che implementa
l’interfaccia europea come richiesto dalla EN 301 489-52.
3. Acceso/Spento/Associa
1. Accendere gli auricolari: si accendono automaticamente
quando si apre il coperchio superiore della custodia di
ricarica.
2. Spegnere gli auricolari: inserire entrambi gli auricolari
nella custodia di ricarica e chiudere completamente il
coperchio superiore della custodia di ricarica. Quindi gli
auricolari si spengono automaticamente.
3. Associazione: MOTO BUDS 600 supporta l’associazione
rapida di Google. Aprire il coperchio superiore della
custodia di ricarica. Per smartphone Motorola o telefono
Android con versione Android 6.0 o successiva, è
suciente confermare MOTO BUDS 600 direttamente
sullo schermo del dispositivo. Per altri dispositivi,
selezionare MOTO BUDS 600 dal menù Bluetooth del
dispositivo. Gli auricolari eseguiranno l’associazione
automaticamente. In caso di associazione al secondo
smartphone, tenere premuto il pulsante di associazione
sulla custodia di ricarica per 4 secondi.
MOTO BUDS 600
Fig.3b
Fig. 3a
27 28
Manufactured, distributed or sold by Meizhou Guo Wei
Electronics Co. LTD., official licensee for this product.
MOTOROLA and the Stylized M Logo are trademarks or
registered trademarks of Motorola Trademark Holdings, LLC.
and are used under license. All other trademarks are the
property of their respective owners. © 2022 Motorola Mobility
LLC. All rights reserved.
Version 3.0 (Global)
29
IFT MOMOMO22-24697
La operación de este equipo está sujeta a las
siguientes dos condiciones: (1) es posible que este
equipo o dispositivo no cause interferencia perjudicial
y (2) este equipo o dispositivo debe aceptar cualquier
interferencia, incluyendo la que pueda causar su
operación no deseada.
<This page has been intentionally left blank>
EN
DE
FR
NL
ES
IT
*Note
Whether the LEDs on the earbuds are displayed in pink or
light blue is determined by the product colour you have
purchased.
*
Hinweis
Ob die LEDs an den Ohrhörern rosa oder hellblau
dargestellt werden, hängt von der von Ihnen erworbenen
Produktfarbe ab.
*
Remarque
Le fait que les LED des écouteurs s'affichent en rose ou en
bleu clair est déterminé par la couleur du produit que
vous avez acheté.
*
Opmerking
Of de LED's op de oordopjes roze of lichtblauw worden
weergegeven, wordt bepaald door de productkleur die je
hebt gekocht.
*
Nota
El color del producto que haya comprado determina si los
LED de los auriculares se muestran en rosa o azul claro.