Bedienungsanleitung -
Digitale Zeitschaltuhr
de
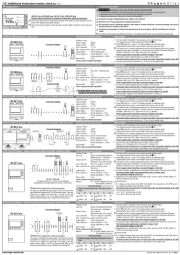
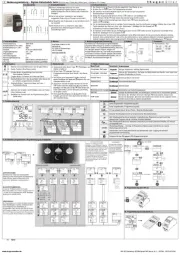
Anschlussbild
7
1 2 3
A
6
4
L
~
+
5
N
~
-
Einbau und Montage dürfen nur von einer Elektro-
fachkraft durchgeführt werden! Anderenfalls besteht
Brandgefahr oder die Gefahr eines elektrischen
Schlages!
Nur an die auf dem Typenschild angegebene
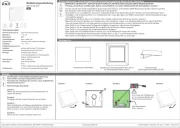
Spannung und Frequenz anschließen!
Bei Eingriffen oder Änderungen an der Schaltuhr
erlischt die Garantie!
Die Schaltuhr ist so zu installieren, dass
außergewöhnlich hohe Störstrahlung die Funktion
nicht beeinträchtigen kann!
1. Sicherheitshinweise
Das Gerät kann in folgenden Anwendungen eingesetzt werden:
Beleuchtung im privaten und gewerblichen Bereich, Straßen- und
Schaufensterbeleuchtung, Steuerung von Lüftungen, Anlagen und
Anwesenheitssimulation etc.
Das Gerät ist ausschließlich zum Einsatz in trockenen Räumen
geeignet.Das Gerät ist nicht geeignet für sicherheitsrelevante
Aufgaben wie z.B. Fluchttüren, Brandschutzeinrichtungen etc.
2. Bestimmungsgemäße Verwendung
Siehe Gerät
AgSnO
2
IP 20 nach DIN EN 60529
-30° ... +55°
1 BSTU
2
4 kV
DIN EN 60730-1/DIN EN 60730-2-7
Geeignet für moderne Leuchtmittel
Anschlussspannung
Kontaktwerkstoff
Schutzart
Umgebungstemperatur
Wirkungsweise
Verschmutzungsgrad
Bemessungsstoßspannung
Standard
CFL, LED
3. Technische Daten
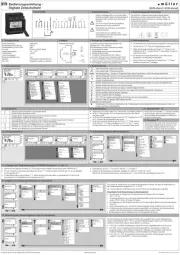
Datum, Uhrzeit und Sommerregel falls nötig mit den
r q -Tasten einstellen und jeweils mit s bestätigen.
Die Schaltuhr ist mit dem aktuellen Datum, der Uhrzeit
und der europäischen Sommerzeitregel voreingestellt.
Stellen Sie die gewünschte Sprache mit den r q -Tasten ein und bestätigen
Sie mit s . (Hinweis: Mit der t -Taste können Sie jederzeit einen Schritt zurück).
Drücken Sie die s / t -Taste. Die Displayanzeige erscheint.
Die Schaltuhr wird im Power-Fail-Modus ausgeliefert. Das Display ist aus.
4. Erstinbetriebnahme
f
OK
f
0
12
24
18.06.2020
9:28
00
f
OK
f
0
12
24
f
OK
f
0
12
24
f
OK
f
0
12
24
f
OK
f
0
12
24
MONT
AG
PROGRAMM
EINSTELLU
NGEN
OPTIONEN
ENDE
PROGRAMM
NEU
PROGRAMM
ABFRAGE
PROGRAMM
AENDERN
PROGRAMM
LOESCHEN
LN
PROGRAMM
Simulation
PROGRAMM
ENDE
Datum-zeit
SOmmerzei
t
Astro
Daten
Sprache
N
Werksein-
Stellunge
n
ENDE
Zaehler
pin-code
zusatz-
schaltzei
ten
zyklus
zufall
ENDE
5. Funktionsübersicht
Aktueller Schaltzustand beruht auf einer Zyklus-Schaltzeit (Taktgeberfunktion).
L
Wird bei „Programm löschen“ angezeigt.
Z
Aktueller Schaltzustand beruht auf einer Impuls-Schaltzeit.
I
Aktueller Schaltzustand beruht auf manueller Umschaltung und bleibt permanent erhalten, bis manuell zurückgesetzt wird.
P
Aktueller Schaltzustand beruht auf manueller Umschaltung des Programms und wird durch das gespeicherte Programm bei der
nächsten Schaltzeit geändert.
H
Aktueller Schaltzustand beruht auf einer programmierten Standardschaltzeit.
U.
Wochentage Montag ... Sonntag; im Programmier-Modus zeigen Unterstriche an, welche Wochentage aktiviert sind.
1234567
Kanal ausgeschaltet / Programmierung AUS
y
Kanal eingeschaltet / Programmierung EIN
x
6. Symbolerklärung
2. Bestätigen der Auswahl oder der Programmierung (eine Ebene tiefer).
1. Aktivieren der Schaltuhr durch Betätigen länger als 1 Sekunde (ohne Netzspannung).
f.
2. Automatik-Modus: Tastendruck länger als 3 Sek. = Permanentschaltung.
1. Automatik-Modus: Ein- oder Ausschalten eines Kanals bis zur nächsten programmierten Schaltzeit.
BA
2. Eingabe-Modus: Verändern der blinkenden Stelle.
1. Eingabe-Modus: Auswahlmöglichkeit zwischen verschiedenen Optionen.
2. Zurück-Funktion (eine Ebene zurück).
f.
1. Wechsel von Automatik-Modus in den Eingabe-Modus.
7. Tastenfunktion
Am Schluss mancher Eingaben können Sie mit den r q -Tasten zwischen
ENDE oder WEITER wählen. Bestätigen Sie WeiTer mit s , werden
die Daten übernommen und Sie wechseln zum Anfang der Eingabe zurück.
Am Schluss einer kompletten Eingabe erscheint ENDE. Bestätigen Sie ENDE
mit s, wechseln Sie zum Automatik-Modus zurück.
Mit der t -Taste gelangen Sie in der Programmierung immer einen Schritt /
eine Ebene zurück.
Gangreserve (ohne Netz): Taste s für 1 Sek. drücken. Das Display schaltet ein.
8. Bedienhinweise
Durch Druck der Kanaltasten können Sie Kanäle
manuell schalten. Diese manuelle Schaltung wird
durch das Handsymbol dargestellt und bleibt bis zur
nächsten Schaltung gültig.
H
9. Kanal ON / OFF
10. Permanent
P
Permanentschaltung durch 3-Sek.-Druck auf die ent-
sprechende Kanaltaste. Kanal ist dauernd ein- bzw.
ausgeschaltet. Schaltung bleibt bis zur erneuten
manuellen Umschaltung (3-Sek.-Druck) bestehen.
f
OK
f
0
12
24
18.06.2020
9:28
00
f
OK
f
0
12
24
f
OK
f
0
12
24
f
OK
f
0
12
24
f
OK
f
0
12
24
MONT
AG
PROGRAMM
PROGRAMM
NEU
Kanal
A
Standard
OKM
f
OK
f
0
12
24
PROGRAMM
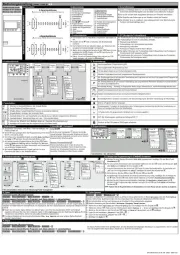
11. b) Standardschaltzeiten (Wochenprogramm)
Standard
f
OK
f
0
12
24
Programm
neu
f
OK
f
0
12
24
Kanal ...
OK
M
Permanent
ENDE
EIN
ZYKLUS
AUS
IMPULS
ENDE
Montag
JA
Dienstag
JA
MittwocH
Ja
Donnerstag
JA
Freitag
JA
SAMSTAG
NEIN
SonnT
AG
NEIN
1
2
3
4
5 6 7
ZEIT
STUNDE
0
00
:
1
2
3
4
5 6 7
ZEIT
Minute
0 00
:
1
2
3
4
5 6 7
Naechste
SCHAL
TZEIT
ENDE
OK
OK
OK
M
Möchten Sie die Programmierung fortsetzen, bestätigen Sie Naechste Schaltzeit mit s.
Möchten Sie die Programmierung beenden, wechseln Sie mit r q zum Punkt Ende und bestätigen Sie dies mit s.
Zeiteinstellung: Stunden r q und dann s, Minuten r q und dann s.
In dieser Ebene müssen Sie anhand der r q -Tasten für jeden Wochentag wählen, ob geschaltet wird JA oder ob nicht geschaltet wird NEIN.
Bestätigen Sie Ihre Auswahl jeweils mit s.
Für eine normale Ein- oder Ausschaltzeit wählen Sie mit den r q -Tasten den Menü-Punkt AUS oder EIN an und bestätigen Sie Ihre Auswahl
mit s.
Möchten Sie eine Standard-Schaltzeit (EIN / AUS) programmieren, bestätigen Sie den Menü-Punkt Standard mit s.
11. c) Beispiel einer Programmierung für STANDARD-Schaltzeien (EIN und AUS)
N
Y
A
c
c
Aktueller Schaltzustand beruht auf Sonnenunter- oder -aufgang mit eventuell programmierter Verschiebung.
S
Schaltuhr ist über PIN gesperrt, PIN-Eingabe erforderlich.
11. a) Programmiermenü
Kanal B
Ende
Permanent
Ende
OKM
OKMM
OK
BA SC44 pro4 HM; de,en, fr, it -24198- 2020.11V02
t
r
q
s
BA
s
1. Aktivierung von Bluetooth bei bereits aktivierter Schaltuhr.
www.hugo-mueller.de
Hugo Müller GmbH & Co KG, Karlstraße 90, DE-78054 VS-Schwenningen
[SC44.x1pro4]
SC 44.21 pro4
0
1
2
24
19.10.2020
MONTAG
9:28
00
B
*
* abhängig von Ausführung
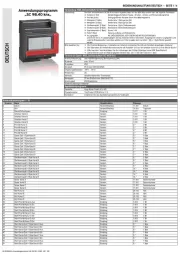
12. Zyklus
Die Zyklus-Funktion bietet Ihnen die Möglichkeit eine periodische Schaltzeit zu programmieren. Die Uhr fungiert dabei als Taktgeber und
taktet zwischen Einschaltimpuls und Impulspause. Die max. Impulsdauer bzw. Impulspause beträgt 9:59:59 h:mm:ss.
PROGRAMM PROGRAMM NEU Kanal A/B STANDARD ...
Sofern Sie noch keinen Zyklus definiert und aktiviert haben, wird Ihnen die Zyklusfunktion NICHT als Schaltzeit angeboten. Erst
wenn Sie einen der 4 möglichen Zyklen im Menü Optionen unter dem Optionspunkt Zyklus (Punkt 13) aktivieren und definieren,
können Sie eine Zyklus-Schaltzeit programmieren.
Die Zyklus-Schaltzeit wird durch andere Schaltzeiten (Ein, Aus, Impuls) oder einer anderen Zyklus-Schaltzeit beendet / überschrieben.
c
c
Die Impuls-Funktion bietet Ihnen die Möglichkeit, eine Ein-Schaltzeit mit festgelegter Schaltdauer zu programmieren. Die Uhr schaltet nach
der programmierten Impuls-Dauer (Impuls bis zu 59:59 mm:ss) wieder aus.
PROGRAMM PROGRAMM NEU Kanal A/B STANDARD ...
Wählen Sie die Impuls-Funktion.
Legen Sie die Einschaltzeit fest (Zeit Stunde / Zeit Minute).
Legen Sie die Wochentage Ihrer Impuls-Schaltzeit fest.
Legen Sie die Einschaltdauer fest (Impuls Minute / Impuls Sekunde).
13. Zyklus Optionen
14. Impuls
Sie haben die Möglichkeit 4 verschiedene Zyklen zu definieren. Diese Zyklen können im Menü Optionen unter dem Punkt Zyklus
aktiviert, definiert bzw. deaktiviert werden (die max. Impulsdauer bzw. Impulspause beträgt jeweils 9:59:59 h:mm:ss):
Optionen ...zYKLUS
zYKLUS 1-4
c
Die Zyklusfunktion wird erst nach Aktivierung als Schaltzeit im Programmiermodus angeboten
Wählen Sie im Menü Optionen den Unterpunkt Zyklus aus und bestätigen Sie Ihre Eingabe mit s.
Wählen Sie mit den r q -Tasten einen der 4 definierbaren Zyklen (Zyklus 1 – 4) aus und bestätigen Sie Ihre Eingabe mit s.
Aktivieren Sie den Zyklus in dem Sie mit den r q-Tasten von Nein auf Ja wechseln und mit s bestätigen.
Legen Sie die Impulsdauer „Einzeit“ fest ( r q s...).
Legen Sie die Impulspause „PAUSE“ fest ( r q s...).
Bestätigen Sie Ende mit s.
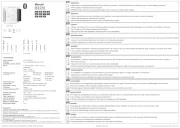
15. Permanentprogramm
Das Permanentprogramm (Ferienprogramm) ermöglicht Ihnen die Programmierung einer permanenten Einschaltung oder Ausschaltung
eines Kanals. Sie haben die Möglichkeit beliebig viele Permanentschaltungen, entsprechend der Speicherkapazität, je Kanal zu
programmieren.
PROGRAMM PROGRAMM NEU Kanal A/B Permanent ...
18. Astrofunktion
17. Prioritäten der Schaltprogramme
Standardschaltzeiten, Sonderprogramme, Zusatzschaltzeiten und Permanentprogramme werden
entsprechend Ihrer Priorität ausgeführt (nach Kanal und Datum). Mit Ausnahme von
Zusatzschaltzeiten setzen höher priorisierte Schaltzeiten und Schaltprogramme niedriger
priorisierte außer Funktion:
Höchste Priorität
Manuelle Permanentschaltung (3 Sek. Tastendruck Kanaltaste)
Permanentprogramm nach Datum
Zusatzschaltzeiten
Einstellungen Astro-Daten Kanal A/B ...
Unter dem Menüpunkt EinsTellungen haben Sie die Möglichkeit die Astro-Funktion für die verschiedenen
Kanäle zu aktivieren. Nach der Aktivierung haben Sie zwei Optionen:
AsTro vorprogrammierT JA: Es wird pro Wochentag eine Astro-EIN und eine Astro-AUS
Schaltzeit mit Offset 00 angelegt.
AsTro vorprogrammierT NEIN: Die Astro-Funktion steht nun bei der Programmierung eines
neuen Schaltprogrammes für den ausgewählten Kanal zur Verfügung.
Die Astro-Funktion bietet Ihnen die Möglichkeit die Schaltzeiten entsprechend dem ortsbezogenen Sonnenuntergang (AsTro-EIN) bzw. Sonnenaufgang (AsTro-AUS)
zu programmieren. Bei Programmierung einer Astro-Schaltzeit wird Ihnen keine Uhrzeitangabe angeboten. Stattdessen haben Sie die Möglichkeit eine
Verschiebung zu programmieren. Zusätzlich kann durch die Schaltzeiten NachT-AUS und NachT-EIN ein
zusätzlicher Zeitraum, zur Aus- bzw. Einschaltung der Zeitschaltuhr definiert werden.
astRO eIN astRO aus
nacht AUS / EIN
Zusatzschaltzeiten ermöglichen Ihnen einzelne Schaltzeiten nach Datum zu programmieren. Zusatzschaltzeiten setzen niedriger priorisierte
Schaltzeiten und Schaltprogramme nicht außer Funktion.
PROGRAMM PROGRAMM NEU Kanal A/B ZUSATZSchaltzeiten ...
optionen Zusatzschaltzeiten ZS JA SAVE
16. Zusatzschaltzeiten
Niedrigste Priorität
Standardprogramm / Wochenprogramm
Sonnenuntergang
SonnenAUFgang
c
Wird die Astro-Funktion aktiviert, werden vorhandene Schaltzeiten für den ausgewählten Kanal gelöscht.
19. Weitere Einstellungen
Menü-Punkt
Hauptmenü
Anwendungen
Programm Abfrage
Programm LOEschen
Datum - Zeit
Sommerzeit
Sprache
Werkseinstellungen
ZAEhler
PIN-Code
Programm
Abfrage Schaltzeiten / Abfrage Speicherplatz
Einstellungen
Löschen der Schaltzeit(en). Sie haben die Möglichkeit alle Kanäle, einen Kanal
oder einzelne Schaltzeiten zu löschen.
Programm
Einstellung Datum und Uhrzeit
Einstellungen
Sommerzeiteinstellungen
Einstellungen
Sprachauswahl
Zurücksetzen auf Auslieferungszustand
Einstellungen
Optionen
Anzeige der Betriebsstunden und Schaltungen je Kanal und für die Schaltuhr
gesamt.
Optionen
Sie können die Schaltuhr mit einem 4-stelligen PIN-Code sperren. Diesen Code
können Sie bearbeiten, aktivieren oder deaktivieren. Sollten Sie Ihren PIN-Code
vergessen haben, wenden Sie sich bitte an unseren Kundendienst.
Programm Simulation
Programm
Simulation der Schaltzeit(en). Sie haben die Möglichkeit den Schaltzustand zu
einem beliebigen Datumsbereich anzeigen zu lassen.
f
OK
f
0
12
24
19.10.2020
9:28
00
MONTAG
bt
Smartphone App
Windows App
f
OK
f
0
12
24
19
.10.2020
9:28
00
MONTAG
WIN
APP
BT active
BT active
20. Programmierung mit Bluetooth
3.
2.
1.
21. Montagehinweis