EN EN EN
5.3 Set the Qpro-N transmitter and the receiver on the
same channel and under the same wireless ID. Long
press <Zm/CH> button to change channel. Short
press <MENU> and choose <ID> to set wireless ID.
(To set mode and other settings, please check the
"Trigger Settings" part of this manual for more
detailed instructions.)
5.4 Half press the transmitter's trigger button < >
which will make the indicator turn green to focus.
Fully press the trigger button < > and the
indicator turns red, then release the button to
release the camera shutter to shoot.
2.3 Turn on the flash, press and hold the < >Wireless
setting button so that the < >Wireless icon
appears on the screen.
Press the <GR/CH> group channel setting button to
set the same channel as the flash trigger. Short press
the < GR/CH> group setting button to set the same
group as the flash trigger.
2.4 Press the camera shutter to activate the flash. The
"status indicator" of the flash unit will flash red.
EN EN EN EN
01 02 03 04 05
20
17 18 19
RS T
SYNC ALL MOD
M1 128+0.3
TTL 1 128+0.3
+0.3
M1 128+0.3
M1 128+0.3
A
B
C
D
E
①
② ③ ④ ⑤
⑥
⑦
⑨
⑩
⑧
STBY ON/OFF
ON/OFF
ON/OFF
12sec
IN
OUT
-3~+3
ON
OFF
0-30M
1-100M
OFF
01~99
1/128(0.3)
1/256(0.1)
BEEP
LIGHT
SYNC
LCD
SHOOT
DIST
ID
STEP
EN
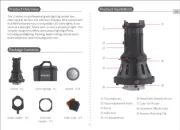
Product overview
Designed for Nikon cameras, the QPro-N trigger controls NEEWER flashes with built-in
Q wireless control system. Featuring multiple channels, a stable connection, and quick
responsiveness, this compact and portable trigger is perfect for various shooting
requirements in all types of photography. The QPro-N can be mounted on Nikon
cameras' hotshoes, or connected to another camera's PC port via a PC cable. This
trigger also features support for TTL flash and high speed sync (HSS).
Package contents
QPro-N flash trigger ×1 Manual ×1
Product diagram
Product diagram
Press to select
Double-press to expand
Back button
(Back to previous)
Group buttons
Dial:
Turn clockwise for +
Counterclockwise for -
Function buttons
(defined by UI)
Short-press
the menu button
Test button
Short-press to switch modes
Long-press for 3 seconds
to lock
Autofocus-assist
beam switch
Power switch
Battery compartment
(back)
2.5mm sync jack
USB Type-C firmware
upgrade port
Autofocus-assist beam
Hot shoe
Hot shoe
quick lock
Battery power
Flash mode
Sound
Modeling lamp master control High-speed sync
Channel
Group Group modeling lamp
Function button icon
Attached to a camera
① ② ③
④⑤
⑥ ⑦
⑨ ⑩
⑧
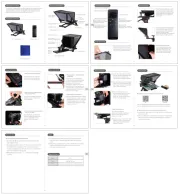
Set-Up Set-Up
Slide open the battery compartment
cover on the back of the flash trigger
and insert 2 AA batteries (sold separately),
ensuring that the positive and negative
polarity markings are respected.
Battery Installation
Remaining battery level indicator shown on LCD display during use.
Battery Level
LCD screen battery indicator Indicates
4 bars Full battery
2 bars 50% battery
1 bar 25% battery
Empty Low battery. Please replace the batteries.
Flashing
Note: This battery charge indication only corresponds to AA alkaline batteries;
please do not refer to this table as NiMH batteries are of low voltage.
The battery power is about to run out. It is
recommended to replace the batteries now to
avoid misfires or the trigger not working over a
larger transmission distance due to insufficient
power.
Attaching to a camera
① Turn the hot shoe quick release
lock clockwise to the unlocked
position as shown in the figure.
② Slide the trigger's base into your
camera hot shoe as shown in the
figure.
③ After mounting on your camera,
turn the hot shoe quick release
lock counterclockwise to the
locked position to use as shown
in the figure.
④ Turn the hot shoe quick lock
clockwise to the unlocked
position as shown in the figure
and slide the hot shoe out in the
direction of the arrow to remove
the flash trigger.
Turning on/off
The different custom functions of this product are categorised below. Please check
the table to change the settings as required.
Custom functions
symbol Functions Settings
symbol Settings and meanings
Sleep
Turn off automatically after
12 seconds
Always on/always off
Set the QPro-N to
trigger flash
Output triggering signal
or control shutter signal
Enable/disable
Enable/disable
0‒30m triggering
Close
Any number from 1 to 99
can be selected
Minimum output is 1/128
(with a step increment of 0.3)
The minimum output is 1/256
(with a step increment of 0.1)
1‒100m triggering
Single-point triggering
mode on
Single-point triggering
mode off
Selectable value of contrast
ratio
Buzzer
Backlight
duration
Sync jack
LCD contrast
ratio
Single-point
triggering
mode
Triggering
distance
Wireless
ID
Flash
power
output
※When the single-point triggering mode ("SHOOT") is turned on, the product can
only send flash triggering signals which will disable other functions.
Compatible models
1. Compatible flash models
Compatible with NEEWER 2.4G flashes with built-in Q wireless control system, including
NW420-N, Z1-N, S101-300W Pro, S101-400W Pro, Q3, NW655-N, Q-N (off camera trigger),
and later flash models with built-in Q wireless control.
※ Supported functions: all functions that both QPro and the flash have.
Compatible with the majority of Nikon branded cameras (for TTL, M, Multi flash mode),
and also works with other models of camera using the PC port (can only be used
in M mode).
The tested compatibility list is as follows:
D4 、D5、 D60、D70S、D90、D100、D200、D300S、D300、D500、D610、D700、D750、D780、
D800、D810、D850、D3100、D3200、D3300、D3400、D3500、D5000、D5100、D5200、D5300、
D5600、D7000、D7100、D7200、D7500、Z5、Z6、Z6ii
※The camera models listed above only includes the ones that we have lab tested
on the trigger and doesn't include all compatible Nikon cameras. The trigger
may be compatible with other models not specified here and will be updated
further based on user feedback received.
Firmware upgrade
The firmware of this product can be upgraded through the USB port. The latest
software announcements and instructions will be published on the official website.
※This product does not come with a USB cable for the firmware upgrade. Please
purchase separately. The USB port of this product is a Type-C port. Please use only
a USB Type-C cable.
※Upgrading the firmware requires Neewer Firmware software support. Please
download and install "Neewer Firmware Update", and then select the corresponding
firmware file before updating.
※As the product is undergoing a firmware upgrade, please refer to the latest
electronic version of the manual.
Causes for misfires and solutions
1. External environment 2.4GHz signal interference (such as wireless base station,
2.4GHz Wi-Fi router, Bluetooth device, and others)—
Please adjust the channel ("CH") settings of the flash trigger (recommended +10),
find a channel without interference, or turn off other 2.4GHz devices while using
this product.
2. Please check whether your flash has recycled to full power or the recycling rate
has kept up with the continuous shooting speed (the flash-ready lamp is already on),
and that the device's overheat protection hasn't activated, or is operating abnormally.
Please lower the power ouput of the flash. If it is in TTL mode, you can try changing
to M mode. (In TTL mode, a pre-flash is required.)
3. Check whether the distance between the flash trigger and the flash is too close
(distance <0.5m)—
Please turn on the "near-range wireless mode" on the flash trigger and set
"C.Fn-DIST" to "0-30m."
4. Check whether the flash trigger and the receiver unit are running low on power—
Please replace the batteries ( 1.5V disposable alkaline batteries are recommended).
Notes
1. If the flash trigger is subject to a strong impact or vibration, it may malfunction.
2. This product is not waterproof. If it is immersed in water or placed in a high humidity
environment, it may malfunction. The development of rust on internal components
resulting from such conditions may cause irreparable damage.
3. Sudden changes in temperature, such as entering or leaving a warm building on a
cold day with the flash trigger exposed in the air, may cause condensation inside the
product. To avoid condensation, please put the flash trigger in a handbag or plastic
bag in advance to prevent sudden temperature changes.
4. Strong static electricity or strong magnetic fields generated by radio broadcast
transmitters and other equipment may interfere with the normal operation of this
product.
5. If you can’t trigger your flash or take pictures correctly, please check whether the
battery is installed correctly and whether the flash trigger's power switch is turned on;
whether the flash trigger is set to the same channel; whether the cable or hot shoe is
correctly and firmly connected in place; whether the function mode settings are correct.
6. If the camera can only shoot but cannot focus, please check whether the camera body
or lens is set to manual focus (MF) and set it to auto focus (AF).
7. If your flash trigger is triggered by other wireless flash systems, simply change the
channel settings of the trigger to counter interference.
Specifications
Model QPro-N
2.4GHz frequency
TTL Autoflash
Built-in Wireless
System
Power Supply
Modulation Mode
Channels
Wireless ID
Group
Manual/
Stroboscopic Flash
High-speed/
Second-curtain sync
Exposure
compensation/lock
Focus Assit
Zoom Settings
Firmware Update
Memory Function
Display Screen
Buzzer
Modeling Lamp
Wireless Shutter
Yes
Yes
Yes
Yes
FSTN dot-matrix screen
The focus value of the flash is adjusted through the
transmitter
Upgrade the firmware through the USB Type-C port
Changes to settings are automatically saved after 2 seconds
and automatically restored after powering it on again
The modeling lamp of the flash is controlled by the trigger
The buzzer of the flash is controlled by the trigger
The receiver can control camera shooting through the
2.5mm sync jack
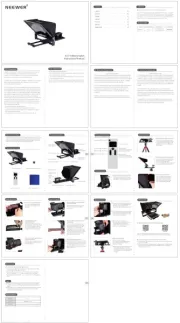
QPro-N TTL Wireless Flash Trigger
Instruction Manual
2021 Shenzhen Neewer Technology Co., Ltd. All Rights Reserved.
This document is the sole property of Shenzhen Neewer Technology
Co., Ltd and shall not be, reproduced,transmitted, transcribed, stored
in a retrieval system or translated in any form, by any means, without
prior written permission from Shenzhen Neewer Technology Co., Ltd.
Shenzhen Neewer Technology Co., Ltd reserves the right to change
content in this instruction manual at any time and without prior
notice.
Date
09/22/2022 1.0 QPro-N TTL Wireless Flash
Trigger Instruction Manual
Version number Description Issued by
C
English
Deutsch
日本語
Español
Français
Italiano
Nederlands
中文
Contents
Version Control
Copyright
01
21
41
61
81
101
121
141
2. Compatible camera models
MSK
A, B, C, D, E (5 groups)
01-99
32
2 AA batteries
EN
Multiple Group Display Single Group Display
Menu Display Multiple Group Zoom Display
SYNC ALL MOD
M1 128+0.3
TTL 1 128+0.3
+0.3
M1 128+0.3
M1 128+0.3
OFF
A
B
C
D
E
SYNC Gr MOD
ATTL
3 0
Zoom 200 MM
MOD
Zoom AUTO
Zoom
A
B
C
D
E
28
Zoom 28
Zoom 28
Zoom 28
CLEARSET
Ver:XX.X
STBY
LIGHT
SYNC
BEEP
ON
OFF
zzz
Flash Trigger Front
LCD Display
Product diagram
Move the power switch to the "ON" position to
turn on the remote flash trigger. The status
indicator will not light up when doing so.
Note: The power switch should be returned to
the off position after use to save power.
EN
06
Wirelessly trigger an on-camera speedlite flash
There follows an example demonstrating the use of the
NEEWER Z1 flash with the trigger:
1.1 Turn off your camera first, then insert the trigger into
your camera's hotshoe, turn on the trigger and
then your camera.
1.2 Long press the <Zm/CH> button of the trigger to set
channel, group, mode and apply other settings
(please check the "Trigger Settings" part of this
manual for detailed instructions).
1.3 Turn on the Z1 flash, press wireless setting button
until the display shows wireless symbol and the slave
unit icon <SLAVE>, then press the channel setting
button <CH> to set the flash on the same channel with
the trigger. Next press the group setting button <Gr>
to set flash on the same group as that of the trigger.
(Note: the connection to other models of speedlite flash
may differ. Please check their manuals for reference.)
1.4 Press your camera shutter to trigger the Z1 flash, and
the trigger's "Status Indicator" will flash red.
How to use: Using the Q3 as an example.
2.1 Turn off the camera, place the flash trigger on the
camera hot shoe mount and turn on both the flash
trigger power switch and the camera.
(Note: For other models of external flash settings, please
follow the corresponding external flash instruction
manual.)
2.2 Press and hold the <GR/CH> button to set the channel,
group, mode and apply settings (see Setting the flash
unit for details).
Wireless sync of external flash
※ Press the Back button to exit group highlighting page.
How to Use the Trigger How to Use the Trigger How to Use the Trigger
EN
07
Wirelessly trigger a Nikon on-camera
Speedlite flash
There follows an illustration to show how to connect an
SB-5000 flash with the trigger:
3.1 Turn off your camera first, then insert the Qpro-N
trigger into your camera's hotshoe. Turn on the
trigger and then your camera.
3.2 Long press the <Zm/CH> button of the Qpro-N trigger
to set channel, press <MENU> and choose <ID> to
set wireless ID of the trigger.
3.3 Connect the Nikon flash to a Q-N receiver, long press
the <TX/RX> button to enter RX mode, then long press
the <Zm/CH> button on the receiver to set it on the
same channel as the Qpro-N trigger. Next, press its
<MENU> button and choose <ID> to match the
trigger's wireless ID.
3.4 Turn on the Nikon flash and set it to on-camera flash
mode (Note: please refer to the manual of your
Nikon flash about this setting).
3.5 Press your camera shutter to trigger the Nikon flash.
The trigger's "Status Indicator" will flash red.
Using a NEEWER S101-300 Pro strobe to demonstrate
how to connect:
4.1 Turn off your camera first, then insert the trigger into
your camera's hotshoe. Turn on the trigger and
then your camera..
4.2 Long press the <Zm/CH> button of the trigger to set
channel, group, mode and apply other settings
(please check the "Trigger Settings" part of this
manual for detailed instructions).
4.3 Connect the strobe to a power source and turn it on.
Press both the <GR/CH> button and the <S1/S2>
button until the screen displays a wireless icon.
Long press the <GR/CH> button to make the strobe
channel match the trigger channel. Then, short
press the <GR/CH> button to make sure the
trigger and strobe groups correspond.
(Note: the connection method for other strobe models
may differ. Please check their manuals for reference).
4.4 Press you camera shutter to trigger the stobe. The
strobe and trigger's "Indicator Status" will flash red.
Wirelessly trigger a studio strobe
EN
08
Wirelessly triggered camera shutter
How to connect:
Two Qpro-N triggers are required for connection:
one connects to your camera as a receiver and the
other as a transmitter.
5.1 Turn off your camera first, then connect one end
of a shutter release cable to the camera's shutter
port and the other end of the cable into the
Qpro-N receiver's "2.5mm Sync Port". Next
turn on the camera followed by the receiver.
5.2 Press the receiver's <MENU> button, then rotate
the dial to select <SYNC> and set it to "OUT".
EN
10
Auto Sleep Mode
1. If no operation is performed within 90 seconds, the
trigger will automatically enter standby mode and
the LCD display will go dark.
2. Press the < > button to activate the trigger system.
When mounted on a Nikon camera hotshoe, you
can also half press camera shutter to activate.
NOTE: to deactivate the auto sleep function, simply
press <MENU> to access custom menu setting
page, select STBY and set it to OFF.
Trigger Settings
Trigger Settings Trigger Settings Trigger Settings
Trigger Settings
Trigger Settings
Auto Focus (AF) Beam
Place the AF Beam switch in the 'ON' position to emit
Auto Focus beam.
When your camera can't focus, the AF beam will
automatically light up. Once the camera re-focuses,
the AF beam will automatically go off.
Channel Setting
1. Long press the <Zm/CH> button to enter channel
setting page.
2. Rotate the dial to select a channel number. Short
press the <Zm/CH> button to confirm the channel
selected.
※The trigger offers 32 channels to choose from. Please
be sure to set the trigger transmitter and receiver on
the same channel before firing flashes.
EN
12
Mode Setting
1. Short press the <MODE> button to switch between
different modes.
2. When the trigger is set as 5 groups (A-E):
2.1 When multiple groups are set, you can switch on
Multi Flash for each group. Enter a group, select Multi,
choose "ON" or "--" to switch on/off.
2,2 When multiple groups are set, choose one group or
multiple groups, then you can press <MODE> button
to switch modes in the order of TTL/M/-- for different
groups separately or together.
2.3 Long press the <MODE> button for 2 seconds until
the word "LOCKED" shows on the bottom part of
the display. The icon indicates that the trigger is
locked and no settings can be changed at this stage.
Long press the <MODE> button for 2 seconds to unlock.
Group Highlighting
Highlight multiple groups or one single group: in multiple
group setting, choose a group and press its group letter
twice to highlight this group and change settings for this
single group.
Set Flash Output
1. When multiple groups are set and in M mode:
1.1 Choose one group by pressing its group letter. Then,
rotate the dial to change flash output for this group
from Min. to 1/1 in increments of 0.1 or 0.3. Press the
< > button to confirm the output value and exit.
1.2 Press the <ALL> button to select all groups and make
their power output values editable, then rotate the
dial to change their output from Min. to 1/1 in
increments of 0.1 or 0.3. Press the <ALL> button
again to confirm the setting.
2. When one single group is highlighted and in M mode,
rotate the dial directly to change the group output
from Min. to 1/1 in increments of 0.1 or 0.3.
NOTE: "Min." refers to the minimum output level that
is available in M or Multi mode, 1/128(0.3) or
1/256(0.1) respectively based on the setting of
C.Fn-STEP. On most on-camera speedlite flashes,
the minimum output available is 1/128 or
1/128(0.3), not 1/256 or 1/256(0.1).
EN
14
3. Short press a group letter to highlight this group to
change its strobe settings: short press the <MOD>
button to adjust modelling lamp brightness of this
group of strobes.
(NOTE: The strobe models that support the turning on/off
of the modelling lamp in one, single group include the
Z1,S101 PRO, X2 series, the Q4 PRO and Q3 flash strobe.
The future NEEWER flash strobes that feature a modelling
lamp will all support this function. ) EN
15
Zoom Setting
Short press the <Zm/CH> button until the display
shows the Zoom value. Select a particular group,
then rotate the dial to change its Zoom value from
AUTO, 24 to 200. After setting the value required,
press the < > button to return to menu page.
Audible Alert Setting
Press the <MENU> button to enter C.Fn BEEP page,
rotate the dial to choose <BEEP>, then press the
<SET> button. You can now rotate the dial to choose
"ON" or "OFF" to activate / deactivate this audible
alert. Press the < > button to return to menu page.
Sync Port Setting
1. Press the <MENU> button to enter C.Fn SYNC page,
rotate the dial to choose <SYNC>, then, press the
<SET> button. You can now rotate the dial to
choose "IN" or "OUT". Short press the <MENU>
button to return to the menu page.
1.1 Choose "IN" to transmit signal to trigger flashes.
1.2 Choose "OUT" to transmit signals to trigger camera
shutter or to trigger speedlite flashes via PC sync.
※ A master unit and a
slave unit need to have
matching channels and
ID to be triggered
together.
Connection with a 2.5mm sync cable
How to use:
6.1 Connect one end of the 2.5mm Sync cable to a
speedlite flash's sync port, and other other end
to a Q-N receiver's sync port.
6.2 Long press the <TX/RX> button on the Q-N receiver
and enter RX mode. Short press the Q-N receiver's
<MENU> and select <SYNC>, then set it to "OUT".
6.3 Set the Qpro-N transmitter and the Q-N receiver
on the same channel and to the same wireless ID.
Long press <Zm/CH> button to change channel,
short press <MENU> and choose <ID> to set
wireless ID. (To set mode and other parameters,
please check the "Trigger Settings" part of this
manual for more detailed instructions.)
6.4 Trigger the flash with the Qpro-N transmitter.
EN
09
Note: The minimum flash
output of the strobe is
1/64. For this reason,
the trigger's power
output should be set
higher than 1/64. The
strobe doesn't support
TTL or multi-flash. Please
set the trigger to M mode
to fire the strobe.
C.Fn: Set Custom Functions
How to Use the Trigger
i-TTL
FCC Statement IC Warning Statements
This device complies with Part 15 of the FCC Rules. Operation is subject to the following
two conditions: (1) this device may not cause harmful interference, and (2) this device
must accept any interference received, including interference that may cause undesired
operation.
CAUTION: The user is cautioned that changes or modifications not expressly approved
by the party responsible for compliance could void the user's authority to operate the
equipment.
NOTE: This equipment has been tested and found to comply with the limits for a Class
B digital device, pursuant to part 15 of the FCC Rules. These limits are designed to provide
reasonable protection against harmful interference in a residential installation. This
equipment generates, uses and can radiate radio frequency energy and, if not installed
and used in accordance with the instructions, may cause harmful interference to radio
communications. However, there is no guarantee that interference will not occur in a
particular installation. If this equipment does cause harmful interference to radio or
television reception, which can be determined by turning the equipment off and on,
the user is encouraged to try to correct the interference by one or more of the following
measures:
—Reorient or relocate the receiving antenna.
—Increase the separation between the equipment and receiver.
—Connect the equipment into an outlet on a circuit different from that to which the
receiver is connected.
—Consult the dealer or an experienced radio/TV technician for help.
FCC RF Radiation Exposure Statement:
1. This Transmitter must not be co-located or operating in conjunction with
any other antenna or transmitter.
2. This equipment complies with RF radiation exposure limits set forth for
an uncontrolled environment.
The device has been evaluated to meet general RF exposure requirement. The device
can be used in portable exposure condition without restriction.
- English Warning Statement
“This device complies with Industry Canada licence-exempt RSS standard(s). Operation
is subject to the following two conditions: (1) this device may not cause interference,
and (2) this device must accept any interference, including interference that may cause
undesired operation of the device.” The digital apparatus complies with Canadian
CAN ICES-3 (B)/NMB-3(B).
This radio transmitter has been approved by Industry Canada to operate with the antenna
types listed with the maximum permissible gain indicated. Antenna types not included in
this list, having a gain greater than the maximum gain indicated for that type, are strictly
prohibited for use with this device.
The device has been evaluated to meet general RF exposure requirement. The device can
be used in portable exposure condition without restriction.
- French Warning Statement
“Le présent appareil est conforme aux CNR d'Industrie Canada applicables aux appareils
radio exempts de licence. L'exploitation est autorisée aux deux conditions suivantes :
(1) l'appareil ne doit pas produire de brouillage, et (2) l'utilisateur de l'appareil doit
accepter tout brouillage radioélectrique subi, mêmesi le brouillage est susceptible d'en
compromettre le fonctionnement.” Cet appareil numérique de la classe B est conforme
à la norme NMB-003 du Canada.
Le présent émetteur radio a été approuvé par Industrie Canada pour fonctionner avec
les types d'antenne énumérés ci-dessous et ayant un gain admissible maximal. Les types
d'antenne non inclus dans cette liste, et dont le gain est supérieur au gain maximal indiqué,
sont strictement interdits pour l'exploitation de l'émetteur.
L'équipement a été évalué comme satisfaisant aux exigences générales en matière
d'exposition aux radiofréquences. L'appareil peut être utilisé sans restriction dans des
conditions d'exposition portatives.
1/64 AF
High-Speed Sync Settings
1. High-speed sync: press the <SYNC> button. The symbol
< > will display on the LCD panel.
Set the shutter sync speed to 1/320s (auto FP) or 1/250s
(auto FP) in the Nikon camera settings. Turn the camera
dial to adjust the shutter speed which can be set to or more
than 1/250s. The shutter speed can be checked through
the camera viewfinder which will confirm whether the FP
high-speed function is in use. If the shutter speed is set at
or is higher than 1/250s, it means the high-speed sync
function is active.
2.Second Curtain Sync: To synchronise the rear curtain
shutter, press and hold < > on your Nikon camera. Turn
the main control dial until the rear curtain flash mode
appears in the control panel, then set the camera
shutter.
REAR