① Short press the " " button to play text on the teleprompter. Short
press the " " button again to pause.
EN
EN
EN
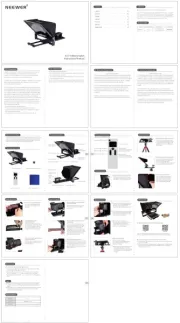
About this product
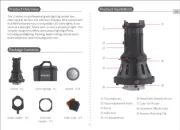
Package Contents
Product Illustration
Product Illustration
Remote Control ×1
Quick Release Plate Screw ×1
Soft Cleaning Cloth ×1
X17 Teleprompter ×1
01
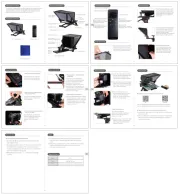
How to Install
How to Install
02
EN
04
How to Install
How to Install
How to Install
How to Use
03
Neewer's X17 teleprompter contains a high-definition display to present
texts and a special coated glass positioned at a 45°angle in front of your
camera to reflect the texts onto the display so that speakers can clearly
read the script and look natural when facing the camera.
Fully unfold the teleprompter's
blackout shade and zip it up on
both sides. Please ensure the
sides are fully sealed all around
to avoid light leaking through.
Remove the teleprompter from its
packaging and remove the protective
layer of film on the glass before use.
①
Beam Splitter
Mirror Glass
Cold Shoe Slot
Display Holding Tray
Tray Securing Knob
Bubble Level
Quick
Release Plate
Cold Shoe Slot
Height
Adjustment
Knob
Quick Release Plate Lock
Camera Base Slot
Base
Locking
Knob
Blackout shade
Camera
Holding Base
Cold Shoe Slot
Beam Splitter
Glass Lock
Unfold the blackout shade
Pull out the Quick Release Plate
Lock and slide the plate out of
the base.
After removing the silicone plug
from the quick release plate, install
the quick release plate screw in
the quick release plate slots, and
then re-insert the silicone plug.
Remove the quick release plate
Installation of the quick
release plate screw
Insert the quick release plate screw
into your camera's bottom screw
hole and tighten it.
Attaching the entire quick release
plate to your camera
Align the quick release plate with the
slot of the base and and slide it in
completely.
Re-inserting the quick release plate
back into the base
Placing tablet or cellphone devices
to play texts
Insert the top screw of your tripod
into the teleprompter's bottom hole,
ensuring a good fit, and tighten the
tripod's knob to secure (drop and
lock system).
Place the teleprompter on a tripod
Remove the protective layer of film
Loosen the Tray Securing Knob by
turning it counterclockwise, then pull
the tray to extend and accomodate
your tablet or cell phone. After
inserting your tablet or phone used
to play texts on the tray, push the tray
a little bit inward to secure your device
and finally rotate the Tray Securing
Knob clockwise to tighten.
Adjusting the camera position
Rotate the Holding Base Lock to loosen.
This will enable you to slide the Camera
Holding Base back and forth on the tray
in order to adjust your camera to the
required position. Tighten the Holding
Base Lock to secure.
How to store after use
After use, please fold the
teleprompter's shade and gently put
down the Beam Splitter Glass as
shown in the image.
②
※
Loosen the Height Adjustment Knob,
move the Camera Holding Base up or
down to set your camera at the
required height and tighten the knob.
③
After your camera is secure in
position, please make sure the lens
is fully covered by the blackout
shade. Pull on the tether to ensure
there isn't any light leakage.
When adjusting your camera's position,
please ensure that the glass, tray and
other teleprompter parts aren't visible
in your camera's viewfinder.
Adjust the angle of the beamsplitter
Rotate the Beam Splitter Glass Lock
counterclockwise, then adjust the
glass to the required angle
(recommended at 45°). Next rotate the
Lock clockwise to hold in position.
EN
How to Use
05
Status Indicator
【Long Press】Turn on/off
Remote Control: Model RT-110
【Short Press】Play/Pause
【Short Press】 Zoom out
【Short Press】Zoom in
【Short Press】
Slow down (when playing);
Page up (when paused)
【Short Press】
Speed up (when playing);
Page down (when paused)
Note
(1) The teleprompter has fragile components and should be handled
carefully to avoid accidentally dropping or subjecting it to physical
impact.
(2) Please do not try to dismantle the product. Should you notice a defect,
please contact Neewer Customer Service or maintenance staff
authorized by Neewer to repair.
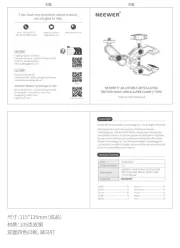
Specifications
Model
Size
Material
X17
380*380*115 mm
Material Aluminum alloy+specialized coating glass
Download and install the APP for the teleprompter
Scan the QR code above (respectively for iOS and Android) with your
phone or tablet to download and install the APP for the teleprompter.
Connect your phone or tablet to the remote via the APP
① Long press the " " button to turn on the remote. A blue indicator will
flash on the screen.
② Activate the Bluetooth on your phone or tablet, log in the teleprompter
APP, search for the Bluetooth signal "NEEWER RT110", and select to
connect with the remote.
Control the teleprompter using the remote
② When playing, short press the "A+"/"A-" button to zoom in or zoom
out; short press the "︿"/" " button to slow down or speed up.
③ When paused, short press the "︿"/" " button to move the page up or
down .
iOS
Android
X17 Teleprompter
Instruction Manual
X17 Teleprompter
Instruction Manual
2022/06/15 V1.0
01
06
11
16
21
26
31
※Before folding away the beam splitter
glass, please be sure to return the
camera tray back to its original height
first to prevent it from coliding with
the glass.
FCC Statement
IC Warning Statement IC Warning Statement
FCC RF Radiation Exposure Statement:
1. This Transmitter must not be co-located or operating in conjunction with
any other antenna or transmitter.
2. This equipment complies with RF radiation exposure limits set forth for
an uncontrolled environment.
The device has been evaluated to meet general RF exposure requirement.
The device can be used in portable exposure condition without restriction.
- English Warning Statement
“This device complies with Industry Canada licence-exempt RSS standard(s).
Operation is subject to the following two conditions: (1) this device may not
cause interference, and (2) this device must accept any interference, including
interference that may cause undesired operation of the device.” The digital
apparatus complies with Canadian CAN ICES-3 (B)/NMB-3(B).
This radio transmitter has been approved by Industry Canada to operate with
the antenna types listed with the maximum permissible gain indicated.
Antenna types not included in this list, having a gain greater than the
maximum gain indicated for that type, are strictly prohibited for use with
this device.
The device has been evaluated to meet general RF exposure requirement.
The device can be used in portable exposure condition without restriction.
- French Warning Statement
“Le présent appareil est conforme aux CNR d'Industrie Canada applicables
aux appareils radio exempts de licence. L'exploitation est autorisée aux deux
conditions suivantes : (1) l'appareil ne doit pas produire de brouillage, et
(2) l'utilisateur de l'appareil doit accepter tout brouillage radioélectrique subi,
mêmesi le brouillage est susceptible d'en compromettre le fonctionnement.”
Cet appareil numérique de la classe B est conforme à la norme NMB-003 du
Canada.
Le présent émetteur radio a été approuvé par Industrie Canada pour
fonctionner avec les types d'antenne énumérés ci-dessous et ayant un gain
admissible maximal. Les types d'antenne non inclus dans cette liste, et dont
le gain est supérieur au gain maximal indiqué, sont strictement interdits pour
l'exploitation de l'émetteur.
L'équipement a été évalué comme satisfaisant aux exigences générales en
matière d'exposition aux radiofréquences. L'appareil peut être utilisé sans
restriction dans des conditions d'exposition portatives.
FCC Statement
This device complies with Part 15 of the FCC Rules. Operation is subject to
the following two conditions: (1) this device may not cause harmful
interference, and (2) this device must accept any interference received,
including interference that may cause undesired operation.
CAUTION: The user is cautioned that changes or modifications not expressly
approved by the party responsible for compliance could void the user's
authority to operate the equipment.
NOTE: This equipment has been tested and found to comply with the limits
for a Class B digital device, pursuant to part 15 of the FCC Rules. These limits
are designed to provide reasonable protection against harmful interference
in a residential installation. This equipment generates, uses and can radiate
radio frequency energy and, if not installed and used in accordance with the
instructions, may cause harmful interference to radio communications.
However, there is no guarantee that interference will not occur in a particular
installation. If this equipment does cause harmful interference to radio or
television reception, which can be determined by turning the equipment off
and on, the user is encouraged to try to correct the interference by one or
more of the following measures:
—Reorient or relocate the receiving antenna.
—Increase the separation between the equipment and receiver.
—Connect the equipment into an outlet on a circuit different from that to
which the receiver is connected.
—Consult the dealer or an experienced radio/TV technician for help.