KEEP THIS USER GUIDE FOR FUTURE REFERENCE
Always retain your proof of purchase in case of warranty service.
AUSTRALIA: www.oricom.com.au
* C an y r by m itor th a s htly p or anti-static .le ou ba on wi lig dam cloth
* Never e ing agents or solven .us clean ts
10 PO GU ODU. DIS SAL IDE FOR BATTERY D PRAN CT
* Do t att pt to re ir or a st any of e cal or ical f i s of e no em pa dju th ele rict mechan unct on th
* Rem ber to di e of e pr t in an en r nta y re ible way.em spos th oduc vi onme ll spons
* For pr er co ion d , take them to e co ion ints des nated by local op llect an disposal th llect po ig
a t s. Do not dispose of in your household waste bins. uthori ie
Imp op us aus osr er or incorrect e of batt s may cerie e corr ion or battery akage, which le
c ld c e r l i ry or mage to pr ty. Use ly the pes of e ou aus pe sona nju da oper on ty th
wh nd th manuaich are i icated in is l.
CAU N: sk of re and r . Do t en, , C or TIO Ri Fi Bu ns No Op Crush expose to excessive heat
I inerate. Fo ow M f r s str i . nc ll anu actu er' In uct ons
Parent Unit: I : 1 40VAC 6 znput 00-2 50/ 0H
Cam nput 00-240 50/ 0Hera Unit: I : 1 VAC 6 z
Up to t m) t r ( ne of s ht)1000f (300 ou doo li ig
Up to t m) i r165f (50 ndoo
Li-ion 3.7V h .8Wh)4000mA (14
R ative 15 85el Hu dity:mi %- %
<19dBm. Parent and Camera Units.
Op mp tu 32 ~+104eration Te era re: + F F (0℃
Int fere e or P r er nc oo
* Move the m itor e to e ca ra. on clos th me
* e ca ra or m itor may be a d too cl e to ny metal e . Th me on pl ce os ma obj cts
* er r ic de ces may be int f ng th e l. Oth elect on vi er eri wi th signa
* e battery power may be too low. Th
* e c era d itor may be Th am an mon too close to each other.
* e vol e on e m itor may be set too h h.Th um th on ig
* Repower the baby it , then plug un (unplug power adaptor back
* Press e RESET key at e k of rent it. th th bac pa un
* e power may t be pr y c ected. Th adaptors no operl onn
* nf m at e c era d itor are . Co ir th th am an mon ON
* era may be far away from e m itor. Cam th on
* era d itor may t be pr y ired; fo ow PA NG instr i . Cam an mon no operl pa ll IRI uct ons
Mi le it ty lev .dd sens ivi elNote:
H h se it ty lev , ig ns ivi el a low sound is needed to activate the ECO function.Note:
Lan ua oug ge Settings are catego zed by cri ntry.
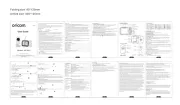
Than pu chas onk you for r ing the Baby MSC640 itor. hear y r by You can now see and ou ba
s ping or pla ng in r r m anytime.lee yi thei oo
Ple rigi le ei vias oue retain y r o na sal dated s rec pt for y r recor . For warranty serou ds ce of y r ou
pr , you w l n d to pro de a copy of y r dated s rec pt to conf m warranty oduct il ee vi ou sale ei ir
sta . R stration is t re ired for warranty coverage. tus egi no qu
Parent it x 1 era it x 1 Power x 2un Cam un adaptor
User m l x 1 Wa nting t x 1 anua ll-mou ki
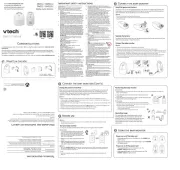
1. IMPORTANT SAFETY INFORMATION
5. Press key to s ct icon to d ete the c era.ele el am
6. Press OK key to conf m.ir
6. MPER TUR2 TE A E T SETT GUNI IN
5. Press key to conf .irm
6. Press key twice to exit to return to camera view or wait 30 secs".
e detected t pera re r ge is 0 .Th em tu an 0~4 ℃
6.2. TEMP LAR1 ERATURE A M TT GSE IN
6. .2 SET TE ATURE LO ERT LIMITSMPER HI/ AL
e h h t pera re arm def lt setting is 36 d e low t pera re arm Th ig em tu al au ℃, an th em tu al
def lt setting is 8 When e t pera re goes ove or b ow e settings, theau ℃. th em tu ab el th
t pera re icon w l di lay on e scr n. It l t er by audible b ps. Press any em tu il sp th ee wil aler us ee
key on e rent it to stop b ping and fl ing.th pa un ee ash
You can e the baby to s p by pla ng a gentle lu aby from e C era it.sooth lee yi ll th am un
pl ll ieay k, l p ll 8 lubac oo (a ab s) play k or stop .bac
e lu aby def lt setting is OFF.Th ll au
ote 1 e n um it is 0.5 r. The max um setting is 5 rs (7 lev .Th mi im un hou im hou els)
ote 4 When the timer alarm sounds, press any key on the parent unit to turn the alarm off.N:
If you 't rn off e a , the arm l ng for 1 te. After three tes don tu th al rm al wil ri minu minuNote 5:
th nu Th the arm l ng again for 1 al wil ri mi te. e arm l ng three mes in total, after this al wil ri ti e
Th mod oun act ou ba un th sounis e ows you to control the sall d ivation of y r by it. If ere is no d
ar d e by it 30 sec , io tr i ion is muted d rent ioun th ba un for onds aud ansm ss an pa un t screen is
turned off th un ct ound oud ha th ns. When e baby it dete s any s s l er t n e se it ty lev , ivi el the
audio and the el le llpa un t screen will turn on. chanrent i To ge the ECO lev , p ase fo ow e th
Press d ld e power key for 3 c s to rn on / off e parent it.an ho th se ond tu th un
Press e to t t e c era up by e step. Press d ld to t t conti ly. onc il th am on an ho il nuous
Press e to t t e c era down by e step. Press d ld to t t conti ly.onc il th am on an ho il nuous
Press e to n e c era left by e step. Press d ld to n conti ly. onc pa th am on an ho pa nuous
Press e to n e c era ht by e step. Press d ld to n conti ly.onc pa th am rig on an ho pa nuous
5. CAM EW CA6 ERA VI /S N
Split Sc ee Functio- r n n
Th on qu pp LIT- CREE unct wh am ase baby m itor is e i ed with SP S N f ion en 2 c er are
s er to see b h ca ras side by de on e s e scr n.us ot me si th am ee
When view is in ee parent unit ll scrfu n e, press d ld key to enter mod an ho talking m e. od
A cr e icon w l be di layed in e corner of e LCD r n. R e the key to mi ophon il sp th th sc ee eleas
When you are in talking m e, the rent it eaker is ted. Normal parent unit od pa un sp mu
6. TH CAMER1 PAIR G IN E A AND PARENT U TSNI
Th un ou pa une baby it is pre-r ered to yegist r rent it. You do t n d to r er it again ss no ee egist unle
th un os th une baby it l es its nk th li wi e parent it. To re-r er y r by it or r er aegist ou ba un , egist
new by it, fo ow e pr e re ow:ba un ll th oc du bel
Note : Cam " icon m an shou an pa thera with "e s it is r ered. You egist ld s ct ele d ir th wi e
ca ra wi tme thou " " icon.
5. When icon i layed on e LCD r n, press e PAIR tton on e b k is d sp th sc ee th bu th ac
6. O e paired, S ess l pa ng icon ows on e LCD r n.nc ucc fu iri sh th sc ee
7. If fa s, repeat e above steps.il th
4. VE EW2 BABY T OUNI RVI :
• It is very important that you read the User Guide carefully as it contains detailed
information you will need to get the most from your Oricom baby monitor. If you
have any issues setting up or using your Oricom baby monitor, please call our
• Your Oricom baby monitor is designed to be an aid and should not be used as a
substitute for responsible and proper adult supervision.
• The baby monitor has been designed to provide some added reassurance in the form
of sound and video transmission for those times when you are not in the same room
as your baby, provided you always stay within hearing range of the baby monitor
during use. Your baby monitor is not a medical device, nor a device to prevent cases
of Sudden Infant Death Syndrome (SIDS) or "cot death", and you should not rely on
it for your baby's wellbeing. It is important that you regularly check on your baby
• Make sure the baby unit, parent unit and mains adaptor cables are kept out of reach
of your baby and other young children at all times.
• Never place the baby unit or parent unit inside your baby’s cot, bed or playpen.
• Never cover the parent or baby units with clothes, towels, blankets or any other
item. Never use or place your parent or baby unit in or near moisture or water (e.g.
near bath or pool). Immersing in water could cause electric shock and even death.
• The installation location plays an important role in ensuring proper operation.
Therefore, maintain a distance of at least one metre from other electronic
equipment, such as microwave ovens or Wi-Fi devices, otherwise they could cause
interference. During continual use, the baby unit power adaptor may become warm
to the touch. This is normal and should not be a concern.
Express Warranty (Australia)
This Express Warranty is provided by Oricom International Pty Ltd ABN 46 086 116 369,
Unit 1, 4 Sovereign Place, South Windsor NSW 2756, herein after referred to as “Oricom”.
Oricom warrants that the product is free from defects in materials or workmanship
during the Express Warranty Period. This Express Warranty does not extend to any
product from which the serial number has been removed or was purchased outside of
The benefits of this Express Warranty are in addition to other rights and remedies you
may have under the Australian Consumer Law. Our goods come with guarantees that
cannot be excluded under the Australian Consumer Law. You are entitled to a
replacement or refund for a major failure and compensation for any other reasonably
foreseeable loss or damage. You are also entitled to have the goods repaired or
replaced if the goods fail to be of acceptable quality and the failure does not amount to
a major failure. In the event of a minor failure, Oricom reserves the right to choose to
repair or replace the product.
The Express Warranty Period will be a period of 2 years beginning on the date of
purchase of the product evidenced by your dated sales receipt. You are required to
provide proof of purchase as a condition of receiving Express Warranty services.
You are entitled to a replacement product or repair of the product at our discretion
according to the terms and conditions of this document if your product is found to be
faulty within the Express Warranty Period. This Express Warranty extends to the
original purchaser only and is not transferable.
Products distributed by Oricom are manufactured using new materials or new and used
materials equivalent to new in performance and reliability. Spare parts may be new or
equivalent to new. Spare parts are warranted to be free from defects in material or
workmanship for thirty (30) days or for the remainder of the Express Warranty Period
of the Oricom branded product in which they are installed, whichever is longer. During
the Express Warranty Period, Oricom will where possible repair and if not replace the
faulty product or part thereof. All component parts removed under this Express
Warranty become the property of Oricom. In the unlikely event that your Oricom
product has a recurring failure, Oricom may always, subject to the Competition and
Consumer Act 2010, at its discretion, elect to provide you with a replacement product
of its choosing that is at least equivalent to your product in performance.
No change to the conditions of this Express Warranty is valid unless it is made in
writing and signed by an authorised representative of Oricom.
Oricom will not be liable under this Express Warranty, and to the extent permitted by
law will not be liable for any defect, loss, damage or injury arising out of or in
1. Failure by you to adhere to the warnings and follow the instructions set out in this
user guide for the proper installation and use of the product;
2. Willful misconduct or deliberate misuse by you of the product;
3. Any external cause beyond our control, including but not limited to power failure,
lightning or over voltage; or
4. Modification to the product or services carried out on the product by anyone other
than Oricom or Oricom’s authorised service provider.
How to make a claim under your Express Warranty in Australia
Oricom has a simple warranty process for you to follow:
• Please call or email our Customer Support Team, 02 4574 8888 or
• A Customer Support Team member will verify after troubleshooting with you if your
product qualifies under warranty. If so, they will give you a Product Return
• We will then email a Return Authorisation form and a Repair Notice (if necessary),
together with instructions on how to return the product for warranty service.
Please note that if a Customer Support Team member advises that your product does
not qualify for return, this warranty does not apply to your product. Products that are
authorised to be returned to Oricom in Australia must include all of the following:
• A completed Return Authorisation form
• A copy of your Proof of Purchase (please keep your original copy)
• The faulty product, including all accessories.
Send the approved returns to:
Oricom International Pty Ltd
South Windsor NSW 2756 Australia
Please note that this Express Warranty excludes expenses incurred by you in returning
any faulty product to us. You must arrange and pay any expenses incurred (including
postage, delivery, freight, transportation or insurance of the product) to return the
faulty product to us, however, we will arrange delivery of the repaired or replaced
Please be aware that the repair of your products may result in the loss of any
user-generated data (such as stored telephone numbers, text messages and contact
information). Please ensure that you have made a copy of any data saved on your
product before sending for repair. Please also be aware that products presented for
repair may be replaced by refurbished products or parts of the same type rather than
Keep all packaging materials and protecve foils out of reach of children.
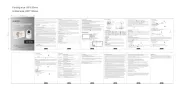
.1 TUR :N N E Y O TH BAB UNIT (CAMERA)
1. I t e DC plug of e power into e DC k in e rear of e Baby Unit.nser th th adaptor th jac th th
2. I t e er end of e power into a it le cal let.nser th oth th adaptor su ab ele rict out
3. O e the is c ected, the power D w l ht .nc adaptor onn LE il lig up
4. k p e by it i .ee th ba un plugged n to mains power
.2 TUR UNIT: N N E T O TH PAR EN3
1. I t e DC plug of e power into e DC k in e de of e rent unit.nser th th adaptor th jac th si th pa
2. I t e er end of e power into a it le cal let.nser th oth th adaptor su ab ele rict out
3. Press d ld e power key for 3 c s on e of e rent it.an ho th se ond th rear th pa un
4. e rent it is , the power D Onc pa un on LE
w l ht up d e age l di lay on e LCD.il lig an th im wil sp th
Note: For best range, make sure the antenna is extended whilst in use.
3.3 ON (AUT ATIC)INFRARED T NIGH VISI OM
Th funct th ima dae infrared n ht sion ig vi ion a ows ll e ca ra to pick up me ges in rk or low
lig im ilht c iti . In is e, ly bl k and ite ond ons th mod on ac wh ages w l be di layed on esp th
on for mu ma Babyitor, opti m i ge quality place baby unit 2 meters away from . When the
c era is in n ht sion e, the icon w l be layed on e top of r n.am ig vi mod il disp th sc ee
• Batteries represent a hazard to health and the environment!
• They contain toxic, ecologically hazardous heavy metals. Do not dispose of batteries
in a fire as they may explode. Dispose of batteries according to local regulations,
never in your household rubbish.
• Do not dismantle, cut, open, crush, bend, puncture, or shred cells or batteries. If a
battery leaks, do not let the battery liquid touch skin or eyes. If this happens,
immediately flush the affected areas with water, and seek medical assistance.
• Do not modify, remanufacture, attempt to insert foreign objects into the battery, or
immerse or expose it to water or other liquids. Batteries may explode if damaged.
• Use only the battery supplied with the product. Improper use, or use of unapproved
batteries, may present a risk of fire, explosion, or other hazard, and may void
• If you believe the battery is damaged, disconnect parent unit from the charger and
stop using the baby monitor. Contact Oricom Support for assistance. Never use a
• If monitor will not be used for a long time, charge battery to 40%~50% capacity, store
in a dry environment at about 25°C.
Charge and discharge battery every 3 months.
Always dispose of your products at the end of their life in accordance with your local
waste disposal requirements.
Packaging materials including cardboard and paper packaging, should be recycled in
accordance with your local council waste regulations.
IMPORTANT SAFETY INFORMATION 1
DISPOSAL GUIDE FOR BATTERY AND PRODUCT 9
EXPRESS WARRANTY (AUSTRALIA) 10
Press key to view/scan c era: am
Press 1 time: ew ca ra 1, icon – 1 di lays on e top of e scr n.Vi me sp th th ee
Press 2 t s: ew ca ra 2, icon – 2 di lays on e top of e scr n.ime Vi me sp th th ee
Press 3 times: p scan ca ra 1 d c era 2, icon – 1 & – 2 di lays on e top of Loo me an am sp th
th ac sp th oun ondse scr n. Eee h w l dicamera il lay on e scr n for aree d 10 sec .
Press 4 t s: SP S N m e , b h icon – 1 d – 2 di lays on e top of e ime LIT- CREE od ot an sp th th
scr n. You can see h ca ras side by de ee bot me si at the same time.
Note: In sp r n , the cur r def lts to ra 1. The deo d at e lit-sc ee mode so au Came vi soun th th
di lay r n plays co s from era 1. To li en to e s d from ra 2, movsp sc ee me Cam st th oun Came
Note: You cannot have sound from both ca ras si lt e ).me mu an ously
(Th au tne def lt b hrig ess level setting is level )3.
U er ll scr n e, press d ld e key ar d 2 sec s to erate z m i .nd fu ee mod an ho th oun ond op oo n/out
6. Press key twice to exit to return to camera view or wait 30 secs".
operation is listening only from camera unit.
4.1 PARENT UNIT OVERVIEW: