OSD Audio Black R103 Manual

OSD Audio Højttaler Black R103

Læs gratis den danske manual til OSD Audio Black R103 (3 sider) i kategorien Højttaler. Denne vejledning er vurderet som hjælpsom af 39 personer og har en gennemsnitlig bedømmelse på 4.3 stjerner ud af 20 anmeldelser. Har du et spørgsmål om OSD Audio Black R103, eller vil du spørge andre brugere om produktet?

Side 1/3
BLACK SERIES INSTALL GUIDE
Preparation:
Installation:
Tools For Installation Speaker Wire Guide
Considerations
Cut Out
Placement
- Pencil
- Drill
- Tape Measure
- Wire Cutter
- Phillips Screwdriver
- Utility Knife
- Safety Eye Wear
- Gloves
- Sandpaper
- Where is the best place to install the speakers?
- Where do the speakers sound the best?
- Separate the speakers 6 - 10 feet apart.
- ( ) Place speakers with the 15° For Ceiling LCR models only
angled woofer pointed towards the main listening area.
- If you intend to paint the grilles, do so before installation.
NOTE: This is the most important part of the entire installation.
If you are not certain whether any obstructions exist behind the
desired mounting area, you should start by cutting a small hole in
the center of your penciled mounting hole with a drywall saw.
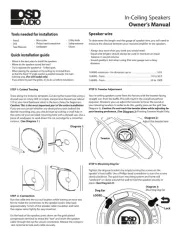
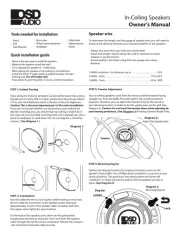
Trace along the included template. Cut along the traced line using a
drywall saw or rotary drill. Use a piece of sandpaper to sand down the
cut out edge for a smoother contour. (See Diagram 2.)
There are many options for proper speaker placement depending
upon speaker type and application. It’s important to carefully plan the
placement of your speakers, as installation requires that you cut a
hole in your wall or ceiling.
(See Diagram 1.) Typical speaker placement for a 5.1 and 7.1
speaker system.
18AWG minimum - for distances up to …………………. 10 ft
16AWG - from …………………………………..…... 10 to 50 ft
14AWG - from …………………………………...… 50 to 100 ft
TV
Diagram 2
Diagram 1
Black manual r9 Eds specs.indd 1 8/24/18 9:35 AM
BLACK SERIES INSTALL GUIDE
Mounting
Connection
Adjustment
Pivoting Tweeter
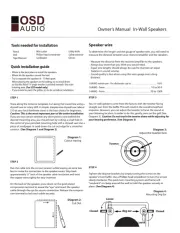
Tighten the mounting brackets by simply turning the screws on
the front of the speaker bafe slowly clockwise. The quick-turn
mounting system and frame will “sandwich” or clamp around the
dry-wall to hold the speaker securely in place once fully tightened
to the locked position.
(See Diagram 3.)
When connecting any speakers to the amplier or receiver, always
make sure the power is off. Locate the connection terminals on the
back of your receiver or amplier. Always make sure to connect au-
dio out from the back of your receiver or amplier to the speakers.
(See Diagram 4.)
NOTE: Not all Amplier/Receivers can safely play more than one
pair of speakers at once. Please refer to your owner’s manual for
impedance and wattage compatibility.
On select models ( *Performance, Reference ) of OSD Black
Series, a front mounted 3 position ±3dB treble contour switch can
be used to tailor high frequencies according to speaker placement
or the listeners preference.
(See Diagram 5.)
* Excludes Shallow Mount Series
Your Black series speaker comes from the factory with the
tweeter centered in the neutral position. This will provide the
smoothest response. However, select models come with a
pivoting tweeter so you can focus the sound directly towards the
listening area if needed. In order to do this, carefully press on the
edge of the tweeter bafe in the direction you wish to focus the
sound. (See Diagram 6.)
CAUTION: When adjusting the pivoting tweeter be sure not to
touch the dome as you may cause damage to the speaker.
Left Out
Left Speaker
Rec/Amp
Right Out
Right Speaker
- -
+ +
--
++
Press Here to
Pivot Tweeter
Open PositionLocked Position
Diagram 3
Diagram 4
Diagram 5
Diagram 6
Black manual r9 Eds specs.indd 2-3


Produkt Specifikationer

Mærke: OSD Audio
Kategori: Højttaler
Model: Black R103

Har du brug for hjælp?

Hvis du har brug for hjælp til OSD Audio Black R103 stil et spørgsmål nedenfor, og andre brugere vil svare dig