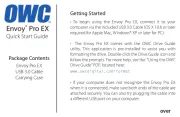
OWC Aura Pro X2 Manual


Læs gratis den danske manual til OWC Aura Pro X2 (10 sider) i kategorien Solid State-drev (ssd). Denne vejledning er vurderet som hjælpsom af 30 personer og har en gennemsnitlig bedømmelse på 5.0 stjerner ud af 15.5 anmeldelser. Har du et spørgsmål om OWC Aura Pro X2, eller vil du spørge andre brugere om produktet?

Side 1/10
1
Start with Internet Recovery
This guide provides the information required to format your OWC SSD, as well as options for installing the Mac operating system and
migrating your data. The process starts by booting into Internet Recovery, using one of the keyboard shortcuts listed below. Because the
shortcut used and the specific Mac determine the OS used by Recovery it is worthwhile to determine the latest compatible OS for your
Mac before choosing a method. We have included Apples official compatibility lists for the last several OS versions (see below).
Recovery Option 1: Cmd-Opt-R (Recommended)
Power on the Mac then immediately press and hold Cmd-
Opt-R until you see a screen similar to the one at right (in
some cases it may be grey). If you see a Wi-Fi menu, choose
your preferred network to continue; you may need to provide
network credentials.
This Recovery option ensures that later in the process, if you use
the ‘Reinstall macOS’ function (i.e. a clean OS install) the latest
compatible version will be used.
Recovery Option 2: Cmd-R
Power on the Mac then immediately press and hold Cmd-R
until you see a screen similar to the one shown above (in
some cases it may be grey). If you see a Wi-Fi menu, choose
your preferred network to continue; you may need to provide
network credentials.
This option ensures that if you use the Reinstall macOS function (i.e. a clean install) later, the most recently installed OS version will be used.
Exception: If you recently had your Mac logic board replaced during a repair, Recovery might instead offer the latest compatible OS.
Additional Notes:
If you want to verify the OS version that you booted into before you go further, you can use the Terminal. From the main menu at
the top of the Recovery screen, choose Utilities > Terminal, then type the command sw_vers and press Return. The OS version that
you have booted into will be displayed. If its the version you expected based on the information provided earlier, you can continue.
If not, you can try again by choosing Apple Menu > Restart, waiting till the screen turns black and then pressing and holding a
different Recovery shortcut, to see if you get the result you want. If you do not it is possible the version of the OS you are looking for
is no longer available for your specific Mac.
Formatting, OS Installation, and Migration Guide
OWC Aura Pro X2 SSD
Important Notes
This process requires a working internet connection on the host computer.
This guide assumes that the was already followed and completed. SSD installation process
IMPORTANT: macOS 10.13 High Sierra (or later OS) must be installed on the host computer BEFORE installing this SSD
for the rst time. These OS versions include an EFI firmware update for your Mac. Without the update, the computer will not
recognize the SSD. This process is separate from and should precede the other processes described here. Note that when
installing the OS onto the drive itself (later in this document), macOS 10.13 or later is also required.
If the SSD is installed on a laptop, make sure the power adapter is connected before you begin the steps below.
macOS 10.15 Catalina-compatible macOS 10.14 Mojave-compatible macOS 10.13 High Sierra-compatible
2
Formatting the SSD
Once you have booted into Recovery, use the built-in Disk Utility to format the SSD. Please note: the drive labels or information shown in
one or more sections of this document may differ from what you see, but the overall processes won’t change.
If you need to start from the beginning, please continue with the Disk Utility process below.
If you have already formatted the drive and are ready to review OS and data migration options, skip to page 5.
Formatting Steps: 10.13-10.15
Step 1 – from the macOS Utilities window, select the Disk Utility option and click Continue.
Step 2 – to ensure that all internal devices and volumes are shown from the start, open the View menu widget near the top-left corner of
the Disk Utility window and choose ‘Show All Devices.
Step 3 – in the sidebar area at left, select the icon or label for the physical disk (item A below) Note: some SSDs may also include a factory-
formatted volume, listed beneath the physical disk item; this factory volume — or any others on the drive — will be permanently erased.
Step 4 – click the ‘Erase button (item B below) to continue.


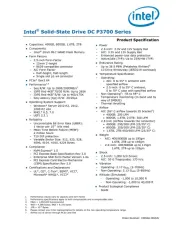
Produkt Specifikationer

Mærke: OWC
Kategori: Solid State-drev (ssd)
Model: Aura Pro X2

Har du brug for hjælp?

Hvis du har brug for hjælp til OWC Aura Pro X2 stil et spørgsmål nedenfor, og andre brugere vil svare dig


Solid State-drev (ssd) OWC Manualer

Solid State-drev (ssd) Manualer

Nyeste Solid State-drev (ssd) Manualer

Nedis

Nedis HDDE25410BK Manual

14 Januar 2025
Intel

Intel DCP3700 Manual

12 Januar 2025
ADATA

ADATA SE800 Manual

29 December 2024
ADATA

ADATA HD720 Manual

29 December 2024
ADATA

ADATA SD600Q Manual

29 December 2024
ELO

ELO E536242 Manual

28 December 2024
Sabrent

Sabrent SB-1342-1TB Manual

21 December 2024
ADATA

ADATA HV320 Manual

16 December 2024
ADATA

ADATA HD770G Manual

16 December 2024
ADATA

ADATA SE770G Manual

16 December 2024