Pearl Sports P-932L Manual


Læs gratis den danske manual til Pearl Sports P-932L (5 sider) i kategorien Musikinstrument. Denne vejledning er vurderet som hjælpsom af 3 personer og har en gennemsnitlig bedømmelse på 4.9 stjerner ud af 2 anmeldelser. Har du et spørgsmål om Pearl Sports P-932L, eller vil du spørge andre brugere om produktet?

Side 1/5
Congratulations on your purchase!
To get optimum performance from your P-932 / P-932L / P-931 Drum Pedal,
please read this Instruction Manual before playing.
P-932/P-932L/931
PEARL DRUM PEDAL
Instruction Manual
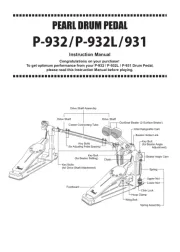
Spring Assembly
Key Bolt
Hoop Clamp
Wing Bolt
Footboard
DuoBeat Beater (2-Surface Beater)
Drive Shaft Assembly
Drive Shaft Drive Shaft
Key Bolts
(for Drive Shaft Attachment)
Chain
Beater Holder Link
Key Bolt
(for Beater Angle
Adjustment)
Interchangeable Cam
Beater Angle Cam
Spring
Upper Nut
Lower Nut
Click Lock
Key Bolts
(for Adjusting Pedal Spacing)
Center Connecting Tube
AB
Beater Holder Link
DuoBeat Beater
Key Bolt
Fig. 2
Fig. 3
Key Bolt
DuoBeat Beater
Beater Angle Cam
Beater Angle Adjustment
Depending on your preference, the Beater can be
positioned closer or farther away from the Bass Drum Head.
This is accomplished by loosening the Key Bolt on the
Beater Angle Cam and swinging the Beater to the desired
angle. Re-tighten the Key Bolt to secure the angle (Fig.3).
Fig. 1
Surface Material
Felt Surface
Sound
Full,
Warm Sound
Surface Material
Plastic Surface
Sound
Sharper,
Punchier Sound
DuoBeat Beater (2-Surface Beater)
The DuoBeat Beater features a Felt Surface for a full, (A)
warm sound and a Plastic Surface for a sharper, (B)
punchier sound. Use the side that best suits your playing
style (Fig.1).
Beater Setting
Insert the shaft of the DuoBeat Beater into the Beater
Holder Link and tighten the Key Bolt with the provided
Drum Key to secure the Beater at the desired height.
Experiment with different Beater heights to find the best
combination of power and speed (Fig.2).
NOTE
If the Drive Shafts are extended too far, they will separate
from the Center Connecting Tube. Reassemble them with the
dots aligned as shown in Fig.6-B.
Connecting the Drive Shaft Assembly
Connect the ends of the Drive Shaft (A) to the short
extensions (B) on the Main and Slave Side Pedals. You may
need to rotate the Cam on the Slave Side Pedal to bring the
footboard of the Slave Side (left) Pedal to the proper playing
height (angle) before attaching the Drive Shaft Joints (A) to
both pedals. Tighten Key Bolt with the provided Drum
Key and then Key Bolt (Figs.4, 5).
To adjust the length of the Drive Shaft, loosen the Key
Bolts on the Center Connecting Tube of the Drive Shaft
Assembly with the provided Drum Key and adjust the
distance between the Main Pedal and the Slave Side
Pedal to your liking. Make sure to re-tighten the Key Bolts
after making the adjustment (Fig.6-A).
Fig. 4
Fig. 5
Drive Shaft
Fig. 6-B
Fig. 6-A
B
A
Drive Shaft
Key Bolt
Key Bolt
Main Pedal
Slave Side Pedal
Drive Shaft
Center Connecting Tube
Key Bolt


Produkt Specifikationer

Mærke: Pearl Sports
Kategori: Musikinstrument
Model: P-932L

Har du brug for hjælp?

Hvis du har brug for hjælp til Pearl Sports P-932L stil et spørgsmål nedenfor, og andre brugere vil svare dig


Musikinstrument Pearl Sports Manualer
Musikinstrument Manualer

Nyeste Musikinstrument Manualer