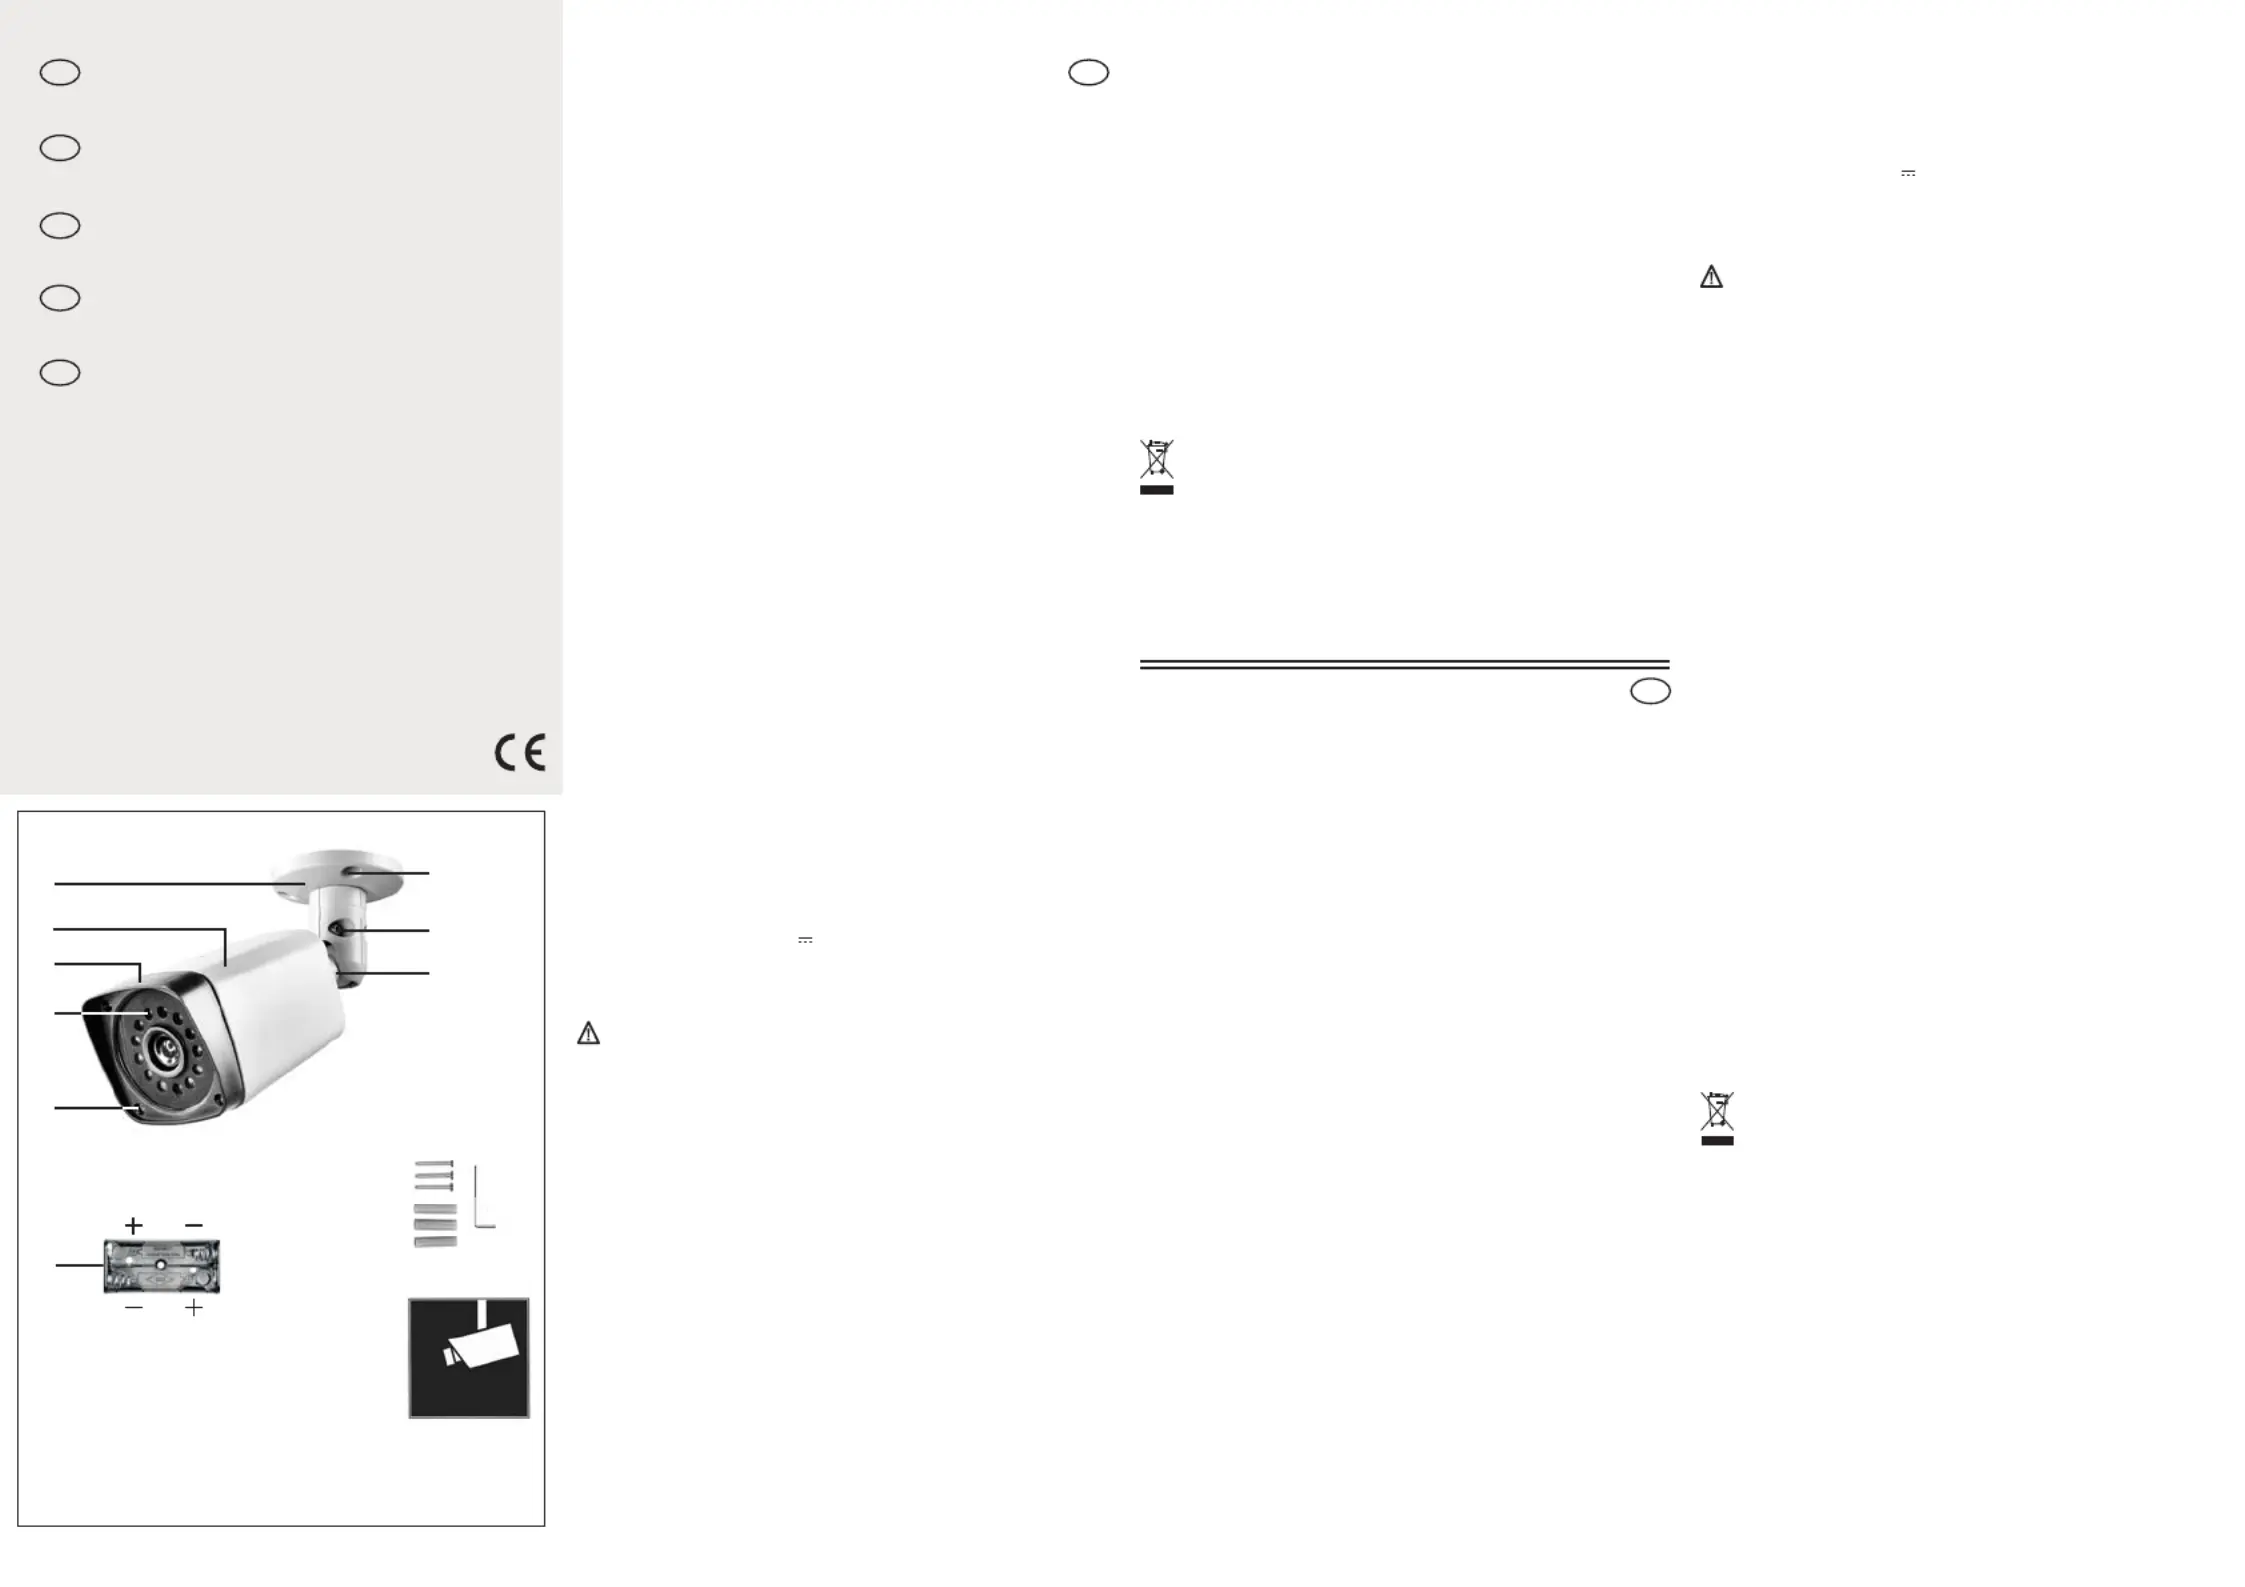
Legen Sie zwei neue Batterien (AA, 1,5V alkalisch; nicht im Lieferumfang enthalten)
polrichtigindasBatteriefach[8]ein.AchtenSieaufdieMarkierungimBatteriefach.
SchließenSiedasGehäusewiedermitdenFixierungsschrauben.
Halten Sie die Platte der Halterung [1] an der gewünschten Stelle an die Wand oder
DeckeundmarkierenSiediedreiBefestigungslöcher[6].
Loch mit an den markierten Stellen und setzen Sie die Dübel
BefestigenSiedieHalterungmitdenSchraubenanderWandbzw.Decke.
Lösen Sie die Feststellschrauben [7] mit dem Inbusschlüssel, richten Sie die
Kameraattrappe in die gewünschte Position aus, und ziehenSie die Feststellschrauben
Sie dürfen Verpackungsmaterial und ausgediente Batterien oder Geräte nicht im
Hausmüll entsorgen, führen Sie sie der Wiederverwertung zu. Den zuständigen
Recyclinghofbzw.dienächsteSammelstelleerfragenSiebeiIhrerGemeinde.
3 Front du boîtier 7 Vis de blocage
4 Diode lumineuse 8 Compartiment à piles
Dimensions: 60 x60 x 99 mm
Dès que la diode lumineuse ne clignote pas, il faut échanger les piles pour
prévenir desdommages dus à la corrosion.
Pourinsérer ouremplacerles piles,ilest recommandédedévisser lacaméradu mur
Desserrerlesvisdefixation[5]dufrontduboîtieretouvrezleboîtier.
Mettez enplace lesnouvelles piles(AA, 1,5 Valcalines; nonfournies àla livraison)
dans le compartiment à batteries en respectant la polarité [5]. Respectez le
marquagedanslecompartimentàpiles.
Refermerleboîtieraveclesvisdefixation.
Maintenez la plaque du support de fixation [1] sur le mur ou le plafond à
l'emplacementdésiréetfaitesunemarqueautraversdestroistrousdefixation[6].
PercezuntroudeØ=5mmàl'emplacementmarquéetintroduisezuntampon.
Fixezlesupportdefixationaumurouauplafondaveclesvis.
Dévissezles visde blocage[7] avecla cléAllen etajustezl'orientation dela caméra
facticeselonlapositionsouhaitéeetserrezfermementlesvisdeblocage.
Ne jetez pas le matériel d'emballage, les piles usagées et les appareils eux-
mêmes, mais amenez-les à des emplacements de récupération. La
déchetterie ou l'emplacement de recyclage le plus proche vous seront
communiqués parvotre administration communale.
Mise en place / échange des piles
Caractéristiques techniques
Tension deservice : 3 V DC
Pile: 2x AA; 1,5 V (non fournie)
Ne laissez jamais des enfants sans surveillance, jouer avec l'appareil, ses
matériaux d'emballageou les diverses petites pièces qui y sont jointes.Ils peuvent
perdre lavie par étouffement!
Veillez à ne pas court-circuiter la batterie et à ne pas la jeter au feu. Elle ne doit
également pas être rechargée. Elle pourrait exploser et mettre votre vie en
Les piles qui coulent ou qui sont endommagées peuvent causer de graves
irritations aucontact de la peau. Enpareil cas, portez desgants appropriés.
Lors de la fixation de l'appareil, faites bien attention! N'endommagez aucune
conduite degaz, électricité ou téléphone!
Bedienungs- und Sicherheitshinweise
BestimmungsgemäßeVerwendung
Diese Kameraattrappe täuscht eine echte Überwachungskamera vor. Hierbei können
potentielle Kriminelle oder Diebe abgeschreckt werden. Die Wirkung wird durch eine
blinkende Leuchtdiode gesteigert.Die Leuchtdiodewird durchzwei AAalkalische Batterien
betrieben( .Das Gerätist fürdenBetrieb imAußenbereich
oderinInnenräumenkonzipiert.
Kontrollieren Sie unmittelbar nach dem Auspacken den Lieferumfang auf Vollständigkeit
sowiedeneinwandfreienZustandderGeräte.
1 x Kameraattrappe mit Halterung
3 x Schrauben 1 x Warnaufkleber 1 x Inbusschlüssel
3 x Dübel ( 5mm) 1 x Bedienungshinweise
Jedeandere Verwendung oderVeränderung desGerätes giltals nichtbestimmungsgemäß.
Für Schäden die durch nicht bestimmungsgemäßen Gebrauch oder falsche Bedienung
verursachtwerden,wirdnichtgehaftet.
Dieses Gerät ist nicht dafür bestimmt, durch Personen (einschließlich Kinder) mit
eingeschränkten physischen, sensorischen oder geistigen Fähigkeiten oder mangels
Erfahrungund/oder mangelsWissen benutztzu werden,essei denn,sie werdendurch eine
fürIhre Sicherheitzuständige Personbeaufsichtigt odererhielten vonIhr Anweisungen,wie
dasGerätzubenutzen ist.Kindermüssenbeaufsichtigt werden,umsicherzustellen,dasssie
LesenSie dieseBedienungsanleitung vollständigund sorgfältigdurch. Bewahren Siediese
AnleitungsorgfältigaufundgebenSiesieggf.anDritteweiter.
1 Halterung 5 Fixierungsschrauben
2 Gehäuse 6 Befestigungslöcher
3 Gehäusevorderseite 7 Feststellschrauben
4 Leuchtdiode 8 Batteriefach
Lassen Sie Kleinkinder nicht unbeaufsichtigt mit dem Gerät, Batterien,
Verpackungsmaterial oder Kleinteilen! Andernfalls droht Lebensgefahr durch
Achten Sie darauf, dass die Batterien nicht kurzgeschlossen oder ins Feuer geworfen
werden. Sie darf außerdem nicht aufgeladen oder geöffnet werden. Es besteht
Lebensgefahr durchExplosion!
Ausgelaufene oder beschädigte Batterien können bei Berührung mit der Haut
Verätzungen verursachen, benutzen Sie deshalb in diesem Fall geeignete
nichtim Lieferumfangenthalten)
Zum Einlegen bzw. Wechseln der Batterien wird empfohlen, die Kamera von der Wand
Lösen Sie die Fixierungsschrauben [5] der Gehäusevorderseite [3] und öffnen Sie das
Batterien einlegen / wechseln
Beschädigen Sie keine Leitungen für Gas, Strom oder Telekommunikation beim
Befestigen! Andernfallsdroht Lebens-, Verletzungsgefahrsowie Beschädigung!
Sobald die Leuchtdiode nicht mehr blinkt, müssen die Batterien ersetzt werden, um
einer Beschädigungdurch Korrosion vorzubeugen.
Überwachungskamera-Attrappe
Bedienungs- und Sicherheitshinweise
Indexa GmbH, Paul-Böhringer-Str. 3, D-74229 Oedheim
www.indexa.de 2018/09/14 Änderungen vorbehalten
Caméra de surveillance factice
Consignes d'utilisation et de sécurité
Gebruiks- en veiligheidsaanwijzingen
Operating and safety instructions
Istruzioni per funzionamento e sicurezza
Conseils d'utilisation et consignes de sécurité
Cette caméra factice a vraiment l'air d'une caméra de surveillance. Les personnes aux
intentions criminelles ou les voleurs peuvent être tenus en respect par ce dispositif.
L'efficacité est encore accrue par une diode lumineuse clignotante. Cet appareil est conçu
pour être utilisé à l'extérieur ou à l'intérieur. La diode lumineuse est alimentée par deux
piles alcalinesAA (non fournies à lalivraison).
1 Support de fixation 5 Vis de fixation
2 Boîtier 6 Trou de fixation
Lisez le présent mode d'emploi dans son intégralité et avec le soin qui convient. dez
toujours cemode d'emploi à portée dela main et remettez-le éventuellementà des tiers.
Toute autre utilisation ou modification de l'appareil n'est pas conforme à sa destination
première. Aucune responsabilité ni garantie ne sont assumées pour les dommages
collatéraux ainsi que pour les dommages résultant d'une utilisation non conforme ou
Cet appareil n'est pas conçu pour être utilisé par des personnes (enfants compris) ne
disposant pas de toutes leurs facultés physiques, sensorielles ou mentales ou ne
disposant pas de l'expérience ou des connaissances nécessaires, à moins qu'elles ne
soient sous la surveillance d'une personne veillant sur leur sécurité ou qu'ils aient reçu de
cette personne une instruction sur le maniement correct dudit appareil. Les enfants
doivent êtresurveillés pour garantir qu'ils nejouent pas avec l'appareil.
Contrôlez juste après le déballage de l'appareil que la livraison est bien complète et que
l'appareil estdans un état irréprochable. Vous devezavoir devant vous
1 x Caméra facticeavec fixation
3 x Vis 1 x Autocollant de mise en garde
3 x Chevilles ( 5mm) 1 x Consignes d’utilisation