Phoenix PB ECO LINK Manual


Læs gratis den danske manual til Phoenix PB ECO LINK (2 sider) i kategorien Ikke kategoriseret. Denne vejledning er vurderet som hjælpsom af 4 personer og har en gennemsnitlig bedømmelse på 4.3 stjerner ud af 2.5 anmeldelser. Har du et spørgsmål om Phoenix PB ECO LINK, eller vil du spørge andre brugere om produktet?

Side 1/2
Phoenix Contact 06/2000 TNR 90 04 19 4 - 00 617900
Telefon +49-(0)5235-3-00
PHOENIX CONTACT GmbH & Co.
Telefax +49-(0)5235-3-41200
www.phoenixcontact.com
32825 Blomberg, GERMANY
Flachsmarktstre 8
Español
Conexión del LINK PB ECO
tamente al módulo. Fíjelo
apretando los tornillos.
2. Conecte la interfaz V.24 del
LINK PB ECO con la interfaz
V.24 (COM1 hasta COM4) de su
PC. Utilice para ello el cable
suministrado.
Interfaz PROFIBUS
D-SUB de 9 polos, conector macho
Pin Señal
6 +5V Tensión de alimentación +5 V
3 P Conexión P
8 N Conexión N
5 GND Ground
El LINK PB ECO es alimentado
eléctricamente a través de la inter-
faz del Profibus.
Asignación de la interfaz V.24
D-SUB de 9 polos, conector hembra
Pin Señal
2 RXD Receive Data
3 TXD Transmit Data
4 DTR Data Terminal Ready
5 GND Ground
8 CTS Clear To Send
Instalación del solfware
Instale en su PC el Profibus-
Master-Simulator-Software que se
encuentra en el disquete adjunto.
Informaciones más detalladas
sobre el software puede
encontrarlas en el mismo disquete,
en el archivo "readme.txt".
1
2
3
4
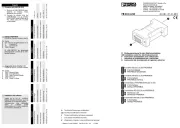
PB ECO LINK Art.-Nr.: 27 41 48 0
D Einbauanweisung für den Elektroinstallateur
GB Installation notes for electrical personnel
F Instruction dinstallation pour l’électricien
I Istruzione di installazione per lelettricista
E Instrucción de montaje para el ingeniero eléctrico
2
1
Deutsch
Konverter RS-232 (V.24)-PROFIBUS
V.24-Schnittstelle
PROFIBUS-Schnittstelle
English
Converter RS-232 (V.24)-PROFIBUS
V.24-Interface
PROFIBUS interface
Français
Convertisseur PROFIBUS-RS-232 (V.24)
V.24-Interface
Interface PROFIBUS
Italiano
Convertitore RS-232 (V.24)-PROFIBUS
Interfaccia V.24
Interfaccia PROFIBUS
Español
Convertidor RS-232 (V.24)-PROFIBUS
V.24-Interfaz
Interfaz PROFIBUS
1
2
1
2
1
2
1
2
1
2
5 V DC ±5 %
< 60 mA
19,2 kBit/s
0 °C +55 °C
63 mm x 34 mm x 17 mm
Español
Tensión de alimentación
Consumo de corriente
Velocidad en baudios (máxima)
Margen de temperatura
Dimensiones (L x A x A)
Italiano
Tensione di alimentazione
Corrente assorbita
Velocità di trasmissione (max.)
Temperatura
Dimensioni (L x P x A)
Français
Tension dalimentation
Consommation de courant
Vitesse de transmission (maximale)
Plage de température :
Dimensions (L x L x H)
English
Supply Voltage
Current consumption
Baud rate (maximum)
Temperature range
Dimensions (L x W x H)
Deutsch
Versorgungsspannung
Stromaufnahme
Baudrate (maximal)
Termperaturbereich
Abmessungen (L x B x H)
D
Technische Änderungen vorbehalten!
GB
Technical modifications reserved!
F
Toutes modifications techniques ré éserv es!
I
Con riserva di modifiche tecniche!
E
¡ éReservado el derecho a las modificaciones t cnicas!
Deutsch English Français Italiano
PB ECO LINK anschließen
1. Stecken Sie den PB ECO LINK
direkt auf das Modul. Befestigen
Sie ihn durch Anziehen der
Schrauben.
2. Verbinden Sie die V.24-Schnitt-
stelle des PB ECO LINKs mit der
V.24-Schnittstelle (COM1 bis
COM4) Ihres PCs. Nehmen Sie
dazu das mitgelieferte Kabel.
Connecting PB ECO LINK
1. Attach the PB ECO LINK directly
to the module. Fasten it by
tightening the screws.
2. Connect the V.24 interface of the
PB ECO LINK with the V.24 inter-
face (COM1 to COM4) of your
PC. Use the cable supplied for
the purpose.
Raccordement de PB ECO LINK
1. Connecter le PB ECO LINK
directement sur le module. Le
fixer en serrant les vis.
2. Relier linterface V.24 du
PB ECO LINK avec linterface
V.24 (COM1 à COM4) du PC
employé. Le câble fourni est
pré àvu cet effet.
Collegamento di PB ECO LINK
1. Inserire PB ECO LINK diretta-
mente nel modulo. Fissarlo
serrando le viti.
2. Collegare l'interfaccia V.24 di
PB ECO LINK con l'interfaccia
V.24 (da COM1 fino a COM4) del
PC. A tale scopo utilizzare il cavo
fornito.
PROFIBUS-Schnittstelle
9-poliger D-SUB, Stecker
Pin Signal
6 +5 V Spannungsversorgung +5 V
3 P Anschluss P
8 N Anschluss N
5 GND Ground
Der PB ECO LINK wird elektrisch
durch die Profibus-Schnittstelle ver-
sorgt.
PROFIBUS interface
9-pos. D-SUB, male connector
Pin Signal
6 +5 V Voltage supply +5 V
3 P Connection P
8 N Connection N
5 GND Ground
The PB ECO LINK is supplied with
electricity through the PROFIBUS
interface.
Interface PROFIBUS
Connecteur mâle SUB-D à 9 broches
Broche Signal
6 +5 V alimentation en tension +5 V
3 P raccordement P
8 N raccordement N
5 GND Ground
Le PB ECO LINK est alimenté en
é électricit via l'interface Profibus.
Interfaccia PROFIBUS
Connettore maschio D-SUB a 9 poli,
Pin Segnale
6 +5 V Tensione di alimentazione +5 V
3 P Connessione P
8 N Connessione N
5 GND Ground
Il PB ECO LINK viene alimentato
elettricamente dall'interfaccia Profi-
bus.
Belegung der V.24-Schnittstelle
9-poliger D-SUB, Buchse
Pin Signal
2 RXD Receive Data
3 TXD Transmit Data
4 DTR Data Terminal Ready
5 GND Ground
8 CTS Clear To Send
V.24 interface assignment
9-pos. D-SUB, female connector
Pin Signal
2 RXD Receive Data
3 TXD Transmit Data
4 DTR Data Terminal Ready
5 GND Ground
8 CTS Clear To Send
Affectation de linterface V.24
Connecteur femelle D-SUB à 9 bro-
ches
Broche Signal
2 RXD ré éception donn es
3 TXD transmission données
4 DTR terminal données fonctionnel
5 GND Ground
8 CTS prê àt l'envoi
Assegnamento dellinterfaccia V.24
Connettore femmina SUB-D a 9 poli
Pin Segnale
2 RXD Receive Data
3 TXD Transmit Data
4 DTR Data Terminal Ready
5 GND Ground
8 CTS Clear To Send
Software installieren
Installieren Sie die Profibus-Master-
Simulator-Software der beiliegen-
den Diskette auf Ihrem PC.
Nähere Informationen zur Software
finden Sie auf der Diskette in der
Datei readme.txt.
Installing software
Install the PROFIBUS Master
Simulator software on the supplied
floppy disk onto your PC.
For further information on the
software, refer to the readme.txt file
on the floppy disk.
Installation du logiciel
Installation du logiciel Profibus-
Master-Simulator, se trouvant sur la
disquette jointe, sur le PC employé.
De plus amples informations
concernant le logiciel sont à relever
sur la disquette, dans le fichier
« »readme.txt .
Installazione del software
Installare sul PC il software Profibus
Master Simulator che si trova nel
dischetto fornito.
Ulteriori informazioni sul software si
trovano nel file readme.txt del
dischetto.
1
P R O F I B U S
V . 2 4
P C
m a x . 1 , 5 m ( 5 9 " )
1111122222
11111
22222
33333
44444
11111
22222
44444
UUUUU SSSSS
BBBBB FFFFF
FFFFF SSSSS
FFFFF NNNNN
PPPPP BBBBB -D-D-D-D-D PPPPP
UUUUU MMMMM
1 1 1 1
2
P R O F I B U SP B E C O - L I N K
6
3
8
5
+5V
N
G N D
P
1
5
6
9
1
5
6
9
6
3
8
5
+5V
N
G N D
P
2 2 2 2
3
2
3
4
5
RXD
D T R
G N D
T X D
1
5
6
9
1
5
6
9
P C P B E C O - L I N K
RXD
D T R
2
3
4
5
G N D
T X D
8
C T S
8
C T S
3 3 3 3
4
4
4
4
4
617900


Produkt Specifikationer

Mærke: Phoenix
Kategori: Ikke kategoriseret
Model: PB ECO LINK

Har du brug for hjælp?

Hvis du har brug for hjælp til Phoenix PB ECO LINK stil et spørgsmål nedenfor, og andre brugere vil svare dig