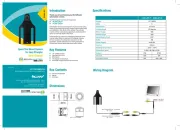
Pioneer ND-BC9 Manual
Læs nedenfor 📖 manual på dansk for Pioneer ND-BC9 (8 sider) i kategorien Bakkamera. Denne guide var nyttig for 3 personer og blev bedømt med 3.5 stjerner i gennemsnit af 2 brugere
Side 1/8

PIONEER CORPORATION
28-8, Honkomagome 2-chome, Bunkyo-ku, Tokyo 113-0021, JAPAN
PIONEER ELECTRONICS (USA) INC.
P.O. Box 1540, Long Beach, CA 90801-1540, U.S.A.
TEL: (800) 421-1404
PIONEER EUROPE NV
Haven 1087, Keetberglaan 1, B-9120 Melsele, Belgium/Belgique
TEL: +32 (0)3 570 05 11
Salamanca, Wellington Street, Slough, SL1 1YP, UK
TEL: +44 (0)208 836 3500
PIONEER ELECTRONICS ASIACENTRE PTE. LTD.
No. 2 Jalan Kilang Barat, #04-02, Singapore 159346
TEL: 65-6378-7888
PIONEER ELECTRONICS AUSTRALIA PTY. LTD.
Unit 13, 153-155 Rooks Road Vermont, Victoria, 3133 Australia
TEL: (03) 9586-6300
PIONEER ELECTRONICS DE MÉXICO S.A. DE C.V.
Blvd. Manuel Ávila Camacho #118, Int 1202 Piso 12, Col. Lomas de
Chapultepec, Alc. Miguel Hidalgo C.P. 11000, Ciudad de México
TEL: 52-55-9178-4270
© 2023 PIONEER CORPORATION.
All rights reserved.
© 2023 PIONEER CORPORATION.
Tous droits de reproduction et de traduction
réservés.
< CYR1341-A > EW
< KMTZ23I >
Owner’s Manual
Mode d’emploi
UNIVERSAL REAR-VIEW CAMERA
CAMERA DE RECUL UNIVERSELLE
ND-BC9
1 Make sure it doesn’t touch the wiper
2 Install on the centre part
Fig. 1
Abb. 1
(A) Rear view camera × 1 (B) RCA power supply cable × 1 (C) Hexagon wrench × 1
(E) Waterproof
pad × 1
(D) Clamp × 6 (F) Double-sided
tape × 1
Fig. 4
Abb. 4
Fig. 8
Abb. 8
Fig. 6
Abb. 6
2 Bumper or rear edge of car
1 Camera stand
Fig. 2
Abb. 2
Fig. 3
Abb. 3
If you want to dispose this product, do not
mix it with general household waste. There
is a separate collection system for used elec-
tronic products in accordance with legisla-
tion that requires proper treatment, recovery
and recycling.
Private households in the member states of the EU,
in Switzerland and Norway may return their used
electronic products free of charge to designated col-
lection facilities or to a retailer (if you purchase a
similar new one). For countries not mentioned above,
please contact your local authorities for the correct
method of disposal. By doing so you will ensure that
your disposed product undergoes the necessary treat-
ment, recovery and recycling and thus prevent poten-
tial negative effects on the environment and human
health.
IMPORTANT
SAFEGUARDS
• Installationandwiringofthisproductrequirespe-
cialist skill and experience. To assure your safety,
please request a specialist technician to install the
unit.
• Donotattempttoheatthesurfaceofthecamera
lens or camera lens itself with a lighter and so on
when they have become frozen. This can cause a
malfunction.
• Thisproductisarearviewcameraforchecking
the view at the rear of a car.
A rear view camera is a camera that provides sym-
metrical images in the same way as rear and side
view mirrors.
• ConnectiontoamonitorwithanRCAvideoinput
is possible, but confirm whether the monitor you
use has a reverse gear connection function.
• Thisproductisdesignedtosupplementthedriver’s
rear view, but the camera images do not show all
dangers and obstacles. Be sure to look behind you
when reversing to confirm the view.
• Thisproductfeaturesawide-anglelens,sothe
near view is wide and the far view is narrow,
which may create a false sense of distance. Be
sure to look behind you when reversing to confirm
the view.
• Donotwashyourcarwithanautomaticcarwash
or high-pressure water as it may result in water
entering the camera or the camera falling off.
• Checkcamerastandinstallationbeforedriving.
– Are the screws loose?
– Is the camera stand firmly secured?
– If the rear view camera comes loose while you
are driving it may cause an accident.
• Thisproductbyitselfdoesnotdisplayguidelines.
6 Be sure not to hide any part of the characters
on the licence plate when attaching the cam-
era.
Fig.5
Abb. 5
00-00
Fig. 7
Abb. 7
2 Top
3 Mark
4 Bottom
5 Make sure to install the rear view camera so that
the mark is located on top of the camera.
1 Hexagon wrench
approx. 45 º
(G) Waterproof sheet × 1
https://www.pioneer-car.eu/eur/

3. Adjust the angle so that the bumper
or rear edge of the car is displayed
at the bottom of the TV screen.
(Fig. 6, Fig. 7, Fig. 8)
1 Hexagon wrench
2 Bumper or rear edge of car
Installation <ENGLISH>
Parts supplied
(A) Rear view camera × 1
(B) RCA power supply cable × 1
(C) Hexagon wrench × 1
(D) Clamp × 6
(E) Waterproof pad × 1
(F) Double-sided tape × 1
(G) Waterproof sheet × 1
Installation example (Fig. 1)
1 Make sure it doesn’t touch the wiper
2 Install on the centre part
Installation procedure
Notes:
• Beforemakingafinalinstallationoftheunit,
temporarily connect the wiring to confirm that
the connections are correct and the system works
properly.
• Useonlythepartsincludedwiththeunittoensure
proper installation. The use of unauthorised parts
can cause malfunctions.
• Consultwithyournearestdealerifinstallation
requires the drilling of holes or other modifications
of the vehicle.
• Installtheunitwhereitdoesnotgetinthedriver’s
way and cannot injure the passenger if there is a
sudden stop, like an emergency stop.
• Whenmountingthisunit,makesurenoneofthe
leads are trapped between this unit and the sur-
rounding metalwork or fittings.
• Beforedrillinganymountingholesalwayscheck
behind where you want to drill the holes. Do not
drill into the gas line, brake line, electrical wiring
or other important parts.
• Ifthisunitisinstalledinthepassengercompartment,
anchor it securely so it does not break free while the
car is moving, and cause injury or an accident.
• Ifthewiringofthisunitislocatedunderafront
seat, make sure it does not obstruct seat move-
ment. Route all leads and cords carefully around
the sliding mechanism so they do not get caught
or pinched in the mechanism and cause a short
circuit.
• Installtheunitnearthecentreofthecar.
• Locateinthepositionyouwanttoinstalltherear
view camera. Adjust the angle of the rear view
camera, and install so that the camera doesn’t
touch the car.
• Installsothatitdoesnotobstructtherearfieldof
view.
• Installsothatitdoesnotprotrudefromthesideof
the car.
• Donotperforminstallationinrainorfog.
• Whenhumidityishigh,drythesurfacetowhich
the unit is to be attached before installing. Moisture
on the attachment surface reduces adhesive strength
which may lead to the unit coming off.
• Ifthetemperatureoftheattachmentsurfaceis
low, warm with a hair dryer of other means before
installing to improve adhesive strength.
• Donotattachthecamerastandtoareasonthecar
body treated with fluorocarbon resin or glass. This
may result in the rear view camera falling off.
• Duringthe24-hourperiodafterinstalling:
– Do not apply water to the unit.
– Do not expose the unit to rain.
– Do not subject the camera to unnecessary force.
• Thoroughlycleanwheretapeisusedforsticking
on the unit.
1. Clean the surface to which the rear
view camera is to be installed.
(Fig. 2)
Use a cloth or other item to wipe oil, wax,
dust and any other dirt from the installation
surface.
2. Peel off the sheet on the back of the
camera stand and stick it on. (Fig. 3,
Fig. 4, Fig. 5)
Press the camera stand with your fingers to
stick it to the installation surface. Touching
the adhesive surface or sticking the unit
on a second time reduces adhesive power
which may result in the unit coming off.
1 Camera stand
2 Top
3 Mark
4 Bottom
5 Make sure to install the rear view camera so
that the mark is located on top of the camera.
6 Be sure not to hide any part of the characters
on the licence plate when attaching the cam-
era.
Installation <FRANÇAIS>
Pièces fournies
(A) Caméra de recul × 1
(B) Câble à fiche Cinch (RCA) d’alimentation × 1
(C) Clé six pans × 1
(D) Attaches × 6
(E) Garniture étanche × 1
(F) Ruban adhésif double-face × 1
(G) Feuille imperméable × 1
Exemple d’installation (Fig. 1)
1 Assurez-vous que la caméra ne gêne pas
l’essuie-glace
2 Installez sur la partie centrale
Procédure d’installation
Remarques :
• Avantdefinaliserl’installationdel’appareil,
connecter temporairement le câblage pour s’assurer
que les connexions sont correctes et que le système
fonctionne convenablement.
• Poureffectuerconvenablementl’installation,utilisez
les pièces fournies et procédez comme il est indiqué.
L’utilisationdepiècesautresquecellesfourniespeut
endommager l’appareil.
• Avantd’effectuerunperçageouunemodificationdu
véhicule, consultez le concessionnaire.
• N’installezpasl’appareildansunendroitoùilpourrait
gêner le conducteur ou blesser un passager en cas de
freinage brusque, par exemple pour un arrêt d’urgence.
• Veillezàcequelescâblesnepuissentpasêtrepincés
entre l’appareil et les pièces métalliques environnantes.
• Avantd’effectuerunperçagerequisparl’installationde
l’appareil, assurez-vous que vous pouvez le faire sans
danger pour les câbles, canalisations, flexibles, etc., qui
sont placés derrière le panneau que vous devez percer.
• Sivousinstallezl’appareildansl’habitacle,veillezà
ce qu’il soit bien ancré de manière qu’il ne puisse pas
provoquer une blessure ou un accident en raison du
déplacement du véhicule sur la route.
• Silecâblagedecetappareilsetrouvesousunsiège
avant, veillez à ce qu’il ne gêne pas la manoeuvre du
siège. Faites cheminer les câbles et les conducteurs de
telle manière qu’ils ne puissent pas gêner le réglage du
siège ni être endommagés par son déplacement, ce qui
pourrait provoquer un court-circuit.
• Installezl’appareilprèsducentredelavoiture.
• Déterminezl’emplacementoùvousdésirezinstallerla
caméra de recul. Réglez l’inclinaison de la caméra et
fixez-la de telle sorte qu’elle ne touche pas le véhicule.
• Installezlacaméradefaçonqu’ellen’obstruepasle
champ de vision vers l’arrière.
• Choisissezunemplacementtelquelacaméranefasse
pas saillie sur un côté du véhicule.
• N’effectuezpasl’installationpartempsdepluieoude
brouillard.
• Sil’humiditéestélevée,séchezpréalablementlasurface
depose.L’humiditéréduitlapuissancedel’adhésifetla
caméra peut ultérieurement se détacher.
• Silatempératuredelasurfacedeposeestbasse,
réchauffez-la à l’aide d’un sèche-cheveux, ou tout
autre moyen convenable, de manière à tirer parti de
toute la puissance de l’adhésif.
• Nefixezpaslesupportdelacaméraàunélémentde
la carrosserie traité avec une résine fluorocarbonée, ni
àunélémentenverre.Lacamérapourraitsedétacher.
• Aucoursdes24heuresquisuiventl’installation:
– Ne mouillez pas la caméra.
– Ne l’exposez pas à la pluie.
– N’exercez aucune contrainte inutile sur la caméra.
• Nettoyezsoigneusementl’emplacementoùvousdevez
poser le ruban adhésif.
1. Nettoyez l’emplacement de pose de
la caméra. (Fig. 2)
À l’aide d’un chiffon, essuyez les traces
d’huile ou de cire, les poussières et les
saletés qui se seraient déposées à
l’emplacement de pose.
2. Retirez la feuille de protection à
l’arrière du support de caméra et
collez ce dernier. (Fig. 3, Fig. 4, Fig. 5)
Appuyez des doigts sur le support de
caméra pour qu’il colle à l’emplacement
de pose. En touchant la surface adhésive,
ou en décollant et recollant le support une
seconde fois, vous réduisez la puissance de
l’adhésif et ultérieurement la caméra peut
se détacher.
1 Support de la caméra
2 Haut
3 Repère
4 Bas
5 Assurez-vous d'installer la caméra de recul d
façonquelerepèresoitsituéau-dessusdela
caméra.
6 Assurez-vous de ne pas cacher la partie des
caractères de la plaque de licence lors d la
fixation de la caméra.
Pour la mise au rebut de ce produit, ne le
mélangez pas avec les déchets domestiques
habituels. Un système de collecte spécifique
pour les produits électroniques usagés existe
conformément à la législation en vigueur sur
le traitement, la collecte et le recyclage.
Lesparticuliersrésidantdanslesétatsmembresde
l’UE, en Suisse et en Norvège peuvent retourner gra-
tuitement leurs produits électroniques usagés dans un
centre de collecte désigné ou chez un revendeur (en
cas d’achat d’un nouvel appareil similaire). Pour les
pays non mentionnées ci-dessus, veuillez contacter
les autorités locales pour connaître la méthode adé-
quate de mise au rebut. Ainsi, vous vous assurez que
votre appareil mis au rebut suit le traitement, la récu-
pération et le recyclage nécessaires, empêchant ainsi
les effets potentiellement négatifs sur l’environnement
et la santé humaine.
• L’installationetlecâblagedecetappareilexigent
un spécialiste compétent et expérimenté. Pour
votre sécurité, faites réaliser l’installation de cet
appareil par un technicien averti.
• N’essayezpasdechaufferlasurfacedel’objectif
de la caméra ou l’objectif lui-même avec un
briquet ou un objet similaire quand elle est gelée.
Cela peut entraîner un mauvais fonctionnement.
• Cetappareilestunecaméraderecul,c’est-à-dire
une caméra qui vous aide dans l’appréciation de ce
qui se trouve à l’arrière du véhicule.
Une caméra de recul fournit des images dans un
miroir, comme c’est le cas des rétroviseurs central
et latéraux.
• Laconnexionàunécranavecuneentréevidéo
RCA est possible, mais vérifiez si l'écran que vous
utilisez dispose d'une fonction de connexion de
marche arrière.
• Cetappareilaétéconçupourcompléterle
rétroviseur du conducteur, mais les images qu’il
fournit n’englobent pas tous les dangers ni tous les
obstacles.Vérifiezcequevousvoyezquandvous
conduisez en marche arrière.
• Cetappareilestdotéd’ungrandangulaire,qui
donne une vue large d’un plan proche et une vue
étroite d’un plan éloigné, pouvant créer de cette
manièreunefausseidéedeladistance.Vérifiezce
que vous voyez quand vous conduisez en marche
arrière.
• Nelavezpaslevéhiculedansunestationdelavage
automatique ni à l’aide d’un dispositif à pression
d’eau élevée car de l’eau pourrait pénétrer dans la
caméra, ou encore la caméra pourrait être arrachée
de son support.
• Vérifiezlesupportdelacaméraavantdeprendre
la route.
– Lesfixationssont-ellesdesserrées?
– Lesupportdelacaméraest-ilsolidementfixé?
– Si la caméra de recul se détache tandis que le
véhicule roule, il peut en résulter un accident.
• Ceproduitn’affichepaslesdirectivesparlui-
même.
IMPORTANTES PRÉCAUTIONS
DE SÉCURITÉ
Produkt Specifikationer
Mærke: | Pioneer |
Kategori: | Bakkamera |
Model: | ND-BC9 |
Har du brug for hjælp?
Hvis du har brug for hjælp til Pioneer ND-BC9 stil et spørgsmål nedenfor, og andre brugere vil svare dig
Bakkamera Pioneer Manualer

29 Maj 2025

6 September 2024

6 September 2024

6 September 2024

6 September 2024
Bakkamera Manualer
- Bakkamera Veise
- Bakkamera Xomax
- Bakkamera Valeo
- Bakkamera Boyo
- Bakkamera Waeco
- Bakkamera CRUX
- Bakkamera Clarion
- Bakkamera Hikvision
- Bakkamera Dometic
- Bakkamera Beeper
- Bakkamera Tracer
- Bakkamera Pro User
- Bakkamera Furrion
- Bakkamera Xzent
- Bakkamera VDO Dayton
Nyeste Bakkamera Manualer

20 Februar 2025

11 Januar 2025

30 December 2025

29 December 2024

29 December 2024

29 December 2024

29 December 2024

6 December 2024

26 November 2024

18 November 2024