Within 10 seconds, the Transmitter’s and Headset’s
LED’s remain solid, indicating a successful pairing.
Dans les 10secondes qui suivent, les voyants LED de
l'émetteur et du casque resteront fixes, ce qui indique
qu'ils ont bien été appariés.
After 30 seconds, your transmitter will search for both the previously paired headset or
600 Gen 2 headset to pair to. Bring the two units closer together
to ensure faster pairing.
Au bout de 30secondes, votre émetteur cherchera le casque apparié précédemment ou
n'importe quel casque Stealth
600 Gen 2 disponible avec lequel s'apparier. Rapprochez les
deux unités pour un appariage plus rapide.
Connect to the Turtle Beach Audio Hub for
Connectez-vous au Turtle Beach Audio Hub pour
afin de mettre à jour le micrologiciel.
tu tlebeach.co /audiohubr m
VEUILLEZ VOUS ASSURER QUE VOTRE CASQUE
DISPOSE DE LA DERNIÈRE VERSION DU MICROLOGICIEL.
PLEASE MAKE SURE YOUR HEADSET
IS UPDATED WITH THE LATEST FIRMWARE.
Port USB pour le chargement
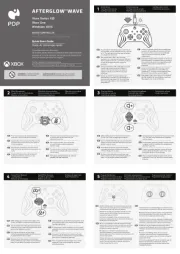
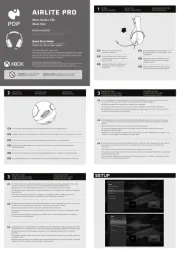
Press (1s) = Power On/Off
Press = Superhuman Hearing
Appuyer (1s) pour allumer/éteindre
Press = Superhuman Hearing
Adjust Mic Monitoring levels
Cycle through EQ audio presets
Appuyer pour parcourir les presets
Always charge your headset before storing it for any extended period of time (greater than
3 months). Never store the unit in temperatures above 113°F/45°C.
Chargez toujours votre casque avant de le ranger pour une longue durée
(plus de 3 mois). Ne stockez jamais le casque à des températures supérieures à 45°C.
Signature Sound | Son emblematique
Bass Boost |Amplification des basses
Bass + Treble Boost |Amplification des basses et des aigus
Vocal Boost |Amplification vocal
600 Gen 2 gives you of rechargeable 15 hours
battery life. Make sure to charge it regularly before storing.
600 Gen 2 vous offre 15heures d'autonomie de
batterie rechargeable. N'oubliez pas de le recharger
régulièrement avant de le ranger.
EQ PRESETS | PRÉSETS D’ÉGALISATION
600 Gen 2 Mini Wireless Transmitter
Émetteur sans fil mini hStealt
Câble de chargement USB-C
Connect Mini Transmitter to USB Port
Local Restrictions on Radio Usage
Caution: Due to the fact that the frequencies used by wireless devices may not yet be harmonized in all countries, these radio
products are designed for use only in specific countries, and are not allowed to be operated in countries other than those of
designated use. As a user of these products, you are responsible for ensuring that the products are used only in the countries for
which they were intended and for verifying that they are configured with the correct selection of frequency and channel for the
country of use. Any deviation from the permissible power and frequency settings for the country of use is an infringement of national
law and may be punished as such.
To determine whether you are allowed to use your wireless network device in a specific country, please check to see if the radio type
number that is printed on the identification label of your device is listed in the manufacturer's OEM Regulatory Guidance document at
http://www.turtlebeach.com/homologation
or contact Turtle Beach directly.
Federal Communications Commission (FCC) Compliance Notices
This section includes the following FCC statements for the Stealth
• FCC ID: XGB-TB3140 (RX) & XGB-TB3141 (TX) • Non-Modification Statement
• Class B Interference Statement • RF Radiation Exposure & Hazard Warning
Class B Interference Statement
This equipment has been tested and found to comply with the limits for a Class B digital device, pursuant to Part 15 of the FCC
Rules. The limits are designed to provide reasonable protection against harmful interference in a residential installation. This
equipment generates, uses, and can radiate radio frequency energy and, if not installed and used in accordance with the
instructions, may cause harmful interference to radio communications. However, there is no guarantee that interference will not
occur in a particular installation. If this equipment doesn’t cause harmful interference to radio or television reception, which can
be diminished by turning the equipment off and on, the user is encouraged lo try to correct the interference by one or more of the
• Reorient or relocate the receiving antenna.
• Increase the separation between the equipment and receiver.
• Connect the equipment into an outlet on a circuit different from that to which the receiver is connected.
• Consult the dealer or an experienced radio/TV technician for help.
This device complies with Part 15 of the FCC Rules. Operation is subject to the following two conditions: [1] This device may not
cause harmful interference, and (2) thls devlce must accept any interference received, Including interference that may cause
RF Radiation Exposure & Hazard Statements
To ensure compliance with FCC RF exposure requirement, this device must be installed in a location such that the antenna of the
device will be greater than 2 cm (0.8 in.] from all persons. Using higher gain antennas and types of antennas not covered under the
FCC certification of this product is not allowed. lnstallers or the radio and and users of the product must adhere to the installation
instructions provided in this manual. This transmitter must not be co-located or operated in conjunction with any other antenna or
Non-Modification Statement
Use only the supplied Internal antenna. Unauthorized anlennas, modifications, or attachments could damage the Stealth
Gen 2 RX & TX Models and violate FCC regulations. Any changes or modifications not expressly approved by the party responsible for
compliance could void the user's authority to operate this equipment. Please contact Turtle Beach for a list of approved 2.4 GHz
This product is compliant with the Consumer Product Safety Improvement Act of 2008, Public Law 110-314 (CPSIA)
Canadian ICES Statements IC:
3879A-3140 (RX) and IC: 38791A-3141 (TX)
This device complies with ICES-003 and RSS-247 of Industry Canada. Operation is subject to the following two conditions:
1. This device may not cause interference, and
2. This device must accept any Interference, including interference that may cause undesired operations of the device.
Ce dispositif est conforme aux normes NMB003 et CNR-247 d’Industrie Canada
Son fonctionnement est soumis aux deux conditions suivantes :
1. Ce dispositif ne doit pas causer d’interférences nuisibles et;
2. Il doit pouvoir accepter les interférences, incluant celles pouvant nuire à son fonctionnement normal.
To prevent radio Interference to the licensed service (I.e. co-channel Mobile Satellite systems) this device is Intended to be operated
indoors and away from windows to provide maximum shielding. Equipment (or its transmit antenna] that is installed outdoors is
subject to licensing and not supported by Stealth
600P Gen 2 RX & TX Models.
Pour éviter les interferences radio au service agréé (c.-à-d. Les systèmes par satellite mobile co-canal), cet appareil est destiné à
fonctionner à l’intérieur et a l’extérieur des fenêtres pour assurer un blindage maximal. L’équipement (ou son antenne d’émission)
installé à l’extérieur est soumis à l’octroi de licences et n’est pas pris en charge par les modèles hStealt
RF Radiation Exposure & Hazard Statement
To ensure compliance with RSS-102 RF exposure requirements, this device must be installed in a location such that the antenna of the
device will be greater than 2 cm (0.8 in.) away from all persons. Using higher gain antennas and types of antennas not covered under
the IC certification of this product is not allowed. Installers of the radio and end users of the product must adhere to the installation
instructions provided in this manual. This transmitter must not be co-located or operated in conjunction wilh any other antenna or
Exposition aux radiations RF & Mention de danger
Pour assurer la conformité avec les exigences RSS-102 d'exposition aux RF (Radio Fréquences), cet appareil doit être installé dans un
endroit ou l’antenne de l'appareil sera situé à une distance de plus de 2 cm (0,8 po.) de toutes personnes. L’utilisation d’antennes de
gain plus élevé et les types d'antennes qui ne sont pas couvertes en vertu de la certification d’IC de ce produit n'est pee autorisée. Les
installateurs de la radio et les utilisateurs du produit final doivent se conformer aux Instructions d’installation fournies dans ce
manuel. Cet émetteur ne dolt pas Aire co-implanté ou exploité en conjonction avec toute autre antenne ou tramemetteur.
European Union and European Fair Trade Association Regulatory Compliance
This equipment may be operated in the countries that comprise the member countries of the European Union and the European Fair
Trade Association. These countries, listed below, are referred to as The European Community throughout this document: AUSTRIA,
BELGIUM, BULGARIA, CYPRUS, CZECH REPUBLIC, DENMARK, ESTONIA, FINLAND, FRANCE, GERMANY, GREECE, HUNGARY,
IRELAND, ITALY, LATVIA, LITHUANIA, LUXEMBOURG, MALTA, NETHERLANDS, POLAND, PORTUGAL, ROMANIA, SLOVAKIA, SLOVENIA,
SPAIN, SWEDEN, UNITED KINGDOM, ICELAND, LICHTENSTEIN, NORWAY, SWlTZERLAND.
EN 55032: 2015; CISPR 32: 2015,
EN 301 489-1 v2.1.1 (2017-02), EN 301 489-17 v3.1.1 (2016-11),
EN 61000-4-2: 2009, EN 61000-4-3: 2006 + A1: 2008 + A2: 2010,
The products are licensed, as required, for additional country specific standards for the International
Marketplace. Additional issued licenses available upon request.
Radio: EN 300 328 V2.1.2 (2019-07)
RoHS 2015/863 amending Annex II to 2011/65/EU, WEEE 2012/19/EU,
REACH 2006/1907/EC, Packaging 94/62/EC, Battery 2006/66/EC,
Toys Safety Directive 2009/48/EC
This is a Class B product. In a domestic environment, this product may cause radio interference, in which case, the user is required to
take appropriate measures.
Dieses ist ein Gerät der Funkstörgrenzwertklasse B. In Wohnbereichen können bei Betrieb dieses Gerätes Rundfunkstörungen
auftreten, in welchen Fällen der Benutzer für entsprechende Gegenmaßnahmen verantwortlich ist.
Ceci est un produit de Classe B. Dans un environnement domestique, ce produit risque de créer des interférences radioélectriques, il
appartiendra alors à l’utilisateur de prendre les mesures spécifiques appropriées.
Turtle Beach Europe Ltd is obligated as a producer with a main activity of selling under The Producer Responsibility Obligations
(Packaging Waste) Regulations 2007. To fulfil our obligation we are registered with Comply Direct and their Recycling Room. Here you
will find advice and information on packaging waste management, recycling symbols and the waste hierarchy principles of reduce,
reuse and recycle. https //www.complydirect.co the-recycling-roo: m/ m/
Please visit the following URL for a complete copy of the Declaration of Conformity: http://www.turtlebeach.com/homologation
Mexican IFT-008 Compliance Statement
“La operación de este equipo está sujeta a las siguientes dos condiciones: (1) es posible que este equipo o dispositivo no cause
interferencia perjudicial y (2) este equipo o dispositivo debe aceptar cualquier interferencia, incluyendo la que pueda causar su
This symbol on the product or its packaging indicates that this product must not be disposed of with your other
household waste. Instead, it is your responsibility to dispose of your waste equipment by handing it over to a
designated collection point for the recycling of waste electrical and electronic equipment. The separate collection
and recycling of your waste equipment at the time of disposal will help conserve natural resources and ensure that it
is recycled in a manner that protects human health and the environment. For more information about where you can
drop off your waste for recycling, please contact your local authority, or where you purchased your product.
Regulatory Compliance Statements for Stealth
Not seeing what you're looking for here?
Visit turtlebeach.com/support
for the latest Tech Support information.
Vous n'avez pas trouvé ce que vous cherchiez?
Rendez-vous sur turtlebeach.com/support
pour consulter les dernières informations
de l'assistance technique.
600 Gen 2 for Input & Output Device
b. Set Output to Headphones to All Audio
c. Set Volume Control (headphones) level to maximum
d. Select Adjust Microphone Level and follow the on-screen instructions to calibrate
Allez dans Paramètre Périphériques >s >Périphériques Audio
600 Gen 2 comme périphérique d'entrée et de sortie
b. Réglez Sortie vers le casque sur Tout audio
c. Mettez le réglage du volume (casque) au maximum
d. Sélectionnez Régler le niveau du microphone et suivez les instructions à l'écran pour
calibrer votre microphoneyour microphone
Dirígete a Configuración >Dispositivos >Dispositivos de audio
600 Gen 2 en la sección de Dispositivo de entrada y salida
b. Selecciona Todo el sonido para la salida a los audífonos
c. Ajusta el control de volumen de los audífonos en el nivel máximo
d. Selecciona Ajustar el nivel del micrófono y sigue las instrucciones en pantalla para
Acede a Definições > Dispositivos > Dispositivos de áudio
a. Define os auscultadores Stealth
600 Gen 2 como dispositivo de entrada e saída
b. Em Saída para auscultadores, escolhe Todo o áudio
c. Define o nível de controlo do volume (auscultadores) para o máximo
d. Seleciona Ajustar o nível do microfone e segue as instruções no ecrã para calibrares
Gå til Indstillinger > Enheder > Lydenheder
600 Gen 2 som Inputenhed og Outputenhed
b. Angiv Output til hovedtelefoner til Al lyd
c. Indstil Lydstyrkekontrol (hovedtelefoner) til maksimalt niveau
d. Vælg Juster mikrofonniveau, og følg instruktionerne på skærmen for at kalibrere
Vai a Impostazioni > > Dispositivi Dispositivi audio
600 di seconda generazione per dispositivi di input e output
b. Imposta Output alle cuffie su Tutto l'audio
c. Imposta Regolazione volume (cuffie) al livello massimo
d. Seleziona Regola livello microfono e segui le istruzioni sullo schermo per calibrare il
Gehe zu Einstellungen Audio-Geräte. > Geräte >DE
a. Wähle bei Ein- und Ausgabegeräte: Stealth
b. Stelle ein, dass alle Sounds über die Kopfhörer ausgegeben werden.
c. Stelle die Lautstärkenregelung (Kopfhörer) auf die höchste Stufe.
d. Wähle Mikrofonpegel anpassen und folge den Anweisungen auf dem Bildschirm, um
dein Mikrofon einzustellen.
Ga naar Instellingen > Apparaten Audioapparaten>
600 Gen 2 als invoer- en uitvoerapparaat
b. Stel Uitvoer naar hoofdtelefoon in op Alle audio
c. Stel Volumebediening (hoofdtelefoon) in op het maximum
d. Selecteer Microfoonniveau aanpassen en volg de instructies op het scherm om je
Gå till Inställningar > Enheter Ljudenheterparaten>
600 Gen 2 som enhet för indata och utdata
b. Ställ in hörlurar som utdata för allt ljud
c. Ställ in volymkontroll (hörlurar) till max
d. Välj justering av mikrofonnivån och följ instruktionerna på skärmen för att
Go to Setting Devices >s s>Audio Device
Declaration of Conformity
Indicates compliance with the Essential Requirements of the Radio Equipment Directive (RED) of the European Union (2014/53/EU).
This equipment meets the following conformance standards:
EN 60950-1: 2006 + A11: 2009 + A1: 2010 + A12: 2011 + A2: 2013 (T-Mark License),
IEC 60950-1: 2005 (2nd Ed.) + Am 1: 2009 + Am 2: 2013 (CB Scheme Certificate),
EN 62368-1: 2014 + A11 (T-Mark License),
IEC 62368-1: 2014 (CB Scheme Certificate),
EN 50332-1: 2013, EN 50332-2: 2013, EN 71-3: 2013
Additional licenses issued for specific countries available on request.
Flip up mic to mute. There
is an audbile tone when the
lorsque le microphone est
Utilisez le mode Superhuman Hearing
pour localiser des sons presque
imperceptibles, comme les pas d'un
ennemi ou le rechargement d'une arme.
Pendant le jeu, vous pouvez activer ou
désactiver Superhuman Hearing
appuyant une fois sur le bouton
D'ALIMENTATIO rapidementN .
pinpoint quiet audio cues like enemy
footsteps and weapon reloads.
During gameplay, you can activate and
deactivate Superhuman Hearing
pressing the POWER button once, quickly.
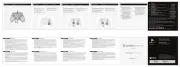
To access the rating label:
Pour accéder à l'étiquette:
2. Once you’ve released the cloth from the lip on top, pull the
ear pad straight back and it should slip right off.
2. Une fois le haut du tissu dégagé, tirez le coussinet vers
vous pour le retirer facilement.
1. Remove the left ear pad by pulling the ear pad straight up
1. Retirez le coussinet gauche en le tirant vers le haut à l'aide
To replace the ear pad, follow the same process in reverse.
Pour remettre le coussinet en place, veuillez suivre la
600 Gen 2 for PlayStation
Transmitter into an available USB port on
4 console. Your Transmitter will begin to double blink blue as it
searches for your Headset.
Connectez votre émetteur Stealth
600 Gen 2 pour PlayStation
à un port USB disponible sur
votre console PlayStation
4. Votre émetteur commencera à clignoter deux fois en bleu,
indiquant qu'il cherche votre casque.
600 Gen 2 for PlayStation
and the LED will begin to double blink blue as it searches
Allumez votre casque Stealth
et le voyant LED commencera à clignoter
deux fois en bleu, indiquant qu'il cherche votre émetteur.
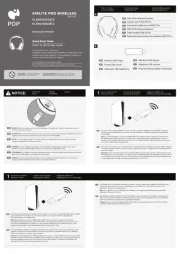
The headset and transmitter are paired out of the box, indicated by a solid LED on the
transmitter. If your transmitter's LED is double-blinking, follow the steps to pair your headset
Le casque et l'émetteur mini devraient déjà être appariés, comme l'indique un voyant fixe sur
l'émetteur. Si le voyant de votre émetteur clignote deux fois, suivez les étapes pour apparier
votre casque et votre émetteur.
Clignote Deux Fois en Bleu
Headset and Mini Transmitter Paired
Casque et metteur Mini AppariésÉ
GUIDE DE E DÉMARRAG RAPIDE
tu tlr e h. m rtbeac co /suppo
60 n 0 Ge 2 ySt nfor Pla atio
Any questions? Des questions ?
Clignote Deux Fois en Bleu
Headset and Mini Transmitter Paired
Casque et metteur Mini AppariésÉ
(While Charging) Battery Full
(En Charge) Batterie Pleinel
(While Charging) Battery Charging
(En Charge) Batterie en Charge