This symbol on the product or its packaging indicates that this product must not be disposed of with your other
household waste. Instead, it is your responsibility to dispose of your waste equipment by handing it over to a
designated collection point for the recycling of waste electrical and electronic equipment. The separate collection
and recycling of your waste equipment at the time of disposal will help conserve natural resources and ensure that
it is recycled in a manner that protects human health and the environment. For more information about where you
can drop off your waste for recycling, please contact your local authority, or where you purchased your product.
Turtle Beach Europe Ltd is obligated as a producer with a main activity of selling under The Producer Responsibility Obligations (Packaging
Waste) Regulations 2007. To fulfil our obligation we are registered with Comply Direct and their Recycling Room. Here you will find advice
and information on packaging waste management, recycling symbols and the waste hierarchy principles of reduce, reuse and recycle.
https://www.complydirect.com/the-recycling-room/
Declaration of Conformity
indicates compliance with the Essential Requirements of the Radio Equipment Directive (RED) of the European Union (2014/53/EU).
This equipment meets the following conformance standards:
Safety: EN 62368-1: 2014 + A11 (T-Mark License),
IEC 62368-1: 2014 (CB Scheme Certificate),
EN 50332-1: 2013, EN 50332-2: 2013, EN 71-3: 2013
Additional licenses issued for specific countries available on request
EMC: EN 55032: 2015 + A11: 2020, CISPR 32: 2015,
EN 301 489-1 v2.2.3 (2019-11), EN 301 489-9 v2.1.1 (2019-04)
EN 61000-4-2: 2009, EN 61000-4-3: 2006 + A1: 2008 + A2: 2010,
The products are licensed, as required, for additional country specific standards for the International Marketplace.
Additional issued licenses available upon request.
Radio: EN 300 328 v2.2.2 (2019-07)
Environmental : RoHS 2015/863 amending Annex II to 2011/65/EU, WEEE 2012/19/EU, REACH 2006/1907/EC, Packaging 94/62/EC,
Battery 2006/66/EC, Toys Safety Directive 2009/48/EC
Please visit the following URL for a complete copy of the Declaration of Conformity:
http://www.turtlebeach.com/homologation
Warning! This is a Class B product. In a domestic environment, this product may cause radio interference, in which case, the user
may be required to take appropriate measures.
Achtung! Dieses ist ein Gerät der Funkstörgrenzwertklasse B. In Wohnbereichen können bei Betrieb dieses Gerätes
Rundfunkstörungen auftreten, in welchen Fällen der Benutzer für entsprechende Gegenmaßnahmen verantwortlich ist.
Attention! Ceci est un produit de Classe B. Dans un environnement domestique, ce produit risque de créer des interférences
radioélectriques, il appartiendra alors à l’utilisateur de prendre les mesures spécifiques appropriées.
Regulatory Compliance Statements for the Stealth
Models: Stealth700X-MAX-RX and Stealth700X-MAX-TX
Local Restrictions on Radio Usage
Caution: Due to the fact that the frequencies used by wireless devices may not yet be harmonized in all countries, these radio products are
designed for use only in specific countries, and are not allowed to be operated in countries other than those of designated use. As a user of
these products, you are responsible for ensuring that the products are used only in the countries for which they were intended and for
verifying that they are configured with the correct selection of frequency and channel for the country of use. Any deviation from the
permissible power and frequency settings for the country of use is an infringement of national law and may be punished as such.
To determine whether you are allowed to use your wireless network device in a specific country, please check to see if the radio type number
that is printed on the identification label of your device is listed in the manufacturer's OEM Regulatory Guidance document at the following
http://www.turtlebeach.com/homologation or contact Turtle Beach directly.
Federal Communications Commission (FCC) Compliance Notices
This section includes the following FCC statements for the Stealth700X-MAX-RX and Stealth700X-MAX-TX:
• FCC ID: XGB-2790RX & XGB-2790TX • Class B Interference Statement
• RF Radiation Exposure & Hazard Warning • Non-Modification Statement
Class B Interference Statement
This equipment has been tested and found to comply with the limits for a Class B digital device, pursuant to Part 15 of the FCC Rules. These
limits are designed to provide reasonable protection against harmful interference in a residential installation. This equipment generates,
uses, and can radiate radio frequency energy and, if not installed and used in accordance with the instructions, may cause harmful
interference to radio communications. However, there is no guarantee that interference will not occur in a particular installation. If this
equipment does cause harmful interference to radio or television reception, which can be determined by turning the equipment off and on, the
user is encouraged to try to correct the interference by one or more of the following measures:
• Reorient or relocate the receiving antenna.
• Increase the separation between the equipment and receiver.
• Connect the equipment into an outlet on a circuit different from that to which the receiver is connected.
• Consult the dealer or an experienced radio/TV technician for help.
This device complies with Part 15 of the FCC Rules. Operation is subject to the following two conditions: (1) This device may not cause harmful
interference, and (2) this device must accept any interference received, including interference that may cause undesired operation.
RF Radiation Exposure & Hazard Statement
To ensure compliance with FCC RF exposure requirements, this device must be installed in a location such that the antenna of the device will
be greater than 2 cm (0.8 in.) from all persons. Using higher gain antennas and types of antennas not covered under the FCC certification of
this product is not allowed. Installers of the radio and end users of the product must adhere to the installation instructions provided in this
manual. This transmitter must not be co-located or operated in conjunction with any other antenna or transmitter.
Non-Modification Statement
Use only the supplied internal antenna. Unauthorized antennas, modifications, or attachments could damage the Stealth700X-MAX-RX and
Stealth700X-MAX-TX and violate FCC regulations. Any changes or modifications not expressly approved by the party responsible for
compliance could void the user's authority to operate this equipment. Please contact Turtle Beach for a list of approved 2.4 GHz antennas.
This product is compliant with the Consumer Product Safety Improvement Act of 2008, Public Law 110-314 (CPSIA)
IC: 3879A-2790RX & 3879A-2790TX (Stealth700X-MAX-RX and Stealth700X-MAX-TX)
This device complies with ICES-003 and RSS-247 of Industry Canada. Operation is subject to the following two conditions:
1. This device may not cause interference, and
2. This device must accept any interference, including interference that may cause undesired operation of the device.
Ce dispositif est conforme aux normes NMB003 et CNR-247 d’Industrie Canada.
1. L’utilisation de ce dispositif est autorisée seulement aux conditions suivantes :
2. il ne doit pas produire de brouillage et l’utilisateur du dispositif doit être prêt à accepter tout brouillage radioélectrique reçu, même si ce
brouillage est susceptible de compromettre le fonctionnement du dispositif.
To prevent radio interference to the licensed service (i.e. co-channel Mobile Satellite systems) this device is intended to be operated
indoors and away from windows to provide maximum shielding. Equipment (or its transmit antenna) that is installed outdoors is subject to
licensing and not supported by Stealth700X-MAX-RX and Stealth700X-MAX-TX.
Pour éviter les interférences radio au service agréé (c.-à-d. Les systèmes par satellite mobile co-canal), cet appareil est destiné à
fonctionner à l'intérieur et à l'extérieur des fenêtres pour assurer un blindage maximal. L'équipement (ou son antenne d'émission)
installé à l'extérieur est soumis à l'octroi de licences et n'est pas pris en charge par les modèles Stealth700X-MAX-RX and
RF Radiation Exposure & Hazard Statement
To ensure compliance with RSS-102 RF exposure requirements, this device must be installed in a location such that the antenna of the
device will be greater than 2 cm (0.8 in.) away from all persons. Using higher gain antennas and types of antennas not covered under the IC
certification of this product is not allowed. Installers of the radio and end users of the product must adhere to the installation instructions
provided in this manual. This transmitter must not be co-located or operated in conjunction with any other antenna or transmitter.
Exposition aux radiations RF & Mention de danger
Pour assurer la conformité avec les exigences RSS-102 d'exposition aux RF (Radio Fréquences), cet appareil doit être installé dans un
endroit ou l'antenne de l'appareil sera située à une distance de plus de 2 cm (0.8 po) de toutes personnes. L’utilisation d'antennes à gain
plus élevé et les types d'antennes qui ne sont pas couverts en vertu de la certification IC de ce produit n'est pas autorisée. Les
installateurs de la radio et les utilisateurs du produit final doivent se conformer aux instructions d'installation fournies dans ce manuel.
Cet émetteur ne doit pas être co-implanté ou exploité en conjonction avec toute autre antenne ou transmetteur
European Union and European Fair Trade Association Regulatory Compliance
This equipment may be operated in the countries that comprise the member countries of the European Union and the European Fair Trade
Association. These countries, listed below, are referred to as The European Community throughout this document:
AUSTRIA, BELGIUM, BULGARIA, CYPRUS, CZECH REPUBLIC, DENMARK, ESTONIA, FINLAND, FRANCE, GERMANY, GREECE, HUNGARY,
IRELAND, ITALY, LATVIA, LITHUANIA, LUXEMBOURG, MALTA, NETHERLANDS, POLAND, PORTUGAL, ROMANIA, SLOVAKIA, SLOVENIA,
SPAIN, SWEDEN, UNITED KINGDOM, ICELAND, LICHTENSTEIN, NORWAY, SWITZERLAND
GUIDE DE E DÉMARRAG RAPIDE
tu tlr e h. m rtbeac co /suppo
Any questions? Des question ?s
Connect to the Turtle Beach Audio Hub for Windows or Mac
to update firmware. Customize your settings with the
Turtle Beach Audio Hub mobile app for and Android iOS.
Connectez-vous au Turtle Beach Audio Hub pour
afin de mettre à jour le micrologiciel.
Personnalisez vos options avec l'application mobile
Turtle Beach Audio Hub pour Android iOS et .
tu tlebeach.co /audiohubr m
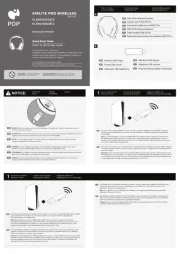
Flip up mic to mute. There
is an audible tone when the
Le mode Superhuman Hearing
permet d'entendre le moindre son,
comme les pas d'un adversaire ou le
Pendant le jeu, vous pouvez activer ou
désactiver Superhuman Hearing
appuyant une fois sur le bouton
pinpoint quiet audio cues like enemy
footsteps and weapon reloads.
During gameplay, you can activate and
deactivate Superhuman Hearing
pressing the MODE button once, quickly.
Refer to mappable buttons section.
Indique les boutons assignables.
Refer to LED Behaviors page
Press (2s) = Power On/Off
Appuyer (2s) pour allumer/éteindre
Signature Sound | Son emblematique
Bass Boost |Amplification des basses
Bass + Treble Boost |Amplification des basses et des aigus
Vocal Boost |Amplification vocal
EQ PRESETS | PRÉSETS D’ÉGALISATION
VEUILLEZ VOUS ASSURER QUE VOTRE CASQUE
DISPOSE DE LA DERNIÈRE VERSION DU MICROLOGICIEL.
PLEASE MAKE SURE YOUR HEADSET
IS UPDATED WITH THE LATEST FIRMWARE.
Micro désactivé Micro désactivé
Clignote deux fois en vert
Headset and Transmitter Paired
Casque et émetteur appariés
Stays white for 2 seconds, then goes back to green.
Reste blanc pendant 2secondes, puis repasse au vert.
LED turns off when battery is fully charged (if headset is off).
Le voyant s'éteint lorsque la batterie est entièrement chargée
(si le casque est éteint).
(While Charging & On) Battery Full
(En charge et Allumé) Batterie Pleinel
(While Charging) Battery Charging
(En Charge) Batterie en Charge
Clignotement rapide blanc
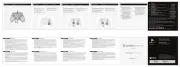
Not seeing what you're looking for here?
Visit turtlebeach.com/support
for the latest Tech Support information.
Vous n'avez pas trouvé ce que vous cherchiez?
Rendez-vous sur turtlebeach.com/support
pour consulter les dernières informations
de l'assistance technique
To access the rating label:
Pour accéder à l'étiquette:
2. Place ear cushion back onto the silver ring of your headset. The
ear cushion will snap into place.
Remettez les coussinets en place sur l'anneau en argent de votre
casque. Le coussinet se placera correctement de lui-même.
1. Remove the ear pad.left
Retirez le coussinet .gauche
Custom EQ Presets available through the
Turtle Beach Audio Hub mobile app.
Des préréglages EQ personnalisés sont
disponibles dans l'application mobile
Depending on the size of your glasses frame, use the tab adjustment to create the appropriate sized channel in the ear
cushion. By default, the adjustment tab is set to the shallowest setting. To increase the size/depth of the channel in the
ear cushion, simply pull the tab and attach it to the post based on your preference.
Utilisez la sangle de réglage pour créer et ajuster l'espace nécessaire correspondant à la taille de vos montures. Par
défaut, la sangle propose le plus petit réglage possible. Pour augmenter la taille ou la profondeur nécessaire, tirez tout
simplement la sangle et fixez-la en fonction de vos préférences.
After you’ve adjusted the glasses friendly channel to your liking, place the ear cushion back onto the speaker.
The ear cushion should snap into place with minimal effort.
Une fois que vous avez ajusté le système à votre convenance, replacez le coussinet sur l'écouteur. À nouveau,
le geste ne devrait pas vous poser de difficulté.
Glasses Relief system creates a channel in the ear cushion to help reduce pressure on your glasses
frame. To adjust this, you must first remove the ear cushion. Hold the ear cushion firmly and pull it away from the
speaker. The ear cushion should come off with minimal effort.
Le système spécial lunettes ProSpecs
réduit la pression exercée sur les montures. Pour l'utiliser, vous devrez
tout d'abord retirer les coussinets. Tenez fermement le coussinet et détachez-le de l'écouteur, ce qui ne devrait
pas nécessiter trop d'efforts.
For those who game with glasses, adjust the ProSpecs
Glasses Friendly System for added comfort
a été conçu spécialement pour garantir aux joueurs
qui portent des lunettes un confort absolu
Système spécial lunettes ProSpecs
Câble de chargement USB-C
When transmitter is in Xbox Mode:
Refer to mappable buttons section.
Indique les boutons assignables.
When transmitter is in USB Mode:
Quand l'émetteur est en mode USB:
Quand l'émetteur est en mode Xbox:
The USB-A transmitter is equipped with a switch
that allows you to change compatibility modes.
wireless compatibility supported through Bluetooth
for game audio only or USB
connection while in docked mode for game & chat audio with games that support chat capability.
*La compatibilité sans fil de la Nintendo Switch
est assurée par connexion Bluetooth
pour le son dans les jeux
ou en USB en mode téléviseur, et pour le volume du chat pour les jeux compatibles avec cette fonctionnalité.
L'émetteur USB-A est équipé d'un bouton qui
permet de changer les modes de compatibilité.
USB TRANSMITTER COMPATIBILITY
TRANSMITTER LED INDICATION
INDICATIONS DU VOYANT DE L'ÉMETTEUR
Clignote deux fois en vert
Headset and Transmitter Paired
Casque et Émetteur Appariés
SURROUND SOUND FOR XBOX (ONLY AVAILABLE ON XBOX)
SON SURROUND POUR XBOX (DISPONIBLE UNIQUEMENT SUR XBOX)
For updated setup instructions visit:
Vous trouverez un guide d'installation mis à jour à l'adresse:
1. Go to Setting Generas >l>Volume & Audio Output
2. Set Headset Format to Windows Sonic for Headphones
1. Ve a Configuración o>Dispositivos de sonid >
2. Selecciona Windows Sonic para auriculares como
formato de los auriculares.
1. Selezionare Impostazion Dispositivi audii >o>
2. Imposta Formato cuffie su Windows Sonic per cuffie.
1. Gå till Inställningar>Ljudenheter > Ljudutdata
2. Ställ in Windows Sonic for Headphones
1. Ga naar Instellingen >Apparaten >Audioapparaten
2. Stel Headsetindeling in op Windows Sonic
1. Ouvrez Paramètre Périphériques audis >o>
2. Réglez Format du casque sur Windows Sonic
1. Wählen Sie Einstellungen >Audiogeräte >
2. Stelle das Headset-Format auf Windows Sonic
1. Dirige-te a Definiçõe Dispositivos de Áudis >o>
2. Configura o Formato dos Auscultadores para
Windows Sonic nos Auscultadores
1. Gå til Indstillinger >Lydenheder >Lyd-output
2. Indstil headset-formatet til Windows Sonic
Put the transmitter into “XBOX” mode.
Mettre l'émetteur en mode "XBOX".
Connect transmitter to USB port.
Connecter l’émetteur au port USB.
Wait for headset & transmitter to pair.
Attendez que le casque et l'émetteur
Put the transmitter into “USB” mode.
Mettre l'émetteur en mode "USB".
Put the transmitter into your platform’s USB-A port.
Insérer l'émetteur dans le port USB-A de votre plateforme.
Wait for headset & transmitter to pair.
Attendez que le casque et l'émetteur
1. Pon el transmisor en modo XBOX.
2. Conecta el transmisor al puerto USB.
3. Enciende los auriculares.
4. Espera a que se emparejen los auriculares
1. Metti il trasmettitore in modalità "XBOX".
2. Collega il trasmettitore alla porta USB.
4. Attendi che le cuffie e il trasmettitore si associno.
1. Zet de zender in de Xbox-modus.
2. Sluit de zender aan op de USB-poort.
4. Wacht totdat de headset en zender zijn gekoppeld.
1. Coloque o transmissor em modo “XBOX”.
2. Ligue o transmissor à porta USB.
3. Ligue os auscultadores.
4. Aguarde pelo emparelhamento dos
auscultadores e do transmissor.
1. Indstil senderen til “XBOX”-tilstand.
2. Sæt senderen i USB-porten.
4. Vent, til der er oprettet forbindelse mellem
1. Metti il trasmettitore in modalità "USB".
2. Collega il trasmettitore alla tua porta "USB-A".
4. Attendi che le cuffie e il trasmettitore si associno.
1. Zet de zender in de USB-modus.
2. Sluit de zender aan op de USB-A-poort
4. Wacht totdat de headset en zender zijn gekoppeld.
1. Pon el transmisor en modo USB.
2. Pon el transmisor en el puerto USB-A
3. Enciende los auriculares.
4. Espera a que se emparejen los auriculares
1. Coloque o transmissor em modo “USB”.
2. Coloque o transmissor na porta USB-A
3. Ligue os auscultadores.
4. Aguarde pelo emparelhamento dos
auscultadores e do transmissor.
1. Indstil senderen til “USB”-tilstand.
2. Indsæt senderen i din platforms USB-A-port.
4. Vent, til der er oprettet forbindelse mellem
1. Ställ in sändaren på "Xbox"-läget.
2. Koppla sändaren till USB-porten.
4. Vänta på att headsetet och sändaren parkopplas.
1. Versetze den Sender in den „XBOX“-Modus.
2. Verbinde den Sender mit dem USB Anschluss.
3. Schalte das Headset ein.
4. Warte, bis Headset und Sender gekoppelt sind.
1. Ställ in sändaren på "USB"-läget.
2. Anslut sändaren i din plattforms USB-A-port.
4. Vänta på att headsetet och sändaren parkopplas.
1. Versetze den Sender in den „USB“-Modus.
2. Verbinde den Sender mit dem USB-A
Anschluss deiner Plattform.
3. Schalte das Headset ein.
4. Warte, bis Headset und Sender gekoppelt sind.
700 Gen 2 MAX gives you 40 hours of rechargeable
battery life. Make sure to charge it regularly before storing.
700 Gen 2 MAX vous offre 40heures
d'autonomie de batterie rechargeable. N'oubliez pas de le
recharger régulièrement avant de le ranger.
The MODE Button and Mappable Wheel can be assigned to
a new function based on your gaming style. To change the
button’s assignment, follow these steps:
Le bouton de MODE et la molette assignable peuvent être
assignés à une nouvelle fonction selon votre style de jeu.
Pour changer la fonction du bouton, suivez ces étapes:
Download the Turtle Beach Audio Hub mobile app on your iOS
Téléchargez l'application mobile Turtle Beach Audio Hub sur
votre appareil iOS ou Android.
Enable Bluetooth on your selected device, and use the
Bluetooth pairing method to access the app.
sur l'appareil sélectionné et servez-vous
pour vous rendre sur l'application.
After pairing, open the app and swipe to the second settings
screen to assign new functions.
Une fois l'appariage effectué, ouvrez l'application et faites
glisser jusqu'au deuxième écran des options pour assigner de
Once selected, your headset will save this configuration.
Une fois la configuration sélectionnée, votre casque la
Scan this QR code to get the
Audio Hub App on your phone
so you can customize your
installer l'application Audio Hub
sur votre téléphone: vous
pourrez ensuite personnaliser
vos boutons reconfigurables.
Bouton multifonction Bluetooth
Voir la configuration Appariage
700 Gen 2 MAX headset will enter Bluetooth
pairing mode once powered on. If no
connection is made in two minutes, Bluetooth
pairing mode will stop. To put your
pairing mode, follow these steps:
Une fois allumé, votre casque Stealth
700 Gen 2 MAX entrera en mode Appariage Bluetooth
Si aucune connexion Bluetooth
n'est effectuée dans les deux minutes, le mode Appariage
sera désactivé. Pour activer le mode Appariage Bluetooth
suivez ces instructions:
ACTION DU BOUTON BLUETOOTH
Appuyer deux fois rapidement
Press Twice Quickly and Hold
Appuyer deux fois rapidement et maintenir
Press Three Times Quickly
Appuyer trois fois rapidement
Press Three Times Quickly and Hold
Appuyer trois fois rapidement et maintenir
Activate Voice Recognition (if available)
Activer la reconnaissance vocale
SETUP | CONFIGURATIO BLUETOOTHN
1. Hold down the Bluetooth
Button until the "Bluetooth
2. After placing your headset in pairing mode, select the headset from within
Settings menu to connect to your headset.
1. Maintenez le bouton Bluetooth
enfoncé jusqu'à obtenir confirmation du
2. Après avoir mis votre casque en mode Appariage, rendez-vous dans les
pour sélectionner votre casque et vous y connecter.
1. Mantén pulsado el botón de Bluetooth
"emparejamiento de Bluetooth
2. Tras dejar tus auriculares en modo de emparejamiento, selecciona los
auriculares en el menú de configuración de Bluetooth
conectar los auriculares.
1. Tieni premuto il pulsante Bluetooth
fino alla comparsa del messaggio
2. Dopo aver messo in modalità associazione le tue cuffie, seleziona le cuffie
dal menu delle impostazioni Bluetooth
1. Halten Sie den Bluetooth
-Knopf gedrückt, bis die Meldung
2. Sobald sich das Headset im Kopplungsmodus befindet, wähle das Headset im
Einstellungen-Menü deines Gerätes aus, um das Headset zu verbinden.
knappen tills ljudsignalerna för Bluetooth
2. Efter att du satt headsetet i parkopplingläget ska du välja headsetet från
-inställningar för att upprätta en anslutning.
1. Mantém premido o Botão Bluetooth
"Emparelhamento Bluetooth
2. Quando puser os seus auscultadores em modo de emparelhamento, selecione
os auscultadores no menu de definições de Bluetooth
do seu dispositivo para os ligar.
-knop ingedrukt tot de vraag om
2. Nadat je de headset in de koppelingsmodus hebt gezet, selecteer je de headset
-instellingenmenu van je apparaat om je headset te koppelen.
-knappen nede indtil "Bluetooth
2. Når dit headset er i parringstilstand, skal du vælge headsettet fra din enheds
-indstillinger for at oprette forbindelse til dit headset.
Always charge your headset before storing it for any extended period of time
(longer than 3 months). Never store the unit in temperatures above 113°F/45°C.
Chargez toujours votre casque avant de le ranger pour une durée prolongée
(plus de 3mois). Ne stockez jamais le casque à des températures supérieures à 45°C.
1. Connect your transmitter to an available USB port on
your console. Your transmitter will double-blink green
as it searches to pair with your headset.
700 Gen 2 MAX for Xbox and the
LED indication will double-blink green as it searches
3. Within 20 seconds, the LED indication on the headset and
transmitter should turn a solid green to indicate
1. Connectez votre émetteur à un port USB disponible sur votre
console. Votre émetteur clignotera deux fois en vert, indiquant
qu'il cherche à s'apparier à votre casque.
700 Gen 2 MAX pour Xbox et le voyant
LED clignotera deux fois en vert, indiquant qu'il cherche
3. Dans les 20 secondes qui suivent, les voyants LED du casque
et de l'émetteur deviendront verts et fixes, indiquant qu'ils