RTS KP-5032PB Manual


Læs gratis den danske manual til RTS KP-5032PB (2 sider) i kategorien Ikke kategoriseret. Denne vejledning er vurderet som hjælpsom af 3 personer og har en gennemsnitlig bedømmelse på 4.5 stjerner ud af 2 anmeldelser. Har du et spørgsmål om RTS KP-5032PB, eller vil du spørge andre brugere om produktet?

Side 1/2
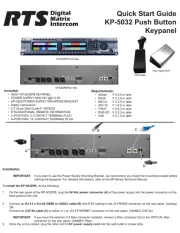
Quick Start Guide
KP-5032 Push Button
Keypanel
Included:
ASSY KP-5032PB KEYPANEL
POWER SUPPLY 60W 24V @0~2.5A
KP-OEI2 POWER SUPPLY MOUNTING BRACKET
Safety Instructions
LIT Quick Start Guide F / RP5032
RTS ADDITIONAL WEBSITE INFORMATION
2–POSITION, 2–CONTACT TERMINAL PLUG
6–POSITION, 12–CONTACT TERMINAL PLUG
Requirements:
AZedit V 5.0.0 or later
IPedit V 3.2.0 or later
MCII-e V 3.2.0 or later
AIO-16 V 1.6.0 or later
FWUT V 3.0.3 or later
DNS-SD V 3.0.3 or later
OMI V 5.1.5 or later
Installation
IMPORTANT: If you plan to use the Power Supply Mounting Bracket, we recommend you install the mounting bracket before
cabling the keypanel. For detailed information, refer to the KP-Series Technical Manual.
To install the KP-5032PB, do the following:
1. On the rear panel of the KP-5032PB, plug the 24 Vdc power connector (A) of the power supply into the power connector on the
back panel of the unit.
2. Connect an RJ-12 or RJ-45 (568B or USOC) cable (B) with RTS cabling to the J8 FRAME connector on the rear panel. (analog)
OR
Connect an CAT-5e cable (C) to either J11 or J12 ETHERNET connector on the rear panel. (OMNEO CAT-5e)
IMPORTANT: IfyouhavetheoptionalJ13berconnectorinstalled,connectaberconnector(D)totheOPTICALber
connector on the rear panel. (OMNEO Fiber)
3. Once the unit is cabled, plug the other end of AC power supply cord into the wall outlet or power strip.
www.rtsintercoms.com
Bosch Security Systems, Inc. | 12000 Portland Avenue South | Burnsville, Minnesota 55337
Form Number: F.01U.329.755 Rev 01
Date: April 2017
Conguration
ConsulttheKP-SeriesTechnicalManual(P/NF.01U.304.914)forspecicinstructionstocompletethefollowingsteps.
To congure the KP-5032PB using IPedit, do the following:
Step 1. In IPedit, using Device|Add, add the KP-5032PB to the device catalog.
Step 2. UsingtheChannelCongurationandStatuspane,congurethekeypaneltocommunicatewiththeOMIcard.
Step 3. On the keypanel, make a connection using the OMNEO Offers menu item.
To congure the KP-5032PB using AZedit, do the following:
Step 1. Verify the type of addressing the KP-5032PB is using; Static or DHCP.
Step 2. UsingtheOMNEOCongurationwindow,congurethekeypaneltocommunicatewiththedesignatedOMIcard.
Step 3. On the keypanel, make a connection using the OMNEO Offers menu item.
To congure the KP-5032PB for analog, do the following:
Step 1. Verify the keypanel is correctly cabled to the matrix.
Step 2. Plug the keypanel into I/O port desired.
NOTE: If using a SCSI backcard, addressing is necessary.
For the most current user documentation, rmware, and software,
visit www.rtisintercoms.com


Produkt Specifikationer

Mærke: RTS
Kategori: Ikke kategoriseret
Model: KP-5032PB

Har du brug for hjælp?

Hvis du har brug for hjælp til RTS KP-5032PB stil et spørgsmål nedenfor, og andre brugere vil svare dig


Ikke kategoriseret RTS Manualer
RTS

RTS KP-3016A Manual

29 September 2025
RTS

RTS EKP-4016PB Manual

28 September 2025
RTS

RTS KP-5032PB Manual

28 September 2025
RTS

RTS EKP-3016 Manual

28 September 2025
RTS

RTS PS-20 Manual

21 September 2025
RTS

RTS WKP-1 Manual

16 September 2025
RTS

RTS KP-5032 Manual

11 September 2025
RTS

RTS DKP-4016 Manual

11 September 2025
RTS

RTS TIF-PRO2 Manual

19 Juli 2025
RTS

RTS 4030-M Manual

16 December 2024

Ikke kategoriseret Manualer

Nyeste Ikke kategoriseret Manualer