Sencor SHB 5608BK Manual

Sencor Stavblender SHB 5608BK

Læs gratis den danske manual til Sencor SHB 5608BK (6 sider) i kategorien Stavblender. Denne vejledning er vurderet som hjælpsom af 14 personer og har en gennemsnitlig bedømmelse på 5.0 stjerner ud af 7.5 anmeldelser. Har du et spørgsmål om Sencor SHB 5608BK, eller vil du spørge andre brugere om produktet?

Side 1/6
07/2019
- 1 -
Copyright © 2019, Fast ČR, a.s.
EN Stick Blender
Translation of the original manual
SHB 5600GG / SHB 5601GR / SHB 5602
BL
SHB 5603VT / SHB 5604
RD
/ SHB 5605RS
SHB 5606GD / SHB 5607CH / SHB 5608BK
07/2019
- 2 -
Copyright © 2019, Fast ČR, a.s.
EN
Stick Blender
Important safety instructions
READ CAREFULLY AND STORE FOR FUTURE USE.
This appliance may be used by persons with physical or mental impairments or by
inexperienced persons, if they are properly supervised or have been informed about how
to use the appliance in asafe manner and understand the potential dangers.
Children must not use this appliance or play with it. Keep this appliance and the power
cord out of reach of children.
Before connecting this appliance to apower socket, make sure the rated voltage stated
on its rating label corresponds to the voltage in your power socket.
This appliance is designed for household and is intended for blending, chopping and
whipping food. Do not use it to process foods that are too hard such as coffee beans, ice
cubes, nutmeg, etc.
Do not use the appliance in an industrial environment or outdoors. Do not use it for any
other purposes than those intended.
Warning:
Incorrect use may lead to injuries.
Do not place the appliance on an electric or gas stove or in its vicinity, on the edge of
atable or on an unstable surface. Only place the appliance on an even, dry and stable
surface.
Only use the appliance with the original accessories that came with it.
Make sure that the appliance is correctly assembled before putting it into operation.
Do not touch moving rotating parts during operation. Otherwise, this could result in
injury.
Be especially careful when handling hot foods and liquids. Hot steam or splashing hot
foods and liquids may cause scalding. For reasons of increased safety, allow hot foods and
liquids to cool down to at least 45 °C before blending.
The operating time of the appliance is 1 minute. Before turning it on again, allow it to
cool down for at least 3 to 5 minutes. When using the appliance to blend sticky or harder
foodstuffs, interrupt operation already after 30 seconds.
Do not turn on the appliance when it is empty. The incorrect use of the appliance may
negatively affect its lifetime.
Always turn off the appliance and disconnect it from the power socket if you will not be
using it and if you will be leaving it without supervision, before assembly, disassembly,
cleaning and before moving it.
07/2019
- 3 -
Copyright © 2019, Fast ČR, a.s.
Check that the motor unit is turned off, disconnected from the power socket and that the
rotating parts have come to acomplete stop before disassembling the appliance into its
individual parts.
When handling the blade assembly of the stick blender or chopper, especially when
taking the blade assembly out of the bowl, when emptying the bowl and cleaning it, take
special care to avoid injury by the blades.
Do not submerge the motor unit and its power cord in water or any other liquid, or wash
these parts under running water.
Ensure that the power plug contacts do not come into contact with moisture. Do not
place heavy items on the power cord. Make sure the power cord does not hang over the
edge of atable or that it is not touching ahot surface.
Do not disconnect the appliance from the power socket by pulling on the power cord.
This could damage the power cord or the socket. Disconnect the power cord from the
power socket by pulling on the plug.
If the power cord is damaged, it must be replaced by an authorised service centre or by
another similarly qualified person, this will prevent the creation of adangerous situation.
It is forbidden to use the appliance if it has adamaged power cord.
Do not use the appliance when it is not functioning properly or showing signs of damage.
In order to prevent ahazardous situation arising, do not repair the appliance yourself or
modify it in any way. Have all repairs or adjustments performed at an authorised service
centre. By tampering with the appliance, you risk voiding your legal rights arising from
unsatisfactory performance or quality warranty.
07/2019
- 4 -
Copyright © 2019, Fast ČR, a.s.
1
2
3
4
5
6
7
8
9
10
11
12
13
A
- 5 -
07/2019
Copyright © 2019, Fast ČR, a.s.
EN
Stick Blender
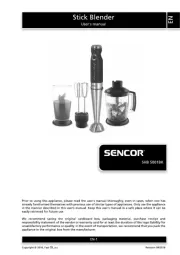
User'smanual
Prior to using this appliance, please read the usersmanual thoroughly, even
in cases, when one has already familiarised themselves with previous use of
similar types of appliances. Only use the appliance in the manner described in
this user’smanual. Keep this usersmanual in asafe place where it can be easily
retrieved for future reference.
■ We recommend saving the original cardboard box, packaging material, purchase
receipt and responsibility statement of the vendor or warranty card for at least
the duration of the legal liability for unsatisfactory performance or quality. In
the event of transportation, we recommend that you pack the appliance in the
original box from the manufacturer.
DESCRIPTION OF THE APPLIANCE
A1 Speed control dial
A2 Backlit pulse button
for turning the motor unit on and off
A3 Motor unit
A4 Buttons (on both sides of the motor
unit)
for releasing removable accessories
A5 Removable stick blender attachment
A6 Beaker, volume 800 ml
A7 Anti-slip base pad for the beaker
A8 Beaters
A9 Beater holder with gear system
A10 Chopper bowl lid with gear system
A11 Chopper blade assembly
A12 Chopper bowl, volume 1 250 ml
A13 Anti-slip base pad for the chopper
bowl
BEFORE FIRST USE
1. Take the appliance and its accessories out of the packaging materials.
2. Thoroughly wash all removable accessories that are intended to come into contact
with food using warm water and aneutral kitchen detergent. Then rinse them with
clean water and allow them to dry naturally or dry them out thoroughly using
a wiping cloth. Clean parts A9 and A10, which are equipped with a gear system,
only using adampened cloth. Take care that water does not enter into these parts.
When cleaning the stick blender attachment A5, do not submerge the end that is
connected to the motor unit A3.
Attention:
When cleaning the blade assembly of the stick blender A5
and chopper A11, be especially careful not to injure yourself
on the blades.
INTENDED USE OF THE APPLIANCE
Stick blender
It is suitable for blending soft ingredients and liquids. It is used namely for preparing
baby food, various types of cocktails, sauces, spreads, etc.
Chopper
It is suitable for chopping foods such as meat, semi-hard or hard cheese, fruit and
vegetables in their raw state, nuts, herbs, etc. Do not attempt to use it to process
excessively hard foods such as ice cubes, coffee beans, nutmeg, cocoa beans.
Hand mixer
After attaching the holder A9 with the beaters A8 to the motor unit A3, you may use
the appliance as ahand mixer. Ahand mixer is suitable for preparing light batters
or for whipping cream, egg whites and creams. Do not use it to whip thick doughs.
ASSEMBLING AND DISASSEMBLING THE APPLIANCE
Before you start assembling or disassembling the appliance, check that the motor
unit A3 is turned off and disconnected from the power socket and that the rotating
parts have come to acomplete stop. Parts that are connected to the motor unit A3,
must be thoroughly dry.
Stick blender
1. Attach the stick blender attachment A5 from underneath to the motor unit A3. The
connection of both parts is indicated by aclick.
2. For blending, use the beaker A6 or another suitable container intended for coming
into contact with food. The anti-slip base pad A7 also serves as alid for the beaker A6,
when you wish to use it for short term storage of food.
3. During disassembly, press and hold down the buttons A4 and at the same time
remove the stick blender attachment A5 from the motor unit A3.
Chopper
1. Place the bowl A12 into the anti-slip base pad A13. On to the central pin on the
bottom of the bowl A12, seat the blade assembly A11 and turn it clockwise by 90°,
until it is secured in the correct position.
2. Close the bowl using the lid A10, whilst ensuring that the blade assembly shaft A11
fits into the middle part of the lid A10 and that the safety locks along the sides of the
lid A10 slide into the safety system of the bowl A12. Turn the lid A10 clockwise all the
way. This will secure it in place, and is indicated by aclick.
3. Seat the motor unit A3 on to the lid A10 and gently push it down until aclick is heard.
Now the chopper is assembled.
4. During disassembly, press and hold down the buttons A4 and at the same time
remove the motor unit A3 from lid A10. Then continue in reverse sequence to the
assembly of the chopper.
Hand mixer
1. Slide the beaters A8, into the holder A9, until they click in. Before use, always check
that the beaters A8 are securely attached.
2. Attach the holder A9 with the beaters A8 from underneath the motor unit A3.
Attachment is indicated by aclick.
3. During disassembly, press and hold down the buttons A4 and at the same time
remove the holder A9 with the beaters A8 from the motor unit A3. Then continue in
reverse sequence to the assembly of the hand mixer.
OPERATING THE APPLIANCE
1. Select the type of accessories that you wish to use and assemble the appliance
according to the instructions in the chapter Assembling and disassembling the
appliance.
Attention:
When assembling the chopper, place the food into the bowl
A12 only after placing the blade assembly A11 on to the central
pin on the bottom of the bowl A12. Do not fill the bowl A12
over the maximum mark.
2. Connect the motor unit A3 to apower socket. When connected to apower socket, the
power switch A2 will be backlit. Set the required speed using the speed control dial
A1. Turn the speed control dial A1 clockwise to increase the speed, and anticlockwise
to reduce the speed.
3. When the required speed is set, you may start the appliance by pressing the power
button A2. Do not set the speed while the appliance is running. The appliance will
run as long as the power switch A2 is pressed. To prevent food from squirting out,
keep the stick blender attachment blade assembly A5 / beaters A8 submerged while
the appliance is running. Also prevent food from squirting out by not overfilling
the bowl/beaker in which you are processing it. When the button A2 is released,
the appliance will stop. When using the chopper and stick blender, we recommend
processing food by means of ashort pulsing action, which will prevent excessive
pulverisation of the food and optimal results will be achieved.
Attention:
The maximum continuous operating time of the appliance
is 1 minute. Then allow it to cool down for 3 to 5 minutes.
When using the appliance to blend sticky or harder foodstuffs,
interrupt operation already after 30 seconds.
4. After you finish using it, disconnect the power cord from the power socket. Make sure
that the rotating parts have stopped rotating, and disassemble the appliance into its
individual parts. Then clean all used parts according to the instructions in chapter
Cleaning and maintenance.
QUICK GUIDE TO PROCESSING INGREDIENTS
Stick blender
Ingredients Amount Speed setting
Processing
time
Baby food 300 g
Medium to
maximum
45 s
Spreads 200 g
Medium to
maximum
30 s
Fruit and vegetables
(cooked)
200 g
Medium to
maximum
45 s
Sauces 500 ml
Medium to
maximum
45 s
Shakes/Cocktails 500 ml
Medium to
maximum
30 s
Chopper
Ingredients Amount Speed setting
Processing
time
Meat 300 g
Medium to
maximum
30 s
Fruit and vegetables 200 g
Medium to
maximum
15 s
Hard and semi-hard
cheeses
150 g Maximum 10 s
- 6 -
07/2019
Copyright © 2019, Fast ČR, a.s.
Hard baked goods 100 g
Medium to
maximum
20 s
Nuts with shells
removed
100 g Maximum 15 s
Herbs 50 g Medium 10 s
First, cut up the food into cubes of approximately 2 × 2 cm and only then process
with the chopper. With vegetables like onion, it is sufficient to cut them into quarters.
Hand mixer
Ingredients Amount Speed setting
Processing
time
Egg whites 4 pcs Maximum 60 s
Whipping cream 200 ml Maximum 60 s
Light doughs 500 g
Medium to
maximum
60 s
Always whip cream and egg whites in a tall narrow beaker. When whipping egg
whites, the beaters A8 and the beaker must always be perfectly clean and dry,
otherwise whipping up the egg whites may not succeed.
The above food processing times are only a reference. The actual processing
time depends on the size of the ingredients, their amount and the required final
consistency. If the required consistency is not achieved during the maximum
operating time of the appliance, you may continue processing the food after the
appliance has cooled down.
CLEANING AND MAINTENANCE
Before cleaning it, make sure that the appliance is turned off, disconnected from the
power socket and that the rotating parts have stopped.
Disassemble the appliance into its individual parts. Thoroughly wash the used
accessories using warm water and neutral kitchen detergent. Then rinse them with
clean water and allow them to dry naturally or dry them out thoroughly using
awiping cloth. Clean parts A9 and A10, which are equipped with agear system, only
using adampened cloth. Take care that water does not enter into these parts. When
cleaning the stick blender attachment A5, do not submerge the end that is connected
to the motor unit A3. The beaker A6 and the bowlA12, the anti-slip base pad A7
andA13, the beaters A8 and the blade assembly A11 can be washed in adishwasher.
Other parts are not intended for washing in adishwasher.
After finishing using the stick blender, it is possible to clean the stick blender blade
assembly A5 by submerging it in warm water with kitchen detergent, and running it
for ashort time. Then disconnect the appliance from the power socket, disassemble it,
and rinse the blade assembly with clean drinking water and dry it thoroughly.
Attention:
When cleaning the blade assembly of the stick blender A5 or
chopper A11, be especially careful not to injure yourself on the
blades.
To clean the outer surface of the motor unit A3, use acloth lightly dipped in aweak
detergent solution. After applying the detergent solution, wipe the surface with
acloth lightly dampened in clean water and then wipe dry.
Never submerge the motor unit A3 or the power cord in water or in any other liquid.
Do not use solvents, abrasive cleaning products, etc. for cleaning the appliance.
Otherwise the surface coat of the appliance may be damaged.
STORAGE
When not using the appliance, store it in adry place out of childrensreach.
Technical specifications
Rated voltage ............................................................................................................................220–240 V
Rated frequency..........................................................................................................................50/60 Hz
Rated power input ....................................................................................................................... 1 200 W
Electrical shock protection class ...........................................................................................................II
Noise level ..................................................................................................................................... 61 dB(A)
The declared noise emission level of the appliance is 61 dB(A), which represents alevel
Aof acoustic power with respect to areference acoustic power of 1 pW.
Explanation of technical terminology
Safety class for electrical shock protection:
Class II – Electrical shock protection is provided by double or heavy-duty insulation.
Due to continuous improvement of the appliance, the manufacturer reserves the right
to make changes to the text, design and technical specifications without prior notice.
INSTRUCTIONS AND INFORMATION REGARDING THE DISPOSAL
OF USED PACKAGING MATERIALS
Dispose of used packaging material at asite designated for waste in your municipality.
DISPOSAL OF USED ELECTRICAL AND ELECTRONIC EQUIPMENT
This symbol on products or original documents means that used
electric or electronic products must not be added to ordinary
municipal waste. For proper disposal, renewal and recycling hand
over these appliances to determined collection points. Alternatively,
in some European Union states or other European countries you may
return your appliances to the local retailer when buying an equivalent
new appliance.
Correct disposal of this product helps save valuable natural resources
and prevents potential negative eects on the environment and human health, which
could result from improper waste disposal. Ask your local authorities or collection
facility for more details.
In accordance with national regulations penalties may be imposed for the incorrect
disposal of this type of waste.
For business entities in European Union states
If you want to dispose of electric or electronic appliances, ask your retailer or supplier
for the necessary information.
Disposal in other countries outside the European Union
This symbol is valid in the European Union. If you wish to dispose of this product,
request the necessary information about the correct disposal method from the local
council or from your retailer.
This product meets all the basic requirements of EU directives related
to it.


Produkt Specifikationer

Mærke: Sencor
Kategori: Stavblender
Model: SHB 5608BK

Har du brug for hjælp?

Hvis du har brug for hjælp til Sencor SHB 5608BK stil et spørgsmål nedenfor, og andre brugere vil svare dig


Stavblender Sencor Manualer
Sencor

Sencor SHB 5001BK Manual

2 September 2025
Sencor

Sencor SHM 5402BL Manual

15 August 2025
Sencor

Sencor SHB 6302BK Manual

14 August 2025
Sencor

Sencor STM 3755VT Manual

14 August 2025
Sencor

Sencor SHM 5270 Manual

14 August 2025
Sencor

Sencor SHM 5408RS Manual

14 August 2025
Sencor

Sencor SHM 5401GR Manual

14 August 2025
Sencor

Sencor SHB 6551WH Manual

14 August 2025
Sencor

Sencor SHM 9130WH Manual

24 Marts 2025

Stavblender Manualer

Nyeste Stavblender Manualer

Arendo

Arendo MIKO 305401 Manual

6 September 2025
Sonifex

Sonifex S1 Manual

4 September 2025
Zelmer

Zelmer ZHB6000 SMART Manual

3 September 2025
Atlas Sound

Atlas Sound MA60G Manual

1 September 2025
Duronic

Duronic JE605 Manual

1 September 2025
Duronic

Duronic HB35 Manual

1 September 2025
Duronic

Duronic JE407 Manual

1 September 2025
Allen & Heath

Allen & Heath ZED-36 Manual

1 September 2025
Kramer

Kramer FC-404NETxl Manual

29 August 2025