EN
USER AND SAFETY GUIDE
DIN MOUNTABLE 3-CIRCUIT WI-FI SMART
RELAY
SHELLY® PRO 3
Read before use
This document contains important technical and safety
information about the device, its safety use and instal-
lation.
⚠CAUTION! Before beginning the installation, please
read this guide and any other documents accompanying
the device carefully and completely. Failure to follow the in-
stallation procedures could lead to malfunction, danger to
your health and life, violation of the law or refusal of legal
and/or commercial guarantee (if any). Allterco Robotics
EOOD is not responsible for any loss or damage in case of
incorrect installation or improper operation of this device
due to failure of following the user and safety instructions
in this guide.
Product Introduction
Shelly® is a line of innovative microprocessor-managed
devices, which allow remote control of electric circuits
through a mobile phone, tablet, PC, or home automation
system. Shelly® devices can work standalone in a lo-
cal Wi-Fi network or they can also be operated through
cloud home automation services. Shelly Cloud is a
service that can be accessed using either Android or
iOS mobile application, or with any internet browser at
https://home.shelly.cloud/. Shelly® devices can be ac-
cessed, controlled and monitored remotely from any
place where the User has internet connectivity, as long
as the devices are connected to a Wi-Fi router and the
Internet. Shelly® devices have embedded Web Interface
accessible at http://192.168.33.1 when connected direct-
ly to the device access point, or at the device IP address
on the local Wi-Fi network. The embedded Web Interface
can be used to monitor and control the device, as well as
adjust its settings.
Shelly® devices can communicate directly with other
Wi-Fi devices through HTTP protocol. An API is provided
by Allterco Robotics EOOD. For more information, please
visit:
https://shelly-api-docs.shelly.cloud/#shelly-family-overview
.
Shelly® devices are delivered with factory-installed rm-
ware. If rmware updates are necessary to keep the de-
vices in conformity, including security updates, Allterco
Robotics EOOD will provide the updates free of charge
through the device embedded Web Interface or Shelly Mo-
bile Application, where the information about the current
rmware version is available. The choice to install or not
the device rmware updates is user’s sole responsibility.
Allterco Robotics EOOD shall not be liable for any lack of
conformity of the device caused by failure of the user to
install the provided updates in a timely manner.
Control your home with your voice
Shelly® devices are compatible with Amazon Alexa and
Google Home supported functionalities. Please see our
step-by-step guide on:
https://shelly.cloud/support/compatibility/.
Shelly® Pro Series
Shelly® Pro series is a line of devices suitable for homes,
oces, retail stores, manufacturing facilities, and other
buildings. Shelly® Pro devices are DIN mountable inside
the breaker box, and highly suitable for new building con-
struction. All Shelly® Pro devices can be controlled and
monitored through Wi-Fi and LAN connections. Bluetooth
connection can be used for the inclusion process.
Shelly Pro 3 (the Device) is a DIN rail mountable 3-cir-
cuit smart relay. Enhanced with the second generation
rmware exibility and LAN connectivity, it provides the
professional integrators with much more options for end
customer solutions.
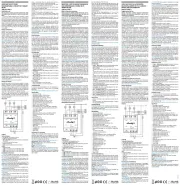
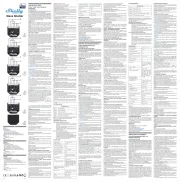
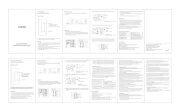
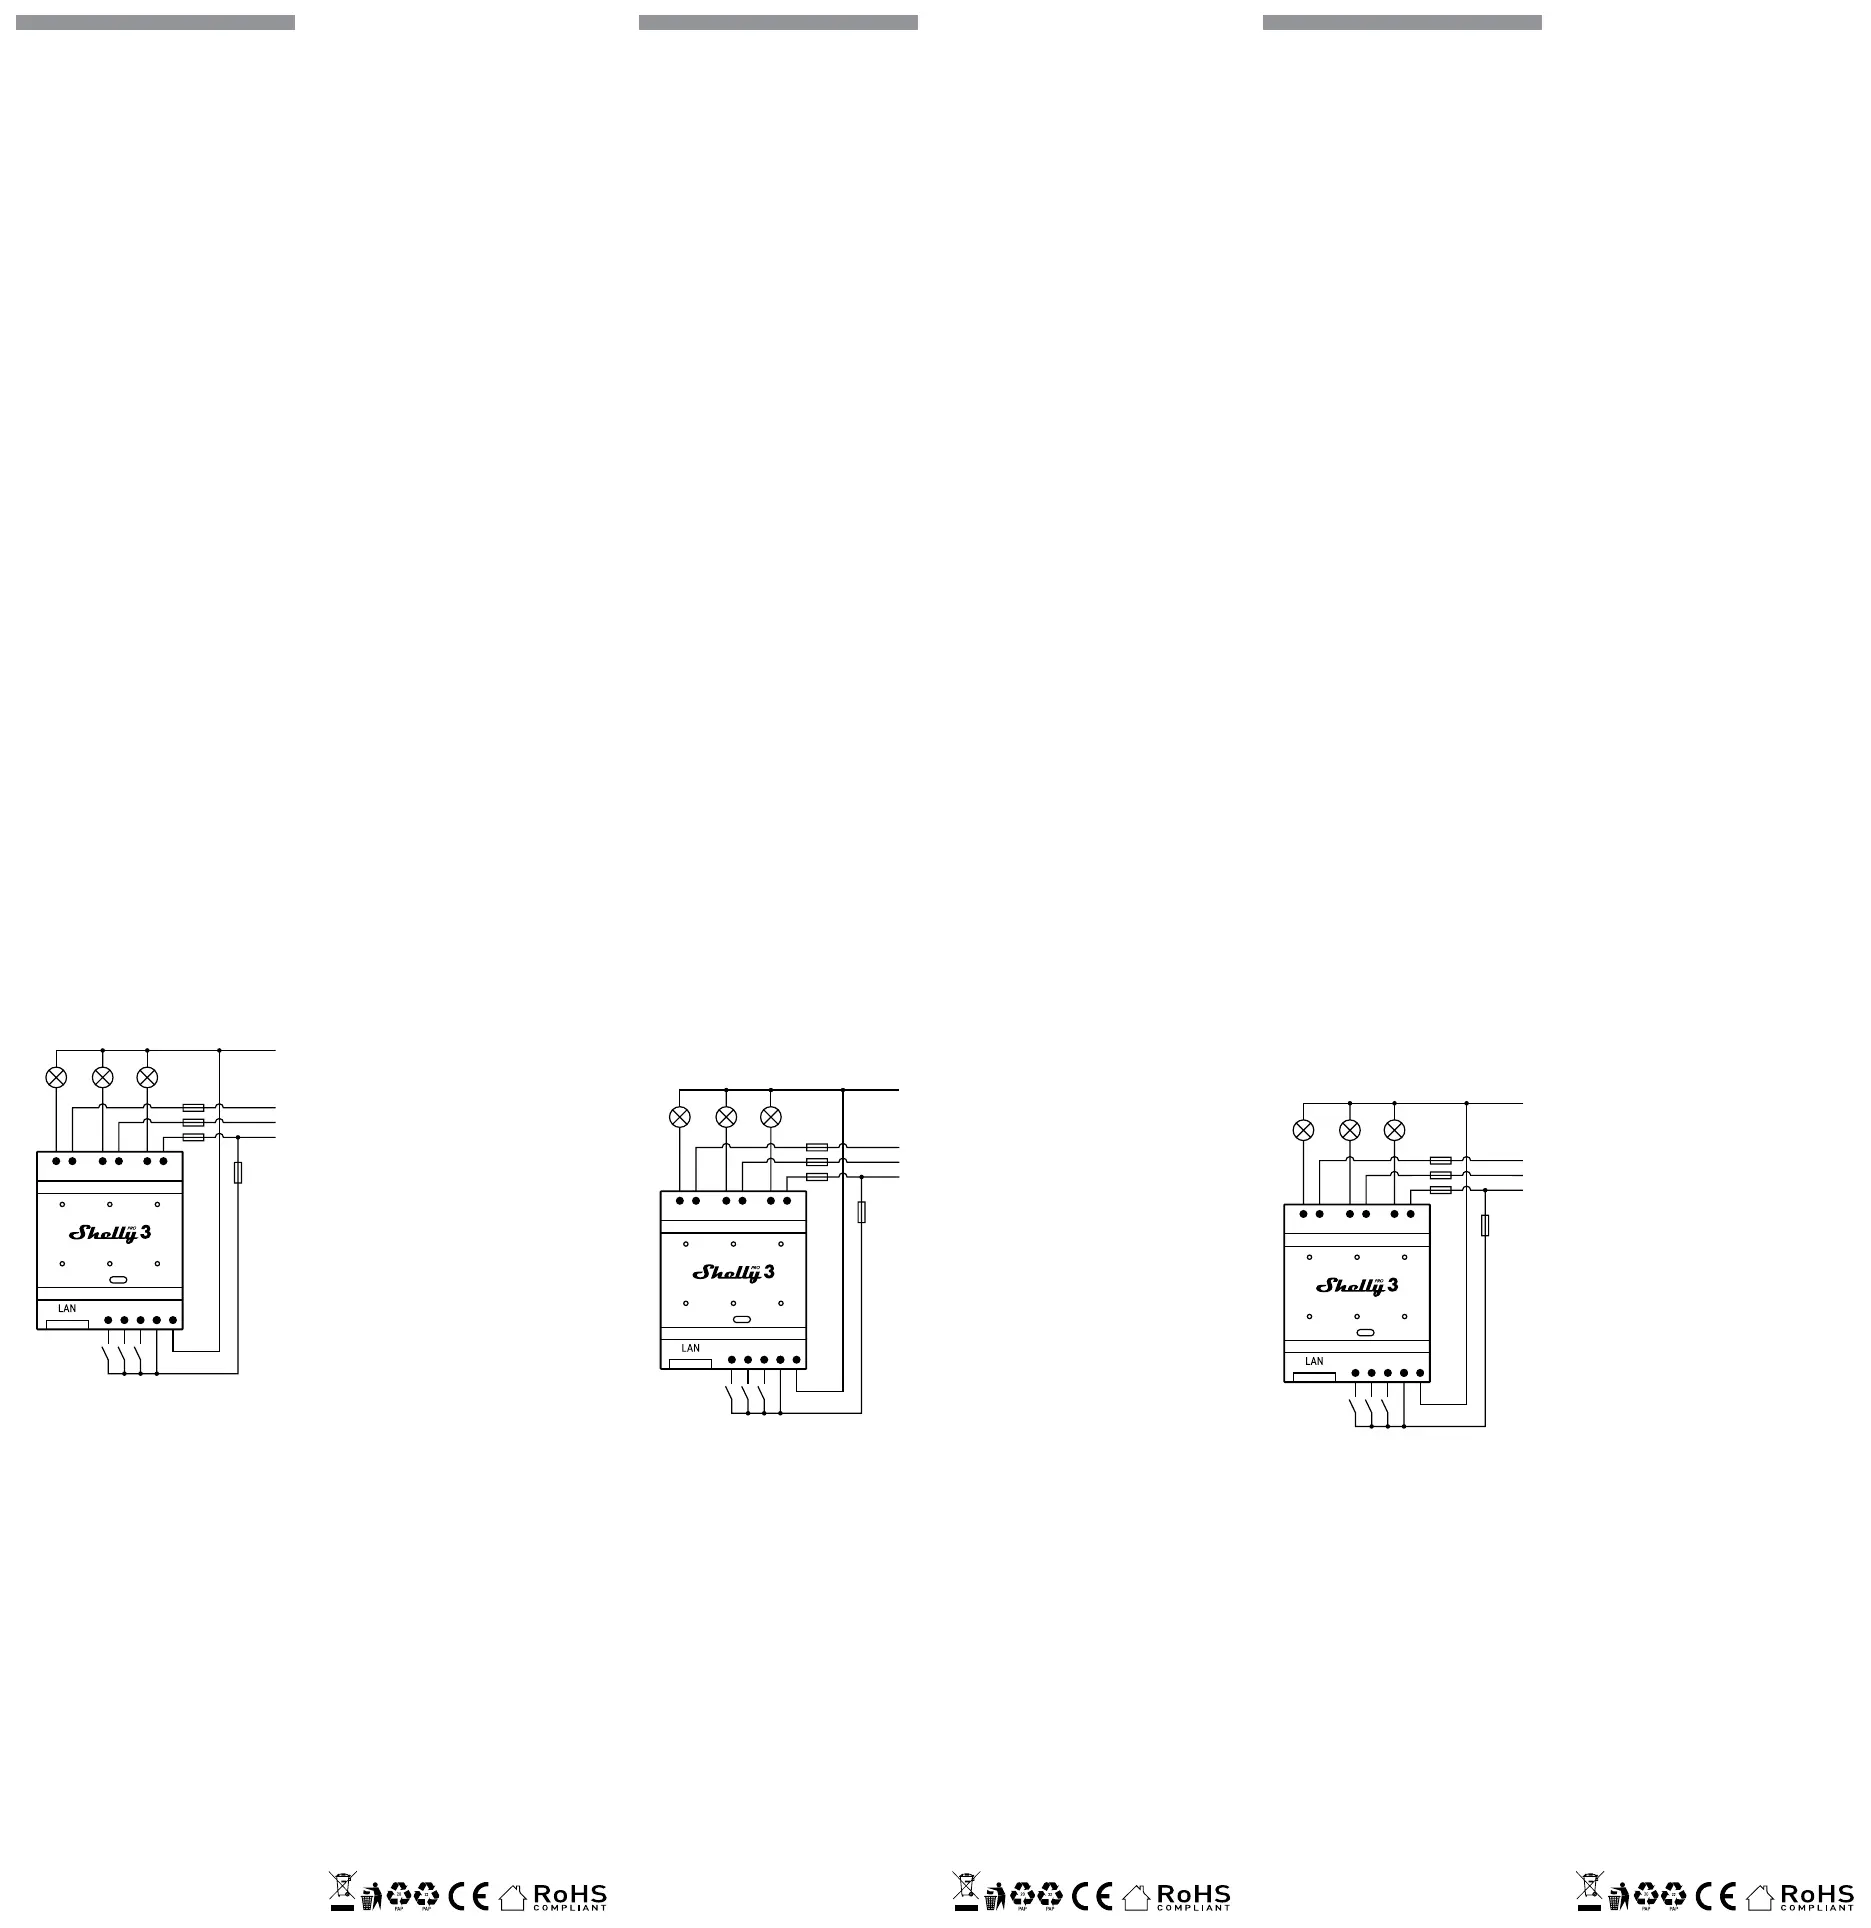
Schematic
N
L3(C
S3
OUT3
S2 LS1
I3O3 I2O2 I1O1
OUT2 OUT1
LANWI-FI
RESET
POWER
Fig. 1
Legend
Device terminals:
• O1, O2, O3: Load output terminals
• I1, I2, I3: Load input terminals
• SW1, SW2, SW3: Switch input terminals controlling O1,
O2 and O3
• L: Live (110-240 VAC) terminals
• N: Neutral terminal
• LAN: Local Area Network RJ 45 connector
Cables:
• N: Neutral cable
• L1(A): Load circuit 1 live (110-240 VAC) cable
• L2(B): Load circuit 2 live (110-240 VAC) cable
• L3(C): Load circuit 3 live (110-240 VAC) cable
Installation Instructions
⚠CAUTION! Danger of electrocution. Mounting/installa-
tion of the Device to the power grid has to be performed
with caution, by a qualied electrician.
⚠CAUTION! Danger of electrocution. Every change in the
connections has to be done after ensuring there is no volt-
age present at the Device terminals.
⚠CAUTION! Use the Device only with a power grid and
appliances which comply with all applicable regulations. A
short circuit in the power grid or any appliance connected
to the Device may damage the Device.
⚠CAUTION! Do not connect the Device to appliances ex-
ceeding the given max load!
⚠CAUTION! Connect the Device only in the way shown in
these instructions. Any other method could cause damage
and/or injury.
⚠CAUTION! Do not install the device at a place that is
possible to get wet.
⚠RECOMMENDATION Connect the Device using solid
single-core cables with increased insulation heat resis-
tance not less than PVC T105°C.
Before starting installing/mounting the Device, wire
check that the breakers are turned off and there is no
voltage on their terminals. This can be done with a phase
DE
BENUTZER- UND SICHERHEITSHANDBUCH
DIN-MONTIERBARES 3-KREIS-WI-FI-
SMART-RELAIS
SHELLY® PRO 3
Bitte vor Gebrauch durchlesen
Dieses Dokument enthält wichtige technische und si-
cherheitstechnische Informationen über das Gerät und
seine sichere Verwendung und Installation.
⚠ACHTUNG! Bevor Sie mit der Installation beginnen,
lesen Sie bitte die Begleitdokumentation sorgfältig und
vollständig durch. Die Nichtbeachtung der empfohlenen
Verfahren kann zu Fehlfunktionen, Lebensgefahr oder
Gesetzesverstößen führen. Allterco Robotics EOOD haftet
nicht für Verluste oder Schäden im Falle einer falschen Ins-
tallation oder Bedienung dieses Geräts.
Produktvorstellung
Shelly® ist eine Produktserie innovativer, mikroprozessor-
gesteuerter Geräte, welche die Fernsteuerung von Elektro-
geräten über ein Mobiltelefon, ein Tablet, einen PC oder
ein Hausautomatisierungssystem ermöglichen. Shelly®
Geräte können eigenständig in einem lokalen WLAN-Netz-
werk arbeiten oder sie können auch über Cloud-Dienste
für die Hausautomatisierung betrieben werden. Shelly
Cloud ist ein solcher Dienst, auf den entweder über eine
Android- oder iOS-Applikation oder über einen beliebigen
Internetbrowser unter https://home.shelly.cloud/ zuge-
griffen werden kann. Shelly® Geräte können von jedem
Ort aus, an dem der Benutzer eine Internetverbindung hat,
angesprochen, gesteuert und überwacht werden, solan-
ge die Geräte mit einem WLAN-Router und dem Internet
verbunden sind. Shelly® Geräte verfügen über eine integ-
rierte Web-Schnittstelle, die unter http://192.168.33.1 im
WLAN-Netzwerk zugänglich ist, das vom Gerät im Access
Point-Modus erstellt wird, oder unter der IP-Adresse des
Gerätes im WLAN-Netzwerk, mit dem es verbunden ist.
Díe integrierte Web-Schnittstelle kann zur Überwachung
und Steuerung des Gerätes sowie zur Anpassung dessen
Einstellungen verwendet werden.
Shelly® Geräte können direkt mit anderen WLAN-Geräten
über das HTTP-Protokoll kommunizieren. Eine API wird
von Allterco Robotics EOOD bereitgestellt. Für weitere
Informationen besuchen Sie bitte:
https://shelly-api-docs.shelly.cloud/#shelly-family-overview
.
Shelly® Geräte werden mit werkseitig installierter Firm-
ware ausgeliefert. Um die Geräte konform zu halten, stellt
Allterco Robotics EOOD die notwendigen Firmware-Up-
dates, einschließlich der Sicherheitsupdates, kostenlos
über die im Gerät eingebettete Web-Schnittstelle sowie
über die Shelly-App zur Verfügung. Die Entscheidung, die
Firmware-Updates des Geräts zu installieren oder nicht,
obliegt der alleinigen Verantwortung des Benutzers. All-
terco Robotics EOOD haftet nicht für Konformitätsmän-
gel des Geräts, die darauf zurückzuführen sind, dass der
Benutzer die bereitgestellten Updates nicht rechtzeitig
installiert hat.
Steuern Sie Ihr Zuhause mit Ihrer Stimme
Shelly® Geräte sind mit den von Amazon Alexa und Goo-
gle Home unterstützten Funktionalitäten kompatibel. Bit-
te sehen Sie sich unsere Schritt-für-Schritt-Anleitung an:
https://shelly.cloud/support/compatibility/.
Shelly® Pro-Serie
Die Shelly® Pro-Serie ist eine Produktserie, die für Woh-
nungen, Büros, Einzelhandelsgeschäfte, Produktions-
stätten und andere Gebäude geeignet ist. Sie sind auf der
DIN-Schiene im Stromkasten montierbar und sehr gut für
den Neubau geeignet. Alle Shelly® Pro-Geräte können so-
wohl über eine WLAN- als auch über eine LAN-Verbindung
gesteuert und überwacht werden. Bluetooth kann zusätz-
lich für die Einbindung genutzt werden.
Shelly Pro 3 (das Gerät) ist ein auf DIN-Schiene montier-
bares 3-Kreis-Smart-Relais. Verbessert durch die Flexibi-
lität der zweiten Generation der Firmware und die LAN-
Konnektivität, bietet es professionellen Integratoren viel
mehr Möglichkeiten für Endkundenlösungen.
Schematische Darstellung
N
L3(C
S3
OUT3
S2 LS1
I3O3 I2O2 I1O1
OUT2 OUT1
LANWI-FI
RESET
POWER
Abb. 1
Legende
Geräteklemmen:
• O1, O2, O3: Lastausgangsklemmen
• I1, I2, I3: Lasteingangsklemmen
• SW1, SW2, SW3: Schaltereingangsklemmen zur Steue-
rung von O1, O2 und O3
• L: Stromführende (110-240 VAC) Anschluss
• N: Neutraler Anschluss
• LAN: Anschluss für lokales Netzwerk RJ 45
Kabel:
• N: Neutrales Kabel
• L1(A): Lastkreis 1 stromführendes (110-240 VAC) Kabel
• L2(B): Lastkreis 2 stromführendes (110-240 VAC) Kabel
• L3(B): Lastkreis 3 stromführendes (110-240 VAC) Kabel
Installationsanleitung
⚠VORSICHT! Gefahr eines Stromschlages. Die Montage/
Installation des Geräts an das Stromnetz muss von einem
qualizierten Elektriker mit Vorsicht durchgeführt werden.
⚠VORSICHT! Es besteht Stromschlaggefahr. Bei jeder
Änderung der Anschlüsse muss sichergestellt werden,
dass an den Klemmen des Geräts keine Spannung anliegt.
⚠VORSICHT! Verwenden Sie das Gerät nur mit einem
Stromnetz und Geräten, die allen geltenden Vorschriften
entsprechen. Ein Kurzschluss im Stromnetz oder in einem
an das Gerät angeschlossenen Gerätes kann dieses be-
schädigen.
⚠VORSICHT! Schließen Sie das Gerät nicht an Geräte an,
die die angegebene Höchstlast überschreiten!
⚠VORSICHT! Schließen Sie das Gerät nur auf die in die-
ser Anleitung beschriebene Weise an. Jede andere Metho-
de kann zu Schäden und/oder Verletzungen führen.
⚠VORSICHT! Installieren Sie das Gerät nicht an einem
Ort, an dem es nass werden kann.
⚠EMPFEHLUNG: Schließen Sie das Gerät mit massiven
einadrigen Kabeln mit erhöhter Isolationswärmebeständig-
IT
GUIDA ALL’USO E ALLA SICUREZZA
RELÈ INTELLIGENTE WI-FI A 3 CIRCUITI
INSTALLABILE SU GUIDA DIN
SHELLY® PRO 3
Leggere prima dell’uso
Questo documento contiene importanti informazioni
tecniche e di sicurezza sul dispositivo e sul suo uso e
installazione in sicurezza.
⚠ATTENZIONE! Prima di iniziare l’installazione leggere
attentamente e completamente la documentazione alle-
gata. La mancata osservanza delle procedure consigliate
potrebbe portare a malfunzionamenti, pericolo per la vita
o violazione della legge. Allterco Robotics EOOD non è re-
sponsabile per eventuali perdite o danni in caso di installa-
zione o funzionamento errati di questo dispositivo.
Introduzione al prodotto
Shelly® è una linea di dispositivi innovativi gestiti da
microprocessori che permettono il controllo remoto
degli elettrodomestici attraverso un telefono cellulare,
un tablet, un PC o un sistema domotico. I dispositivi
Shelly® sono in grado di funzionare autonomamente in
una rete Wi-Fi locale o possono anche essere gestiti at-
traverso servizi di automazione domestica cloud. Shelly
Cloud è un servizio di questo tipo a cui si può accede-
re utilizzando un’applicazione mobile Android o iOS o
con qualsiasi browser internet su https://home.shelly.
cloud/. I dispositivi Shelly® sono accessibili, controllati
e monitorati a distanza da qualsiasi luogo in cui l’utente
abbia una connettività Internet, purché i dispositivi siano
collegati a un router Wi-Fi e a Internet. I dispositivi Shel-
ly® hanno un’interfaccia web incorporata accessibile a
http://192.168.33.1 nella rete Wi Fi, creata dal disposi-
tivo in modalità Access Point, o all’indirizzo URL del di-
spositivo nella rete Wi-Fi a cui è connesso. L’interfaccia
web incorporata può essere utilizzata per monitorare e
controllare il dispositivo, così come per regolare le sue
impostazioni.
I dispositivi Shelly® sono in grado di comunicare diretta-
mente con altri dispositivi Wi-Fi attraverso il protocollo
HTTP. Un’API è fornita da Allterco Robotics EOOD. Per
maggiori informazioni, visitare:
https://shelly-api-docs.shelly.cloud/#shelly-family-overview
.
I dispositivi Shelly® vengono consegnati con un rmware
installato in fabbrica. Se sono necessari aggiornamenti
del rmware per mantenere i dispositivi in conformità,
compresi gli aggiornamenti di sicurezza, Allterco Ro-
botics EOOD fornirà gli aggiornamenti gratuitamente
attraverso l’interfaccia web incorporata del dispositivo o
l’applicazione mobile Shelly, dove sono disponibili le in-
formazioni sulla versione corrente del rmware. La scelta
di installare o meno gli aggiornamenti del rmware del di-
spositivo è di esclusiva responsabilità dell’utente. Allterco
Robotics EOOD non è responsabile per qualsiasi mancan-
za di conformità del dispositivo causata dalla mancata
installazione degli aggiornamenti forniti dall’utente in
modo tempestivo.
Controlla la tua casa con la tua voce
I dispositivi Shelly® sono compatibili con le funzionalità
supportate da Amazon Alexa e Google Home. Consulta la
nostra guida passo dopo passo su:
https://shelly.cloud/support/compatibility/.
Shelly® Pro Series
La serie Shelly® Pro è una linea di dispositivi adatti per
abitazioni, uci, negozi al dettaglio, impianti di produzio-
ne e altri edici. I dispositivi Shelly® Pro sono montabili
DIN all’interno della scatola dell’interruttore e sono parti-
colarmente adatti per la costruzione di nuovi edici. La
connettività per tutti i dispositivi Shelly® Pro può avvenire
tramite connessione Internet Wi-Fi o LAN e il Bluetooth
può essere utilizzato per il processo di inclusione.
Shelly Pro 3 (il Dispositivo) è un relè intelligente a 3 cir-
cuiti montabile su guida DIN. Grazie alla essibilità del
rmware di seconda generazione e alla connettività LAN,
offre agli integratori professionali molte più opzioni per le
soluzioni dei clienti nali.
Schema
N
L3(C
S3
OUT3
S2 LS1
I3O3 I2O2 I1O1
OUT2 OUT1
LANWI-FI
RESET
POWER
g. 1
Legenda
Terminali del dispositivo:
• O1, O2, O3: Terminali di uscita del carico
• I1, I2, I3: terminali di ingresso del carico
• SW1, SW2, SW3: terminali di ingresso dell’interruttore
che controllano O1, O2 e O3
• L: Terminale sotto tensione (110-240 VCA)
• N: Terminale di neutro
• LAN: Connettore RJ 45 della rete locale
Cavi:
• N: Cavo di neutro
• L1(A): Cavo del circuito di carico 1 sotto tensione (110-
240 VAC)
• L2(B): Cavo del circuito di carico 2 sotto tensione (110-
240 VAC)
• L3(C): Cavo del circuito di carico 3 sotto tensione (110-
240 VAC)
Istruzioni per l’installazione
⚠ATTENZIONE! Pericolo di folgorazione. Il montaggio/
installazione del dispositivo alla rete elettrica deve essere
eseguito con cautela da un elettricista qualicato.
⚠ATTENZIONE! Pericolo di folgorazione. Ogni modica
dei collegamenti deve essere effettuata dopo essersi assi-
curati che non ci sia tensione ai morsetti dell’apparecchio.
⚠ATTENZIONE! Utilizzare l’apparecchio solo con una
rete elettrica e con apparecchi conformi a tutte le norme
vigenti. Un cortocircuito nella rete elettrica o in qualsiasi
apparecchio collegato all’apparecchio può danneggiare
l’apparecchio.
⚠ATTENZIONE! Non collegare l’apparecchio ad apparec-
chi che superano il carico massimo indicato!
⚠ATTENZIONE! Collegare l’apparecchio solo nel modo
indicato in queste istruzioni. Qualsiasi altro metodo po-
trebbe causare danni e/o lesioni.
meter or multimeter. When you are sure that there is no
voltage, you can proceed to connecting the cables.
Connect the I1, I2 and I3 input terminals to the corre-
sponding circuit breakers as shown on Fig.1.
Connect the three load circuits to O1, O2 and O3 output
terminals and the Negative cable.
Three different phases can be used for the three load
circuits.
Connect the N terminal to the Negative cable.
Connect L terminal to the Device power supply circuit
braker. Any of the three phases can be used to power the
Device.
Connect three switches/buttons to the SW1, SW2 and
SW3 terminals and the Device power supply circuit break-
er.
Any combination of AC and DC circuits can be switched
as long as the currents through the Device relays do not
exceed 16 A and the voltages at their contacts is not high-
er than 240 VAC or 30 VDC.
⚠RECOMMENDATION: For inductive appliances that
cause voltage spikes during switching on/off, such as
electrical motors, fans, vacuum cleaners and similar ones,
RC snubber (0.1µF / 100 Ω / 1/2 W / 600 VAC) should be
connected parallel to the appliance. The RC snubber can
be purchased at
https://shop.shelly.cloud/rc-snubber-wi-smart-home-automation
.
Initial Inclusion
If you choose to use the Device with the Shelly Cloud
mobile application and Shelly Cloud service, instructions
on how to connect the Device to the Cloud and control it
through the Shelly App can be found in the “App Guide”.
The Shelly Mobile Application and Shelly Cloud service
are not conditions for the Device to function properly.
This Device can be used stand-alone or with various other
home automation platforms and protocols.
⚠CAUTION! Do not allow children to play with the but-
tons/switches connected to the Device. Keep the Devices
for remote control of Shelly (mobile phones, tablets, PCs)
away from children.
LED indication
• Power (red): Red light indicator will be on if power sup-
ply is connected.
• Wi-Fi (varies):
- Blue light indicator will be on if in AP mode.
- Red light indicator will be on if in STA mode and not
connected to a Wi-Fi network.
- Yellow light indicator will be on if in STA mode and
connected to a Wi-Fi network. Not connected to Shelly
Cloud or Shelly Cloud disabled.
- Green light indicator will be on if in STA mode and
connected to a Wi-Fi network and to the Shelly Cloud.
- The light indicator will be ashing Red/Blue if OTA
update is in progress.
• LAN (green): Green light indicator will be on if LAN is
connected.
• Out 1 (red): Red light indicator will be on if the Output
1 relay is closed.
• Out 2 (red): Red light indicator will be on if the Output
2 relay is closed.
• Out 3 (red): Red light indicator will be on if the Output
3 relay is closed.
Reset button
• Press and hold for 5 sec for AP mode.
• Press and hold for 10 sec for factory reset.
Troubleshooting
In case you encounter problems with the installation or
operation of Shelly® Pro 3, please check its knowledge
base page:
www.shelly.cloud/knowledge-base/devices/shelly-pro3/
Specication
• Mounting: DIN rail
• Dimensions (HxWxL): 59x53x96 mm
• Working temperature: -20°C - 40°C
• Power supply: 110 - 240 VAC, 50/60Hz
• Electrical consumption: < 3 W
• Max switching voltage: 240 VAC / 30 VDC
• Max switching current per channel: 16 A
• Max total current trough all channels: 48 A
• Max RF output power : 20 dBm
• Radio protocol: Wi-Fi 802.11 b/g/n
• Wi-Fi frequency: 2412 - 2472 МHz (Max. 2483 MHz)
• Operational range (depending on local construction):
- up to 50 m outdoors,
- up to 30 m indoors
• Bluetooth: v.4.2
• Bluetooth modulation: GFSK, π/4-DQPSK, 8-DPSK
• Bluetooth frequency TX/RX - 2402 - 2480MHz
• LAN: Yes
• Dry contacts: Yes
• Power metering: No
• Overpower protection: No
• Overcurrent protection: No
• Overvoltage protection: No
• Overtemperature Protection: Yes
• Scripting (mjs): Yes
• MQTT: YES
• Webhooks (URL actions): 20 with 5 URLs per hook
• Schedules: 20
• CPU: ESP32
• Flash: 8 MB
Declaration of conformity
Hereby, Allterco Robotics EOOD declares that the radio
equipment type Shelly Pro 3 is in compliance with Direc-
tive 2014/53/EU, 2014/35/EU, 2014/30/EU, 2011/65/EU.
The full text of the EU declaration of conformity is avail-
able at the following internet address
https://shelly.cloud/knowledge-base/devices/shelly-pro-3/
Manufacturer: Allterco Robotics EOOD
Address: Bulgaria, Soa, 1407, 103 Cherni vrah Blvd.
Tel.: +359 2 988 7435
E-mail: support@shelly.cloud
Web: https://www.shelly.cloud
Changes in the contact data are published by the Manu-
facturer at the ocial website: https://www.shelly.cloud
All rights to trademark Shelly® and other intellectual
rights associated with this Device belong to Allterco Ro-
botics EOOD.
keit von mindestens PVC T105°C an.
Bevor Sie mit der Installation/Montage des Geräts be-
ginnen, prüfen Sie, ob die Leitungsschutzschalter (Siche-
rungen) ausgeschaltet sind und keine Spannung an den
Klemmen anliegt. Dies kann mit einem Phasenmesser
oder Multimeter erfolgen. Wenn Sie sicher sind, dass kei-
ne Spannung anliegt, können Sie mit dem Anschluss der
Kabel fortfahren.
Verbinden Sie die Eingangsklemmen I1, I2 und I3 mit
den entsprechenden Leistungsschaltern, wie in Abb. 1
gezeigt.
Schließen Sie die drei Lastkreise an die Ausgangsklem-
men O1, O2 und O3 und das negative Kabel an.
Für die drei Lastkreise können drei verschiedene Phasen
verwendet werden.
Verbinden Sie den N-Anschluss mit dem Minuskabel.
Verbinden Sie die L-Klemme mit dem Leistungsschalter
der Gerätestromversorgung. Jede der drei Phasen kann
verwendet werden, um das Gerät mit Strom zu versorgen.
Schließen Sie drei Schalter/Tasten an die Klemmen SW1,
SW2 und SW3 und den Trennschalter der Stromversor-
gung des Geräts an.
Jede Kombination von AC- und DC-Stromkreisen kann ge-
schaltet werden, solange die Ströme durch die Gerätere-
lais 16 A nicht überschreiten und die Spannungen an ihren
Kontakten nicht höher als 240 VAC oder 30 VDC sind.
⚠EMPFEHLUNG: Bei induktiven Geräten, die beim Ein-
und Ausschalten Spannungsspitzen verursachen, wie z.B.
Elektromotoren, Ventilatoren, Staubsauger und ähnliche,
sollte ein RC-Dämpfer (0,1µF / 100 Ω / 1/2 W / 600 VAC)
parallel zum Gerät angeschlossen werden. Der RC-Snubber
kann unter
https://shop.shelly.cloud/rc-snubber-wi-smart-home-automation
erworben werden.
Erstmalige Einbindung
Wenn Sie sich dafür entscheiden, das Gerät mit der Shelly
Cloud App und dem Shelly Cloud Service zu verwenden,
nden Sie Anweisungen zur Verbindung des Geräts mit
der Cloud und zur Steuerung über die Shelly App im “App
Guide”. Die Shelly Mobile App und der Shelly Cloud Ser-
vice sind keine Voraussetzung für das ordnungsgemäße
Funktionieren des Geräts. Dieses Gerät kann alleine, so-
wie mit verschiedenen anderen Hausautomatisierungs-
diensten und -anwendungen verwendet werden.
⚠VORSICHT! Erlauben Sie Kindern nicht, mit den an
das Gerät angeschlossenen Tasten/Schaltern zu spielen.
Halten Sie die Geräte zur Fernsteuerung des Shelly (z.B.:
Mobiltelefone, Tablets, PCs) von Kindern fern.
LED-Anzeige
• Power - Strom (rot): Die rote Leuchtanzeige leuchtet,
wenn die Stromversorgung angeschlossen ist.
• Wi-Fi (variiert):
- Blaues Licht leuchtet, wenn das Gerät im AP-Modus
ist.
- Rotes Licht leuchtet, wenn es sich im STA-Modus be-
ndet und nicht mit einem Wi-Fi-Netzwerk verbunden
ist.
- Gelbes Licht leuchtet, wenn es sich im STA-Modus
bendet und mit einem Wi-Fi-Netzwerk verbunden ist.
Nicht mit Shelly Cloud verbunden oder Shelly Cloud
deaktiviert.
- Die grüne Leuchtanzeige leuchtet, wenn sie sich im
STA-Modus bendet und mit einem Wi-Fi-Netz und der
Shelly Cloud verbunden ist.
- Die Leuchtanzeige blinkt rot/blau, wenn eine OTA-Ak-
tualisierung durchgeführt wird.
• LAN (grün): Die grüne Leuchtanzeige leuchtet, wenn
eine LAN-Verbindung besteht.
• Out 1 - Ausgang 1 (rot): Die rote Leuchtanzeige leuch-
tet, wenn das Ausgangsrelais 1 geschlossen ist.
• Out 2 - Ausgang 2 (rot): Die rote Leuchtanzeige leuch-
tet, wenn das Ausgangsrelais 2 geschlossen ist.
• Out 3 - Ausgang 3 (rot): Die rote Leuchtanzeige leuch-
tet, wenn das Ausgangsrelais 3 geschlossen ist.
Reset-Taste
• Drücken und halten Sie 5 Sekunden lang für den AP-
Modus.
• Zum Zurücksetzen auf Werkseinstellungen 10 Sekun-
den lang gedrückt halten.
Fehlerbehebung
Sollten Sie Probleme mit der Installation oder dem Betrieb
von Shelly® Pro 3 haben, schauen Sie bitte auf der Seite
der Wissensdatenbank nach:
www.shelly.cloud/knowledge-base/devices/shelly-pro3/
Spezikation
• Montage: DIN-Schiene
• Abmessungen (HxBxL): 59x53x96 mm
• Arbeitstemperatur: -20°C - 40°C
• Maximale Höhe: 2000 m
• Spannungsversorgung: 110 - 240 VAC, 50/60Hz
• Elektrischer Verbrauch: < 3 W
• Maximale Schaltspannung: 240 VAC
• Max. Schaltstrom pro Kanal: 16 A
• Max. Gesamtstrom durch alle Kanäle: 48 A
• Max. HF-Leistung: 20 dBm
• Funkprotokoll: Wi-Fi 802.11 b/g/n
• Wi-Fi Frequenz: 2412 - 2472 МHz (Max. 2483 MHz)
• Reichweite (abhängig von den örtlichen Gegebenhei-
ten):
- bis zu 50 m im Freien,
- bis zu 30 m in Innenräumen
• Bluetooth: v.4.2
• Bluetooth-Modulation: GFSK, π/4-DQPSK, 8-DPSK
• Bluetooth-Frequenz TX/RX - 2402 - 2480MHz
• LAN: Ja
• Trockene Kontakte: Ja
• Leistungsmessung: Nein
• Überspannungsschutz: Nein
• Überstromschutz: Nein
• Überspannungsschutz: Nein
• Übertemperaturschutz: Ja
• Skripting (mjs): Ja
• MQTT: JA
• Webhooks (URL-Aktionen): 20 mit 5 URLs pro Haken
• Zeitpläne: 20
• CPU: ESP32
• Flash: 8 MB
Konformitätserklärung
Hiermit erklärt Allterco Robotics EOOD, dass der Funkan-
lagentyp Shelly Pro 3 der Richtlinie 2014/53/EU, 2014/35/
EU, 2014/30/EU, 2011/65/EU entspricht. Den vollständi-
gen Text der EU-Konformitätserklärung nden Sie unter
folgender Internetadresse
https://shelly.cloud/knowledge-base/devices/shelly-pro-3/
Hersteller: Allterco Robotics EOOD
Adresse: 103 Cherni vrah Blvd., 1407 Soa, Bulgarien
Tel.: +359 2 988 7435
E-Mail: support@shelly.cloud
Internet: https://www.shelly.cloud
Änderungen der Kontaktdaten werden vom Hersteller auf
dessen oziellen Website veröffentlicht
https://www.shelly.cloud
Alle Rechte an der Marke Shelly® und anderen geistigen
Eigentumsrechten im Zusammenhang mit diesem Gerät
gehören Allterco Robotics EOOD.
⚠ATTENZIONE! Non installare il dispositivo in un luogo
che possa bagnarsi.
⚠RACCOMANDAZIONE Collegare il dispositivo utilizzan-
do cavi unipolari solidi con una maggiore resistenza termi-
ca dell’isolamento non inferiore a PVC T105°C.
Prima di iniziare l’installazione/montaggio del dispositivo,
controllare che gli interruttori siano spenti e che non ci
sia tensione sui loro terminali. Questo può essere fatto
con un misuratore di fase o un multimetro. Quando siete
sicuri che non c’è tensione, potete procedere al collega-
mento dei cavi.
Collegare i terminali di ingresso I1, I2 e I3 agli interruttori
corrispondenti come mostrato in g.1.
Collegare i tre circuiti di carico ai terminali di uscita O1, O2
e O3 e il cavo negativo.
Tre diverse fasi possono essere utilizzate per i tre circuiti
di carico.
Collegare il terminale N al cavo negativo.
Collegare il terminale L al freno del circuito di alimentazio-
ne del dispositivo. Una qualsiasi delle tre fasi può essere
utilizzata per alimentare il Dispositivo.
Collegare tre interruttori/pulsanti ai terminali SW1, SW2
e SW3 e all’interruttore di alimentazione del Dispositivo.
È possibile commutare qualsiasi combinazione di circuiti
CA e CC purché le correnti attraverso i relè del dispositivo
non superino i 16 A e le tensioni ai loro contatti non siano
superiori a 240 V CA o 30 V CC.
⚠RACCOMANDAZIONE: Per gli apparecchi induttivi che
causano picchi di tensione durante l’accensione e lo spe-
gnimento, come motori elettrici, ventilatori, aspirapolvere
e simili, è necessario collegare in parallelo all’apparecchio
uno snubber RC (0,1µF / 100 Ω / 1/2 W / 600 VAC). Lo
snubber RC può essere acquistato sul sito
https://shop.shelly.cloud/rc-snubber-wi-smart-home-automation
.
Inclusione iniziale
Se si sceglie di utilizzare il dispositivo con l’applicazione
mobile Shelly Cloud e il servizio Shelly Cloud, le istruzioni
su come collegare il dispositivo al Cloud e controllarlo at-
traverso l’App Shelly si trovano nella “Guida App”. L’appli-
cazione mobile Shelly e il servizio Shelly Cloud non sono
condizioni per il corretto funzionamento del Dispositivo.
Questo Dispositivo può essere utilizzato con vari altri ser-
vizi e applicazioni di automazione domestica.
⚠ATTENZIONE! Non permettere ai bambini di giocare
con i pulsanti/interruttori collegati al Dispositivo. Tenere i
dispositivi per il controllo remoto di Shelly (telefoni cellula-
ri, tablet, PC) lontano dai bambini.
Indicazione a LED
• Power - Alimentazione (rosso): L’indicatore luminoso
rosso si accende se l’alimentazione è collegata.
• Wi-Fi (varia):
- L’indicatore luminoso blu è acceso se il dispositivo è
in modalità AP.
- L’indicatore rosso è acceso se il dispositivo è in moda-
lità STA e non è connesso a una rete Wi-Fi.
- L’indicatore luminoso giallo si accende se è in modali-
tà STA ed è connesso a una rete Wi-Fi. Non connesso a
Shelly Cloud o Shelly Cloud disattivato.
- L’indicatore luminoso verde è acceso se in modalità
STA e connesso a una rete Wi-Fi e a Shelly Cloud.
- L’indicatore luminoso lampeggia in rosso/blu se è in
corso un aggiornamento OTA.
• LAN (verde): L’indicatore luminoso verde è acceso se la
rete LAN è collegata.
• Out 1 - Uscita 1 (rosso): L’indicatore luminoso rosso si
accende se il relè di uscita 1 è chiuso
• Out 2 - Uscita 1 (rosso): L’indicatore luminoso rosso si
accende se il relè di uscita 2 è chiuso
• Out 3 - Uscita 1 (rosso): L’indicatore luminoso rosso si
accende se il relè di uscita 3 è chiuso
Pulsante di reset
• • Tenere premuto per 5 secondi per la modalità AP.
• • Tenere premuto per 10 secondi per il reset di fabbrica.
Risoluzione dei problemi
In caso di problemi con l’installazione o il funzionamen-
to di Shelly® Pro 3, si prega di consultare la pagina della
base di conoscenza:
https://shelly.cloud/knowledge-base/devices/shelly-pro3/
Speciche
• Montaggio: Guida DIN
• Dimensioni (HxLxP): 59x53x96 mm
• Temperatura di lavoro: -20°C - 40°C
• Altitudine massima: 2000 m
• Alimentazione: 110 - 240 VAC, 50/60Hz
• Consumo elettrico: < 3 W
• Tensione massima di commutazione: 240 VAC
• Corrente di commutazione massima per canale: 16 A
• Corrente totale massima attraverso tutti i canali: 48 A
• Potenza del segnale radio: 20 dBm
• Protocollo radio: Wi-Fi 802.11 b/g/n
• Frequenza Wi-Fi: 2412 - 2472 МHz (max. 2483 MHz)
• Portata operativa (a seconda della struttura locale):
- no a 50 m all’aperto,
- no a 30 m all’interno
• Bluetooth: v.4.2
• Modulazione Bluetooth: GFSK, π/4-DQPSK, 8-DPSK
• Frequenza Bluetooth TX/RX - 2402 - 2480MHz
• LAN: Sì
• Contatti a secco: Sì
• Misurazione della potenza: No
• Protezione da sovralimentazione: No
• Protezione da sovracorrente: No
• Protezione da sovratensione: No
• Protezione da sovratemperatura: Sì
• Scripting (mjs): Sì
• MQTT: SÌ
• Webhook (azioni URL): 20 con 5 URL per ogni hook
• Pianicazioni: 20
• CPU: ESP32
• Flash: 8 MB
Dichiarazione di conformità
Con la presente, Allterco Robotics EOOD dichiara che il
tipo di apparecchiatura radio Shelly Pro 3 è conforme
alla Direttiva 2014/53/UE, 2014/35/UE, 2014/30/UE,
2011/65/UE. Il testo completo della dichiarazione di
conformità UE è disponibile al seguente indirizzo internet
https://shelly.cloud/knowledge-base/devices/shelly-pro-3/
Produttore: Allterco Robotics EOOD
Indirizzo: Bulgaria, Soa, 1407, 103 Cherni vrah Blvd.
Tel.: +359 2 988 7435
E-mail: support@shelly.cloud
Web: https://www.shelly.cloud
Le modiche ai dati di contatto sono pubblicate dal Pro-
duttore sul sito Web uciale del Dispositivo
https://www.shelly.cloud
Tutti i diritti sul marchio Shelly® e altri diritti intellettuali
associati a questo dispositivo appartengono a Allterco
Robotics EOOD.
23/2022