This document contains important technical
and safety information about the device, its
safety use and installation.
⚠CAUTION! Before beginning the installa-
tion, please read carefully and entirely this
guide and any other documents accompany-
ing the device. Failure to follow the installation
procedures could lead to malfunction, danger
to your health and life, violation of law or re-
fusal of legal and/or commercial guarantee (if
any). Allterco Robotics EOOD is not responsi-
ble for any loss or damage in case of incor-
rect installation or improper operation of this
device due to failure of following the user and
safety instructions in this guide.
Shelly® devices are delivered with factory-in-
stalled rmware. If rmware updates are
necessary to keep the devices in conformity,
including security updates, Allterco Robotics
EOOD will provide the updates free of charge
through the device Embedded Web Interface
or the Shelly mobile application, where the
information about the current rmware ver-
sion is available. The choice to install or not
the device rmware updates is the user’s sole
responsibility. Allterco Robotics EOOD shall
not be liable for any lack of conformity of the
device caused by failure of the user to install
the provided updates in a timely manner.
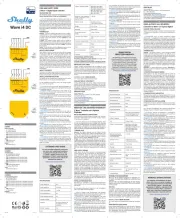
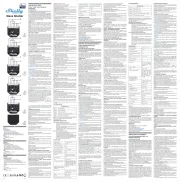
ShellyBLU Button1 (the Device) is a Bluetooth
button, which helps you easily activate and
deactivate any device or scene with just a
Installation Instructions
⚠CAUTION! Keep device away from liquids
and moisture. The device shouldn’t be used in
places with high humidity.
⚠CAUTION! Do not use if the Device has
⚠CAUTION! Do not attempt to service or re-
pair the Device yourself!
⚠CAUTION! The Device may be connected
wirelessly and may control electric circuits and
appliances. Proceed with caution! Irresponsi-
ble use of the Device may lead to malfunction,
danger to your life or violation of the law.
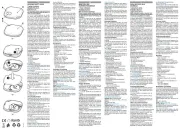
1. Open gently the Device back cover using
your thumb nail, screwdriver or another at
object as shown on g. 2.
2. Slide in the supplied battery as shown on
⚠CAUTION! Pay attention to the battery po-
3. Replace the back cover by pressing it to
the Device as shown on g. 2 until you hear
Pressing the button will cause the Device to
start transmitting signals for one second in
compliance with the BT Home format. Learn
more at https://bthome.io.
ShellyBLU Button1 has advanced security fea-
ture and supports encrypted mode.
ShellyBLU Button1 supports multi-click - sin-
gle, double, triple and long press.
The LED indication will emit the same num-
ber of ashes as the button presses and the
buzzer - the corresponding number of beeps.
To pair ShellyBLU Button1 with another Blue-
tooth device press and hold the Device button
The device will await connection for the next
one minute. The available Bluetooth charac-
teristics are described in the ocial Shelly API
ShellyBLU Button1 features beacon mode. If
enabled, the Device will emit beacons every
8 second, and can be discovered or used for
Bitte vor Gebrauch durchlesen
Dieses Dokument enthält wichtige technische
und sicherheitstechnische Informationen über
das Gerät und seine sichere Verwendung und
⚠ACHTUNG! Bevor Sie mit der Installation
beginnen, lesen Sie bitte die Begleitdokumen-
tation sorgfältig und vollständig durch. Die
Nichtbeachtung der empfohlenen Verfahren
kann zu Fehlfunktionen, Lebensgefahr oder
Gesetzesverstößen führen. Allterco Robotics
EOOD haftet nicht für Verluste oder Schäden im
Falle einer falschen Installation oder Bedienung
Shelly® Geräte werden mit werkseitig instal-
lierter Firmware ausgeliefert. Um die Geräte
konform zu halten, stellt Allterco Robotics
EOOD die notwendigen Firmware-Updates, ein-
schließlich der Sicherheitsupdates, kostenlos
über die im Gerät eingebettete Web-Schnitt-
stelle sowie über die Shelly-App zur Verfügung.
Die Entscheidung, die Firmware-Updates des
Geräts zu installieren oder nicht, obliegt der al-
leinigen Verantwortung des Benutzers. Allterco
Robotics EOOD haftet nicht für Konformitäts-
mängel des Geräts, die darauf zurückzuführen
sind, dass der Benutzer die bereitgestellten
Updates nicht rechtzeitig installiert hat.
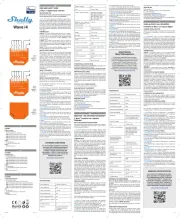
ShellyBLU Button1 (das Gerät) ist ein Bluetooth-
Taster, mit dem jedes Gerät oder jede Szene mit
nur einem Klick einfach aktiviert oder deakti-
viert werden kann. (Abb. 1)
• C: Halterung für Schlüsselanhänger
⚠VORSICHT! Halten Sie das Gerät von Flüs-
sigkeit und Feuchtigkeit fern. Das Gerät sollte
nicht in Umgebung mit hoher Feuchtigkeit ver-
⚠VORSICHT! Verwenden Sie das Gerät nicht,
⚠VORSICHT! Versuchen Sie nicht, das Gerät
selbst zu warten oder reparieren!
⚠VORSICHT! Das Gerät kann drahtlos verbun-
den werden und dabei elektrische Schaltkreise
und Geräte steuern. Mit Vorsicht fortfahren! Un-
verantwortlicher Umgang mit dem Gerät kann
zu Fehlfunktionen, Lebensgefahr oder Gesetz-
1. Öffnen Sie vorsichtig die Abdeckung der
Geräterückseite mit einem achen, stumpfen
Gegenstand, wie in Abb. 2 dargestellt.
2. Schieben Sie die mitgelieferte Batterie wie in
⚠CAUTION! Achten Sie auf die Polarität der
3. Bringen Sie die hintere Abdeckung wieder an,
indem Sie sie auf das Gerät drücken, bis Sie ein
Klickgeräusch hören (siehe Abb. 2).
ShellyBLU Button1 verwenden
Durch Drücken der Taste beginnt das Gerät mit
der Übertragung von Signalen für eine Sekunde
in Übereinstimmung mit dem BT Home-For-
mat. Erfahren Sie mehr unter https://bthome.io.
ShellyBLU Button1 verfügt über erweiterte
Sicherheitsfunktionen und unterstützt den ver-
ShellyBLU Button1 unterstützt Mehrfachklicks
- einfaches, doppeltes, dreifaches und langes
Die LED-Anzeige blinkt so oft, wie die Taste ge-
drückt wurde, und der Buzzer gibt die entspre-
chende Anzahl von Signaltönen aus.
Um den ShellyBLU Button1 mit einem anderen
Bluetooth-Gerät zu koppeln, halten Sie die Gerä-
tetaste für 10 Sekunden gedrückt.
Das Gerät wartet eine Minute lang auf die
Verbindung. Die verfügbaren Bluetooth-Eigen-
schaften sind in der oziellen Shelly-API-Doku-
mentation beschrieben unter:
Questo documento contiene importanti infor-
mazioni tecniche e di sicurezza sul dispositivo
e sul suo uso e installazione in sicurezza.
⚠ATTENZIONE! Prima di iniziare l’installazio-
ne leggere attentamente e completamente la
documentazione allegata. La mancata osser-
vanza delle procedure consigliate potrebbe
portare a malfunzionamenti, pericolo per la
vita o violazione della legge. Allterco Robotics
EOOD non è responsabile per eventuali perdite
o danni in caso di installazione o funzionamen-
to errati di questo dispositivo.
I dispositivi Shelly® vengono consegnati con
un rmware installato in fabbrica. Se sono
necessari aggiornamenti del rmware per man-
tenere i dispositivi in conformità, compresi gli
aggiornamenti di sicurezza, Allterco Robotics
EOOD fornirà gli aggiornamenti gratuitamente
attraverso l‘interfaccia web incorporata del di-
spositivo o l‘applicazione mobile Shelly, dove
sono disponibili le informazioni sulla versione
corrente del rmware. La scelta di installare o
meno gli aggiornamenti del rmware del dispo-
sitivo è di esclusiva responsabilità dell‘utente.
Allterco Robotics EOOD non è responsabile
per qualsiasi mancanza di conformità del di-
spositivo causata dalla mancata installazione
degli aggiornamenti forniti dall‘utente in modo
ShellyBLU Button1 (il Dispositivo) è un pulsante
Bluetooth, che ti aiuta ad attivare e disattivare
facilmente qualsiasi dispositivo o scena con un
• B: Anello di indicazione LED
• C: Supporto portachiavi
• E: Copertina posteriore
Istruzioni per l‘installazione
⚠ATTENZIONE! Pericolo di folgorazione. Te-
nere il dispositivo lontano da liquidi e umidità.
Il dispositivo non deve essere utilizzato in luo-
⚠ATTENZIONE! Non utilizzare se il Dispositi-
⚠ATTENZIONE! Non tentare di riparare o ri-
parare il Dispositivo da soli!
⚠ATTENZIONE! Il Dispositivo può essere
connesso in modalità wireless e può controlla-
re circuiti elettrici ed elettrodomestici. Procedi
con cautela! L‘uso irresponsabile del Disposi-
tivo può causare malfunzionamenti, pericolo
per la vita o violazione della legge.
Inserimento della batteria
1. Aprire delicatamente il coperchio posteriore
del dispositivo utilizzando l‘unghia del pollice,
un cacciavite o un altro oggetto piatto come
2. Inserire la batteria in dotazione come mo-
⚠ATTENZIONE! Prestare attenzione alla po-
3. Riposizionare il coperchio posteriore pre-
mendolo contro il dispositivo nché non si sen-
te un clic come mostrato in g. 2.
Utilizzo del pulsante Shelly Blu 1
Premendo il pulsante, il Dispositivo inizierà a
trasmettere segnali per un secondo in confor-
mità con il formato BT Home. Scopri di più su
ShellyBLU Button1 p1-ha funzionalità di sicurezza
avanzate e supporta la modalità crittografata.
ShellyBLU Button1 supporta il multi-clic: pres-
sione singola, doppia, tripla e lunga.
L‘indicazione LED emetterà lo stesso numero
di lampeggi delle pressioni del pulsante e del
cicalino - il numero corrispondente di bip.
Per accoppiare ShellyBLU Button1 con un altro
dispositivo Bluetooth, tieni premuto il pulsante
del dispositivo per 10 secondi.
Il dispositivo attenderà la connessione per il
prossimo minuto. Le caratteristiche Bluetooth
disponibili sono descritte nella documentazio-
This mode allows also remote activating of
the Device buzzer for 30 seconds (e.g. to nd
To restore the device conguration to factory
settings, press and hold the button for 30 sec-
onds short after inserting the battery.
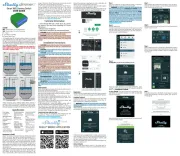
If you choose to use the Device with the Shelly
Cloud mobile application and Shelly Cloud
service, instructions on how to connect the
Device to the Cloud and control it through the
Shelly App can be found in the “App Guide”.
The Shelly mobile application and Shelly
Cloud service are not conditions for the De-
vice to function properly. This Device can be
used standalone or with various other home
automation platforms and protocols.
1. Open the back cover as shown on g. 2.
2. Extract the exhausted battery using your
thumb nail, screwdriver or another at object.
3. Slide in a new battery as shown on g. 2
⚠CAUTION! Use only 3 V CR2032 or com-
patible battery! Pay attention to the battery
3. Replace the back cover by pressing it to
the Device until you hear a clicking sound as
• Dimensions: 36x36x6 mm / 1.44х1.44х0.25 in
• Weight with battery: 9 g / 0.3 oz
• Working temperature: -20°C to 40°C
• Humidity 30 % to 70 % RH
• Power supply: 1x 3 V CR2032 battery
• Battery life: up to 2 years
• Multi-click support: Up to 4 possible
• Radio protocol: Bluetooth
• RF band: 2400 - 2483.5 MHz
• Encryption: AES encryption (CCM mode)
• Operational range (depending on local
Declaration of conformity
Hereby, Allterco Robotics EOOD declares that
the radio equipment type ShellyBLU Button1
in compliance with Directive 2014/53/EU,
2014/35/EU, 2014/30/EU, 2011/65/EU. The
full text of the EU declaration of conformity
is available at the following internet address:
https://shelly.link/blu-button-1_DoC
Manufacturer: Allterco Robotics EOOD
Address: 103 Cherni vrah Blvd., 1407 Soa,
E-mail: support@shelly.cloud
Ocial website: https://www.shelly.cloud
Changes in the contact information data are
published by the Manufacturer on the ocial
All rights to the trademark Shelly® and other
intellectual rights associated with this Device
belong to Allterco Robotics EOOD.
ShellyBLU Button1 verfügt über einen Beacon-
Modus. Wenn er aktiviert ist, sendet das Gerät
alle 8 Sekunden ein Beacon aus und kann so
entdeckt oder zur Anwesenheitserkennung ver-
In diesem Modus kann auch der Buzzer des
Geräts aus der Ferne für 30 Sekunden aktiviert
werden (z. B. um ein verlorenes Gerät in der
Um die Gerätekonguration auf die Werksein-
stellungen zurückzusetzen, halten Sie die Taste
nach dem Einlegen der Batterie kurz 30 Sekun-
Wenn Sie sich dafür entscheiden, das Gerät
mit der Shelly Cloud App und dem Shelly Cloud
Service zu verwenden, nden Sie Anweisungen
zur Verbindung des Geräts mit der Cloud und
zur Steuerung über die Shelly App im “App
Guide”. Die Shelly Mobile App und der Shelly
Cloud Service sind keine Voraussetzung für das
ordnungsgemäße Funktionieren des Geräts.
Dieses Gerät kann alleine, sowie mit verschie-
denen anderen Hausautomatisierungsdiensten
und -anwendungen verwendet werden.
1. Öffnen Sie die hintere Abdeckung wie in Abb.
2. Nehmen Sie die leere Batterie mit dem Dau-
mennagel, einem Schraubendreher oder einem
anderen achen Gegenstand heraus, wie in
3. Schieben Sie eine neue Batterie ein, wie in
⚠CAUTION! Verwenden Sie nur 3 V CR2032
oder eine kompatible Batterie! Achten Sie auf
die Polarität der Batterie!
3. Bringen Sie die hintere Abdeckung wieder an,
indem Sie sie auf das Gerät drücken, bis Sie ein
Klickgeräusch hören (siehe Abb. 2).
• Abmessungen: 36x36x6 mm /
• Gewicht mit Batterie: 9 g / 0.3 oz
• Arbeitstemperatur -20°C bis 40°C
• Luftfeuchtigkeit 30 % bis 70 % RH
• Stromversorgung: 1x 3 V CR2032-Batterie
(im Lieferumfang enthalten)
• Lebensdauer der Batterie: bis zu 2 Jahre
• Unterstützung von Mehrfachklicks: Bis zu 4
• Funkprotokoll: Bluetooth
• Frequenzband: 2400 - 2483.5 MHz
• Max. Sendeleistung in Frequenzband:
• Verschlüsselung: AES-Verschlüsselung
• Reichweite (abhängig von den baulichen
-bis zu 10 m in Innenräumen
Hiermit erklärt Allterco Robotics EOOD, dass
die Funkanlage Typ ShellyBLU Button1 der
Richtlinie 2014/53/EU, 2014/35/EU, 2014/30/
EU, 2011/65/EU entspricht. Den vollständigen
Text der EU-Konformitätserklärung nden Sie
unter folgender Internetadresse:
https://shelly.link/blu-button-1_DoC
Hersteller: Allterco Robotics EOOD
Adresse: 103 Cherni vrah Blvd., 1407 Soa,
E-Mail: support@shelly.cloud
Ozielle Website: https://www.shelly.cloud
Änderungen der Kontaktdaten werden vom
Hersteller auf dessen oziellen Website ver-
öffentlicht https://www.shelly.cloud
Alle Rechte an der Marke Shelly® und anderen
geistigen Eigentumsrechten im Zusammen-
hang mit diesem Gerät gehören Allterco Robo-
ne uciale dell‘API Shelly all‘indirizzo:
ShellyBLU Button1 dispone della modalità bea-
con. Se abilitato, il dispositivo emetterà beacon
ogni 8 secondi e potrà essere rilevato o utilizza-
to per il rilevamento della presenza.
Questa modalità consente anche l‘attivazione
da remoto del buzzer del Dispositivo per 30 se-
condi (es. per ritrovare un Dispositivo smarrito
Per ripristinare la congurazione del dispositivo
alle impostazioni di fabbrica, tenere premuto il
pulsante per 30 secondi poco dopo aver inse-
Se si sceglie di utilizzare il dispositivo con
l‘applicazione mobile Shelly Cloud e il servizio
Shelly Cloud, le istruzioni su come collegare il
dispositivo al Cloud e controllarlo attraverso
l‘App Shelly si trovano nella „Guida App“. L‘appli-
cazione mobile Shelly e il servizio Shelly Cloud
non sono condizioni per il corretto funziona-
mento del Dispositivo. Questo Dispositivo può
essere utilizzato con vari altri servizi e applica-
zioni di automazione domestica.
Sostituzione della batteria
1. Aprire il coperchio posteriore come mostrato
2. Estrarre la batteria scarica utilizzando l‘un-
ghia del pollice, un cacciavite o un altro oggetto
piatto. come mostrato in g. 3.
3. Inserire una nuova batteria come mostrato
⚠ATTENZIONE! Utilizzare solo batterie
CR2032 da 3 V o compatibili! Prestare atten-
zione alla polarità della batteria!
3. Riposizionare il coperchio posteriore pre-
mendolo contro il dispositivo nché non si sen-
te un clic come mostrato in g. 2.
• Dimensioni: 36x36x6 mm /
• Peso con batteria: 9 g / 0,3 once
• Temperatura di lavoro -20°C no a 40°C
• Umidità Dal 30 % al 70 % di umidità relativa
• Alimentazione: 1 batteria CR2032 da 3 V
• Durata della batteria: no a 2 anni
• Supporto multi-click: Fino a 4 azioni
• Protocollo radio: Bluetooth
• Bande di radiofrequenza:
• Massima potenza a radiofrequenza:
• Crittograa: crittograa AES (modalità
• -Portata operativa (a seconda della strut
Dichiarazione di conformità
Con la presente, Allterco Robotics EOOD dichia-
ra che il tipo di apparecchiatura radio ShellyBLU
Button1 è conforme alla Direttiva 2014/53/UE,
2014/35/UE, 2014/30/EU, 2011/65/EU. Il testo
completo della dichiarazione di conformità UE
è disponibile al seguente indirizzo internet:
https://shelly.link/blu-button-1_DoC
Produttore: Allterco Robotics EOOD
Indirizzo: Bulgaria, Soa, 1407, 103 Cherni vrah
E-mail: support@shelly.cloud
Sito web uciale: https://www.shelly.cloud
Le modiche ai dati di contatto sono pubblicate
dal Produttore sul sito Web uciale.
Tutti i diritti sul marchio Shelly® e altri diritti
intellettuali associati a questo dispositivo ap-
partengono a Allterco Robotics EOOD.