ƜƷƨƼƸŴǷǰȞȬȳǺǛƓᝰƍ൭NJƍƨƩƖƋǓƕƱƏƝƟƍLJƢŵஜᛟଢ
ǛƝችᛠƷɥŴȬȳǺƷೞᏡŴદ˺ŴӕǓৢƍɥƷදॖໜǛദƠƘྸᚐƠƯŴ
ϙჇજࢨǛƓಏƠLjƘƩƞƍŵƳƓஜᛟଢƸŴӲǫȡȩဇσဇƱƳƬƯƓǓLJ
ƢƷưŴႸƴǑǓƝ
̅
ဇǫȡȩƷᛆ࢘ሖǛƓᛠLjƴƳǓŴƝ
̅
ဇǫȡȩƷᛟ
ଢNjƋǘƤƯƝᚁƘƩƞƍŵƓᛠLjƴƳƬƨƋƱƸŴٻЏƴ
̬ሥƠƯƘƩƞƍŵ
ӕǓৢƍǛᛚǔƱŴ
̅ဇᎍƕͻǛƏӧᏡࣱƕƋǓLJƢŵ
ŠȬȳǺǛ˄ƚƨǫȡȩưŴٽᨗǍࢍƍήเǛᙸǔƱŴᙻщᨦܹǛឪƜƢऀǕƕƋǓ
LJƢŵཎƴȬȳǺҥ˳ưٽᨗǛႺᙸǔƱŴڂଢƷҾ׆ƱƳǓLJƢŵ
ӕǓৢƍǛᛚǔƱŴ̅ဇᎍƕᨦܹǛƏƔŴཋႎܹƕႆဃƢǔӧᏡࣱƕƋǓLJƢŵ
ŠȬȳǺŴLJƨƸȬȳǺǛ˄ƚƨǫȡȩǛŴȬȳǺǭȣȃȗǛ˄ƚƳƍLJLJ્ፗƠƳ
ƍưƘƩƞƍŵٽᨗƷήƕᨼήྵᝋǛឪƜƠŴ້໎ƷҾ׆ƱƳǔئӳƕƋǓLJƢŵ
ŠȞǦȳȈᢿƸᙐᩃƳ࢟ཞǛƠƯƓǓLJƢƷưŴᒰƴৢƏƱࣴƷҾ׆ƱƳǓLJƢŵ
ŠɤᏩƸҗЎƴࢍࡇƷƋǔNjƷǛƝ
̅
ဇƘƩƞƍŵࢊƍNjƷǛƝ
̅
ဇƴƳǓLJƢƱŴ
᠃͂ƢǔऀǕƕƋǓLJƢŵ
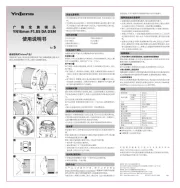
ӲᢿỉӸᆅί 1ὸ
ձȕǣȫǿȸƶơ
ղǺȸȠȪȳǰ
ճȕǩȸǫǹȪȳǰ
մᙀяႎុᩉႸႮ
յਦዴ
նOS ǹǤȃȁ
շȕǩȸǫǹȢȸȉЏ੭ƑǹǤȃȁ
ոȞǦȳȈ
չȬȳǺȕȸȉ
ἝἅὅဇỆếẟề
ƜƷȬȳǺƸᩓᄬǓೞನǛ ƠƯƓǓŴȋdzȳᙌ ȬȳǺƴƓƚǔ ǿǤAF E
ȗȬȳǺƱӷሁƷˁಮƴƳƬƯƍLJƢŵᘙ(A)ƴᚡ ƷǫȡȩưƝ
̅
ဇƴƳǕLJƢŵ
ᲢŬҮƷೞᆔƸŴǫȡȩƷȕǡȸȠǦǧǢǛஇૼƷȐȸǸȧȳƴǢȃȗȇȸȈƠ
ƯƘƩƞƍŵᲣ
ŦȕǤȫȠɟაȬȕǫȡȩưƸƝ
̅
ဇƴƳǕLJƤǜŵ
Ŧᘙ ƷೞᆔưƸƝ
̅
ဇƴƳǕLJƤǜŵ(B)
ŦஇૼೞᆔƴƭƖLJƠƯƸŴ ǿǤȗȬȳǺƴࣖ
ݣƠƯƍǔƔŴƝ
̅
ဇƷǫȡȩE
ƷᛟଢưᄩᛐƠƯƘƩƞƍŵ
ỿἶἠὅဇỆếẟề
ƜƷȬȳǺƸŴǫȡȩƷ ȞǤǯȭǢǸȣǹȈȡȳȈೞᏡƴࣖ
ݣƠƯƍLJƢƕŴAF
ӷơȬȳǺǛᙐૠஜႇƢǔƜƱƸưƖLJƤǜŵ
ἾὅἌỉბᏮ૾ඥ
ǫȡȩǁƷბᏮ૾ඥƸŴƓਤƪƷǫȡȩƷᛟଢƴࢼƬƯƘƩƞƍŵ
ŦȞǦȳȈ᩿ƴƸǓᡲѣဇŴAF ᡲѣဇƷᘺፗǍŴᩓൢໜሁƕƋǓLJƢŵǭǺ
Ǎ൲ǕƕƭƘƱᛚ˺ѣǍᨦƷҾ׆ƱƳǓLJƢƷưƝදॖƘƩƞƍŵ
ᩧЈỆếẟề
ᩧЈƷൿܭ૾ඥƸŴƓਤƪƷǫȡȩƷᛟଢƴࢼƬƯƘƩƞƍŵ
ἦὅἚӳỪẶểἌὊἱὅἂ
ǪȸȈȕǩȸǫǹưજࢨƢǔئӳƸŴȕǩȸǫǹȢȸȉЏǓ੭ƑǹǤȃȁǛ AF
ƴǻȃȈƠLJƢᲢ ᲣŵȞȋȥǢȫưજࢨƢǔئӳƸŴȕǩȸǫǹȢȸȉЏǓ੭2
ƑǹǤȃȁǛ ƴǻȃȈƠŴȕǩȸǫǹȪȳǰǛׅƠƯȔȳȈǛӳǘƤLJƢŵM
ŦǫȡȩƷȕǩȸǫǹȢȸȉƷЏǓ੭ƑƸŴƝ
̅
ဇƷǫȡȩƷᛟଢƴࢼƬƯƘ
Ʃƞƍŵ
ŦȞȋȥǢȫưȔȳȈǛӳǘƤǔᨥŴႸႮƕ ᲢᨂᢒᲣƷˮፗưNjᢒƴȔȳĐ
ȈƕӳǘƳƍƜƱƕƋǓLJƢƷưŴȕǡǤȳȀȸưᄩᛐƠƳƕǒȔȳȈǛӳǘ
ƤƯƘƩƞƍŵ
ƜƷȬȳǺƸŴ ƴǻȃȈƠƨLJLJưȞȋȥǢȫưƷȔȳȈᙀദǛƢǔƜƱNjAF
ӧᏡưƢŵǫȡȩǛǷȳǰȫ ȢȸȉƴǻȃȈƠƯŴӳࢸŴǷȣȃǿȸȜǿAF
ȳǛҞƠƷLJLJưȕǩȸǫǹȪȳǰǛׅƠƯȔȳȈǛᛦૢƠƯƘƩƞƍŵ
LJƨƜƷȬȳǺƸŴǪȸȈȕǩȸǫǹƕ˺ѣƠƯƍǔưNjŴȕǩȸǫǹȪȳǰ
ǛׅƢƱȞȋȥǢȫƴЏǓஆǘǔž ЏǓஆƑೞᏡſᲢȞȋȥǢȫǪȸȐȸȩǤMF
ȉᲣǛͳƑƯƍLJƢŵȬȳǺƷȕǩȸǫǹȢȸȉЏǓ੭ƑǹǤȃȁǛ ƴǻȃMO
ȈƠƯ
̅ဇƠƯƘƩƞƍᲢ Უŵ3
ŦК٥ǓƷ ƱǽȕȈǦǨǢžUSB DOCK SIGMA Optimization ProſǛဇƍƯŴ
MF MFЏǓஆƑೞᏡƷஊјᲩјƷᚨܭŴƓǑƼ ƴЏǓஆǘǔǿǤȟȳǰƷ
ᛦૢǛƢǔƜƱƕưƖLJƢŵᛇƠƘƸžSIGMA Optimization ProſƷȘȫȗǛ
ƝᚁƘƩƞƍŵ
ŦSIGMA Optimization Pro
Ƹ
Ŵ
ࡴᅈ
ǦǧȖǵǤȈǑǓ
૰
ưȀǦȳȭȸȉưƖLJƢ
ŵ
http://www.sigma-global.com/download/
ẎἌὊἱὅἂẏ
ǺȸȠȪȳǰǛׅƠƯŴஇᢘƳನƴƳǔǑƏƴໜុᩉǛ٭҄ƞƤLJƢŵ
ốủᙀദೞᏡỆếẟề
ƜƷȬȳǺƸŴਤƪજࢨƷȖȬǛ᠉ถƢǔŴƿǕᙀദೞᏡ OS(Optical
Stabilizer)Ǜ ƠƯƍLJƢŵOS ON ǹǤȃȁǛ ƴƠLJƢŵᲢ ᲣǷȣȃǿȸȜ4
ǿȳǛҞƠƠŴȕǡǤȳȀȸưƕܤܭƠƯƍǔƷǛᄩᛐƠƯƔǒજࢨƠƯƘ
ƩƞƍŵᲢҞƠƠƯƔǒƕܤܭƢǔLJưŴኖᲫᅺƔƔǓLJƢŵᲣ
ŦˌɦƷவˑưƸŴƿǕᙀദೞᏡƸ
̅ဇƠƳƍưƘƩƞƍŵ
ƒ ƒɤᏩሁưǫȡȩǛܭƠƯƷજࢨ ȐȫȖᲢᧈ᧓ᩧήᲣજࢨ
ŦǷȣȃǿȸȜǿȳƔǒਦǛᩉƠƯNjŴǫȡȩƷᩧЈᚘƕƸƨǒƍƯƍǔ᧓ƸŴ
ƿǕᙀദೞᏡNj˺ѣƠƯƍLJƢŵ˺ѣɶƴȬȳǺǛٳƠƨǓŴǫȡȩƷᩓ൷
ǛӕǓЈƢƱŴȬȳǺƷᨦƷҾ׆ƱƳǓLJƢŵ
ŦજࢨႺࢸǍǫȡȩƷϋᔺȕȩȃǷȥƷΪᩓƳƲƴŴȕǡǤȳȀȸƕੵǕǔ
ƜƱƕƋǓLJƢƕŴજࢨƴƸࢨ᪪ƋǓLJƤǜŵ
ŦǭȤȎȳဇƸ ˌٳƷȕǣȫȠǫȡȩƴƓƍƯŴƿǕᙀദೞᏡƕദࠝEOS-1V
ƴƖLJƤǜŵ ǹǤȃȁǛ ƴƠƯ
̅ဇƠƯƘƩƞƍŵOS OFF
ἾὅἌἧὊἛ
ȬȳǺȕȸȉƸŴဒឋƴफࢨ᪪ǛɨƑǔஊܹήዴƷǫȃȈƴஊјưƢŵӕǓ˄ƚ
૾ඥƸŴȬȳǺέᇢƴȬȳǺȕȸȉǛƸNJᡂLjŴᚘ૾ӼƴഥLJǔLJưׅƠƯᄩ
ܱƴӕǓ˄ƚƯƘƩƞƍŵᲢ Უ5
Ŧઃ࠘ƴƸŴȬȳǺȕȸȉǛᡞƞƴƸNJᡂLjŴᚘ૾ӼƴׅƠƯӕǓ˄ƚǔƜ
ƱƕưƖLJƢŵ
ἧỵἽἑὊ
Ŧ͞ήȕǣȫǿȸǛ
̅
ဇƢǔئӳƸŴό
͞
ήǿǤȗᲢǵȸǭȥȩȸ ᲣǛƝ
̅
ဇPL
ƘƩƞƍŵ
̬ሥẆӕৢɥỉදॖ
ŦൢƸǫȓǍᥢƷҾ׆ƱƳǓLJƢŵᧈ᧓
̅ဇƠƳƍئӳƸŴʑ༞дƱɟደƴ
ࣱ݅Ʒᑣƍܾ֥ƴλǕƯ
̬ሥƠƯƘƩƞƍŵȊȕǿȪȳሁŴ᧸ᖓдƷƋǔئ
ƴƸ
̬ሥƠƳƍưƘƩƞƍŵ
ŦȬȳǺ᩿ƴƸႺਦưᚑǕƳƍưƘƩƞƍŵǴȟǍ൲Ǖƕ˄ƍƨƱƖƴƸŴȖ
ȭǢȸƔȬȳǺȖȩǷưӕǓᨊƍƯƘƩƞƍŵਦƷួƳƲƸŴࠊᝤƷȬȳǺǯ
ȪȸȊȸ෩ƱȬȳǺǯȪȸȋȳǰȚȸȑȸư᠉ƘਚƍƯƘƩƞƍŵșȳǸȳŴ
ǷȳȊȸሁƷஊೞ๋дƸዌݣƴ
̅ǘƳƍưƘƩƞƍŵ
ŦƜƷȬȳǺƸ᧸൦ನᡯưƸƋǓLJƤǜŵᩋټǍ൦ᡀưƷ
̅ဇưƸŴǒƞƳƍ
ǑƏƴදॖƠƯƘƩƞƍŵ൦ƕȬȳǺϋᢿƴλǓᡂljƱŴٻƖƳᨦƷҾ׆Ʊ
ƳǓŴ
̲
ྸɧᏡƴƳǔئӳƕƋǓLJƢŵ
Ŧ࣯ນƳภࡇ٭҄ƴǑǓŴȬȳǺϋᢿƴ൦ƕဃơǔƜƱƕƋǓLJƢŵ݊ƍދٳ
Ɣǒଡ଼ƔƍܴϋƴλǔƱƖƳƲƸŴDZȸǹǍȓȋȸȫᘥƴλǕŴԗƷภࡇƴ
ƳơLJƤƯƔǒƝ
̅
ဇƘƩƞƍŵ
Լឋ̬ᚰểỴἧἑὊἇὊἥἋỆếẟề
Լឋ̬ᚰƱǢȕǿȸǵȸȓǹƴ᧙ƠƯƸŴКኡƷż
̬
ᚰᙹܭŽǛƝӋༀƘƩƞƍŵ
ɼễˁಮ
ȬȳǺನᲢ፭ Უ- 14 - 19 இٻજ̿
ࢨྙ 1:4.8
ဒ ᚌ 84.1 - 34.3° ȕǣȫǿȸǵǤǺ 82mm
இݱǓ 22 இٻࢲ ᧈƞX 88x107.6mm
இჺજࢨុᩉ 37cm 1020g
ŦٻƖƞƞƸŴǷǰȞȞǦȳȈƷNjƷưƢŵ
ŦƜƷȬȳǺƸŴᤲǍƻእǛԃLJƳƍ ؾݣሊǬȩǹǛ
̅
ဇƠƯƍLJƢŵ
᪥ᮏㄒ㻌
දॖ
ԓ
Thank you very much for purchasing a Sigma Lens. In order to get the
maximum performance and enjoyment out of your Sigma lens, please read
this instruction booklet thoroughly before you start to use the lens.
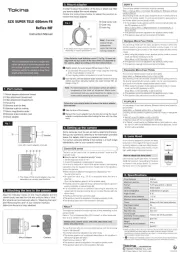
DESCRIPTION OF THE PARTS (fig.1)
䐟Filter Attachment Thread
䐠Zoom Ring
䐡Focus Ring
䐢Distance Scale
䐣Focus Index Line
䐤OS Switch
䐥Focus Mode Switch
䐦Mount
䐧Lens Hood
FOR NIKON MOUNT
This lens includes an electromagnetic diaphragm mechanism, the same
specifications as the E-type mechanism in Nikon AF lenses. The lens is
compatible with the cameras listed in Table (A). (The models with the Ŭ
mark require the latest version of the camera firmware to ensure
compatibility.)
ŦIt is not compatible with film single-lens reflex cameras.
ŦIt is not possible to use the lens with the cameras in Table (B).
ŦFor models not listed in Table (A) or Table (B), please refer to the camera’s
instruction manual to check for compatibility of E-type lenses.
FOR CANON MOUNT
It is not possible to register more than one lens of same description, although
this lens is designed to accommodate the [AF Microadjustment] function built
into digital SLRs.
ATTACHING TO THE CAMERA BODY
When this lens is attached to the camera body it will automatically function in
the same way as your normal lens. Please refer to the instruction booklet for
your camera body.
ŦOn the lens mount surface, there are a number of couplers and electrical
contacts. Please keep them clean to ensure proper connection. To avoid
damaging the lens, be especially sure to place the lens with its front end
down while changing the lens.
SETTING THE EXPOSURE MODE
The sigma lens functions automatically after mounting to your camera. Please,
refer to the camera instruction book.
FOCUSING AND ZOOMING
For autofocus operation, set the focus mode switch on the lens to the “AF”
position (fig.2). If you wish to focus manually, set the focus mode switch on
the lens to the “M” position. You can adjust the focus by turning the focus
ring.
ŦPlease refer to camera’s instruction manual for details on changing the
camera’s focusing mode.
ŦWhen operating this lens in manual focus mode, it is recommended that
correct focus be confirmed visually in the viewfinder rather than relying on
the distance scale.
This lens also permits manual focusing even in the autofocus mode. With the
camera set to the One-Shot AF (AF-S) mode, it is possible to manually
override the autofocus while the shutter release button is pressed halfway.
Also, this lens can offer [Full-time MF function] (Manual Override) by rotating
the focus ring of the lens while auto focusing is in operation. For Full- time MF,
set the focus mode switch on the lens to the “MO” position (fig.3).
ŦWhen using USB DOCK (sold separately) and its dedicated software, “SIGMA
Optimization Pro”, it is possible to select Full-time MF function ON / OFF, You
can also adjust the amount of ring rotation to operate Full-time MF function.
For further information, please refer to the SIGMA Optimization Pro “Help”
menu.
ŦSIGMA
Optimization
Pro
can
be
downloaded
free
of
charge
from
the
following
website: http://www.sigma-global.com/download/
ż ŽZOOMING
Rotate the Rubber grip on the zoom ring to the desired position.
ABOUT OS (OPTICAL STABILIZER) FEATURES
This OS lens effectively compensates for image blurring caused by camera
shake. Set the OS switch to ON (fig.4). Press the shutter button halfway down,
confirm the image in the viewfinder is stable then take the picture. (It takes
approximately 1 second to produce a stable image from the time of
depressing the shutter button halfway).
ŦDo not use the Optical Stabilizer in the following situations:
ƒWhen the lens is mounted on a tripod.
ƒWhen using the camera in Bulb mode.
ŦThe OS continues to operate after you release your finger from the shutter
button, as long as the exposure meter displays the exposure value. Never
remove the lens or remove the camera’s battery while the image stabilizer is
operating as this could damage the lens.
ŦAlthough the viewfinder image may appear to shake immediately after
shooting and/or at the start of the flash charge cycle of the cameraÞs
built-in flash, it will not cause any effect to the pictures.
ŦFor Canon mount, the Optical Stabilizer (OS) function will not work with film
SLR cameras except the Canon EOS-1V.
LENS HOOD
A bayonet type detachable hood is provided with the lens. This lens hood
helps to prevent flare and ghosted images caused by bright illumination from
outside the picture area. Attach the hood and turn clockwise until it stops
rotation. (fig.5)
ŦIn order to place the lens and hood into the storage case, you must first
remove the hood, then replace it on the lens in the reverse position.
FILTER
ŦWhen using a polarizing filter with AF camera, use the “circular” type.
BASIC CARE AND STORAGE
ŦAvoid any shocks or exposure to extreme high or low temperatures or to
humidity.
ŦFor extended storage, choose a cool and dry place, preferably with good
ventilation. To avoid damage to the lens coating, keep away from mothballs
or naphthalene gas.
ŦDo not use thinner, benzine or other organic cleaning agents to remove dirt
or finger prints from the lens elements. Clean by using a soft, moistened
lens cloth or lens tissue.
ŦThis lens is not waterproof. When you use the lens in the rain or near water,
keep it from getting wet. It is often impractical to repair the internal
mechanism, lens elements and electric components damaged by water.
ŦSudden temperature changes may cause condensation or fog to appear on
the surface of the lens. When entering a warm room from the cold outdoors,
it is advisable to keep the lens in the case until the temperature of the lens
approaches room temperature.
TECHNICAL SPECIFICATIONS
Lens construction 14 - 19 Magnification 1:4.8
Angle of View 84.1 - 34.3° Filter Size 82mm
Minimum Aperture 22 Dimensions
Dia.gLength 88 x 107.6mm
(3.46g4.24 in)
Minimum
Focusing
Distance
37cm (1.21ft) Weight 1020g (35.9oz)
ŦDimensions and weight include the SIGMA mount.
ŦThe glass materials used in the lens do not contain environmentally
hazardous lead and arsenic.
ENGLISH
Wir danken Ihnen für das Vertrauen, das Sie uns mit dem Kauf dieses SIGMA
Produktes erwiesen haben. Bitte lesen Sie sich diese Anleitung vor der ersten
Benutzung des Gerätes aufmerksam durch.
BESCHREIBURUNG DER TEILE (Abb.1)
䐟Filtergewinde
䐠Brennweitenring
䐡Entfernungsring
䐢Entfernungsskala
䐣Einstellindex
䐤OS Schalter
䐥Fokussierschalter
䐦Anschluß
䐧Gegenlichtblende
NIKON ANSCHLUSS
Dieses Objektiv besitzt einen elektromagnetischen Blendenmechanis-mus
mit den gleichen Spezifikation wie der E-Typ-Mechanismus der Nikon-AF-
Objektive.
Das
Objektiv
ist
mit
den
in
der
Tabelle
(A)
genannten
Kameramodellen
kompatibel. (Die Modelle mit der Ŭ-Markierung benötigen die
aktuelle
Kamera-
Firmwareversion,
um
die
Kompatibilität
zu
gewährleisten.)
ŦEs ist nicht kompatibel mit analogen Spiegelreflexkameras.
ŦEs ist nicht möglich, das Objektiv mit den in Tabelle (B) genannten
Kameramodellen zu verwenden.
ŦBei Kameramodellen, die weder in Tabelle (A) noch Tabelle (B) aufgelistet
sind, entnehmen Sie die Information zur Kompatibilität mit E-Typ-
Objektiven bitte der Bedienungsanleitung der Kamera.
CANON ANSCHLUSS
Es ist nicht möglich, mehr als ein Objektiv dieses Modells in der Kamera zu
hinterlegen, obwohl es dafür entwickelt wurde mit der [AF Feinabstimmung]-
Funktion der digitalen Spiegelreflexkameras zu arbeiten.
ANSETZEN AN DAS KAMERAGEHÄUSE
An die Kamera angesetzt, funktioniert das Objektiv genauso automatisch wie
lhr Normalobjektiv. Einzelheiten hierüber finden Sie in der Bedienungsanleitung
zur Kamera.
ŦHalten Sie die Kontakte und Kupplungselemente am Objektivanschluß stets
sauber. Stellen Sie das Ovjektiv grundsätzlich nur mit der Vorderseite nach
unten ab, um eine Beschädingung der Kupplungselemente zu vermeiden.
EINSTELLEN DER BETRIEBSART
Das SIGMA Objektiv stellt nach dem Ansetzen an die Kamera alle Funktionen
automatisch zur Verfügung. Einzelheiten entnehmen Sie bitte der
Gebrauchsanleitung der Kamera.
EINSTELLUNG VON SCHÄRFE UND BRENNWEITE
Für die automatische Scharfeinstellung schalten Sie den Fokussierschalter
am Objektiv auf die “AF”-Position (Abb.2). Sollten Sie die Schärfe manuell
einstellen wollen, schalten Sie den Fokussierschalter am Objektiv auf die
“M”-Position. Sie können die Schärfe nun durch Drehen des Entfernungsrings
einstellen.
ŦHinweise zum Wechsel der Fokussierbetriebsart der Kamera entnehmen Sie
bitte der Bedienungsanleitung der Kamera.
ŦBei manueller Fokussierung sollte die Schärfe auf der Mattscheibe
eingestellt werden.
Dieses Objektiv kann auch manuell scharfgestellt werden, während die
AF-Betriebsart eingestellt ist. Wenn die Kamera auf Einzelbild-AF eingestellt
ist, können Sie, nachdem das Objektiv von der Automatik scharfgestellt wurde
und zum Stillstand gekommen ist, die Schärfe durch Drehen am Fokussierring
manuell einstellen. Der Auslöser muß hierbei halb durchgedrückt bleiben.
Ebenso bietet dieses Objektiv die [Jederzeit-MF-Funktion](M Oanual verride)
durch Drehen am Fokusring des Objektivs während des Autofokus-Betriebs.
Um die Jederzeit-MF-Funktion zu nutzen, stellen Sie den Fokusschalter am
Objektiv auf die MO-Position (Abb.3).
ŦMithilfe des USB-Docks (optional erhältlich) und der speziell konzipierten
Software, "SIGMA Optimization Pro", kann bei der Jederzeit-MF-Funktion
zwischen AN/AUS gewählt werden. Ebenso kann die notwendige Drehung
am Fokusring zur Aktivierung der Jederzeit-MF-Funktion individualisiert
werden. Weitere Informationen entnehmen Sie bitte dem "Hilfe"-Menü der
SIGMA Optimization Pro.
ŦSIGMA Optimization Pro kann kostenlos von der folgenden Website
heruntergeladen werden: http://www.sigma-global.com/download/
Durch Drehen des Zoomringes wird die Brennweite eingestellt.
ÜBER DIE OS (OPTICAL STABILIZER) FUNKTION
Dieses OS (Optical Stabilizer) Objektiv kompensiert erfolgreich die Unschärfe
in Ihren Bildern, die durch Verwacklung der Kamera während der Aufnahme
entsteht. Stellen Sie den OS Schalter auf ON (Abb.4). Drücken Sie den
Auslöser halb durch, vergewissern Sie sich, daß das Bild im Sucher stabil
steht und drücken den Auslöser zur Anfertigung der Aufnahme ganz durch. (Es
dauert ca. 1 Sekunde, um nach dem Andrücken des Auslösers ein stabiles Bild
zu erzeugen).
ŦBitte benutzen Sie den Optical Stabilizer nicht in den folgenden Situationen:
ƒ wenn das Objektiv auf einem Stativ montiert ist
ƒ bei Langzeitbelichtungen (Bulb)
ŦDer Optical Stabilizer bleibt auch nachdem Sie den Finger von dem Auslöser
genommen haben solange aktiviert, wie der Belichtungsmesser die
Belichtungsdaten anzeigt. Nehmen Sie niemals das Objektiv von der
Kamera oder entfernen Sie die Batterien der Kamera, während der Optical
Stabilizer noch aktiviert ist, Sie können das Objektiv hierdurch beschädigen.
ŦObwohl das Sucherbild direkt nach der Aufnahme und zu Beginn des
Aufladens des eingebauten Blitzgerätes wackeln könnte, hat dies keinen
Einfluss auf Ihre Bilder.
ŦFor Canon mount, the Optical Stabilizer (OS) function will not work with film
SLR cameras except the Canon EOS-1V.
GEGENLICHTBLENDE
Das Objektiv wird mit einer abnehmbaren Bajonett-Gegenlichtblende geliefert.
Diese hilft, Streulicht und Reflexe zu vermeiden, wie sie durch starkes, seitlich
einfallendes Licht entstehen können. Orientieren Sie sich beim Anbringen der
Gegenlichtblende an den aufgedruckten Markierungen und achten Sie darauf,
daß die Blende korrekt einrastet. (Abb.5)
Ŧ
Zum
Transport
oder
zur
Aufbewahrung
des
Objektives
kann
die
Gegenlichtblende
abgenommen und umgestülpt aufgesetzt werden.
FILTER
ŦBei Einsatz von Polfiltern verwenden Sie an einer Autofokuskamera bitte
ausschließlich Zirkular-Polfilter.
PFLEGE UND AUFBEWAHRUNG
ŦSetzen Sie das Objektiv nicht harten Stößen, extrem hohen bzw. niedrigen
Temperaturen oder hoher Luftfeuchtigkeit aus.
ŦWählen Sie für längere Lagerung einen kühlen, trockenen und möglichst gut
belüfteten Ort. Vermeiden Sie die Lagerung in der Nähe von Chemikalien,
deren Dämpfe die Vergütung angreifen könnten.
ŦVerwenden Sie zur Entfernung von Schmutz oder Fingerabdrücken auf
Glasflächen keinesfalls Verdünner, Benzin oder andere organische
Reinigungsmittel, sondern ein sauberes, feuchtes Optik-Reinigungstuch
oder Optik-Reinigungspapier.
ŦDas Objektiv ist nicht wassergeschützt. Sorgen Sie deshalb bei Aufnahmen
im Regen oder in der Nähe von Wasser für ausreichenden Schutz. Die
Reparatur eines Objektives mit Wasserschaden ist häufig nicht möglich!
ŦTemperaturschocks können zum Beschlagen des Objektives und seiner
Glasflächen führen. Beim Wechsel aus der Kälte in ein geheiztes Zimmer
empfiehlt es sich, das Objektiv solange im Köcher oder der Fototasche zu
belassen, bis es die Zimmertemperatur angenommen hat.
TECHNISCHE DATEN
Glieder - Linsen 14 - 19 Größter
Abbildun
onaler Bildwinkel
84.1
-
34.3° Filterdurchmesser 82mm
Kleinste Blende 22
Abmessun
ŦAbmessungen und Gewicht beziehen sich auf den SIGMA-Anschluß.
Ŧ
Das
Glas,
das
für
das
Objektiv
verwendet
wird,
enthält
kein
umweltschädliches
Blei und Arsen.
DEUTSCH
Nous vous remercions d’avoir choisi un objectif SIGMA. Pour en tirer le
meilleur profit et le plus grand plaisir, nous vous conseillons de lire
attentivement le mode d’emploi avant toute utilisation.
DESCRIPTION DES ELEMENTS (fig.1)
䐟Filetage pour filatre
䐠Bague de zoom
䐡
Bague des distances
䐢
Echelle
des
distances
䐣Repère de distance
䐤Curseur OS
䐥
Sélecteur
de
mise
au
point
䐦Baïonnette
䐧Pare-Soleil
EN MONTURE NIKON
Cet objectif est équipé d’un mécanisme de diaphragme électromagnétique,
aux caractéristiques identiques à celles du mécanisme des optiques Nikon AF
de type E. L’objectif est compatible avec les appareils indiqués dans le
tableau (A). (Les modèles avec le symbole ۻ nécessitent la dernière version
du firmware de l’appareil pour assurer la compatibilité.)
ŦIl n’est pas compatible avec les appareils argentiques.
ŦIl n’est pas possible d’utiliser l’objectif avec les boîtiers indiqués dans le
tableau (B).
ŦPour les modèles qui ne figurent pas dans le tableau (A) ou dans le tableau
(B), veuillez-vous référer au manuel d’utilisation de l’appareil pour vérifier la
compatibilité du boîtier avec les objectifs de type E.
EN MONTURE CANON
Il n’est pas possible d’enregistrer plus d’un objectif de même désignation,
même si cet objectif est conçu pour assurer la fonction [Micro-adjustment de
l’AF] intégrée aux reflex numériques.
FIXATION SUR L’APPAREIL
Lorsque l’objectif est fixé sur le boîtier, les automatismes fonctionnent
comme avec vos objectifs habituels. Consultez éventuellement le mode
d’emploi de l’appareil.
ŦSur la monture se trouvent plusieurs contacts électriques et électroniques.
Gardez-les bien propres pour garantir un bon fonctionnement. Ne posez
jamais l’objectif sur sa base arrière pour éviter d’endommager ces
éléments.
REGLAGE DU SYSTEME D’EXPOSITION
Cet objectif Sigma fonctionne automatiquement dès qu’il est monté sur le
boîtier. Veuiliez vous reporter au mode d'emploi de I’appareil.
MISE AU POINT ET ZOOMING
Pour une mise au point automatique, placez le sélecteur de mise au point en
position “AF”(fig.2). Pour une mise au point manuelle, placez le sélecteur en
position “M” position, et ajustez le point en tournant la bague de mise au
point.
ŦVeuillez vous référer au mode d'emploi du boîtier pour changer le mode de
mise au point de l'appareil.
ŦEn cas dÞutilisation de cet objectif en mise au point manuelle, il est
recommandé de vérifier la qualité de la mise au point à partir du viseur.
Cet objectif permet la mise au point manuelle, même en mode autofocus. Avec
l’appareil en mode de mise au point “spot” (ONE SHOT)(AF-S), vous pouvez
retoucher la mise au point manuellement après que l’objectif ait fait la mise
au point automatiquement en maintenant le déclencheur enclenché à
mi-course.
Cet objectif dispose de la fonction de [Retouche manuelle MF] (Manual
Override) en tournant la bague de mise au point en mode autofocus. Pour une
utilisation en mode de priorité manuelle du point, placez le commutateur de
mode de mise au point de l'objectif sur la position « MO » (fig.3).
ŦEn utilisant le dock USB (vendu séparément) et le logiciel dédié SIGMA
Optimization Pro, il est possible d'activer ou de désactiver la retouche
manuelle. Il est également possible de paramétrer la démultiplication de la
bague de mise au point en retouche manuelle. Pour plus d'information,
veuillez vous reporter à l'Aide de SIGMA Optimization Pro.
ŦLe logiciel SIGMA Optimization Pro peut être téléchargé gratuitement à
l'adresse Web suivante : http://www.sigma-global.com/download/
䛀
㻌
ZOOMING
䛁
Tournez la bague de zoom sur la position voulue.
FONCTIONNEMENT
DU
STABILISATEUR
OPTIQUE
OS
(OPTICAL STABILIZER)
Cet objectif dispose du système de stabilisation optique Sigma OS (Optical
Stabilizer) qui évite les risques de flou liés aux mouvements du boîtier lors de
la prise de vue. Placez le curseur OS sur ON (fig.4). Appuyez à mi-course sur le
déclencheur, vérifiez la stabilité de l'image dans le viseur et prenez la photo.
(la stabilisation de l'image est obtenue environ 1 seconde après que le
déclencheur a été activé).
ŦLe stabilisateur optique OS ne doit pas être employé dans les cas suivants :
ƒsi l'objectif est monté sur un trépied. ƒen pose B (longue durée d'exposition)
ŦLe stabilisateur optique OS demeure activé après avoir relâché le
déclencheur aussi longtemps que le posemètre affiche les valeurs
d'exposition. Il ne faut jamais détacher l'objectif de l'appareil, ni retirer les
piles du boîtier tant que le stabilisateur est activé, sous peine
d'endommager l'objectif.
ŦMême si l'image dans le viseur semble vibrer immédiatement après la prise
de vue ou au démarrage de la charge du flash intégré du boîtier, ceci
n'affecte en rien les images.
ŦPour la monture Canon, la fonction de stabilisation optique (OS) ne
fonctionnera pas avec les boîtiers argentiques à objectifs interchangeables
excepté le Canon EOS-1V.
PARE-SOLEIL
Un pare-soleil démontable avec fixation à baïonnette est livré avec objectif.
Ce pare-soleil protège l’objectif des rayons parasites et de lumière incidente.
Assurez-vous qu’il se fixe convenablement jusqu’à la position de blocage
(fig.5).
ŦPour replacer l'objectif et le pare-soleil dans la valise de transport, veillez à
détacher d'abord le pare-soleil et à le replacer ensuite en position inversée.
FILTRES
ŦSi vous souhaitez utiliser un filtre polarisant sur un zoom AF, choisissez-le
de type “circulaire”.
PRECAUTIONS ELEMENTAIRES ET RANGEMENT
ŦNe pas exposer l’objectif aux chocs, ni à des températures extrèmes, ou à
l’humidité.
ŦSi l’objectif n’est pas utilisé pendant longtemps, choisir un endroit frais, sec
et bien ventilé. Ne pas placer l’objectif près de la naphtaline ou des produits
anti-mites afin de ne pas détériorer le revêtement multicouche des lentilles.
ŦNe pas utiliser de dissolvant, d’essence ou autre matière organique pour le
nettoyage de saletés ou d’empreintes de doigts sur les éléments optiques.
ŦCet objectif n’est pas étanche. Si vous l’utilisez par temps de pluie ou près
de l’eau, veuillez à ne pas le mouiller. Les réparations du mécanisme interne,
des éléments optiques et/ou des éléments électriques ne sont pas toujours
possibles en cas de dommages.
ŦDes écarts soudains de température peuvent causer de la condensation ou
de la buée peut apparaître sur la lentille frontale. Lorsque vous pénétrez
dans un local chauffé en venant d’un extérieur froid, il est recommandé de
placer l’objectif dans un étui jusqu’à ce que sa température avoisine celle
du local.
CARACTERISTIQUES
Construction de l’objectif
14 - 19
Rapport de reproduction
1:4.8
Angle de champ 84.1
-
34.3° Diamétre de filtre 82mm
Ouverture minimale 22 Dimension:
diamentre×longueur 88
x
107.6mm
Distance minimale de
mise au
oint 37cm Poids 1020g
ŦDimensions et poids donnés pour la monture SIGMA.
ŦLes verres utilisés dans cet objectif ne contiennent aucune matière
nuisibles à l’environnement telles que le plomb et l’arsenic.
FRAN
AIS
Wij stellen het op prijs dat u een Sigma objectief heeft aangeschaft. Teneinde
maximaal profijt en plezier van uw Sigma objectief te hebben, adviseren wij u
deze gebruiksaanwijzing geheel door te lezen alvorens u het objectief gaat
gebruiken.
BESCHRIJVINS VAN DE ONDERDELEN (fig.1)
䐟Filterschroefdraad
䐠Zoomring
䐡Scherpstelring
䐢Afstandschaal
䐣Index teken
䐤OS Schakelaar
䐥Scherpstelkeuze schakelaar
䐦Vatting
䐧Zonnekap
VOOR NIKON VATTING
Dit objectief beschikt over een electromagnetisch diafragma mechanisme
met dezelfde specificaties als het E-type mechanisme in Nikon AF
objectieven. Het objectief is te gebruiken met camera’s zoals in onderstaande
Tabel (A) aangegeven (voor modellen met Ŭ markering is hiervoor de
nieuwste versie van de camera firmware vereist)
ŦHet is niet bruikbaar met film single-lens reflex camera’s.
ŦHet is niet mogelijk het objectief te gebruiken met camera’s in Tabel (B).
ŦVoor modellen die niet in Tabel (A) of Tabel (B) zijn genoemd: raadpleeg de
gebruiksaanwijzing
van
de
camera
op
bruikbaarheid
met
E-type
objectieven.
VOOR CANON VATTING
Er kan slechts één objectief met dezelfde beschrijving worden vastgelegd,
desalniettemin kan dit objectief overweg met de [AF-fijnafstelling] functie
van de camera.
BEVESTIGING OP DE CAMERABODY
Wanneer uw Sigma objectief op de camerabody is bevestigd, zal het
automatisch net zo functioneren als de originele opjectieven. Lees hiervoor de
gebruiksaanwijzing van uw camera.
ŦOp
de
vatting
bevindt
zich
een
aantal
electrische
contacten
en
koppelstukken.
Deze moeten goed schoon worden gehouden teneinde van een goed contact
verzekerd te zijn. Plaats, bij het verwisselen van objectieven deze altijd met
de voorzijde en niet met de vatting op tafel. Dit ter voorkoming van
beschadiging.
BELICHTINGSINSTELLING
Wanneer een Sigma objectief op uw camerabody is bevestigd, functioneert dit
geheel automatisch. Lees hiervoor de gebruiksaanwijzing van uw camera.
SCHERPSTELLEN EN ZOOMEN
Om de autofocus functie te activeren dient u het schuifje op het objectief op
de AF postitie te zetten (fig.2). Wilt u handmatig scherpstellen zet dan het
schuifje op het objectief op de M positie. Vervolgens kunt u scherpstellen door
aan de focusring te draaien.
ŦRaadpleeg a.u.b. de gebruiksaanwijzing van uw camera om bovengenoemde
instellingen op uw camera te wijzigen.
ŦWanneer .u dit objectief op handmatige instelling gebruikt, raden wij u aan
de correcte scherpstelling visueel in de zoeker vast te stellen.
This lens also permits manual focusing even in the autofocus mode. With the
camera set to the One-Shot AF (AF-S) mode, it is possible to manually
override the autofocus while the shutter release button is pressed halfway.
Also, this lens can offer [Full-time MF function] (Manual Override) by rotating
the focus ring of the lens while auto focusing is in operation. For Full- time MF,
set the focus mode switch on the lens to the “ ” position (fig.3). MO
ŦBij gebruik van het USB DOCK (los verkrijgbaar) en de bijbehorende software,
“SIGMA Optimization Pro”, is het mogelijk om Full-time MF-functie te
selecteren AAN / UIT. Tevens is het mogelijk de mate van rotatie van de
focusring bij te stellen om de Full-time MF functie te bedienen. Voor meer
informatie verwijzen wij naar het SIGMA Optimization Pro “Help” menu.
ŦSIGMA Optimization Pro kan gratis worden gedownload op de volgende
website: http://www.sigma-global.com/download/
ż ŽZOOMEN
Verdraai de zoomring naar de gewenste positie.
FUNCTIES EN MOGELIJKHEDEN VAN DE OPTICAL STABILIZER (OS)
Dit OS (Optical Stabilizer) objectief is zeer effectief om bewegingsonscherpte
te voorkomen. Schuif OS-schakelaar naar ON (fig.4). Druk de ontspanknop van
uw camera half in. Controleer of het zoekerbeeld stabiel is en maak dan de
opname (nadat u de ontspanknop half hebt ingedrukt, duurt het ongeveer 1
seconde voordat het zoekerbeeld stabiel is).
ŦGebruik de Optical Stabilizer in de volgende gevallen niet:
ƒ wanneer het objectief op een statief staat.
ƒ met de sluitertijd op 'B' (bulb).
ŦHet OS-systeem blijft werken wanneer u uw vinger van de ontspanknop
neemt zolang de lichtermeter actief is. Haal het objectief niet van de camera
en neem de batterij niet uit de camera wanneer de beeldstabilisator actief is.
U zou het objectief kunnen beschadigen.
ŦOok al lijkt het zoekerbeeld te dansen nadat u de opname hebt gemaakt of
tijdens het laden van de ingebouwde flitser, heeft dit geen enkel effect op de
opnamen.
ŦDe optische stabilisatie (OS) functioneert niet in combinatie met film SLR
camera’s, behalve de Canon EOS-1V.
ZONNEKAP
Bij dit objectief wordt een losse zonnekap met bajonetaansluiting
meegeleverd. De zonnekap draagt bij tot het voorkomen van lichtvlekken en
nevenbeelden, die worden veroorzaakt door sterk tegenlicht dat vanachter het
onderwerp direct in het objectief valt. Let erop dat bij het monteren van de
zonnekap deze volledig in de geblokkeerde positie wordt gedraaid. (fig.5)
ŦOm objectief en zonnekap op te kunnen bergen in de koffer, moet u eerst de
zonnekap afnemen en deze omgekeerd op het objectief plaatsen.
FILTERS
ŦGebruik uitsluitend een “circulair” polarisatiefilter in combinatie met een
autofocus camera.
ONDERHOUD EN OPSLAG
ŦVermijd vallen of stoten en stel het objectief niet bloot aan extreem hoge of
lage temperaturen of hoge vochtigheid.
ŦIndien het objectief voor langere tijd wordt opgeborgen, kies dan voor een
koele, droge en bij voorkeur goed geventileerde plaats. Houd het objectief,
om beschadiging van de lenscoating te voorkomen, weg van mottenballen of
naftalinegas.
ŦGebruik geen thinner, benzine of andere organische schoonmaakmiddelen
om vuil of vingerafdrukken van de lenselementen te verwijderen. Gebruik
daarvoor een speciaal lensdoekje of lenstissues.
ŦDit objectief is niet waterbestendig. Zorg er bij regen of in de buurt van
water voor dat het niet nat wordt. Lenselementen, interne mechanische
delen en electrische componenten die door water zijn aangetast, zijn in de
meeste gevallen niet tegen redelijke kosten te herstellen.
ŦPlotselinge temperatuur verandering kan condensatie veroorzaken op het
oppervlak van de lens. Bij het betreden van een warme kamer vanuit de
koude buitenlucht, is het raadzaam het objectief in de tas te houden totdat
de temperatuur van het objectief ongeveer gelijk is aan die van de
kamertemperatuur.
TECHNISCHE GEGEVENS
Lensconstructie
(
groepen
-
elementen
) 14 - 19 Maximale vergrotings
maatstaf 1:4.8
Beeldhoek 84.1
-
34.3° Filtermaat 82mm
Kleinste diafragma 22
Afmetingen (diam. x lengte)
88
x
107.6
mm
Kortste instelafstand
37cm Gewicht 1020g
ŦOpgegeven afmetingen en gewicht zijn met SIGMA vattin.
ŦDe glassoort die in dit objectief gebruikt werd bevat geen milieu belastend
lood of a rsenicum.
NEDERLANDS
Le agradecemos la compra de este objetivo Sigma. Para conseguir los
mejores resultados de su objetivo lea atentamente este manual de
instrucciones antes de utilizarlo.
DESCRIPCION DE LOS COMPONENTES (fig.1)
䐟Rrosca para filatros
䐠Aro del zoom
䐡Aro de enfoque
䐢Escala de distancias
䐣Linea de indice
䐤OS Botón
䐥Selector de enfoque
䐦Montura
䐧Parasol
PARA MONTURA NIKON
Este objetivo incluye un mecanismo de diafragma electromagnético, las
mismas especificaciones que el mecanismo de tipo E en los objetivos Nikon
AF. El objetivo es compatible con las cámaras señaladas en la tabla (A). (Los
modelos con la marca Ŭ requieren la última versión del firmware en la
cámara para asegurar la compatibilidad.)
ŦNo es compatible con cámaras réflex de película de 35mm.
ŦNo se puede utilizar el objetivo con las cámaras de la tabla (B).
ŦPara los modelos que no aparecen en la tabla (A) o en la tabla (B), por favor
consulte el manual de instrucciones de la cámara para comprobar la
compatibilidad entre los objetivos de tipo E.
PARA MONTURA CANON
Este objetivo es compatible con la función [Micro ajuste AF] de la cámara,
pero no se puede registrar más de un mismo objetivo con la misma
descripción.
CONEXION AL CUERPO DE CAMERA
Cuando el objetivo se conecta a la cámara funciona del mismo modo que los
objetivos originales. Consulte el manual de instrucciones de su cámara.
ŦEn la superficie de la montura existen una serie de contactos eléctricos y
acopladores. Manténgalos limpios para asegurar una correcta conexión.
Para prevenir daños en el objetivo tenga especial cuidado al apoyarlo
cuando cambie de optica.
MODE AJUSTE DE EXPOSICION
Los objetivos Sigma funcionan automáticamente al conectarlos a su cámara.
Por favor, consulte el manual de su cámara.
INTERRUPTOR DE BLOQUEO DEL ZOOM
Para utilizar el autofoco, ponga el selector en la posición “ ” (fig.2).Si quiere AF
enfocar manualmente ponga el selector en la posición “M”. Ajuste el foco
moviendo el aro de enfoque.
ŦPara cambiar el modo de enfoque de la cámara, mírelo en el manual de
instrucciones de la cámara.
ŦCuando utilice estos objetivos en modo de enfoque manual es
recomendable comprobar visualmente por el visor cualquier cambio de
enfoque.
Este objetivo también permite el enfoque manual aunque esté en modo
automático. Con la cámara preparada para Modo Disparo AF puede ajustar el
enfoque manualmente después que el objetivo haya enfocado
automáticamente (y se pare) mientras mantenga el botón disparador
suavemente presionado.
Además, este objetivo ofrece la [Función MF Total] (M Oanual verride) girando
el anillo de enfoque del objetivo, mientras que el enfoque automático está en
funcionamiento. Para MF a tiempo completo, ajuste el interruptor de modo de
enfoque del objetivo a la posición "MO" (fig.3).
ŦAl usar el USB Dock (se vende por separado) y el software dedicado "SIGMA
Optimization Pro", puede seleccionar la función MF Total Encendida /
Apagada. También puede ajustar la cantidad de rotación del anillo para
operar la función MF completa. Para más información, por favor consulte el
menú “Ayuda” de “SIGMA Optimization Pro”.
ŦPuede descargar el programa SIGMA Optimization Pro de forma gratuita
desde el siguiente sitio web: http://www.sigma-global.com/download/
ż ŽOPERACION ZOOM
Gire el aro del Zoom hasta la posición deseada.
CARACTERÍSTICAS DE ESTABILIZADOR ÓPTICO
Ésta lente OS (con estabilizador óptico) compensa el desenfoque provocado
por el movimiento o temblor. Fijar OS (Estabilizador Óptico) en la posición
encendido (fig.4). Presionar el disparador a medio camino, confirmar que la
imagen en el visor aparece estable y entonces tomar la fotografía. (Tarda
aproximadamente 1 segundo en producir una imagen estable tras haber
presionado el disparador)
ŦNo utilice el estabilizador óptico en las siguientes situaciones:
ỉCuando el objetivo este montado en un trípode
ỉModo de exposición B –(Bulb) (tiempo de exposición largo)
ŦEl Estabilizador Óptico funciona a pesar de quitar el dedo del disparador
durante el tiempo indicado por el obturador. Nunca se debe desmontar el
objetivo o las baterías de la cámara mientras el Estabilizador esté en uso ya
que podría causar defectos en el objetivo.
ŦA pesar de que en el visor la imagen aparezca ligeramente borrosa
inmediatamente después de la toma y que se inicie el ciclo de carga del
flash esto no provocará defectos en la fotografía.
ŦPara monturas Canon, la función de estabilización óptica (OS) no funciona
con cámaras SLR de película, excepto con la Canon EOS-1V.
PARASOL
Se incorpora con el objetivo un parasol extraíble de tipo bayoneta. Este
parasol ayuda a prevenir los destellos y reflejos producidos por la iluminación
ambiental. Al conectarlo compruebe que quede completamente sujeto. (fig.5).
ŦPara guardar el objetivo y el parasol en su caja primero tiene que sacar el
parasol y después invertirlo en el objetivo.
FILTROS
ŦCuando utilice un filtro polarizador en una cámara AF, observe que sea de
tipo circular.
CUIDADOS BASICOS Y ALMACENAJE
ŦEvite los golpes o la exposición a temperaturas extremas, altas o bajas, y/o
humedad.
ŦEn caso de almacenaje por un tiempo prolongado, elija un lugar fresco y
seco, preferiblemente con buena ventilación. Para evitar daños en el
tratamiento de los objetivos, aléjelos de las bolas o gas de naftalina.
ŦNo utilice diluyente, gasolina u otros limpiadores orgánicos para limpiar la
suciedad de los objetivos. Para limpiarlos utilice un paño de tela suave o
limpia objetivos.
ŦEstos objetivos no son impermeables. Cuando los utilice en la lluvia o cerca
del agua, asegúrese de mantenerlo seco. Es prácticamente imposible
reparar los mecanismos internos, elementos de cristal y componentes
eléctricos dañados por el agua.
ŦSi hay cambios súbitos de temperatura puede haber condensación o velo en
la superficie del objetivo. Cuando entre en una habitación cálida, viniendo
de un lugar frío, es recomendable mantener el objetivo en su caja hasta que
su temperatura se asemeje a la de la habitación.
CARACTERISTCAS
Construcción del objetivo 14 - 19 Ampliación 1:4.8
Ángulo de visión 84.1 - 34.3° Diámetro filtro 82mm
Apertura mínima 22 Dimensiones
(diám x long)88 x 107.6mm
Distancia mínima enfoque 37cm Peso 1020g
ŦDimensiones y peso incluyen montura SIGMA.
ŦLos materiales empleados en el objetivo no contienen productos nocivos
para la salud ni el medio ambiente.
ESPAÑOL
Vi ringraziamo della preferenza accordataci con l’acquisto del vostro nuovo
obiettivo Sigma. Vi raccomandiamo di leggere attentamente le presenti
istruzioni prima di cominciare a usarlo. Conoscendolo meglio, vi sarà facile
ottenerne le migliori prestazioni e soddisfazioni.
ELEMENTI CONSTITUTIVI (fig.1)
䐟Portafiltri frontale a vite
䐠
Ghiera di variazione della focale
䐡Ghiera di messa a fuoco
䐢Scala delle distanze
䐣Indice di collimazione
䐤Interruttore OS
䐥
Selettore di fuoco
䐦Innesto
䐧Paraluce
PER INNESTO NIKON
L’obiettivo è dotato di diaframma elettromagnetico che possiede le stesse
caratteristiche del meccanismo tipo-E montato negli obiettivi Nikon AF.
L’obiettivo è compatibile con le fotocamere elencate nella Tabella (A). (I
modelli contrassegnati con il simbolo Ŭ devono avere il firmware aggiornato
all’ultima versione per poter funzionare correttamente).
Non è compatibile con le fotocamere reflex a pellicola.
Non è possibile usare questo obiettivo con le fotocamere elencate nella
Tabella (B).
Per verificare la compatibilità con gli obiettivi Tipo-E dei modelli non
elencati né nella Tavola (B) né nella tavola (A), consultate I relative libretti
d’istruzione.
PER INNESTO CANON
Non è possibile regolare più di un obiettivo con le medesime caratteristiche,
anche se l’obiettivo è progettato per regolare la funzione [Regolazione fine AF]
incorporata nelle reflex digitali.
APPLICAZIONE SUL CORPO MACCHINA
Una volta che avrete innestato lo zoom nel portaottica della fotocamera,
funzionerà automaticamente allo stesso mode di un obiettivo normale (v.
istruzioni per l’uso della fotocamera).
La superficie dell’innesto presenta un certo numero di contatti elettrici e
altri elementi di accoppiamento. Vi raccomandiamo di curarne la pulizia. I
contatti sono molto delicati. Durante le operazioni di cambio di ottica,
appoggiate l’obiettivo su una superficie idonea badando a rivolgerne in giù
la parte della lente frontale per evitare di danneggiare i contatti in
questione.
IMPOSTAZIONE DEL MODO DI ESPOSIZIONE
Una
volta
montato
sulla
fotocamera,
l'obiettivo
Sigma
funziona
automaticamente.
Si consultino le istruzioni per l'uso del corpo macchina.
MESSA A FUOCO E MANOVRA DELLO ZOOM
Per attivare l’Autofocus, impostare la messa a fuoco scegliendo, sull’obiettivo,
la posizione “ ” (fig.2). Quando si desidera mettere a fuoco manualmente, AF
scegliere, sull’obiettivo, la posizione “M”. In questo caso si mette a fuoco
ruotando la ghiera di messa a fuoco.
Consultare il libretto d’istruzioni della fotocamera per variare la modalità di
messa a fuoco.
Se usate l’obiettivo con messa a fuoco manuale, accertatevi della nitidezza
del quadro mediante osservazione diretta dell’immagine che si forma nel
mirino.
Questo obiettivo lascia la facoltà di mettere a fuoco manualmente persino ad
autofocus inserito. Se infatti la fotocamera è predisposta per il modo di
funzionamento One Shot AF (AF-S), non c’è che da premere a meta corsa il
pulsante di scatto e da far intervenire il meccanismo di messa a fuoco
automatica (con successivo arresto) per ottenere, meediante la ghiera di
messa a fuoco manuale, la nitidezza “personalizzata” che si preferisce.
L’obiettivo offre anche la funzione di messa a fuoco manuale MF continua.
Basta ruotare l’anello di messa a fuoco mentre è attivo l’autofocus (Manual
Override). Per la modalità MF-Full-Time impostare, sull’obiettivo, la modalità
di messa a fuoco nella posizione “MO” (fig.3)
Grazie al DOCK USB (venduto separatamente) e al suo software dedicato,
“Sigma Optimization Pro” è possibile impostare la Funzione di messa a
fuoco manuale MF continua su accesa (ON) oppure spenta (OFF). E’ anche
possibile impostare l’angolo di rotazione dell’anello di messa a fuoco. Per
maggiori informazioni consultare la voce “Aiuto” nel menu di Sigma
Optimization Pro.
Il software SIGMA Optimization Pro può essere scaricato gratuitamente da
questo sito web: http://www.sigma-global.com/download/
ࠓ ࠔMANOVRA DELLO ZOOM
Fate ruotare la presina di gomma sulla ghiera dello zoom sino a raggiungere la
posizione desiderata.
PRESTAZIONI OS (STABILIZZATORE OTTICO)
Quest’obiettivo OS (Otticamente Stabilizzato) elimina il mosso causato dal
tremolio impresso accidentalmente alla macchina fotografica. Impostare il
cursore OS su ON (fig.4). Premere il pulsante di scatto a metà corsa, accertarsi
che l’immagine nel mirino sia ferma e, quindi, scattare la foto. (Bisogna
attendere circa un secondo prima che l’immagine, visibile nel mirino, si
stabilizzi dopo aver premuto il pulsante a metà corsa).
Lo Stabilizzatore Ottico non si può usare quando la fotocamera è montata
su cavalletto, oppure quando l’otturatore è impostato sulla posa B.
Lo Stabilizzatore Ottico continua a funzionare, per tutto il tempo
dell’esposizione, dopo che avete sollevato il dito dal pulsante di scatto. Non
staccate mai l’obiettivo dalla fotocamera quando lo Stabilizzatore Ottico è
in funzione: potreste danneggiare l’obiettivo.
Può accade che, appena dopo lo scatto, nel mirino l’immagine appaia mossa,
oppure quando il flash incorporato alla fotocamera inizia a caricarsi e in
altre situazioni simili. Ciò non causa affatto immagini mosse.
Negli obiettivi con innesto Canon lo stabilizzatore ottico OS non è attivo con
i corpi macchina delle reflex a pellicola.
PARALUCE
Il vostro obiettivo è corredato da un paraluce staccabile con attacco a
baionetta. Il paraluce previene efficacemente i riflessi interni e le immagini
fantasma che possono prodursi con un’illuminazione controluce. Dopo aver
applicato il paraluce, sinceratevi che sia perfettamente bloccato.(fig.5)
Per riporre l’obiettivo, il paraluce può essere applicato anche all’incontrario.
FILTRI
Se volete adoperare un polarizzatore con una fotocamera AF, sceglietelo del
tipo “circolare”.
CURA E CONSERVAZIONE
Proteggete l’obiettivo da cadute e colpi, ed evitate di esporlo ad alte
temperature o umidità eccessiva.
In previsione di un prolungato periodo di inutilizzo, conservate l’obiettivo in
un posto fresco, asciutto e, possibilmente, ben aerato. Evitate di esporlo a
vapori di canfora o naftalina, che potrebbero deteriorame i delicati
rivestimenti antiriflessi.
Non usate solventi, benzina o altri detergenti organici quando si tratta di
eliminare dagli elementi ottici tracce di sporco o impronte digitali, Ripuliteli
invece con un panno morbido inumidito o con una cartina per lenti.
L’obiettivo non è impermeabile. Fate che non si bagni quando lo usate sotto
la pioggia o vicino all’acqua. Spesso i meccanismi interni, gli elementi ottici
e i componenti elettrici vengono danneggiati irrimediabilmente dall’acqua,
tanto da renderne impossibile qualsiasi riparazione.
Improvvisi sbalzi di temperatura possono favorire la formazione di condensa
o provocare la velatura della lente frontale. Quando entrate in un vano
riscaldato mentre fuori fa molto freddo, vi consigliamo di tenere l’obiettivo
nella relativa custodia finché la sua temperatura non si sarà adattata alla
temperatura ambiente.
CARATTERISTICHE TECNICHE
Costituzione
ottica
(Gru
o 84.1 - 34.3° Diamentro filtri 82mm
Apertura minima 22 Dimensioni
(diametro
×
lunghezza)
88
x
107.6
mm
Distanza
min.
messa fuoco
37cm Peso 1020
Dimensioni e pesi s’intendono comprensivi di attacco SIGMA.
Le materie vitree usate per la realizzazione dell’obiettivo non contengono
piombo né arsenico, sostanze potenzialmente pericolose sotto il profilo
ecologico.
ITALIANO