DE Aufnahmeschaft für Kernbohrer
IT Mandrino per corone a forare
PL Uchwytdowiertełrdzeniowych
WARNING: Failure to follow these instructions may result in injury, damage to the tool or invalidation
• Use personal protective equipment. Always wear eye protection. Protective equipment such as a
dust mask, non-skid safety shoes, hard hat or hearing protection used for appropriate conditions will
reduce personal injuries.
• Use good quality industrial gloves. Safety-rated vibration-reduction gloves with low tear resistance are
recommended when core drilling.
• Dress properly. Do not wear loose clothing or jewellery. Keep your hair and clothing away from
moving parts. Loose clothes, jewellery or long hair can be caught in moving parts.
• Check core drills and arbors for damage or defects before use. Damaged drills and arbors should not
be used and must be disposed of.
• NEVER use hammer or impact action with diamond core drill bits; this will damage the cutting
edges, increase the risk of jamming and may bend longer arbors and arbor extensions.
• Core drill bits should only be used with drills with safety clutches, with the possible exception of small
• Core drills, arbors and extensions are heavy, and core drilling creates a large load for the motor of the
power tool, even at low speed. It is important to consider these factors when selecting a suitable power
drill for the diameter and depth of the hole being drilled. It may be necessary to use the ‘stitch’ drilling
techniquerstandthennishwiththecoredrilltomakethenalcutforthehole.
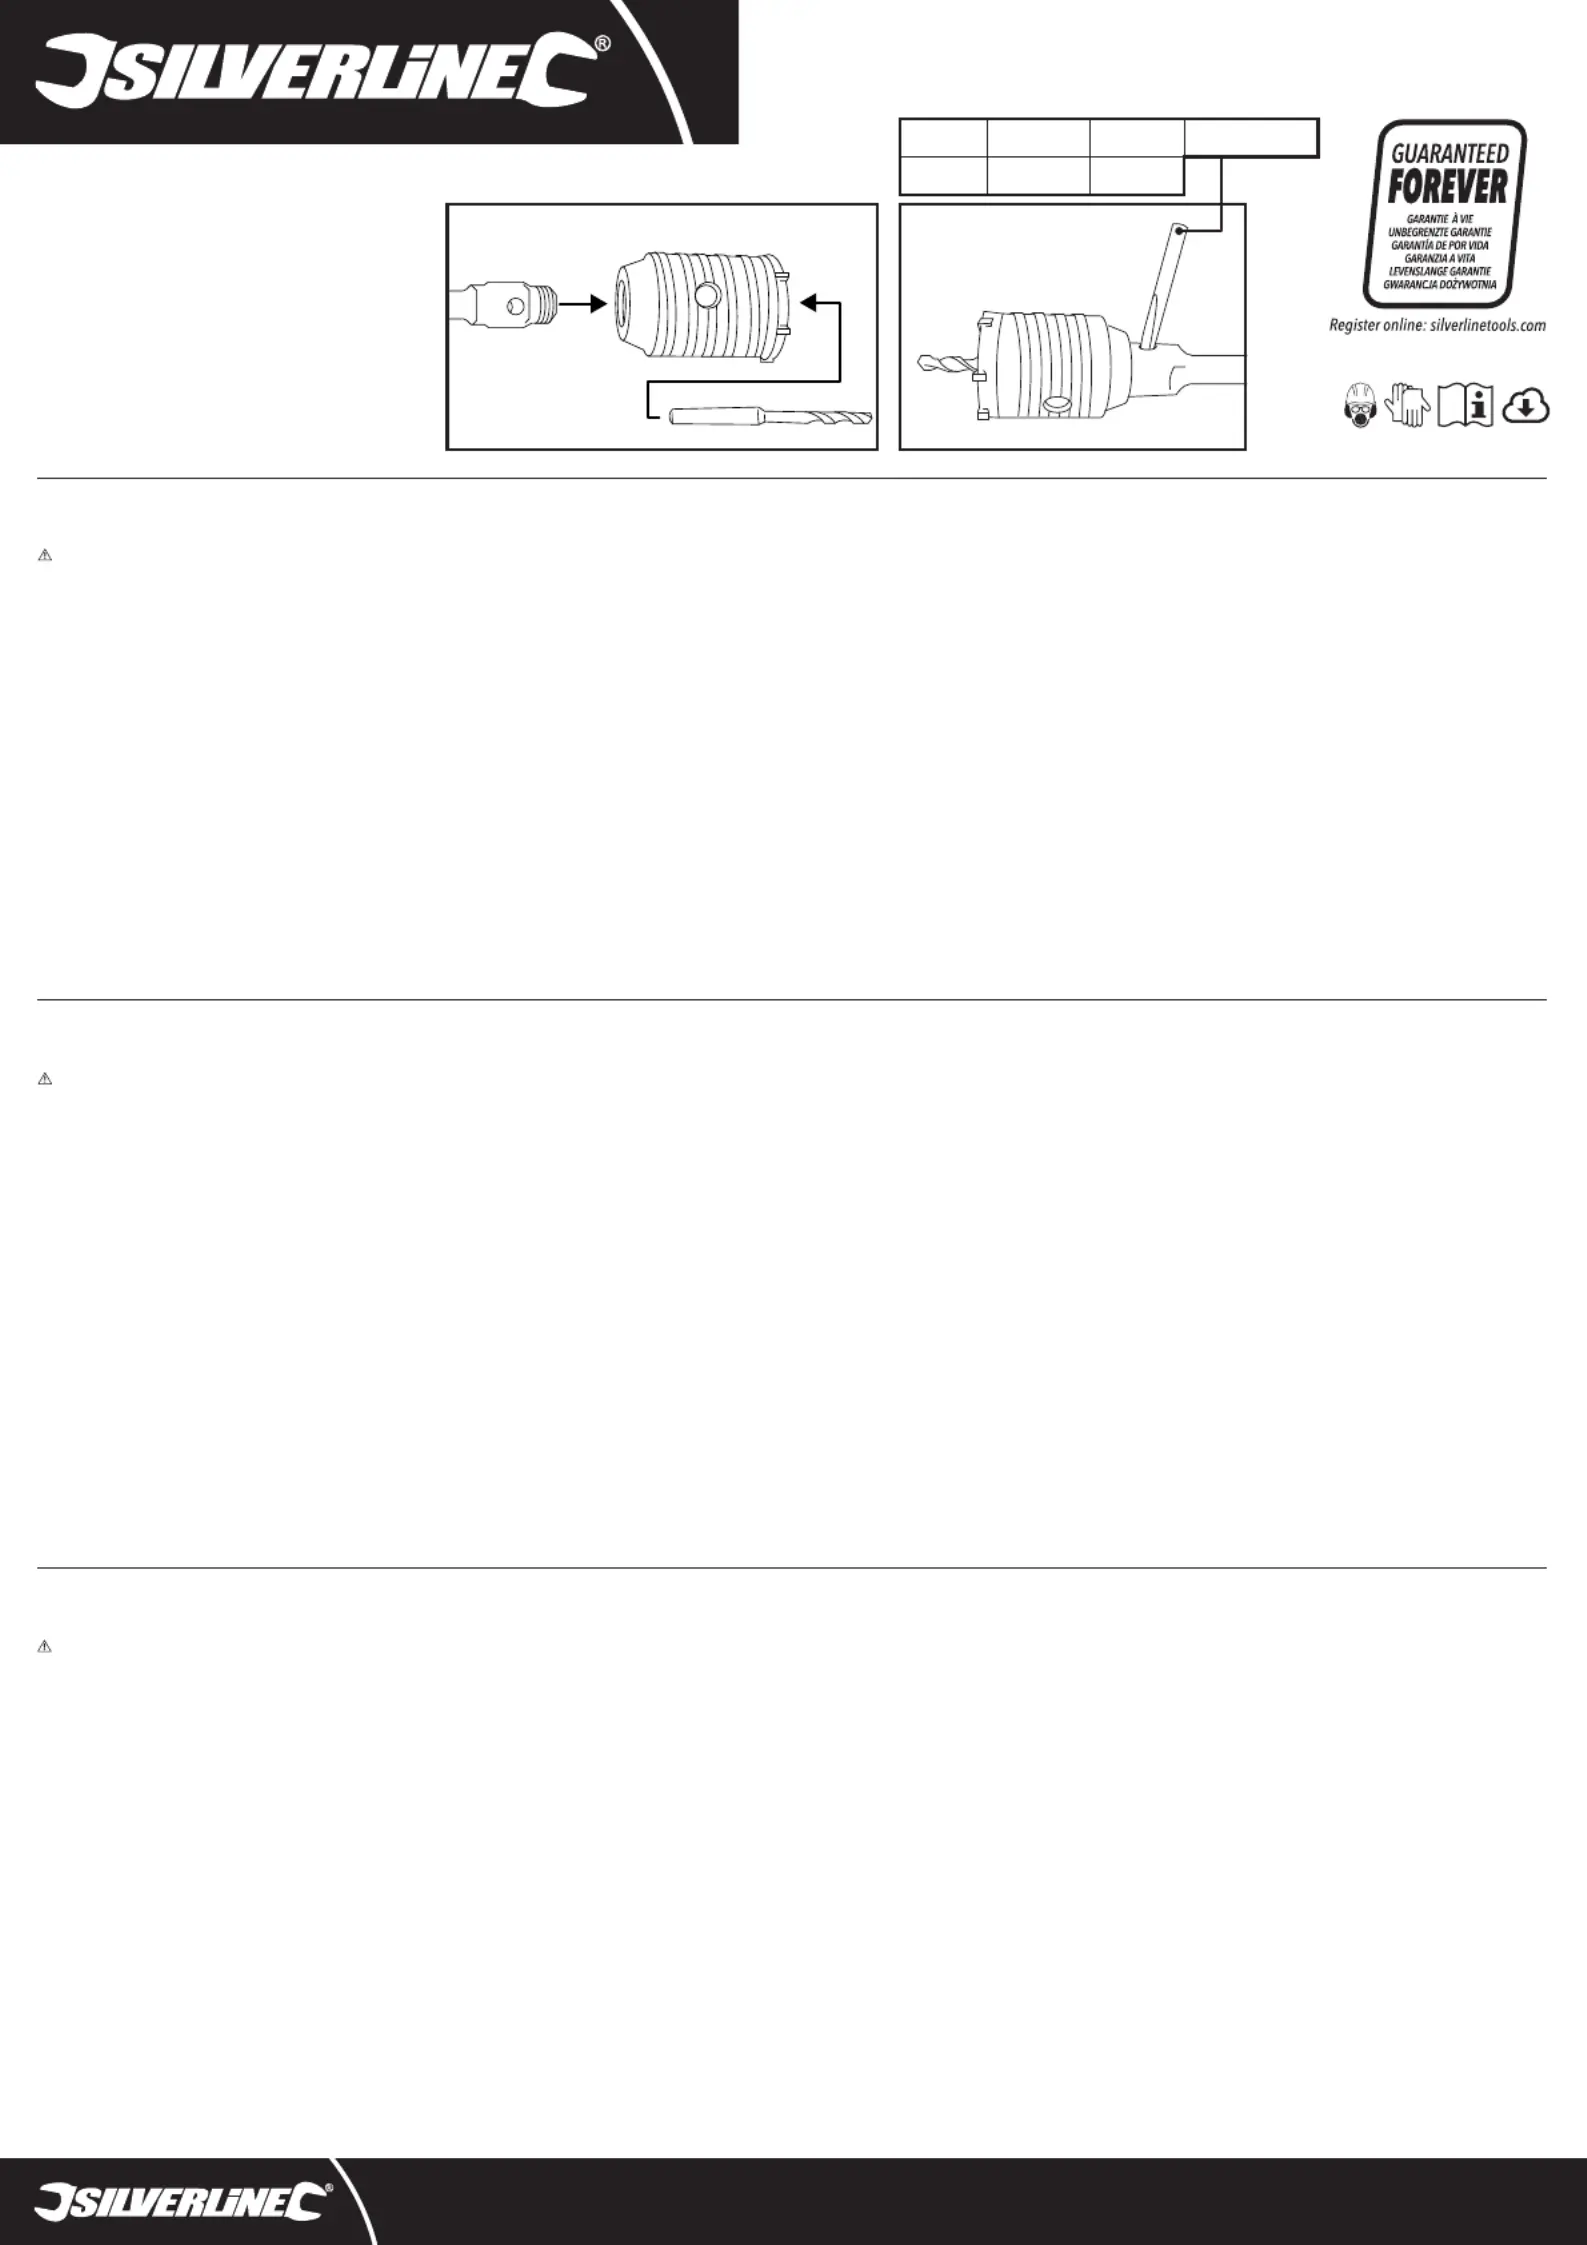
1. Alwaysswitchoffanddisconnectthedrillfromthepowersupplybeforettingorremovingacoredrillbit
2. Screw the arbor squarely into the core drill bit, taking care to ensure it is not cross-threaded.
3. Ifusinganarborextension,tsecurelyensuringitisnotcross-threaded.Alsocheckthatbotharborand
4. Mount the arbor into the chuck of the power drill.
5. Place the tapered end of the pilot drill into the arbor and lightly tap with a soft-faced hammer or similar
until secure. Do not damage the drill tip by using a hard hammer. Do not use excessive force.
6. Lubricate the arbor shank in accordance with drill manufacturer’s recommendations.
7. Ensure the drill has a side handle for complete control whilst core drilling.
1. Check there are no electric cables or gas or water pipes in the drilling area.
2. Drillapilotholerstusingamasonrydrillbitofthesamesizeasthearborpilotdrill.Thiswillcreatea
channel for the arbor pilot drill bit to follow when core drilling.
3. EnsurethedrillisinrotarymodeandthathammeractionisNOTengaged.
4. Hold the drill squarely to the cutting surface. Ensure the core drill bit is moving before it comes into
contact with the surface, and when withdrawing from the hole.
5. Once drilling has commenced, and the circular channel is created that secures the position of the core
drill, the pilot drill can be removed if desired. Once any plaster or looser masonry has been drilled switch
tohammeractionifrequired(DONOTusehammeractionwithdiamondcoredrills).
6. Thecoredrillmaybecomeblockedwithwastematerialwhendrillingthroughmasonry.Itisimportantto
remove this material before continuing (stopping to carry out this procedure will also allow the core drill
NOTE: Never use force which will cause the core drill to vibrate; allow the drill to do the work and set the
work rate, this will prolong the life of the drill bit, produce a smoother cut, and reduce the risk of jamming.
1. After use, the core drill bit can be very hot; take care when removing.
2. Use the wedge-shaped edge of an ejector drift, through the central hole of the arbor, to push the pilot
drillout(Fig.II).Theejectordriftmayneedtobestrucklightlyonitsatendwithasoft-facedhammeror
mallet to push the pilot drill bit out.
Note:Theejectordriftmayalsohelpwhilettedthroughthearborhole,toholdthearborwhilethecore
drillisunscrewed.Alternatively,arborshavetwoatsidesforsecuringwithaspanner,orinavice,when
Fortechnicalorrepairserviceadvice,pleasecontactthehelplineon(+44)1935382222
Web: www.silverlinetools.com
ToolstreamLtd.BoundaryWay,LuftonTradingEstate,Yeovil,Somerset,BA228HZ,UnitedKingdom
ToolstreamB.V.,Hogeweg39,5301LJZaltbommel,TheNetherlands
AVERTISSEMENT : le non-respect de ces instructions peut entraîner des blessures graves, endommager
l’outil et/ou annuler la garantie du produit.
• Portez des équipements de protection individuelle. Portez toujours des protections oculaires.
Le port d’équipements de protection tels que des masques anti-poussières, des chaussures de sécurité
antidérapantes, un casque de sécurité ou des protections anti-bruit, selon le travail à effectuer, réduira
• Utilisez des gants industriels de bonne qualité. Il est recommandé de porter des gants de sécurité
anti-vibrations, avec une résistance minimum à la déchirure, pendant le perçage/carottage.
• Portez des vêtements appropriés. NE PAS porter de vêtements amples ou des bijoux pendants.
Gardez les cheveux et vêtements à l’écart des parties mobiles. Les vêtements amples, les bijoux
pendants ou les cheveux longs peuvent être happés par les pièces en mouvement.
• Vériez que les scies trépan et portes trépan ne sont pas endommagés ou défectueux avant de
les utiliser. Les scies trépan et portes trépan endommagés ne doivent en aucun cas être utilisés, et
doivent être mis hors service.
• N’utilisez JAMAIS le mode percussion avec les forets de scies trépan diamantés ; cela
endommagerait les tranchants, augmenterait le risque de blocage et pourrait déformer les portes
• Les scies trépan doivent uniquement être utilisées avec des perceuses dotées d’un embrayage de
sécurité, à l’exception peut-être des petites scies trépan.
• Les scies trépan, portes trépan et extensions sont lourds, et le perçage/carottage crée une charge
importante pour le moteur de l’outil électrique, même à faible vitesse. Il est important de tenir compte
de ces facteurs lors du choix d’une perceuse électrique adaptée au diamètre et à la profondeur du trou à
percer.Ilpeuts’avérernécessairedepercerdespetitstrousautourduborddutrounal,puisdeterminer
aveclacarotteusepoureffectuerlacoupenale.
1. Arrêtezetdéconnecteztoujourslaperceusedel’alimentationélectriqueavantd’installerouderetirer
une scie trépan ou un porte-trépan.
2. Vissezleporte-trépand’équerredanslascie-trépan,enveillantàcequeleletagesoitcorrectement
3. Sivousutilisezuneextensiondeporte-trépan,xez-lasolidementenveillantàcequeleletagesoit
correctementengagé.Vériezégalementqueleporte-trépanetl’extensionsontdroits.
4. Montezleporte-trépandanslemandrindelaperceuseélectrique.
5. Placezl’extrémitéconiqueduforetpilotedansleporte-trépanettapezenplaceàl’aided’unmarteauà
face souple ou similaire. Ne pas utiliser un marteau à face rigide, au risque d’endommager la pointe du
foret.N’exercezpasdeforceexcessive.
6. Lubriezlatigeduporte-trépan(conformémentauxrecommandationsdufabricantdelaperceuse).
7. Veillezàcequelaperceusesoitéquipéed’unepoignéelatéralepouruncontrôletotalpendantle
Instructions d’utilisation
1. Vériezqu’iln’yapasdecâblesélectriquesoudeconduitesdegazoud’eaudanslazonedeperçage.
2. Percezd’aborduntroupiloteàl’aided’unforetàmaçonneriedelamêmetaillequeleforetpilotedela
scie-trépan. Cela permettra de créer un canal que le foret pilote de la scie-trépan pourra suivre lors du
3. Assurez-vousquelaperceuseestenmoderotatifetquelemodepercussionn’estPASengagé.
4. Tenezlaperceusebienenfacedelasurfacedecoupe.Assurez-vousqueleforetdelascie-trépanesten
mouvement avant d’entrer en contact avec la surface et lors du retrait hors du trou.
5. Une fois que le perçage a commencé, et que le canal circulaire est créé pour sécuriser la position de la
scie-trépan,leforetpilotepeutêtreretirésinécessaire.Unefoisqueleplâtreoulamaçonneriepluslâche
aétépercé,passezaumodepercussionsinécessaire(NEPASutiliserlemodepercussionaveclesscies
6. La scie-trépan peut être bloquée par des résidus lors du perçage de la maçonnerie. Il est important
d’enlever ces résidus avant de continuer (s’arrêter pour effectuer cette procédure permettra également à
lascie-trépanderefroidir).
Remarque : nejamaisutiliseruneforcequiferaitvibrerlascie-trépan.Laissezlascie-trépanfaireletravail,
andeprolongerladuréedeserviceduforet,d’obtenirunecoupeplusnetteetderéduirelerisquede
1. Aprèsutilisation,lascie-trépanpeutêtretrèschaude;faitesattentionlorsquevouslaretirez.
2. Utilisezunchasse-cône,àtraversletroucentralduporte-trépan,pourfairesortirleforetpilote(Fig.II).Il
peutêtrenécessairedefrapperlégèrementsurl’extrémitéplateduchasse-côneavecunmarteauouun
maillet à face souple pour faire sortir le foret pilote.
Remarque :lechasse-cônepeutégalementêtreutile,lorsqu’ilestinsérédansletrouduporte-trépan,pour
tenirleporte-trépanlorsquelascie-trépanestdévissée.Lesportestrépanontégalementdeuxcôtésplats
pourêtrexésavecunecléoudansunétaulorsdudévissagedessciestrépan.
Pourtoutconseiltechniqueouréparation,veuilleznouscontacterau(+44)1935382222.
Site web : www.silverlinetools.com
ToolstreamLtd.BoundaryWay,LuftonTradingEstate,Yeovil,Somerset,BA228HZ,Royaume-Uni.
ToolstreamB.V.,Hogeweg39,5301LJZaltbommel,Pays-Bas.
WARNUNG!VersäumnissebeiderEinhaltungderAnweisungenkönnenschwereVerletzungen
verursachen oder das Gerät beschädigen.
Allgemeine Sicherheitshinweise
• Tragen Sie persönliche Schutzausrüstung und stets eine Schutzbrille. DasTragenpersönlicher
Schutzausrüstung,wieStaubmaske,rutschfesteSicherheitsschuhe,SchutzhelmoderGehörschutz,je
nachArtdesEinsatzes,verringertdasRisikovonVerletzungenerheblich.
• Verwenden Sie stets hochwertige Industrie-Handschuhe.BeimKernbohrenwerden
sicherheitsgeprüfte,vibrationsdämpfendeHandschuhemitgeringerReißfestigkeitempfohlen.
• Tragen Sie geeignete Kleidung. Tragen Sie keine weite Kleidung oder Schmuck. Halten Sie Haare,
Kleidung und Handschuhe fern von sich bewegenden Teilen. Lockere Kleidung, Schmuck oder
langeHaarekönnenvonsichbewegendenTeilenerfasstwerden.
• Überprüfen Sie den Kernbohrer vor dem Gebrauch auf Schäden und Mängel.Beschädigte
Kernbohrer dürfen nicht verwendet werden und müssen entsorgt werden.
• Verwenden Sie Diamant-Kernbohrer NIEMALS im Hammer- oder Schlagbohrmodus; dies
beschädigtdieSchneiden,erhöhtdasRisikodesVerklemmensundkannlängereAufnahmeschäfteund
dessen Verlängerungen verbiegen.
• KernbohrersolltennurinBohrmaschinenmitSicherheitskupplungverwendetwerden,mitder
möglichen Ausnahme von kleinen Kernbohrern.
• Kernbohrer, Aufnahmeschäfte und Verlängerungen sind schwer, und das Kernbohren stellt selbst bei
niedrigerDrehzahleinegroßeBelastungfürdenMotordesElektrowerkzeugsdar.Esistdaherwichtig,
dieseFaktorenbeiderAuswahleinergeeignetenBohrmaschinefürdenDurchmesserunddieTiefe
deszubohrendenLochszuberücksichtigen.Eskannnotwendigsein,zuerstdieStichbohrtechnik
anzuwendenunddannmitdemKernbohrerfortzufahren.
1. VergewissernSiesich,dassdasGerätausgeschaltetundvomStromnetzgetrenntist,bevorSie
Kernbohrer montieren oder entfernen.
2. SetzenSiedenAufnahmeschaftsenkrechtindenKernbohrereinundachtenSiedarauf,dasser
rechtwinkligsitztundrichtigeingeschraubtist.
3. WennSieeineAufnahmeschaft-Verlängerungverwenden,setzenSiesiefestein.PrüfenSie,dasssowohl
derAufnahmeschaftalsauchdieVerlängerungsenkrechtsitzenundrichtigeingeschraubtsind.
4. SetzenSiedenAufnahmeschaftindasBohrfutterderBohrmaschineein.
5. FührenSiedaskonischeEndedesZentrierbohrersindenAufnahmeschafteinundklopfenSiees
mit einem Gummihammer oder ähnlichem fest. Verwenden Sie auf keinen Fall einen gewöhnlichen
Hammer,derkönntedieBohrerspitzebeschädigen.
6. SchmierenSiedenAufnahmeschaft(gemäßdenEmpfehlungendesBohrer-Herstellers).
7. VergewissernSiesich,dassdieBohrmaschineüberZusatzgriffeverfügt,damitSiebeimKernbohren
vollständige Gerätekontrolle haben.
1. StellenSiesicher,dasssichimBohrbereichkeineStromkabel,Gas-oderWasserleitungenbenden.
2. BohrenSiezunächsteinTestbohrlochmiteinemSteinbohrerdergleichenGrößewiederdes
Zentrierbohrers.DadurchwirdeinKanalgeschaffen,demderZentrierbohrerbeimKernbohrenfolgen
3. VergewissernSiesich,dasssichdieBohrmaschineaufRotationsmoduseingestelltistundder
SchlagbohrmodusNICHTaktiviertist.
4. HaltenSiedenBohrerrechtwinkligzurbohrendenOberäche.AchtenSiedarauf,dasssichdie
Bohrkronebewegt,bevorsiemitderFlächeinBerührungkommtundwennsieausderÖffnung
5. SobaldderBohrvorgangbegonnenhatundeinkreisförmigerKanalentstandenist,derdiePositiondes
Kernbohrerssichert,kannderZentrierbohreraufWunschentferntwerden.SobaldderPutzoderdas
lockereMauerwerkdurchbohrtist,kannbeiBedarfaufdenSchlagbohrmodusumgeschaltetwerden
(VerwendenSiebeiDiamantbohrernNIEMALSdenSchlagbohrmodus).
6. BeimBohrendurchMauerwerkkannderKernbohrerdurchAbfallmaterialverstopftwerden.Esist
wichtig,diesesMaterialzuentfernen,bevorSiefortfahren(durcheineUnterbrechungkannsichder
HINWEIS:WendenSiekeinenübermäßigenDruckan,diedenKernbohrerzumVibrierenbringt;lassen
SiedenBohrerdieArbeitmachenundrichtenSiedieArbeitsgeschwindigkeitdementsprechendein;dies
verlängertdieLebensdauerdesBohrers,führtzueinergleichmäßigerenBohrungundverringertdieGefahr
1. NachdemGebrauchkannderKernbohrersehrheißsein;lassenSiebeimHerausnehmenbesondere
2. VerwendenSiediekeilförmigeKanteeinesAustreibersdurchdaszentraleLochdesAufnahmeschafts,um
denZentrierbohrerherauszuschieben(Abb.II).MöglicherweisemüssenSiemiteinemGummihammer
leichtaufdasacheEndedesAustreibersschlagen,umdenZentrierbohrerherauszudrücken.
Hinweis: DerAustreiberkannauchdazudienen,denAufnahmeschaftzuhalten,währendderKernbohrer
herausgeschraubtwird.AlternativdazuhabenAufnahmeschäftezweiacheSeiten,dieesermöglichen,
denSchaftmiteinemSchraubenschlüsseloderineinemSchraubstockzuxieren,wennderKernbohrer
InformationenzuReparatur-undKundendienstenerhaltenSieunterderRufnummer(+44)1935/382222.
Webseite: www.silverlinetools.com
ToolstreamLtd.BoundaryWay,LuftonTradingEstate,Yeovil,Somerset,BA228HZ,Großbritannien.
ToolstreamB.V.,Hogeweg39,5301LJZaltbommel,Niederlande.
EN: Drift FR: Chasse-cône DE: Austreiber ES: Expulsor de brocas
IT: Espulsore NL: Uitwerpstift PL: Dryf