Silverstone XE04-4189 Manual


Læs gratis den danske manual til Silverstone XE04-4189 (2 sider) i kategorien Hardwarekoeling. Denne vejledning er vurderet som hjælpsom af 57 personer og har en gennemsnitlig bedømmelse på 4.6 stjerner ud af 29 anmeldelser. Har du et spørgsmål om Silverstone XE04-4189, eller vil du spørge andre brugere om produktet?

Side 1/2
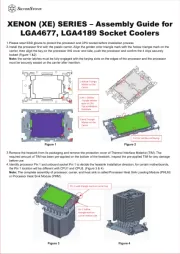
Figure 1 Figure 2
Figure 3 Figure 4
Car er Latches and keying ri
Pin 1 d triangle ma on carrier top soli rk
Pin 1 ho w llo
t angle ma on ri rk
car er bo om de ri si
Install the processor first with the plastic carrier. Align the golden color triangle mark with the hollow triangle mark on the
carrier, then align the key on the processor IHS cover and side, push the processor and confirm the 4 clips securely
locked (Figure 1 &2)
Note: the carrier latches must be fully engaged with the keying slots on the edges of the processor and the processor
must be securely seated on the carrier after insertion.
1.
2.
Remove the heatsink from its packaging and remove the protection cover of Thermal Interface Material (TIM). The
required amount of TIM has been pre-applied on the bottom of the heatsink. Inspect the pre-applied TIM for any damage
before use.
Identify processor Pin 1 and onboard socket Pin 1 to decide the heatsink installation direction; for certain motherboards,
the Pin 1 location will be different with CPU1 and CPU2. (Figure 3 & 4)
Note: The complete assembly of processor, carrier, and heat sink is called Processor Heat Sink Loading Module (PHLM)
or Processor Heat Sink Module (PHM).
3.
4.
H w T angle ollo ri
Ma er on the rk
Car erri
1.
Pin-1 den Gol
T angle Ma eri rk r
both n CPU o
Top and Bo om
Substrate
2.
S d T angle oli ri
Ma er on the rk
Car erri
3.
1
1
2
2
3
3
XENON (XE) SERIES Assembly Guide for
LGA4677, LGA4189 Socket Coolers


Produkt Specifikationer

Mærke: Silverstone
Kategori: Hardwarekoeling
Model: XE04-4189

Har du brug for hjælp?

Hvis du har brug for hjælp til Silverstone XE04-4189 stil et spørgsmål nedenfor, og andre brugere vil svare dig