Smeg FP610X Manual
Læs gratis den danske manual til Smeg FP610X (52 sider) i kategorien Ovn. Denne vejledning er vurderet som hjælpsom af 31 personer og har en gennemsnitlig bedømmelse på 3.8 stjerner ud af 16 anmeldelser.
Har du et spørgsmål om Smeg FP610X, eller vil du spørge andre brugere om produktet?

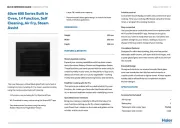
Produkt Specifikationer
| Mærke: | Smeg |
| Kategori: | Ovn |
| Model: | FP610X |
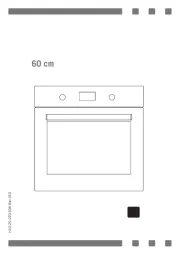
| Bredde: | 597 mm |
| Dybde: | 548 mm |
| Højde: | 592 mm |
| Produktfarve: | Rustfrit stål |
| Strøm: | 3000 W |
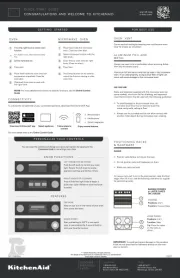
| Indvendig belysning: | Ja |
| Grill: | 2700 W |
| Børnesikring: | Ja |
| Nem at rengøre: | Ja |
| Timer type: | Digital |
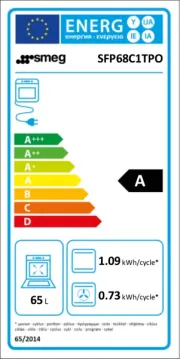
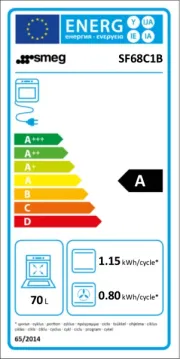
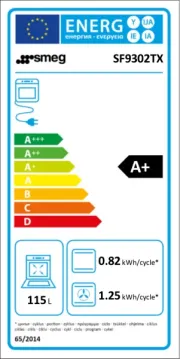
| Energieffektivitetsklasse: | A |
| Ovntype: | Elektrisk ovn |
| Samlet indvendig ovn kapacitet: | 68 L |
| Antal ovne: | 1 |
| Autosluk timer tilbereder mad sikkert: | Ja |
| Energiforbrug: | 0.91 kWh |
| Automatiske programmer, antal: | 10 |
| Dimensioner på installationsrummet (BxDxH): | 564 x 560 x 585 mm |
Har du brug for hjælp?
Hvis du har brug for hjælp til Smeg FP610X stil et spørgsmål nedenfor, og andre brugere vil svare dig
Ovn Smeg Manualer


Ovn Manualer
- George Foreman
- Breville
- Zanker
- AENO
- Vestfrost
- Indesit
- Alto-Shaam
- Cooking Performance Group
- Haeger
- Fulgor Milano
- Create
- MBM
- Scandomestic
- Sheffield
- Steba
Nyeste Ovn Manualer