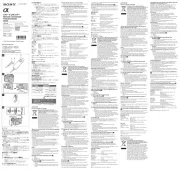
Sony RM-EZ2T Manual


Læs nedenfor 📖 manual på dansk for Sony RM-EZ2T (2 sider) i kategorien Fjernbetjening. Denne guide var nyttig for 22 personer og blev bedømt med 4.5 stjerner i gennemsnit af 2 brugere

Side 1/2
3-255-607- (1)11
Remote Commander
Operating Instructions
Mode d’emploi (au verso)
RM-EZ2T
© 2003 Sony Corporation Printed in China
English
About this Remote Commander
You can set up the Remote Commander to operate the
following components of almost all major brands including
Sony.
Installing the Batteries
Before replacing the batteries, have new ones ready
beforehand.
Open the battery compartment and insert two R6 (size AA)
batteries (not supplied).
Be sure to line up the + and – on the batteries with the + and
– in the battery compartment.
1 2
When to replace the batteries
Under normal conditions, batteries will last up to 6 months. If
the Remote Commander does not operate properly, the
batteries might be worn out. Replace the batteries with new
ones.
Notes
Replace both batteries with new ones.
Do not take more than 3 minutes to replace the batteries as your
code number settings will be erased.
Notes on Batteries
Do not mix old batteries with new ones or mix different
types of batteries together.
If the electrolyte inside the batteries should leak, wipe the
contaminated area of the battery compartment with a cloth
and replace the old batteries with new ones. To prevent the
electrolyte from leaking, remove the batteries when you
plan not to use the Commander for a long period of time.
Setting the Component Codes
To use this Remote Commander with a Sony brand
component that is already preset at the factory, you can skip
this procedure.
If you are using another brand’s component, or if you cannot
operate even a Sony brand component, follow this procedure.
Position
TV
Component that can be preset
TV
Factory setting
Sony TV
Setting by Entering the Code Number
See the supplied chart, “Component code numbers” and find
the code for your component.
1While pressing the
2-
button, press the 1 button.
2Enter the three-digit component code in the
“Component code numbers” table.
For example, to set a Philips’ TV, press -86.
3Press the t button.
4Aim this Commander to your component and check if
you can operate it using this Commander.
You can write down the code number on the label inside the battery
compartment lid.
If you cannot operate your component...
First, try repeating these set up procedures using the other
codes listed for your component (see “Component code
numbers”).
After trying all the codes listed for your component, if you
still cannot get the Commander to work properly, try the
search method described under “Setting by Searching for
the Correct Code.”
Note
Be sure to proceed to each following step in the above procedure
within 10 seconds, otherwise the mode settings will be canceled.
Setting by Searching for the Correct Code
If you have tried all the code numbers listed for your
component and you still cannot get the Commander to work
(or if your component was not listed), try the following.
1Turn on the component you wish to set up using its power
switch.
2While pressing the
2-
button, press the 1 button.
3Aim the Commander at the component and press and
release the button. Then press and release the PROGR+ 1
button.
4Repeat step 3 until the correct code number is found.
Each time you press the button and then the PROGR+ 1
button, a new code number will be transmitted.
Keep trying until your component operates as follows:
TV: the power turns off.
Be patient as you do this; it may take up to about 120 tries
for a TV until the correct code number is located.
5When the correct code is found, press the t button.
6Turn on the component again, and check that the
Commander can control the other functions of your
component such as channel and volume control.
If the component does not operate properly, repeat steps 1 to
5 and search for another code.
If you still cannot get the Commander to work properly, see
“Troubleshooting”.
Note
Be sure to proceed to each following step in the above procedure
within 10 seconds, otherwise the mode settings will be canceled.
Operating a Component
Point the Commander directly at your component and
press the button for the desired function.
See “Remote Button Descriptions” for details.
Note on using the Commander
Using this Commander will not add new functions to your
components. The functions of the Commander are limited to the
functions of the component itself. For example, if your TV does not
have a mute function, the button on this Commander will not%
function with your TV.
Troubleshooting
If you’re having problems setting up or using the Remote
Commander:
When setting up the Commander, carefully go through the
procedures described under “Setting the Component
Codes”. If the code that is listed first for your component
does not work, try all the codes for your component — in
the order in which they are listed. If all the codes fail to
work (or if your component is not listed), try using the
procedures under “Setting by Searching for the Correct
Code”.
Check that you are aiming the Commander directly at the
component, and that there are no obstructions between the
Commander and the component.
Make sure the batteries you are using are not worn out, and
that they are inserted correctly.
Check that the component has infrared remote capability.
For example, if your component did not come with a remote
control, it probably is not capable of being controlled by the
Remote Commander.
Should any problem persist, reset the Commander to the
factory setting by pressing the 1, t and 2 buttons
simultaneously.
If you have any questions or problems concerning the
Remote Commander that are not covered in this manual,
please call the telephone number in the warranty.
Remote Button Descriptions
1To change the input mode.
2To mute the TV volume.
3Volume up: +
Volume down:
4To select double-digit
numbers. Works in the
same way as your TV’s
commander.
5Fastext buttons.
6To switch to Teletext.
7To turn on.
To return to TV from
Teletext.
8To turn the power on and
off.
9Programme up: +
Programme down:
0To change the programme.
Also to turn on the power.
qa To select a number between
20 and 29.
Component code numbers /
Numéros de code des
composants
English
The table of codes is at the back.
The left row of the table shows the brand, the right row
shows the code No.
Français
Les tableaux de codes se trouvent au dos.
La colonne gauche du tableau indique la marque. La colonne
droite indique le n° de code.
To set a Component Code (see the instruction manual for
details)
Pour enregistrer un code d’appareil (voir le mode
d’emploi pour les détails)
While pressing the
2-
button,
press the 1 button.
Appuyez sur la touche
2-
tout en maintenant la touche 1
enfoncée
x
Code No. / Code N°
x
3
2
1
0
8
5
9
6
7
1- 2-
4
PROGR
1
Specifications
Operable distance
Approx. 7 m (23 ft) (varies depending on the component
of each manufacturer)
Power requirements
Two R6 (size AA) batteries (not supplied)
Battery life
Approx. 6 months (varies depending on frequency of use)
Dimensions
Approx. 66 31 mm (w/h/d) (2 × 149 ×
5
/
8
× 5
7
/
8
× 1
1
/
4
in.)
Mass
Approx. 91 g (3.2 oz.) (not including batteries)
Design and specifications are subject to change without
notice.
086
Your Code Number
2-
zThe number 5 button and
the PROGR+ button each
have a tactile dot for ease
of use.


Produkt Specifikationer

Mærke: Sony
Kategori: Fjernbetjening
Model: RM-EZ2T

Har du brug for hjælp?

Hvis du har brug for hjælp til Sony RM-EZ2T stil et spørgsmål nedenfor, og andre brugere vil svare dig


Fjernbetjening Sony Manualer

Sony

Sony RM-V80T Manual

10 Marts 2024
Sony

Sony RMT-DSLR1 Manual

31 December 2023
Sony

Sony RM-X6S Manual

9 December 2023
Sony

Sony RM-V210T Manual

19 November 2023
Sony

Sony RM-MC60 Manual

3 November 2023
Sony

Sony RMT-DSLR2 Manual

27 September 2023
Sony

Sony RM-AV3100 Manual

4 September 2023
Sony

Sony RM-EZ2T Manual

25 August 2023
Sony

Sony RM-VL610 Manual

12 Juli 2023

Fjernbetjening Manualer

Nyeste Fjernbetjening Manualer