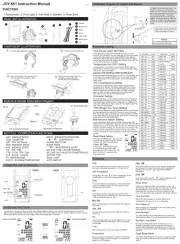
SEN SOR
5.0mm
Distance Countdown Setting mode (Fig 88)
Time Countdown Setting mode (Fig 94)
Backlight long bright setting (Fig 87)
Menu blanking mode setting (Fig 10 / 24 / 83)
Menu combination settings (Fig 10 / 17 / 75)
Maintenance Distance Setting(Fig 23 / 62)
Clock Setting (Fig 9 / 67)
Initial Time Setting (Fig 22 / 55)
Odometer Initial Value Setting (Fig 8 / 16 / 49 )
Riders Weight Setting (Fig 5 / 34)
Temperature Setting (Fig 6 / 14)
Chain wheel / Flywheel Setting mode (Fig 7 / 37)
Wheel Size Setting (Fig 2 / 19)
KM / M Setting (Fig 12)
Language Setting (Fig 1 / 3)
4
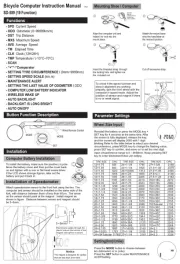
Sensor
CR2032 Battery
2
Computer
1
Wheel Magnet
3
Ties
5
6
Mounting Shoe & Wired Remote Control
Installation
Battery Installation
Accessories
Computer Installation
Attach the computer to the handlebar and secure using included ties. To
check the installation, spin the front wheel with the computer in speed
mode and observe whether there is output on the computer screen.
Adjust sensor and magnet position if signal is weak or nonexistent.
The magnet is designed for spokes
that are less than 2mm thick
Pass bicycle spokes through
the plastic hole on the
bottom of the magnet
and tighten to secure
Notice
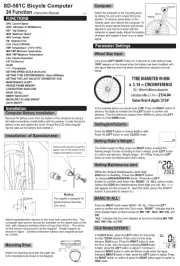
Parallel
Accessories should be positioned parallel to computer, as shown
Parallel
When riding, the computer and accessories should be parallel to one
another. The diagram below shows the positioning and distance between
the computer, speedometer, and cadence sensor, which should be ≤ 60 cm.
Position of Computer and Accessories
JOY-583C
Instructions
FUNCTIONS
PARAMETER SETTINGS
AUXILIARY MODE
-MENU FREE COMBINATION MODE
-SPEED COMPARISON
-HIDE MENU MODE
-MAINTENANCE ALERT
-LOW BATTERY INDICATOR
-WIRELESS WAKE UP
-SMART BACKLIGHT
-REMOTE CONTROL
-BACKLIGHT IS LONG BRIGHT
SET MODE
Computer Function Display Area
Speed
Heart rate
Function
Front
Back
Cadence
Contact
Slot
Battery
Cover
The speed sensor is installed on the front fork of the bicycle. The distance
between the sensor and the watch body is less than 60cm. The speed sensor
and the rim magnet are installed on the same side. The SPEED circle of the
sensor corresponds to the magnet position of the magnet. The magnet is
installed as shown in the figure. Adjust the relative position of the magnet
and the sensor so that the distance between them is less than 5.0 mm.
Rotation Animation
Speed Comparison
Low Battery Indicator
Function
Page sequence
Speed unit
5
2
1
3
4
Installation of sensor
Parameter Settings
In Wheel Size Setting mode, the default is 2155 mm. select wheel
circumference based on below chart. Press the MODE button to change
each figure, and press SET to confirm and move on to next setting.
Afterwards, press SET to enter into Riders Weight Setting .
IN Maintenance Distance mode, press the MODE button to change the
value, and press the SET button confirm and advance. Default value: 200,
and its ranges from 200 to 800KM. Press the MODE button to
confirm and enter into Clock setting.
Press SET and MODE button at the same time for 3 seconds on any page to
enter the language setting mode. Press MODE to enter the language
selection, press SET to confirm and enter the kilometer/wheel perimeter
setting page.
On the kilometer/wheel perimeter setting page, press the MODE button to
select the km/mile setting, then press the MODE button to switch
kilometers (km)/mile (Mile), press the SET button to confirm and enter the
wheel perimeter setting.
Tire Size Chart (in mm)
If you are unable to locate your tire size on this chart,
you can use the method shown to the right to measure
the time diameter and calculate the tire circumference.
Circumference = diameter x 3.14
When the Riders Weight setting mode is selected, press the MODE to set
weight measurement unit (KG or LB) and press SET button to move to set
weight. Use the MODE button to adjust flashing number for weight, and
press SET to confirm and advance to next digit. The default weight is 65 KG,
any value from 0 ~ 299 entered. Press SET button to confirm value and
enter into Temperature Setting mode.
In Temperature Setting mode, MODE button for 3 seconds to press the
toggle between Celsius and Fahrenheit. SET Press button to confirm value
and enter into Flywheel Parameter Setting mode.
When the Initial Time setting mode is selected, press the MODE button to
enter it. To adjust the selected figure, press the MODE button, and press
the SET button to confirm your value and move to the next field. Value
ranges from 0 to 99,999 hours. Press the SET button once finished with
Initial Time setting to move onto setting.Maintenance Distance
FUNCTION DESCRIPTIONS
On the flywheel chain wheel parameter setting page, press the MODE
button to enter the flywheel parameter setting. The number of the flywheel
teeth is arranged from large to small. When there is no flywheel, the
number of teeth is replaced by 0. The number of the chain wheel is
arranged from large to small, and the number of chain wheel is replaced by
0 when there is no chain wheel. (See the back for detailed adjustment
instructions.) After setting, press SET to confirm and enter the initial value
and the vehicle inspection mileage setting page.
On the initial value and maintenance distance setting page, press
the MODE button and “initial mileage” jumps, then press the MODE button,
The “initial mileage” value jumps, then press the MODE button to adjust.
Press the SET button to confirm the entry to the next value setting. After the
setting is completed, press the SET button to enter the total time initial
value setting.
AVSD (Average Speed)
MASD (Maximum Speed)
Displays the maximum speed reached during a single trip.
Displays the average speed of a single trip.
MAX-TMP (Maximum Temperature)
Displays the maximum temperature of a single trip.
MIN-TMP (Minimum Temperature)
Displays the minimum temperature of a single trip.
CAL (Calories Expended)
For total heat consumed from last reset of code table to the current driving process,
the counting range is 0~99999.9kcal.
In sleep mode, the current date is displayed.
AUXILIARY MODE AND FUNCTIONS
Low Battery Indicator
If the voltage remaining is less than 2.7V, the Low Battery Indicator will flash
as a reminder to change the battery.
Remote Control
Speed Comparison
The wired remote control allows for access to the MODE button without
removing your hand from the handlebar.
The Speed Comparison displays your current speed in comparison to the
average speed. When above average speed, the arrow will point upwards, and
when below average speed, the arrow will point downwards.
Wireless Auto Wake-up
Shake the handlebar to disable Sleep Mode.
Smart Backlight
The Smart Backlight will activate when there is insufficient light. Press any
button to turn on the Backlight for 5 seconds.
Maintenance Alert
When the Odometer value exceeds the set maintenance mileage, the
Maintenance Alert indicator (wrench) will flash as a reminder that
maintenance is necessary. Hold the SET button to clear the Maintenance
Alert indicator.
TROUBLESHOOTING
Improper magnet/sensor alignment
Improper input, such as wheel
circumference
Temperature exceeds operating limits
(0° C to 55° C, or 32° F to 131° F)
Prolonged sunlight exposure
Irregular figures
displayed
Remove and battery and reinstall after
10 seconds
Speed transmitter installed at incorrect
angle
Speed transmitted has low battery
Speed transmitter does not sense
magnet
Date (Year, Month, Day, Week)
DIST DOWN (Trip Distance Countdown)
TIME DOWN (Trip Time Countdown)
GEAR RATO (Gear Ratio)
Will display 3:1 or 8:1. 3:1 indicates that the chain wheel has a 3 fluted disc,
while 8:1 indicates that the chain wheel has an 8 fluted disc, with ratio of the
first chain wheel being recommended based on speed. Recommended
cadence for flat terrain is 90, while recommended cadence for sloped terrain is
75. Reference Chain wheel/Flywheel setting from previous section for more
information.
FAT (Fat Burned)
For total fat from last reset of code table to the current driving process, the
counting range is 0~99999.9kg .
When starting to ride, the mileage starts counting down from the set value.
If it is not set, the countdown is negative when starting from zero.
When starting to ride, the time starts counting down from the set value. If
the setting is not set from zero, the countdown time is negative.
Hide the menus that are not commonly used according to the needs of
riding, which can simplify the operation flow when the code table is used.
The menu after blanking is not displayed, but the ride data is recorded in
the background.
The menus are combined based on the rider's habits, and three menus in one
group is displayed on the same page.
Menu combination mode
Menu hide mode
The long bright status of backlight is closed by default, and the backlight is
long bright in working mode after it is turned on. The code table turns off
the backlight automatically after entering dormant mode.
Backlight long bright
The Total Odometer will display all distance accrued while computer is active,
ranging from 0.01 to 99999.9 KM/M.
Under "menu blanking" mode, the "Blanking" menu jumps, then press the
mode button to confirm and enter the menu blanking mode setting, and
then press the "mode" button to switch OFF/ON when the fifth page Off is
jumping. Next, press the SET button to confirm and enter the fourth page
setup( see Figure 83 flow chart for details). After the menu blanking setting
is completed, press the SET button to confirm and enter the code table
working mode.
Note: 1. The first page displayed cannot be hidden.
2. Blanking menu is set forward from the fifth page.
3. The previous page sets the blanking state, and the following pages
will also be blanked by default.
On the time setting page, press MODE button to enter the “hour” setting,
then press the MODE button to change the value, press the SET button to
confirm and enter the “minute” setting.
After entering the “minute” setting, the “minute” value jumps, press MODE
button to change the value, press SET button to confirm and change the
number of digits, press SET button to confirm and enter the “year” setting.
After entering the “year” setting, the “year” value jumps, press MODE
button to change the value, press SET button to confirm and enter the
“month” setting.
After entering the “month” setting, the “month” value jumps, press the
MODE button to change the value, press SET to confirm and enter the “day”
setting.
After entering the “day” setting, the “day” value jumps, press the MODE
button to change the value, press SET to confirm and enter the “week”
setting.
After entering the “week” setting, the “week” value jumps, press the MODE
button to change the value, press SET to confirm and enter the menu
setting page.
Clear Signal Data
SPEED (Current Speed)
The current speed is displayed on the screen at all times. It ranges from
0 – 99.9 KM/H or MPH, and is accurate to +/- 0.1 KM/H or MPH.
TODO (Total Odometer)
DIST.DAY (Daily Distance)
The Daily Distance will display all distance accrued since last reset. It ranges
from 0.01 to 9999.9 KM/M, and will reset to zero once the maximum value
has been reached.
TOTM (Total Time)
FUNCTION DESCRIPTIONS
CLOK(Clock)
TIME (Ride Time)
Press and hold the MODE button for 3 seconds in any interface of the
working mode to enter the “long bright” setting, press the MODE button to
turn it on or off. Press the SET button to confirm and enter the mileage
countdown setting.
In any mode of the working mode, press and hold the MODE button for
3 seconds to enter the backlight long bright, mileage countdown and time
countdown setting page. After the backlight long bright setting is finished,
press the SET button and “distance countdown” value jumps, press the
MODE button to adjust the value, press the SET button to change the
number of digits. When completed, press the SET button to confirm and
enter the time countdown setting mode.
In the “Time countdown” setting mode, the hour value jumps, press the
MODE button to change the value, press the SET button to confirm and
enter the next digit setting. After the hour setting is completed, press the
SET button to confirm and enter the minute setting. In the minute setting
mode, press the MODE button to change the value, press the SET button to
confirm and enter the next digit setting. When the settings if finished, press
the SET button to confirm and return to working mode.
Press and hold the SET button for 3 seconds in
any interface in working mode: the single data of
DIST / MASD / AVSD / TIME / MAX-TMP /
MIN-TMP / CAL / FAT will be cleared.
The counting range for the sum of the time spent on a single ride is
0~99999.
24-hour clock display.
Single riding time, the riding time restarted after the single-time value is
cleared, the time range is 0~99:59:59, and it will reset to zero when excess.
O
Clear the value
On the menu setting page, press the MODE button to enter the
“combination” setting. The first line menu of the first page jumps, press the
MODE button to switch the menu, press the SET button to confirm and
enter the second line menu setting (refer to Figure 75 for the detailed
operation), after the menu combination setting is completed, press the SET
button to confirm and enter the menu blanking setting mode.
-LANGUAGE SETTING ( (Fig 1 / 3)Chinese / English)
-KM / M (Fig 4)
-CELSIUS / FAHRENHEIT(Fig 6 / 14)
-WHEEL SIZE (Fig 2 / 19)
-INITIAL ODOMETER VALUE (KM / M) (Fig 8 / 16 / 49)
-INITIAL CHRONOMETER VALUE (Fig 22 / 55)
-METRIC / IMPERIAL SETTING (Fig 5 / 13)
-RIDER WEIGHT (Fig 20 / 34)
-MAINTENANCE DISTANCE (Fig 23 / 62)
-CLOCK (Fig 9 / 67)
-DATE (Fig 71)
-DISTANCE COUNTDOWN (Fig 88)
-TIME COUNTDOWN (Fig 94)
-CHAINWHEEL / FLYWHEEL (Fig 7 / 37)
-MENU COMBINATION SETTINGS (Fig 10 / 75)
-HIDE MENU (Fig 24 / 83)
-SPEED (0~99.9 KM/H M/H )
- TODO Total Odometer (0~99999.9KM/H) (Fig 25)
- TOTM Total Time (0~99999hrs ) (Fig 25)
-CLOK Clock (12/24H) (Fig 25)
-DIST Daily Distance (Fig 26)
- TIME Ride Time (0~99:99hrs) (Fig 26)
- TEMP Temperature (-20°C~70°C / -4°F~158°F) (Fig 26)
- MASD Maximum Speed (Fig 27)
- AVSD Average Speed (Fig 27)
-CAL Calories Expended (Fig 27)
-TRIP TIME
- MAX-TMP Maximum Temperature (Fig 28)
- MIN-TMP Minimum Temperature (Fig 28)
-FAT Fat Burned (Fig 28)
-DIST DOWN Trip Distance Countdown (Fig 29)
- TIME DOWN Trip Time Countdown (Fig 29)
-GEAR RATO Gear Ratio (Fig 29)
-DATE (YY/MM/DD/WW)
Thread ties through
the slots under the
base to attach to
handlebar
Match base
alignment with
computer and
insert to attach
*Computer battery installation: Open the battery cover. Install two CR2032
batteries with positive poles facing battery cover.
6
7
Extension Stand
7
TRIP TIME
TEMP (Temperature)
Displays the current temperature, ranging from
-20°C to 70°C, or - 4°F to 158°F.
Single travel time, the restarted timing after the single value is cleared. Tim range is
0~9999:49, and it will reset to zero when excess. The trip time is not displayed by
default, and can only be called up through a menu combination.