Swatch Matita SUOB726 Manual
Læs gratis den danske manual til Swatch Matita SUOB726 (42 sider) i kategorien Ur. Denne vejledning er vurderet som hjælpsom af 11 personer og har en gennemsnitlig bedømmelse på 4.8 stjerner ud af 6 anmeldelser. Har du et spørgsmål om Swatch Matita SUOB726, eller vil du spørge andre brugere om produktet?
Side 1/42

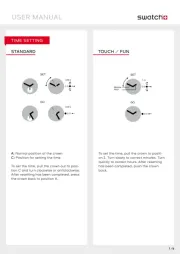
USER MANUAL
LOREM IPSUM
1/6
TOUCH / FUNSTANDARD
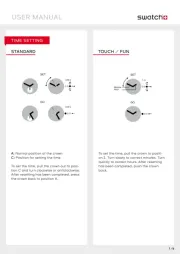
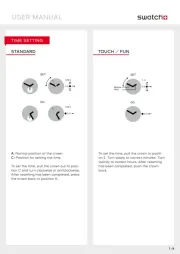
TIME SETTING
A: Normal position of the crown
C: Position for setting the time
To set the time, pull the crown out to posi-
tion C and turn clockwise or anticlockwise.
After resetting has been completed, press
the crown back to position A.
To set the time, pull the crown to positi-
on 2. Turn slowly to correct minutes. Turn
quickly to correct hours. After resetting
has been completed, push the crown
back.
SET
A B C
A B C
GO
Minute
1. 2.
Hour
SET
GO

USER MANUAL
2/6
TOUCH / FUN
READJUSTMENT
STANDARD
DATE OR DAY SETTING
To set the date, pull the crown out to posi-
tion B, and turn anticlockwise. To set the
day, turn the crown in a clockwise direc-
tion. After resetting has been completed,
press the crown back to position A.
A B C
A B C
SET
GO
5 sec.
TEST / OK
ADJUST HAND/+HOUR
ADJUST HAND/+MINUTES
GO
1. 2.
pull
within
5 sec.
1. 2.
G
o
t
o
1
2
G
o
t
o
1
2
Push crown for 5 seconds. If both hands
go to 12 o’clock, test is ok. Push crown
again and hands go back to time.
If hands are not exactly at 12 o’clock, pull
crown to position 2. Turn clockwise to
readjust hour hand. Turn counter clock-
wise to readjust minute hand. Push crown
back and hands turn back to show time.

USER MANUAL
3/6
LOOMI ON
TOUCH YOUR SWATCH
LIGHT FUNCTION
~4 secs.
Push
POP
TOUCH LOOMI
LOOMI FUNCTION: DISPLAY
LOOMI
Note: Wear your Swatch simply
with its band or try „popping“ it
directly onto your clothes.

USER MANUAL
4/6
SHOW ALARM TIME
STOP ALARM
~4 secs.
TOUCH ALARM
Touch your Swatch.
Hands move to show alarm time for approx.
4 seconds.
Touch your Swatch to stop alarm.
ALARM ON/OFF
...CHANGE ON/OFF
SHOW LAST ALARM
...SET NEW ALARM
GO
1. 2.
1. 2.
on
o
on
o
Switch alarm on/o and set alarm time
Press crown and hands go to actual mode
on or o.
Press crown again to change mode.
P ull crown to position 1 and the hands go
to the last alarm time.
To set a new alarm time, turn crown (turn
slowly = minutes, turn quickly = hours).
Then push crown back and hands turn
back to time and alarm mode will be “on”.

USER MANUAL
5/6
~4 secs.
TOUCH GAME
Touch your Swatch.
Hands come together at 12 o‘clock and start
to rotate at least on full turn.
IMPORTANT: If hands are
not exactly at 12 o‘clock, they
have to be readjusted.
Hands stop by accident and show the
result of your game for some seconds...
...then, hands turn back to time.
IMPORTANT: When the hands
do not show correctly ON-
OFF (alarm mode), the Touch
Alarm must be adjusted (e.g.
after battery change or a hard
knock).
ALARM DEMO
2 sec.
Press crown for 2 seconds to start alarm
demo.
To stop, press crown again.

USER MANUAL
6/6
SET
READ
SCUBA FUNCTION: ELAPSED TIME
Using the adjustment ring
For setting the start time and duration of
an activity, line up the marker on the ad-
justment ring with the minute hand. Timing
starts at the time indicated by the marker.
The elapsed time is indicated by the minute
hand pointing the number on the adjust-
ment ring.
IMPORTANT: After being submerged in
salt water, the Scuba 200 Chrono should
always be rinsed with fresh water.
CAUTION: The Irony Scuba 200 Chrono is
not a professional diving watch.
WARNING NOTE

BEDIENUNGSANLEITUNG
LOREM IPSUM
1/6
TOUCH / FUNSTANDARD
ZEIT EINSTELLEN
A: Normalstellung der Krone
C: Position für die Zeiteinstellung
Zum Einstellen der Zeit die Krone in
Stellung C herausziehen und im
Uhrzeigersinn oder Gegenuhrzeigersinn
drehen. Nach erfolgter Einstellung Krone
zurück in Position A drücken.
Einstellen der Zeit
Ziehen Sie die Krone auf Position 2 heraus.
Langsame Drehung: Korrektur Minuten.
Schnelle Drehung: Korrektur Stunden.
Drücken Sie die Krone wieder ganz hinein.
EINSTELLEN
A B C
A B C
BETRIEB
Minuten
1. 2.
Stunden
EINSTELLEN
BETRIEB

BEDIENUNGSANLEITUNG
2/6
TOUCH / FUN
ZEIGERJUSTIERUNG
STANDARD
TAG / DATUM EINSTELLEN
Zum Einstellen des Datums die Krone in
Position B herausziehen und im
Gegenuhrzeigersinn drehen. Zum
Einstellen des Tages die Krone im
Uhrzeigersinn drehen. Nach erfolgter
Einstellung Krone zurück in Position A
drücken.
A B C
A B C
EINSTELLEN
BETRIEB
5 Sek.
TEST / OK
STUNDENZEIGER JUSTIEREN
MINUTENZEIGER JUSTIEREN
BETRIEB
1. 2.
5 Sek.
gedrückt
halten
1. 2.
A
u
f
1
2
s
t
e
l
l
e
n
A
u
f
1
2
s
t
e
l
l
e
n
Test und Initialisieren
Drücken Sie die Krone 5 Sek. lang. Wenn
beide Zeiger exakt auf 12 Uhr gehen, ist
der Test ok. Drücken Sie die Krone erneut
und die Zeiger kehren zur Zeitangabe
zurück.
Wenn die Zeiger nicht exakt auf 12 Uhr
ausgerichtet sind, müssen sie justiert
werden. Ziehen Sie die Krone auf Position
2. Drehen im Uhrzeigersinn richtet den
Stundenzeiger.
Drehen im Gegenuhrzeigersinn richtet den
Minutenzeiger. Drücken Sie danach die
Krone wieder hinein und die Zeiger kehren
zur Zeitangabe zurück.

BEDIENUNGSANLEITUNG
3/6
LOOMI GEHT AN
TIPPEN SIE AUF IHRE SWATCH
BELEUCHTUNG
~4 Sek.
Drücken
POP
TOUCH LOOMI
LOOMI-FUNKTION: ANZEIGE
LOOMI
ANMERKUNG: Tragen Sie Ihre
Swatch einfach mit dem
Armband, oder klemmen Sie
sie direkt an Ihre Bekleidung.

BEDIENUNGSANLEITUNG
4/6
ALARMZEIT ANZEIGEN
ALARM ABSTELLEN
~4 Sek.
TOUCH ALARM
Tippen Sie auf Ihre Swatch.
Zeiger bewegen sich zur eingestellten
Alarmzeit und zeigen diese etwa 4 Sek.
lang an.
Tippen Sie auf Ihre Swatch, um den Alarm
zu stoppen.
Alarm-Modus ein-/ausschalten, Einstellen
der Alarmzeit
Drücken Sie kurz auf die Krone und die
Zeiger gehen auf den aktuellen Modus on
oder o. Drücken Sie die Krone erneut, um
den Modus zu wechseln.
Ziehen Sie die Krone auf Position 1 und
die Zeiger gehen automatisch auf die
zuletzt eingestellte Alarmzeit. Um diese
zu ändern, drehen Sie an der Krone.
(Langsame Drehung: Minuten; schnelle
Drehung: Stunden).

BEDIENUNGSANLEITUNG
5/6
~4 Sek.
TOUCH GAME
Tippen Sie auf Ihre Swatch.
Beide Zeiger gehen auf 12 Uhr und machen
mindestens eine ganze Umdrehung.
WICHTIG: Wenn die Zeiger nicht
exakt auf 12 Uhr ausgerichtet
sind, müssen sie justiert werden.
Zeiger stoppen per Zufall und zeigen
einige Sekunden das Spielresultat…
...und kehren dann wieder zur Zeitangabe
zurück.
WICHTIG: Wenn die Zeiger
nicht genau ON-OFF zeigen
(Alarmmodus), dann muss die
Touch Alarm neu eingestellt
werden (z.B. nach Batterie-
wechsel oder starker Erschüt-
terung).
ALARM-DEMO
2 Sek.
Um die Alarm-Demo zu starten, drücken Sie
2 Sek. lang auf die Krone.
Um sie wieder zu stoppen, drücken Sie die
Krone erneut.
Wenn Sie die Krone wieder hineindrücken,
gehen die Zeiger wieder zurück zur
Zeitanzeige und der Alarm-Modus ist auf
“on“.

BEDIENUNGSANLEITUNG
6/6
EINSTELLEN
ABLESEN
TAUCHFUNKTION: VERGANGENE
ZEIT
Gebrauch des Einstellrings
Zur Einstellung der Startzeit und Dauer
einer Aktivität, den Markierungspunkt des
Einstellrings genau am Minutenzeiger
platzieren. Die Dauer berechnet sich ab
dem Markierungspunkt angegebenen Zeit-
punkt. Die vergangene Zeit wird vom
Minutenzeiger durch Hinweis auf die Zahl
am Einstellring angezeigt.
WICHTIG: Nach einem Aufenthalt im
Salzwasser sollte die Scuba 200 Chrono
stets mit frischem Wasser gespült werden.
ACHTUNG: Die Irony Scuba 200 Chrono
ist keine professionelle Taucheruhr.
WICHTIGER
HINWEIS

MANUEL D’UTILISATEUR
LOREM IPSUM
1/6
TOUCH / FUNSTANDARD
RÉGLAGE DE L‘HEURE
A: Position normale de la couronne
C: Position de réglage de l’heure
Pour régler l’heure, tirer la couronne
jusqu’en position C et la tourner dans le
sens désiré. Terminer en repoussant la
couronne dans la position A.
Mettre à l‘heure
Tirez la couronne en position 2.
Tournez doucement pour corriger les
minutes.
Tournez rapidement pour corriger les
heures. Rentrez la couronne.
RÉGLER
A B C
A B C
TERMINÉ
Minute
1. 2.
Heure
RÉGLER
TERMINÉ

MANUEL D’UTILISATEUR
2/6
TOUCH / FUN
RÉGLAGE
STANDARD
RÉGLAGE DU JOUR / DE LA DATE
Pour régler la date, tirer la couronne
jusqu’en position B et la tourner dans le
sens anti-horaire. Puis dans le sens horaire
pour régler le jour. Terminer en repoussant
la couronne dans la position A.
A B C
A B C
RÉGLER
TERMINÉ
5 s
TEST / OK
AJUSTER L'AIGUILLE/+HEURE
AJUSTER L'AIGUILLE/+MINUTES
TERMINÉ
1. 2.
tirer
dans
les 5 s
1. 2.
A
l
l
e
r
s
u
r
1
2
A
l
l
e
r
s
u
r
1
2
Test et initialisation
Appuyez pendant 5 secondes sur la cou-
ronne. Si les deux aiguilles montrent exac-
tement midi/minuit, le test est en ordre.
Appuyez une nouvelle fois sur la couronne,
les aiguilles achent de nouveau l‘heure.
Si les aiguilles n‘achent pas exactement
midi/minuit, elles doivent être ajustées.
Tirez la couronne en position 2. Tournez-
la dans le sens des aiguilles d‘une montre
pour ajuster l‘aiguille des heures. Tournez-
la dans le sens contraire des aiguilles
d‘une montre pour ajuster l‘aiguille des
minutes. Rentrez ensuite la couronne, les
aiguilles achent de nouveau l‘heure.

MANUEL D’UTILISATEUR
3/6
LA LOOMI S’ALLUME
TAPEZ LÉGÈREMENT SUR VOTRE SWATCH
LUMIÈRE
~4 s
Appuyez
POP
TOUCH LOOMI
FONCTION DE LA LOOMI:
ÉCLAIRAGE
LOOMI
REMARQUE: Portez simple-
ment votre Swatch avec son
bracelet ou xez-la directement
à vos vêtements.

MANUEL D’UTILISATEUR
4/6
AFFICHER L'HEURE DE L'ALARME
ARRÊTER L'ALARME
~4 s
AFFICHER L‘HEURE DE L‘ALARME
Appuyez sur votre Swatch.
Les aiguilles se déplacent pour acher
l‘heure de l‘alarme pendant 4 secondes env.
Appuyez sur votre Swatch pour arrêter
l‘alarme.
Enclencher/Déclencher l‘alarme et mettre
l‘alarme à l‘heure
Appuyez sur la couronne, les aiguilles
passent en mode „on“ ou „o“.
Appuyez une nouvelle fois sur la couronne
pour changer de mode.
Tirez la couronne en position 1, les
aiguilles achent automatiquement la
dernière alarme xée.
Pour dénir une nouvelle alarme, tournez
la couronne (lentement = minutes, vite =
heures).

MANUEL D’UTILISATEUR
5/6
~4 s
JOUER AVEC LA TOUCH
Appuyez sur votre Swatch.
Les aiguilles se déplacent pour acher
midi/minuit et font au moins une fois le tour
du cadran.
IMPORTANT: Si les aiguilles
n‘achent pas exactement midi/
minuit, elles doivent être ajustées.
Les aiguilles s‘arrêtent au hasard et a-
chent le résultat du jeu pendant quelques
secondes…
…puis elles se déplacent pour acher de
nouveau l‘heure.
IMPORTANT: Si les aiguilles
n‘achent pas correctement
ON-OFF (mode alarme), Touch
Alarm doit être réglé une nou-
velle fois (par ex. après avoir
changé la pile ou suite à une
secousse forte).
DÉMONSTRATION DE L'ALARME
2 s
Appuyez sur la couronne pendant 2
secondes pour lancer l‘alarme.
Appuyez une nouvelle fois sur la couronne
pour l‘arrêter.
Lorsque vous rentrez la couronne, les
aiguilles se déplacent pour acher de
nouveau l‘heure et l‘alarme est enclenchée
(mode „on“).

MANUEL D’UTILISATEUR
6/6
RÉGLER
LIRE
FONCTION DE LA SCUBA: TEMPS
ÉCOULÉ
Emploi de la lunette de réglage
Elle sert à indiquer le début et la durée
d’une action. Placer le point de repère de
la lunette exactement en face de l’aiguille
des minutes. La durée est calculée à partir
du temps indiqué par le point de repère. Le
temps écoulé est indiqué par l’aiguille des
minutes pointée sur le chire de la lunette
de réglage.
IMPORTANT: Après une immersion dans
l’eau salée, la Scuba 200 Chrono devrait
toujours être rincée à l’eau douce.
ATTENTION: La Irony Scuba 200 Chrono
n’est pas une montre de plongée
professionnelle.
WARNING NOTE

GEBRUIKERSHANDLEIDING
LOREM IPSUM
1/6
TOUCH / FUNSTANDARD
TIJD INSTELLEN
A: Normale positie van de kroon
C: Positie voor tijdsinstelling
Trek aan de kroon tot deze in positie C
staat en draai met de klok mee of er tege-
nin om de tijd in te stellen. Druk de kroon
terug naar positie A wanneer het instellen
is voltooid.
Trek aan de kroon tot deze in stand 2 staat
om de tijd in te stellen. Draai langzaam
om de minuten te corrigeren. Draai snel
om de uren te corrigeren. Druk de kroon
terug als het instellen is voltooid.
A B C
A B C
INSTELLEN
START
minuten
1. 2.
uren
INSTELLEN
START

GEBRUIKERSHANDLEIDING
2/6
TOUCH / FUN
OPNIEUW INSTELLEN
STANDARD
DAG/DATUM INSTELLEN
Om de datum in te stellen trek je aan de
kroon tot deze in positie B staat en draai
je hem tegen de klok in. Draai de kroon
met de wijzers van de klok mee om de dag
van de maand in te stellen. Eenmaal klaar
met het instellen druk je de verstelknop
terug naar positie A.
A B C
A B C
INSTELLEN
START
5 sec.
TEST / OK
INSTELLEN WIJZER/+UUR
INSTELLEN WIJZER/+MINUTEN
GO
1. 2.
trek
binnen
5 sec.
1. 2.
G
a
n
a
a
r
1
2
G
a
n
a
a
r
1
2
Druk de kroon 5 seconden in. Als beide
wijzers naar 12 uur gaan, is de test ok.
Druk nog een keer op de kroon en de
wijzers gaan terug naar de tijd.
Als de wijzers niet precies op 12 uur
staan, trek je de kroon naar positie 2.
Draai met de klok mee om de uurwijzer in
te stellen. Draai tegen de klok in om de
minutenwijzer in te stellen. Druk de kroon
terug en de wijzers draaien terug om de
tijd weer te geven.

GEBRUIKERSHANDLEIDING
3/6
LOOMI ON
RAAK JE SWATCH AAN
LICHT-FUNCTIE
~4 sec.
Indrukken
POP
TOUCH LOOMI
LOOMI-FUNCTIE: SCHERM
LOOMI
OPMERKING: Draag je Swatch
gewoon in het bandje of wip
hem eruit en bevestig hem aan
je kleren.

GEBRUIKERSHANDLEIDING
4/6
ALARMTIJD BEKIJKEN
ALARM STOPPEN
~4 sec.
TOUCH ALARM
Raak je Swatch aan.
De wijzers geven 4 sec. de alarmtijd aan.
Raak de Swatch aan om het alarm te
stoppen.
ALARM AAN/UIT
…VERANDER AAN/UIT
RECENTE ALARMTIJD BEKIJKEN
…ALARM INSTELLEN
START
1. 2.
1. 2.
aan
u
i
t
aan
u
i
t
Alarm aan of uit zetten en alarmtijd
instellen.
Druk op kroon en de wijzers gaan naar de
huidige stand (aan/uit). Druk nog een keer
op de kroon om de stand te wijzigen.
Trek aan de kroon en stel deze in op positie
1 en de wijzers gaan naar de meest recente
alarmtijd. Draai aan de kroon om een
nieuwe alarmtijd in te stellen (lanzaam
draaien = minuten, snel = uren).
Druk de kroon terug en beide wijzers
draaien naar de huidige tijd en het alarm
staat “aan”.

GEBRUIKERSHANDLEIDING
5/6
~4 sec.
TOUCH GAME
Raak je Swatch aan.
De wijzers komen samen bij 12 uur en rote-
ren minstens één hele draai.
BELANGRIJK: Als de wijzers niet
precies op 12 uur staan, moeten
ze opnieuw worden ingesteld.
„Wijzers stoppen per ongeluk en tonen
de resultaten van je spel gedurende een
paar seconden...
... daarna draaien de wijzers terug naar
de huidige tijd.“
BELANGRIJK: als de wijzers AAN-
UIT niet juist worden weergeven
(alarmstand) moet het Touch
Alarm worden ingesteld (bijv. na
het verwisselen van batterijen of
een harde klap).
ALARM DEMO
2 sec.
Druk de kroon 2 seconden in om de
alarmdemo te starten.
Druk nogmaals op de kroon om te stoppen.

GEBRUIKERSHANDLEIDING
6/6
INSTELLEN
AFLEZEN
SCUBA-FUNCTIE: VERSTREKEN TIJD
De instelring gebruiken
Om de starttijd en de duur van een acti-
viteit in te stellen, breng je de markering op
de instelring op één lijn met de minutenwij-
zer. Het opnemen van de tijd begint op het
tijdstip dat door de markering wordt aange-
geven. De verstreken tijd wordt aangegeven
door de minutenwijzer die naar een num-
mer op de instelring wijst.
BELANGRIJK: Na onderdompeling in zout
water moet de Scuba 200 Chrono altijd
worden afgespoeld met zoet water.
LET OP: De Irony Scuba 200 Chrono is
geen professioneel duikhorloge.
WAARSCHUWING

MANUAL DEL USUARIO
LOREM IPSUM
1/6
TOUCH / FUNSTANDARD
PROGRAMACIÓN DE LA HORA
A: Posición normal de la corona
C: Posición para la puesta en hora
Para poner la hora, extraer la corona a
la posición C y girar en sentido deseado.
Después de haber realizado el ajuste, lle-
var la corona nuevamente a la posición A.
Ajuste de la hora
Extraiga la corona hasta la posición 2.
Giro lento: corrección de minutos.
Giro rápido: corrección de horas.
Vuelva a meter completamente la corona.
A B C
A B C
AJUSTAR
LISTO
Minutos
1. 2.
Horas
AJUSTAR
LISTO

MANUAL DEL USUARIO
2/6
TOUCH / FUN
REAJUSTE
STANDARD
PROGRAMACIÓN DE DÍA / FECHA
Para poner la fecha, extraer la corona a la
posición B y girar en el sentido contrario
de las agujas del reloj. Para poner el día,
girar la corona en sentido de las agujas
del reloj. Después de haber realizado el
ajuste, llevar la corona nuevamente a la
posición A.
A B C
A B C
AJUSTAR
LISTO
5 seg.
PRUEBA / OK
AJUSTAR AGUJA HORAS
AJUSTAR AGUJA MINUTOS
LISTO
1. 2.
Extraer
en menos
de 5 seg.
1. 2.
I
r
a
1
2
I
r
a
1
2
Prueba e inicialización
Apriete la corona durante 5 segundos. Si
ambas manecillas pasan exactamente a
12 horas, el resultado de la prueba es cor-
recto. Al apretar nuevamente la corona,
las manecillas vuelven a la indicación de
la hora.
Si las manecillas no están orientadas
exactamente a 12 horas, deben ser reajus-
tadas. Extraiga la corona hasta la posici-
ón 2. Girando en sentido de las agujas del
reloj orientará el horario, mientras que el
giro en sentido antihorario ajustará el mi-
nutero. Meta luego nuevamente la corona
y las manecillas vuelven a la indicación de
la hora.

MANUAL DEL USUARIO
3/6
LOOMI SE ENCIENDE
GOLPEE LIGERAMENTE SU SWATCH
ILUMINACIÓN
~4 seg.
Apriete
POP
TOUCH LOOMI
FUNCIÓN LOOMI: ENCENDER
LOOMI
NOTA: Lleva tu Swatch simple-
mente con su brazalete o sujé-
tale directamente en tu ropa.

MANUAL DEL USUARIO
4/6
MOSTRAR HORA DE ALARMA
DETENER LA ALARMA
~4 seg.
TOUCH ALARM
Golpee ligeramente en su Swatch.
Las manecillas se desplazan a la hora de
alarma ajustada, enseñándola durante 4
segundos aprox.
Toque su Swatch para detener la alarma.
Conexión/desconexión de alarma y ajuste
de hora de alarma
Apriete brevemente en la corona y las
manecillas pv asan al modo actual „On“ u
„O“. Apriete nuevamente la corona para
cambiar el modo.

MANUAL DEL USUARIO
5/6
~4 seg.
TOUCH GAME
Golpee ligeramente en su Swatch.
Ambas manecillas pasan a 12 horas y reali-
zan al menos un giro completo
IMPORTANTE: Si las manecillas
no están orientadas exactamente
a 12 horas, deben ser reajusta-
das.
Las manecillas se detienen por casuali-
dad, mostrando el resultado de su juego
durante algunos segundos…
...Luego, las manecillas vuelven a mostrar
la hora.
IMPORTANTE: Si las mane-
cillas no señalan claramente
ON-OFF (modo de alarma),
debe ajustarse nuevamente el
Touch Alarm (p. ej. después de
un cambio de pila o sacudidas
fuertas).
DEMOSTRACIÓN DE ALARMA
2 seg.
Para iniciar la demostración de la alarma,
apriete durante 2 segundos la corona.
Para terminarla nuevamente, apriete otra
vez la corona.
Extraiga la corona hasta la posición 1 y las
manecillas pasarán automáticamente a la
última hora de alarma ajustada. Para mo-
dicarla gire la corona. (Giro lento: minu-
tos; giro rápido: horas). Si mete otra vez la
corona, las manecillas vuelven a la indica-
ción de la hora, estando el modo de alarma
en „on“.

MANUAL DEL USUARIO
6/6
ESTABLECER
LEER
FUNCIÓN DE BUCEO:
TIEMPO TRANSCURRIDO
Uso del aro de ajuste (luneta)
Sirve para indicar el comienzo y el nal de
una acción. Posicionar el punto de marca-
ción del aro de ajuste frente al minutero. La
duración es calculada a partir del momento
indicado por el punto de marcación. Alinear
el marcador en el aro de ajuste con el mi-
nutero. El tiempo transcurrido es indicado
por el minutero que señala al aro de ajuste.
IMPORTANTE: Después de haber usado el
Scuba 200 Chrono en agua salada, de-
berà ser aclarado con agua corriente.
ATENCIÓN: El Irony Scuba 200 Chrono no
es ningún reloj de buceo profesional.
ADVERTENCIA

MANUALE UTENTE
LOREM IPSUM
1/6
TOUCH / FUNSTANDARD
IMPOSTAZIONE ORA
A: Posizione normale della corona
C: Posizione per la regolazione dell’ora
Per regolare l’ora, la corona va tirata in
fuori nella posizione C e ruotata in senso
desirato. Quando la regolazione è conclu-
sa riportare nuovamente la corona nella
posizione A.
Impostazione dell’ora
Portare la corona in posizione 2.
Rotazione lenta: correzione dei minuti.
Rotazione rapida: correzione delle ore.
Spingere nuovamente la corona contro la
cassa.
IMPOSTA
A B C
A B C
CONFERMA
Minuti
1. 2.
Ore
IMPOSTA
CONFERMA

MANUALE UTENTE
2/6
TOUCH / FUN
MESSA A PUNTO
STANDARD
IMPOSTAZIONE GIORNO / DATA
Per regolare la data, la corona va tirata in
fuori nella posizione B e ruotata in senso
antiorario. Per regolare il giorno, ruotare la
corona in senso orario. Quando la regola-
zione è conclusa riportare nuovamente la
corona nella posizione A.
A B C
A B C
IMPOSTA
CONFERMA
5 sec.
TEST / OK
REGOLA LANCETTA/+ORE
REGOLA LANCETTA/+MINUTI
CONFERMA
1. 2.
Estrai
entro
5 sec.
1. 2.
V
a
i
s
u
l
1
2
V
a
i
s
u
l
1
2
Test e inizializzazione
Mantenere premuta la corona per 5 se-
condi. Se le due lancette si posiziona-
no esattamente sulle ore 12:00, il test è
andato a buon ne. Premere nuovamente
la corona e le lancette si riposizionano
sull’ora attuale.
Se le lancette non si posizionano esatta-
mente sulle ore 12:00, è necessario re-
golarle manualmente. Portare la corona
in posizione 2, quindi ruotarla in senso
orario per regolare la lancetta delle ore e
ruotarla in senso antiorario per regolare
la lancetta dei minuti. Quindi, spingere
nuovamente la corona contro la cassa e le
lancette si riposizionano sull’ora attuale.

MANUALE UTENTE
3/6
IL LOOMI SI ACCENDE
BATTETE LEGGERMENTE SUL VOSTRO SWATCH
LUCE
~4 sec.
Premere
POP
TOUCH LOOMI
FUNZIONE LOOMI: DISPLAY
LOOMI
NOTA: Portate il Vostro Swatch
semplicemente facendo uso del
cinturino o tentate di pinzarlo
direttamente sui Vostri vestiti.

MANUALE UTENTE
4/6
MOSTRA ORA SVEGLIA
ARRESTA SVEGLIA
~4 sec.
TOUCH ALARM
Toccate il vostro Swatch.
Le lancette si portano sull’ora impostata per
la sveglia e la indicano per circa 4 sec.
Toccate il vostro Swatch per fermare
la sveglia.
SVEGLIA ON/OFF
…CAMBIA ON/OFF
MOSTRA ULTIMA SVEGLIA
….IMPOSTA NUOVA SVEGLIA
CONFERMA
1. 2.
1. 2.
on
o
on
o
Attivazione/disattivazione del modo
Sveglia, impostazione dell’ora per la
sveglia
Premere brevemente sulla corona e le
lancette indicano il modo attuale „on“
oppure „o“. Premere nuovamente la
corona, per cambiare il modo impostato.

MANUALE UTENTE
5/6
~4 sec.
TOUCH GAME
Toccate il vostro Swatch.
Le due lancette si posizionano sulle ore
12:00 e compiono almeno un giro completo.
IMPORTANTE: Se le lancette non
si posizionano esattamente sulle
ore 12:00, è necessario regolarle
manualmente.
Le lancette si fermano a caso ed indicano
per alcuni secondi il risultato del gioco…
...e poi ritornano ad indicare l’ora attuale.
IMPORTANTE: Se le lancette
non indicano correttamente
ON-OFF (modo Sveglia), in
tal caso è necessario regolare
nuovamente il Touch Alarm
(per es. dopo aver sostituito
la pila o in seguito ad un urto
violento).
DEMO SVEGLIA
2 sec.
Per avviare la dimostrazione per la sveglia,
mantenere premuta la corona per 2 sec.
Per fermare la dimostrazione, premere nuo-
vamente la corona.
Portare la corona in posizione 1 e le
lancette si portano automaticamente
sull’ultima ora impostata per la sveglia. Per
cambiare l’impostazione, ruotare la corona
(rotazione lenta per i minuti e rotazione
rapida per le ore). Quando la corona viene
riposizionata contro la cassa, le lancette
si riposizionano sull’ora attuale e il modo
Sveglia è su „on“.

MANUALE UTENTE
6/6
IMPOSTA
LEGGI
FUNZIONE SCUBA:
TEMPO TRASCORSO
Uso della ghiera girevole
Serve per indicare inizio e durata di
un’attività. All’ inizio dell’attività, porre
il contrassegno della ghiera girevole
esattamente di fronte alla lancetta dei
minuti. La durata dell’attività si calcola
a partire dal contrassegno no al
punto indicato dalla lancetta al termine
dell’attività. Il tempo trascorso è indicato
dalla lancetta dei minuti che punta il
numero sulla ghiera girevole.
IMPORTANTE: Dopo un’immersione in
mare, risciacquare lo Scuba 200 Chrono
con acqua dolce.
ATTENZIONE: L’Irony Scuba 200 Chrono
non è un orologio professionale da immer-
sione.
AVVERTENZA

MANUAL DO UTILIZADOR
LOREM IPSUM
1/6
TOUCH / FUNSTANDARD
ACERTAR A HORA
A: Posição normal da coroa
C: Posição para ajustar a hora
Para ajustar a hora, puxar a coroa para a
posição C e girar no sentido dos ponteiros
do relógio ou no sentido contrário. Ao ter-
minar, retorne a coroa para a posição A.
Acertar a hora
Puxe a coroa até à posição 2.
Giro lento: ajuste dos minutos.
Giro rápido: ajuste das horas. Pressione a
coroa colocando-a na posição normal.
AJUSTAR
A B C
A B C
PARTIDA
Minuto
1. 2.
Hora
AJUSTAR
PARTIDA

MANUAL DO UTILIZADOR
2/6
TOUCH / FUN
REAJUSTE
STANDARD
AJUSTE DA DATA/DIA
Para acertar a data puxe a coroa para
a posição B e gire-a no sentido anti-
horário. Para acertar o dia da semana,
gire a coroa no sentido dos ponteiros do
relógio. Ao terminar, retorne a coroa para
a posição A.
A B C
A B C
AJUSTAR
PARTIDA
5 seg.
TESTE / OK
AJUSTE PONTEIRO/+ HORA
ADJUST HAND/+MINUTES
PARTIDA
1. 2.
puxar
dentro
de 5 seg.
1. 2.
I
r
p
a
r
a
1
2
I
r
p
a
r
a
1
2
Teste / Reajuste
Pressione a coroa por 5 segundos. Se os
dois ponteiros indicarem exactamente as
12 horas, o teste foi o.k. Pressione de novo
a coroa e os ponteiros retornarão à indi-
cação das horas.
Se os ponteiros não se posicionarem
exactamente nas 12 horas, deverão ser
ajustados. Puxe a coroa até à posição 2.
Girando no sentido horário ajusta-se o
ponteiro das horas, girando no sentido
anti-horário ajusta-se o ponteiro dos mi-
nutos. Após o reajuste, pressione a coroa
para a posição normal e os ponteiros
retornarão à indicação das horas.

MANUAL DO UTILIZADOR
3/6
LOOMI ACENDE
TOQUE O SEU SWATCH
ILUMINAÇÃO
~4 seg.
Pressione
POP
TOUCH LOOMI
VISOR FUNÇÃO LOOMI
LOOMI
NOTA: Use o seu Swatch sim-
plesmente com a pulseira ou
prenda-o directamente à sua
roupa.

MANUAL DO UTILIZADOR
4/6
MOSTRAR HORA DE ALARME
PARAR ALARME
~4 seg.
TOUCH ALARM
Toque o seu Swatch.
Os ponteiros deslocam-se para a hora de
alarme ajustada para mostrá-la durante 4
segundos.
Toque o seu Swatch para interromper
o alarme.
ALARME LIG/DESL
ALTERAR LIG/DESL
MOSTRAR ÚLTIMO ALARME
DEFINIR NOVO ALARME
PARTIDA
1. 2.
1. 2.
ligad
o
desliga
d
o
ligad
o
desliga
d
o
Desligar/ligar o Alarm Modus, ajuste da
hora de alarme
Pressione brevemente a coroa e os
ponteiros posicionam-se no actual modo
Alarm on ou o. Pressionar de novo a coroa
para mudar o modo.
Puxe a coroa até à posição 1 e os ponteiros
posicionam-se automaticamente no último
ajuste da hora de alarme. A m de mudar
a hora de alarme, gire a coroa (giro lento:
minutos; giro rápido: horas). Ao empurrar
de novo a coroa para a sua posição
normal, os ponteiros retornarão à indicação
da hora e o modo Alarm estará em „on“.

MANUAL DO UTILIZADOR
5/6
~4 seg.
JOGO TÁCTIL
Toque o seu Swatch.
Os dois ponteiros deslocam-se para
as 12 horas e efectuam, no mínimo, um
giro inteiro.
IMPORTANTE: Se os ponteiros
não se posicionarem exacta-
mente nas 12 horas, deverão ser
ajustados.
Os ponteiros param ao acaso e
mostram o resultado do jogo durante
alguns segundos...
...retornando depois à indicação das
horas.
IMPORTANTE: Se os ponteiros
não indicarem correctamente
ON-OFF (modo alarme), o
Touch Alarm deve ser ajustado
novamente (p.ex. após uma
substituição de pilha ou um
golpe forte).
ALARM DEMO
2 seg.
Para dar partida ao Alarm Demo,
pressione a coroa durante 2 segundos.
A m de interrompê-lo, pressione de novo
a coroa.

MANUAL DO UTILIZADOR
6/6
AJUSTAR
LER
FUNÇÃO SCUBA: TEMPO
DECORRIDO
Uso da catraca (luneta)
A luneta serve para indicar o começo e a
duração de uma acção. Posicionar o pon-
to de marcação exactamente em frente
do ponteiro dos minutos. A duração será
contada a partir do momento indicado do
ponto de marcação. O tempo decorrido é
indicado pelo ponteiro de minutos a partir
do marcador sobre o anel de ajuste.
IMPORTANTE: Depois de cada permanên-
cia na água salgada deve-se enxaguar
sempre o Scuba 200 Chrono em água
limpa.
CUIDADO: O Irony Scuba 200 Chrono não
é um relógio prossional de mergulho.
NOTA DE AVISO
Produkt Specifikationer
Mærke: | Swatch |
Kategori: | Ur |
Model: | Matita SUOB726 |
Har du brug for hjælp?
Hvis du har brug for hjælp til Swatch Matita SUOB726 stil et spørgsmål nedenfor, og andre brugere vil svare dig
Ur Swatch Manualer
24 Juni 2025
24 Juni 2025
23 Juni 2025
23 Juni 2025
22 Juni 2025
22 Juni 2025
22 Juni 2025
22 Juni 2025
22 Juni 2025
22 Juni 2025
Ur Manualer
- Withings
- Naviforce
- Elro
- Kalenji
- Festina
- ELYSEE
- Longines
- TFA
- Miyota
- Emporio Armani
- AKAI
- Michael Kors
- Lacoste
- Nedis
- Lorus
Nyeste Ur Manualer
28 Juli 2025
28 Juli 2025
28 Juli 2025
27 Juli 2025
27 Juli 2025
27 Juli 2025
27 Juli 2025
27 Juli 2025
27 Juli 2025
27 Juli 2025