TomTom Start² Manual

TomTom Navigator Start²

Læs gratis den danske manual til TomTom Start² (38 sider) i kategorien Navigator. Denne vejledning er vurderet som hjælpsom af 72 personer og har en gennemsnitlig bedømmelse på 4.4 stjerner ud af 36.5 anmeldelser. Har du et spørgsmål om TomTom Start², eller vil du spørge andre brugere om produktet?

Side 1/38
TomTom Start
Getting started1.
2
Getting started
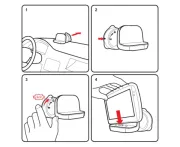
Mounting your navigation device
1. Push the EasyPort™ Mount on your TomTom Start against the windscreen
in your car.
2. Adjust the angle of your device.
3. Lock the EasyPort Mount by twisting the base.
4. Insert the Car Charger into your device.
5. Insert the Car Charger into the cigarette lighter in your car.
6. Switch your device on by pressing the On/Off button on the back of your
device.
7. You now have to answer some questions to set up your device. Tap the
screen to answer the questions.
1 2
34
5 6
3
8. To remove the Mount from your windscreen, first unlock the EasyPort
Mount, then gently pull one of the tabs. The Mount comes away from the
windscreen.
GPS reception
When you first start your TomTom Start navigation device, the device may
need a few minutes to determine your GPS position and show your current
position on the map. In future, your position will be found much faster, usually
within a few seconds.
To ensure good GPS reception, you should use your device outdoors. Large
objects such as tall buildings can sometimes interfere with reception.
Changeable covers
You can personalise your TomTom Start by changing the covers. Go to tom-
tom.com/startskins to check which covers are available.
To remove the cover from the device, first remove the mount. Then hold either
side of the cover and push through the centre of the cover to detach the device
from the cover as shown in the diagram.
Troubleshooting
In rare cases, your TomTom Start navigation device may not start correctly or
may stop responding to your taps.
First, check that the battery is properly charged. To charge the battery, con-
nect your device to the car charger.
If this does not solve the problem, you can reset the device. To do this, do the
following.
1. Remove the Mount from the device by pressing the release button on the
Mount.
7 8
4
2. Pull the back cover off the device by holding either side of the cover and
pushing the device through the centre of the cover.
3. Use a straightened paper clip, or something similar, to push the reset but-
ton. The reset button is on the bottom of your device.
12 3
Driving View2.
5
Driving View The Driving View shows your current location on the map together with
detailed information such as current speed and route instructions.
Tap the centre of the screen at any time to open the Main Menu.
AYour current position.
BThe name of the next major road or road sign information, if applicable.
CYour speed and the speed limit, if known.
Tap this panel on the status bar to adjust the volume.
When the volume control is displayed, the next route instruction is spoken.
This is a useful way to hear and adjust the current volume level.
DNext route instruction.
Tap this panel on the status bar to switch between 2D and 3D views of the
Driving View.
EThe name of the street you are on.
FInformation about your journey: journey time, remaining distance and
arrival time.
Tap this panel on the status bar to see a route summary.
7
Night /Day
Options
Help
sound
Tap this button to turn the sound on.
night
Tap this button to set the night colour scheme, which reduces the bright-
ness of the screen and shows the map using dark colours.
This is useful when driving at night or in dark environments such as long
tunnels.
day
Tap this button to set the day colour scheme, which increases the bright-
ness of the screen and shows the map using bright colours.
options
Tap this button to adjust the settings for your device.
For more information, see the chapters Options and Advanced settings.
help
Tap this button to see the contact details and plan a route to an emergency
services centre or another specialist service such as a veterinary service.
For more information, see the chapter Help.
Browse Map4.
8
Browse Map To look at the map in the same way as you might look at a traditional paper
map, tap Browse map in the Main Menu.
You can use your finger to move the map by touching the screen and sliding
your finger across the screen.
AThe scale bar
BMarker
Markers point to your current location, your home location and your desti-
nation. The marker shows the distance to the location.
Tap a marker to centre the map on the location pointed to by the marker.
CGPS button
Tap this button to centre the map on your current position.
DThe POI button
Tap this button to select which POIs are shown.
EThe cursor
FThe Find button
Tap this button to find specific addresses.
GThe Cursor button
Tap this button to plan a route to the cursor position, create a Favourite at
the cursor position or find a Point of Interest near to the cursor position.
HThe zoom bar
9
Zoom in and out by moving the slider.
11
6. Tap Done.
Your navigation device is ready to guide you to your destination.
13
Recalculate
original
Tap this button to return to the original route without deviations to avoid
roadblocks or travelling via particular locations.
Travel via...
Tap this button to change your route so that it passes a particular location,
perhaps to pick someone up on the way. When you do this, a marker is
shown on the map for the location you choose the travel via.
You choose the location you want to pass in the same way as you choose a
destination. So you can select from all the same options: for example,
Address, Favourite, Point of Interest and Point on map.
Your Start will calculate a new route to your destination that passes the
location you chose. Unlike your final destination, your Start does not
inform you when you pass by this location.
Plan route
Tap this button to plan a new route. When you plan a new route, the old
one will be deleted.
Clear route
Tap this button to delete the current route.
Options7.
14
Options You can change the way your TomTom Start looks and behaves.
Tap Options in the Main Menu.
Change voice
Set clock
Change language
Home and Favourites
Change voice
Your navigation device gives spoken warnings and instructions using
voices which have been recorded by actors.
To select a different voice on your device, tap Change voice in the Options
menu or in the Voices and images menu. Then select a voice from the list.
You can add and remove voices using TomTom HOME.
Set clock
Tap this button to select the time format and to set the time.
The easiest way to set the time is by tapping the Sync button. Your Start
will then take the time from GPS information.
Note Sync
Sync
Change
language
Tap this button to change the language used for all the buttons and mes-
sages you see on your Start.
You can choose from a wide range of languages. When you change the lan-
guage, you are also given the opportunity to change the voice.
Home and
Favourites
Tap this button to manage your Home and Favourite locations.
For more information, see the chapter Favourites.
15
Voices and images
Map corrections
Advanced settings
To change the advanced settings on your TomTom Start, tap the Advanced
button in the Options menu.
Set units
Operate left-handed / Operate right handed
Keyboard preferences
Voices and
images
Tap this button to change your settings for voices and images.
For more information, see the chapter Voices and images.
Map
corrections
Tap this button to make a correction to your map.
You can download map corrections made by other TomTom users or
restrict your updates to corrections that have been verified by TomTom.
Set units
Tap this button to set the units used for the following measurements:
• Distance
• Time
Latitude and longitude
Operate left-
handed
Tap this button to move important buttons, for example, the Done and Can-
cel buttons as well as the zoom bar, to the left hand side of the screen. This
makes it easier to tap the buttons with your left hand without blocking the
screen.
To move the buttons back to the right hand side of the screen, tap Operate
right-handed.
Keyboard
preferences
You use the keyboard to enter your destination or to find an item in a list,
such as a POI.
Tap this button to select the size of the keys on the keyboard and the key-
board layout. You can select from two sizes:
Large keyboard
Small keyboard
Several keyboard layouts are available:
ABCD keyboard
QWERTY keyboard
AZERTY keyboard
16
Enable/Disable Safety Alerts
TomTom Safety Alerts
Important: Regularly connect your navigation device to TomTom HOME to
update the list of locations for all types of safety alerts. The locations of mobile
cameras are sent directly to your device.
When a safety camera location is shown on the map, a warning sound is
played to warn you that you are approaching an area where a safety camera
is located.
Switch map
Reset factory settings
Enable/
Disable Safety
Alerts
Tap this button to enable or disable TomTom Safety Alerts.
Switch map
Tap this button to change the map you are using.
Reset factory
settings
Tap this button to restore the factory settings to your TomTom Start.
All your settings, including your Home location and any Favourites, are
deleted.
Favourites8.
17
Favourites
What are Favourites?
Favourites are places that you often visit. You can create Favourites so that
you don’t have to enter the address every time you plan a route.
They don’t have to be places you especially like, just useful addresses.
How can I create a Favourite?
From the Main Menu, tap Options followed by Home and Favourites and then
tap Add Favourite.
You can then select the location of the Favourite from the list below.
You can type your own name for the Favourite when the keyboard is shown.
To enter the name, there’s no need to delete the suggested name, just start
typing.
Home
You can set your Home location as a Favourite.
Favourite
You cannot create a Favourite from another Favourite. This option will
always be unavailable in this menu.
To rename a Favourite, tap Home and Favourites then Manage Favourites
in the Options menu.
Address
You can specify an address to be a Favourite.
Recent
destination
Select a Favourite location from a list of places you have recently used as
destinations.
18
How can I use a Favourite?
You will normally use a Favourite to plan a route somewhere without having
to enter the address. To plan a route to a Favourite location, do the following:
1. Tap the screen to bring up the Main Menu.
2. Tap Plan route.
3. For this example, tap Yes when asked about leaving from where you are.
4. Tap Favourite.
5. Select a Favourite from the list as your destination.
6. Tap Now.
If your current location is unknown, you are asked if you want to wait until
the location is known or if you want to plan a route using your last known
position. For this example, select and tap Plan using last know position
Done.
The route is planned and a summary of the route is shown.
7. Tap Done.
Your navigation device is ready to guide you to your destination.
Point of
Interest
You can add a Point of Interest (POI) as a Favourite.
Does it make sense to do this?
If you visit a POI you particularly like, for example a restaurant, you can add
it as a Favourite.
To add a POI as a Favourite, tap this button, then do the following:
1. Narrow your choice of POIs by selecting the area where the POI is.
You can select one of these options:
POI near you - to search from a list of POIs near your current position.
POI in city - to choose a POI in a particular town or city. You have to
specify a town or city.
POI near Home - to search from a list of POIs near your Home loca-
tion.
If you are currently navigating to a destination, you can also select from
a list of POIs which are on your route or near your destination. Choose
one of these options:
POI along route
POI near destination
2. Select the category of POI.
Tap the category of POI if it is shown or tap the arrow to choose from
the complete list.
Tap Any POI category to search for a POI by name.
Point on map
Tap this button to create a Favourite using the map browser.
Select the location of the Favourite using the cursor, then tap Done.
Points of Interest9.
20
Points of Interest Points of Interest or POIs are useful places on the map. Here are some exam-
ples:
• Restaurants
• Hotels
• Museums
Parking garages
Petrol stations
Note Map corrections
Navigating to a POI
You can use a POI as your destination. For example, if you are travelling to an
unfamiliar city, you could choose a POI to help find a parking garage.
1. Tap the screen to bring up the Main Menu.
2. Tap Plan route in the Main Menu.
3. Tap Yes when asked if you want to leave from where you are.
4. Tap Point of Interest.
5. Narrow your choice of POIs by selecting the area where the POI is located.
You can select one of these options:
POI near you - to choose from a list of POIs near to your current location.
POI in city - to find a POI in a particular town or city.
POI near Home - to choose from a list of POIs near to your Home location.
You can select from a list of POIs which are along your route or close to your
destination. Choose from one of these options:
POI along route
POI near destination
Note
6. Type the name of the town you want to visit and select the town when it
appears in the list.
21
7. Select the category of POI or if you selected to POI in city then type the
name of the city.
Tap the category of POI. Some categories are not available depending on
the stage of planning.
Tap the arrow to choose from the complete list of categories. Select the cat-
egory from the list or start to type the name of the category and select it
when it appears in the list.
8. Tap Parking garage.
9. From the list of POIs shown, select the POI you want to navigate to.
The table below explains the distances listed next to each POI.
If you know the name of the POI, tap Find and type the name. Select it from
the list when it is shown.
The next screen shows more detailed information including the location of
the POI on the map and the phone number of the POI, if available.
Tap Select to confirm you want to plan a route to this POI.
Once you have selected a POI, the route to the POI is calculated by your
TomTom Start.
POI near you Distance from your current location
POI in city Distance from the city centre
POI near Home Distance from your Home location
POI along
route
Distance from a location on your route
POI near desti-
nation
Distance from your destination
Voices and images10.
22
Voices and images
Voices
Your navigation device has different voices which have been recorded by
actors. These voices are used in the following ways:
Spoken instructions
• Warnings
Volume control
You can control the volume on your navigation device in two ways:
To adjust the volume level, tap the left-hand section of the status bar in the
Driving View.
The last spoken instruction is repeated and the volume level is shown.
Move the volume slider to adjust the volume.
To turn the sound on or off, tap volume in the Main Menu.
Set day colour scheme
Set night colour scheme
Change car symbol
Set day colour
scheme
Tap day in the Main Menu to start using these colours.
You can also download additional colour schemes using TomTom HOME.
Set night
colour scheme
Tap night in the Main Menu to start using these colours.
You can also download additional colour schemes using TomTom HOME.
Change car
symbol
Tap this button to select the car symbol that shows your current position in
the Driving View.
You can download additional car symbols using TomTom HOME.
23
Change voice
Change start-up image
Change shutdown image
Change voice
Your navigation device gives spoken warnings and instructions using
voices which have been recorded by actors.
To select a different voice on your device, tap Change voice in the Options
menu or in the Voices and images menu. Then select a voice from the list.
You can add and remove voices using TomTom HOME.
Change start-
up image
Tap this button to select the start-up image which is shown every time you
switch on the device.
You can download additional start-up images using TomTom HOME.
Change
shutdown
image
Tap this button to select the shutdown image which is shown every time
you switch off the device.
You can download additional shutdown images using TomTom HOME.


Produkt Specifikationer

Mærke: TomTom
Kategori: Navigator
Model: Start²
Bredde: 94 mm
Dybde: 20 mm
Højde: 81 mm
Vægt: 125 g
Produktfarve: Sort
Skærm diagonal: 3.5 "
Skærmopløsning: 320 x 240 pixel
Berøringsskærm: Ja
Kompatible hukommelseskort: Ikke understøttet
Bluetooth: Ingen
Formfaktor: Håndholdt / Fastsat
Naturligt aspektforhold: 4:3
Indbyggede højttaler(e): Ja
Hurtig start guide: Ja
Kabler inkluderet: USB
Strømkilde type: Battery, Cigar lighter
Indbygget kamera: Ingen
Batterilevetid (maks.): 2 t
Understøttede radiobånd: Ikke understøttet
Antenne: Intern
Intern lagerkapacitet: 2 GB
Marine (kortplottere, ekkolod): Ingen
Sport (fitness, løb): Ingen
Udendørs (vandring, trekking): Ingen
Geocaching (GPS stash hunt): Ingen
Automatisk: Ja
Luftfart: Ingen
Lastbil: Ingen
Golf: Ingen
Traffic Message Channel (TMC): Ingen
Live service: Ingen
Kort inkluderet: Ja
Kort dækning: Central Europe, Western Europe
Widescreen: Ja
Opbevaringsmedietype: Flash
Avanceret vognbaneskift: Ja
IQ Routes-teknologi: Ja
Hjælp mig! Nødsituation menu: Ja
Plug & Go: Ja
QuickGPSfix: Ja
Map-Share-teknologi: Ja

Har du brug for hjælp?

Hvis du har brug for hjælp til TomTom Start² stil et spørgsmål nedenfor, og andre brugere vil svare dig


Navigator TomTom Manualer
TomTom

TomTom Eclipse Manual

29 December 2024
TomTom

TomTom VIA 1510 Manual

14 Oktober 2024
TomTom

TomTom GO 7000 Manual

12 Oktober 2024
TomTom

TomTom Start 20 Manual

7 Oktober 2024
TomTom

TomTom GO 700 Manual

4 Oktober 2024
TomTom

TomTom Via 110 Manual

2 Oktober 2024
TomTom

TomTom Navigator 3 Manual

10 September 2024
TomTom

TomTom GO 500 Manual

9 September 2024

Navigator Manualer

Nyeste Navigator Manualer