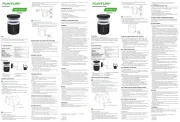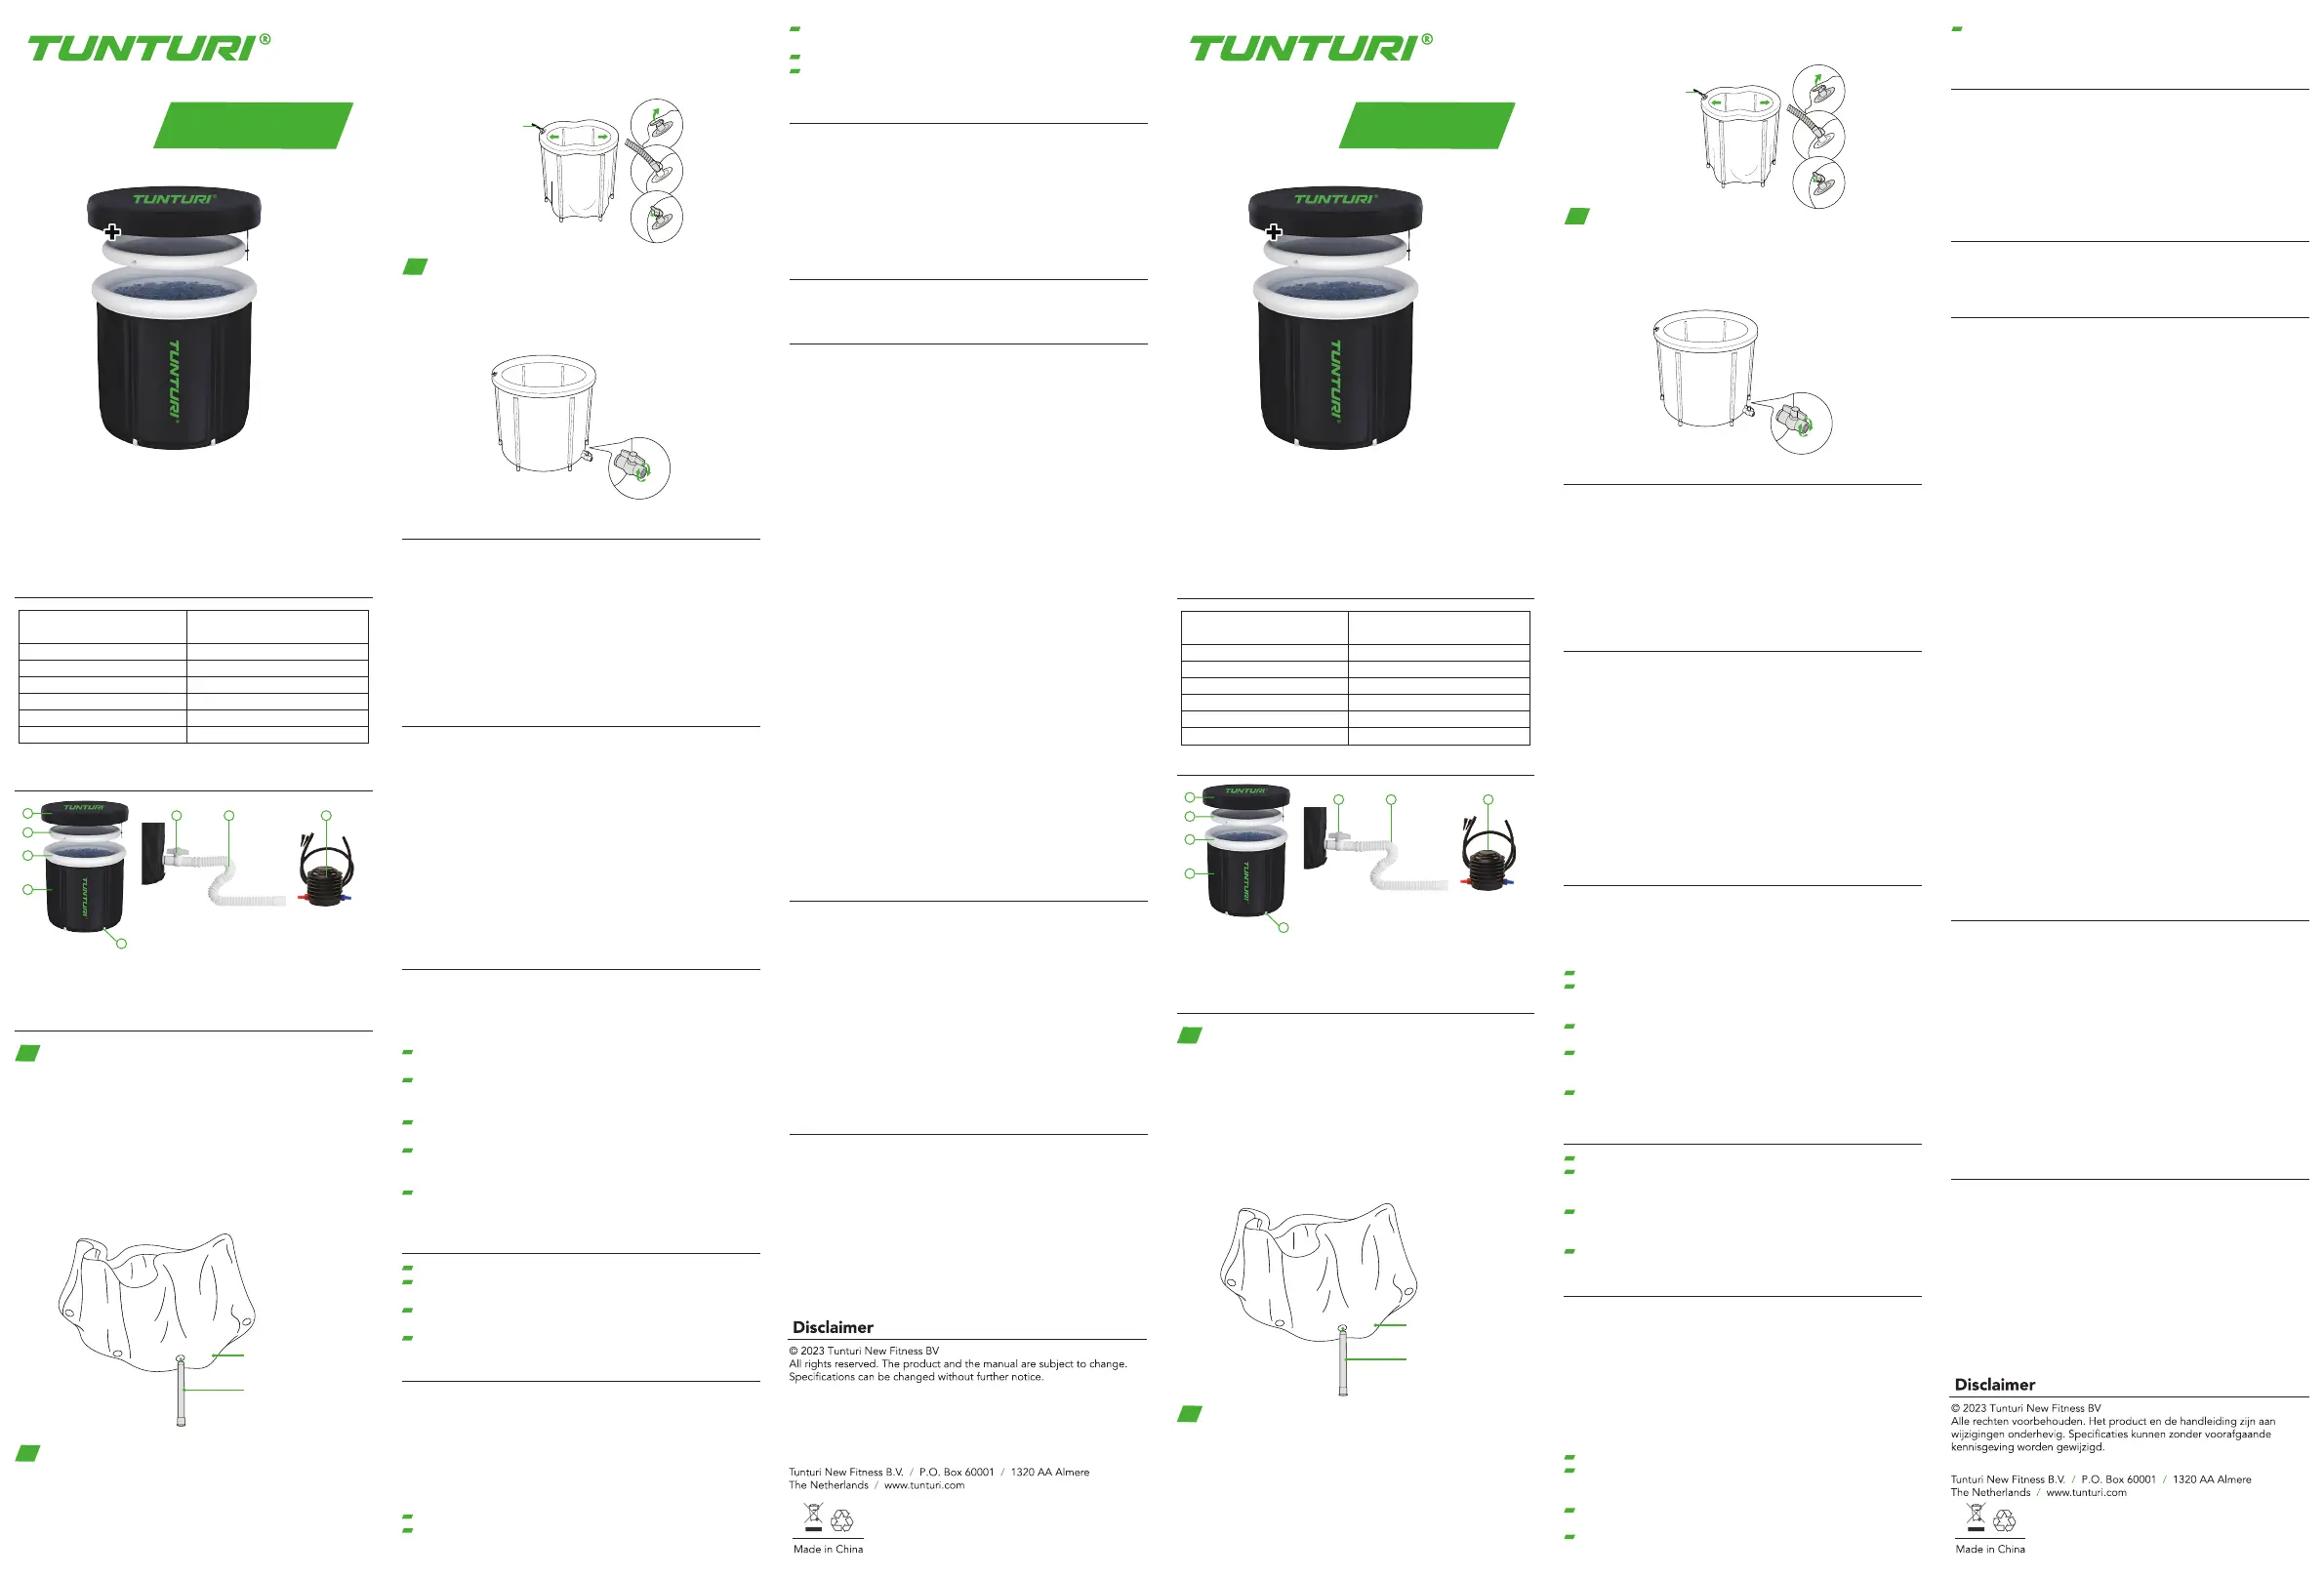
1
2
4
5
3
7 8 6
IB30 IJSBAD, POD
14TUSRP001
Note:
Adult setup is required.
Properly dispose of all packaging especially plastic bags, which can
present suffocation hazard to small children, before setup.
Please read the instructions carefully before using the Ice Bath, Pod.
Product specifications
Weight:
Material:
Max filing:
Max user length:
Maximum temperature:
Lowest temperature:
75 x 75 x 75 cm
29.5 x 29.5 x 29.5 inch
3710 g | 8.17 lb
PVC
330L water
210 cm | 6 ft 11
50 degrees
minus 25 degrees
Dimensions (LWH):
USER MANUAL
1. Pod
2. Inflatable thermo lid
3. All weather cover
4. Inflatable top ring
5. 6x removable support legs
6. Foot pump
7. Quick release tap
8. Drain hose
Product parts
1. Gather the ice tub and six support legs.
2. Locate the holes for the support legs, near the bottom edge of
the tub.
3. Insert a support leg through each hole. See Figure 1.
a. Insert the round tip first and make sure the flat part of the feet is
sticking out.
4. Make sure to do step 3 for all 6 legs.
5. Set the tub upright. Pull the legs apart, so the bottom of the tub
is flat on the ground.
6. Pull out the valve of the inflatable top ring so that is is ready for
inflation in the next step.
5 MINUTE SETUP GUIDE
Unfold the tub and insert the legs
1
We recommend storing the tub if you won't be using it for a long
time.
Store indoors, in a cool, dry location.
Do not store in direct sunlight, in a high-temperature or high-
moisture environment, or near heat sources.
REPAIRING THE TUB
Self-adhesive repair patches are included in case your tub gets
punctured, torn, or begins to leak.
To repair the tub:
1. Drain and wash the tub.
2. Allow the tub to completely dry.
3. Remove the backing from a repair patch.
4. Press the patch firmly to the punctured or torn area for at least
two minutes.
WARNING: DROWNING HAZARD
Never leave children or vulnerable adults unattended near the tub.
Children and vulnerable adults must be supervised at all times.
WARNING
To reduce the risk of serious injury or death:
1. Never use for longer than 10-15 minutes to avoid hypothermia.
2. Get out of the tub and move to a warm location at the first sign of
discomfort or if you experience any of the following symptoms,
shivering or shaking, rapid breathing, clumsiness or lack of
coordination, difficulty concentrating, sleepiness, pale skin color, or
sense of discomfort of pain. Drink a warm beverage and wrap
yourself in a blanket. Seek medical attention if your symptoms
worsen or do not improve. Consult with your physician before
using the product again.
3. If someone in your household experiences any of the following
symptoms from moderate to severe hypothermia, help them exit the
tub and move to a warm location if safe to do so: slurred speech,
confusion, body temperature below 96 °F, dilated pupils, slow
shallow breathing, absence of shivering/shaking, drowsiness or
fatigue, slow reflexes, or loss of consciousness. Hypothermia is a
medical emergency, seek immediate medical attention.
4. Do not place electrical appliances, such as a computer, radio, TV,
or phone, within 6 feet of the tub to avoid the risk of electric shock,
injury, or death.
5. Do not use during severe weather conditions, such as electrical
storms or high winds.
6. Keep away from heat and open flames; the material will burn or
melt when in contact with open flames or heat.
7. Do not sit or stand on the edge of the tub.
8. Never jump or dive into or out of the tub.
9. Use the product only on a flat, sturdy, non-slip surface.
10. Do not use on hills, slopes, or near stairs or bodies of water.
11. Drink plenty of liquids before and after use to avoid dehydration.
12. Stop using the product immediately if you feel pain or discomfort.
13. This product is for adult use only. Keep children, pets, and
vulnerable adults away from the product at all times.
14. Never leave children, pets, and vulnerable adults unattended near
the product.
15. This product is not intended for use by people with reduced
physical, sensory, or mental capabilities unless supervised by a
responsible adult.
CAUTION
To reduce the risk of minor or moderate injury, or damage to the
product or property:
1. Always inspect the product for damage, wear and tear. Check the
drain pipe and drain stopper to ensure they are both securely closed.
Do not use if damaged, worn, malfunctioning, or missing parts. Do
not use the product again until the problem has been fixed.
2. Do not allow more than one person to use the product at a time.
3. Only inflate the headrest with the included air pump, or another
low-pressure device designed to inflate air beds and inflatables. Do
not use an air compressor, shop vacuum, vacuum cleaner, or
compressed air to inflate, as this could cause the headrest to burst
which may result in injury.
4. Do not fill the headrest with water or other liquids. Fill with cold air
only; do not fill with hot air.
NOTICE
1. The product is intended for in-home use only. Do not use the
product in any commercial, rental, institutional, or therapeutic setting.
2. Dispose of the product and all parts according to local and federal
regulations.
3. Prolonged exposure to sunlight can damage or degrade the
product.
4. Keep sharp objects away to avoid damaging the product.
5. Remove all items, especially sharp objects, from your hands and
pockets before using.
6. Do not wear jewelry, belts, or other accessories that could
puncture the product.
7. Do not wear jewelry that could become tarnished.
1. Locate the foot pump.
2. Locate the air-valve on the rop ring.
3. Pull the tab on the stopper to open the air valve and insert the
air pump nozzle. See Figure 2.
4. Hold the air valve firmly around the nozzle to keep air from
escaping as you inflate the top ring.
Inflate the top ring
2
BEFORE USING THE TUB FOR THE FIRST TIME
1. Wash the inside of the tub with warm, soapy water. Rinse the tub
thorougly and wipe it down with a clean, cry cloth.
2. Then, add water to the tub using a hose or a bucket.
a. We recommend filling the tub about halfway full and adjusting
the water level a little at a time if needed.
b. Never fill the tub more than 2/3 of the way full. Your body will
displace the water when you get in, which can cause the tub to
overflow if it's too full.
c. It will take about 25 minutes to fill the tub, but this depends on
the filling method.
1. Locate the quick release tap and drain on the tub.
2. Rotate the quick release tap couterclockwise to tighten it and to
prevent leaks.
It should be hand-tight, so stop tightening when you start to feel
resistance. Do not overtighten as this can damage your ice tub.
Tighten the drain
3
DRAINING THE TUB
1. Locate the included drain hose.
2. Pull the ends of the drain hose apart to extend it.
3. Slide the end of the drain hose over the tap.
4. Direct the other end of the drain hose to a suitable drainage
location, such as a nearby sink, bathtub, or a suitable area of your
yard if your ice tub is set up outside.
5. Open the drain pipe by turning the handle counterclockwise one
¼ turn, until it is in line with the drain pipe. See Figure 3.
a. Please note, the drain hose is not pictured in Figure 3. Always
be sure to attach the drain hose to the drain pipe before
draining the ice tub.
b. It will take about 20 minutes to drain the tub.
6. When the water is completely drained, always remember to close
the drain pipe by turning the knob clockwise.
CLEANING THE TUB
1. Drain the tub.
2. Wash the inside of the tub with warm water and mild soap.
3. Rinse the tub thoroughly and allow it to completely dry before
using it again, or folding and storing it.
NOTES :
We recommend washing the tub once a week with mild soap
and water.
Regularly clean your ice tub to prevent bacteria growth and
deterioration of the tub materials. Regularly cleaning your tub
also helps keep the water hygienic.
Do NOT use harsh detergents or abrasive, corrosive, solvent, or
chemical cleaners.
Do NOT add chlorine or bromine to the water as they will damage
or degrade the tub. Use of such chemicals is forbidden and will
void your warranty.
Be sure to regularly clean the drain pipe, drain hose, and other
accessories with mild soap and water.
5. When fully inflated, the top ring will be firm and have no creases.
Be carefull not to overinflate it.
6. Reinsert the stopper to close the air valve. Press the air valve
gentle into the ring.
7. Please do the same stept for the inflatable thermo lid.
KEEPING YOUR ICE TUB WATER CLEAN
Shower or bathe with soap and water before each use.
Always cover the tub with the all-weather lid when not in use to
keep your water clean and keep out bugs, dirt, and debris.
If using your tub outdoors, make sure to wear shoes on your walk
to the ice tub, or carefully rinse your feet before getting in.
Do not add soap, oil, bath salts, or other products to the water.
STORING THE TUB
1. Deflate the top ring and tuck it inside the tub.
2. Remove the support legs and set them aside.
3. Lay the tub flat on the ground and fold the bottom edge of the
tub up.
4. Fold each side of the tub towards the center. Fold the tub in half,
left to right. Then fold in half top to bottom.
5. Store the folded tub and all accessories together in the included box.
NOTES :
We recommend thoroughly washing the tub before storing it.
Always make sure the tub is completely dry before storing. If the
tub is damp when stored, mildew can grow.
14TUSRP001
Opmerking:
Volwassenen moeten de installatie uitvoeren.
Zorg ervoor dat al het verpakkingsmateriaal, vooral plastic zakken die
een verstikkingsgevaar voor kleine kinderen kunnen vormen, op de
juiste manier wordt weggegooid voordat de installatie wordt uitgevoerd.
Productspecificaties
Gewicht:
Materiaal:
Maximale vulling:
Maximale gebruikerslengte:
Maximale temperatuur:
Laagste temperatuur:
75 x 75 x 75 cm
29.5 x 29.5 x 29.5 inch
3710 g | 8.17 lb
PVC
330L water
210 cm | 6 ft 11
50 graden
min 25 graden
Afmetingen (LxBxH):
1. Pod
2. Opblaasbaar thermodeksel
3. All-weather hoes
4. Opblaasbare bovenste ring
5. 6x verwijderbare ondersteuningspoten
6. Voetpomp
7. Snelsluitende kraan
8. Afvoerslang
Onderdelen van het product
1. Verzamel het ijsbad en zes ondersteuningspoten.
2. Zoek de gaten voor de ondersteuningspoten, vlakbij de onderste
rand van het bad.
3. Steek een ondersteuningspoot door elk gat. Zie Figuur 1.
a. Steek eerst de ronde punt in en zorg ervoor dat het platte deel
van de voeten naar buiten steekt.
4. Zorg ervoor dat je stap 3 voor alle 6 poten uitvoert.
5. Zet het bad rechtop. Trek de poten uit elkaar, zodat de onderkant
van het bad plat op de grond ligt.
6. Trek het ventiel van de opblaasbare bovenste ring uit, zodat het
klaar is voor inflatie in de volgende stap.
INSTALLATIEGIDS VAN 5 MINUTEN
Vouw het bad uit en plaats de poten
1
Bewaar niet in direct zonlicht, in een omgeving met hoge
temperaturen of hoge vochtigheid, of in de buurt van
warmtebronnen.
HET REPAREREN VAN HET BAD
Zelfklevende reparatiepleisters zijn inbegrepen voor het geval dat uw
bad doorboord, gescheurd raakt of begint te lekken.
Om het bad te repareren :
1. Laat het bad leeglopen en maak deze schoon.
2. Laat het bad volledig drogen.
3. Verwijder de bescherming van een reparatiepleister.
4. Druk de pleister stevig op het doorboorde of gescheurde gebied
gedurende minstens twee minuten.
WAARSCHUWING: VERDRINKINGSGEVAAR
Laat kinderen of kwetsbare volwassenen nooit onbeheerd achter bij
het bad. Kinderen en kwetsbare volwassenen moeten te allen tijde
worden begeleid.
WAARSCHUWING
Om het risico op ernstig letsel of overlijden te verminderen:
1. Gebruik nooit langer dan 10-15 minuten om onderkoeling te
voorkomen.
2. Verlaat het bad en verplaats naar een warme locatie bij het eerste
teken van ongemak of als u een van de volgende symptomen ervaart:
rillen of schudden, snelle ademhaling, onhandigheid of gebrek aan
coördinatie, moeite met concentreren, slaperigheid, bleke huidskleur,
of gevoel van ongemak of pijn. Drink een warme drank en wikkel uzelf
in een deken. Zoek medische hulp als uw symptomen verergeren of
niet verbeteren. Raadpleeg uw arts voordat u het product opnieuw
gebruikt.
3. Als iemand in uw huishouden een van de volgende symptomen van
matige tot ernstige onderkoeling ervaart, help hen dan het bad te
verlaten en naar een warme locatie te gaan indien veilig: onduidelijke
spraak, verwarring, lichaamstemperatuur onder de 96 °F, verwijde
pupillen, langzame oppervlakkige ademhaling, afwezigheid van
rillen/schudden, slaperigheid of vermoeidheid, trage reflexen,
of bewusteloosheid. Onderkoeling is een medisch noodgeval,
zoek onmiddellijk medische hulp.
4. Plaats geen elektrische apparaten, zoals een computer, radio, tv of
telefoon, binnen 1,8 meter van het bad om het risico op elektrische
schokken, letsel of overlijden te vermijden.
5. Gebruik niet tijdens ernstige weersomstandigheden, zoals
elektrische stormen of harde wind.
6. Houd het product uit de buurt van warmte en open vuur; het
materiaal zal branden of smelten bij contact met open vuur of hitte.
7. Zit of sta niet op de rand van het bad.
8. Spring of duik nooit in of uit het bad.
9. Gebruik het product alleen op een vlakke, stevige, antislip
ondergrond.
10. Gebruik niet op heuvels, hellingen, of in de buurt van trappen of
waterpartijen.
11. Drink voldoende voor en na gebruik om uitdroging te voorkomen.
12. Stop onmiddellijk met het gebruik van het product als u pijn of
ongemak ervaart.
13. Dit product is alleen bedoeld voor volwassenen. Houd kinderen,
huisdieren en kwetsbare volwassenen te allen tijde uit de buurt van
het product.
14. Laat kinderen, huisdieren en kwetsbare volwassenen nooit
onbeheerd achter in de buurt van het product.
15. Dit product is niet bedoeld voor gebruik door mensen met
verminderde lichamelijke, zintuiglijke of mentale capaciteiten, tenzij
onder toezicht van een verantwoordelijke volwassene.
LET OP
Om het risico op lichte tot matige verwondingen of schade aan het
product of eigendommen te verminderen:
1. Controleer altijd het product op schade, slijtage en scheuren.
Controleer de afvoerbuis en afvoerstop om ervoor te zorgen dat ze
beide stevig gesloten zijn. Gebruik het niet als er beschadigde,
versleten, defecte of ontbrekende onderdelen zijn. Gebruik het
product pas opnieuw nadat het probleem is verholpen.
2. Sta niet toe dat meer dan één persoon tegelijkertijd het product
gebruikt.
3. Blaas het hoofdsteun alleen op met de bijgeleverde luchtpomp of
een ander apparaat met lage druk dat is ontworpen om
luchtbedden en opblaasbare voorwerpen op te blazen. Gebruik
geen luchtcompressor, winkelstofzuiger, stofzuiger of perslucht om
op te blazen, aangezien dit de hoofdsteun kan laten barsten en tot
letsel kan leiden.
4. Vul de hoofdsteun niet met water of andere vloeistoffen. Vul alleen
met koude lucht; vul niet met hete lucht.
MELDING
1. Het product is uitsluitend bedoeld voor gebruik binnenshuis. Gebruik
het product niet in een commerciële, verhuur-, institutionele- of
therapeutische omgeving.
2. Gooi het product en alle onderdelen weg volgens lokale en federale
voorschriften.
3. Langdurige blootstelling aan zonlicht kan het product beschadigen
of aantasten.
4. Houd scherpe voorwerpen uit de buurt om schade aan het product
te voorkomen.
5. Verwijder alle items, vooral scherpe voorwerpen, uit uw handen en
zakken voordat u het gebruikt.
6. Draag geen sieraden, riemen of andere accessoires die het product
kunnen doorboren.
7.Draag geen sieraden die kunnen verkleuren.
1. Zoek de voetpomp.
2. Zoek het luchtventiel op de bovenste ring.
3. Trek het lipje aan de stop om het luchtventiel te openen en steek
de luchtpompmond erin. Zie Figuur 2.
4. Houd het luchtventiel stevig rond de monding om te voorkomen
dat er lucht ontsnapt terwijl je de bovenste ring opblaast.
5. Wanneer volledig opgeblazen, zal de bovenste ring stevig zijn en
geen kreukels hebben. Wees voorzichtig om het niet te veel op te
blazen.
Blaas de bovenste ring op
2
VOOR HET EERSTE GEBRUIK VAN HET BAD
1. Was de binnenkant van het bad met warm water en zeep. Spoel
het bad grondig af en veeg het af met een schone, droge doek.
2. Voeg vervolgens water toe aan het bad met een slang of een emmer.
a. We raden aan het bad ongeveer halfvol te vullen en indien nodig
het waterpeil geleidelijk aan te passen.
b. Vul het bad nooit meer dan 2/3 vol. Uw lichaam verplaatst het
water wanneer u erin gaat, wat kan leiden tot overlopen als het
te vol is.
c. Het duurt ongeveer 25 minuten om het bad te vullen, maar dit
hangt af van de vulmethode.
1. Zoek de snelontkoppelingskraan en afvoer op het bad.
2. Draai de snelontkoppelingskraan tegen de klok in om deze vast te
zetten en lekken te voorkomen.
3. Het moet met de hand strak worden aangedraaid, dus stop met
draaien wanneer je weerstand begint te voelen. Draai niet te strak
aan, omdat dit je ijsbad kan beschadigen.
Zet de afvoer vast
3
HET LEGEN VAN HET BAD
1. Zoek de meegeleverde afvoerslang.
2. Trek de uiteinden van de afvoerslang uit elkaar om deze te verlengen.
3. Schuif het uiteinde van de afvoerslang over de kraan.
4. Richt het andere uiteinde van de afvoerslang naar een geschikte
afvoerlocatie, zoals een nabijgelegen gootsteen, badkuip of een
geschikt gebied in uw tuin als uw ijsbad buiten is opgesteld.
5. Open de afvoerpijp door de handgreep tegen de klok in een
kwartslag te draaien, totdat deze in lijn is met de afvoerpijp.
Zie Figuur 3.
a. Let op, de afvoerslang staat niet afgebeeld in Figuur 3. Zorg er
altijd voor dat u de afvoerslang aan de afvoerpijp bevestigt
voordat u het ijsbad leegt.
b. Het duurt ongeveer 20 minuten om het bad leeg te laten lopen.
6. Wanneer het water volledig is afgetapt, vergeet dan niet de
afvoerpijp te sluiten door de knop met de klok mee te draaien.
HET REINIGEN VAN HET BAD
1. Laat het bad leeglopen.
2. Was de binnenkant van het bad met warm water en milde zeep.
3. Spoel het bad grondig af en laat het volledig drogen voordat u het
opnieuw gebruikt of opvouwt en opbergt.
OPMERKINGEN :
We raden aan het bad wekelijks met milde zeep en water te reinigen.
Reinig uw ijsbad regelmatig om bacteriegroei en achteruitgang van
de badmaterialen te voorkomen. Regelmatige reiniging van uw bad
helpt ook om het water hygiënisch te houden.
Gebruik GEEN agressieve reinigingsmiddelen of schurende,
corrosieve, oplosmiddel- of chemische reinigers.
Voeg GEEN chloor of broom aan het water toe, omdat dit het bad
zal beschadigen of degraderen. Het gebruik van dergelijke
chemicaliën is verboden en leidt tot het vervallen van de garantie.
Zorg ervoor dat u regelmatig de afvoerpijp, afvoerslang en andere
accessoires met milde zeep en water reinigt.
6. Steek de stop terug om het luchtventiel te sluiten. Druk het
luchtventiel voorzichtig in de ring.
7. Voer dezelfde stappen uit voor het opblaasbare thermodeksel.
HET WATER VAN UW IJSBAD SCHOON HOUDEN
Douche of baad met zeep en water voor elk gebruik.
Bedek het bad altijd met het all-weather deksel wanneer het niet in
gebruik is om het water schoon te houden en insecten, vuil en puin
buiten te houden.
Als u uw bad buitenshuis gebruikt, zorg er dan voor dat u schoenen
draagt op weg naar het ijsbad, of spoel uw voeten zorgvuldig af
voordat u erin stapt.
Voeg geen zeep, olie, badzout of andere producten toe aan het water.
HET OPSLAAN VAN HET BAD
1. Laat de bovenste ring leeglopen en stop deze in het bad.
2. Verwijder de ondersteuningspoten en zet ze opzij.
3. Leg het bad plat op de grond en vouw de onderkant van het bad
omhoog.
4. Vouw elke zijde van het bad naar het midden. Vouw het bad
doormidden, van links naar rechts. Vouw het vervolgens doormidden
van boven naar beneden.
5. Bewaar het opgevouwen bad en alle accessoires samen in de
bijgeleverde doos.
OPMERKINGEN :
We raden aan het bad grondig te wassen voordat u het opbergt.
Zorg er altijd voor dat het bad volledig droog is voordat u het
opbergt. Als het bad vochtig is bij opslag, kan er schimmel
ontstaan.
We raden aan het bad op te bergen als u het lange tijd niet zult
gebruiken.
Berg het op in een koele, droge omgeving binnenshuis.
Lees de instructies zorgvuldig door voordat je de IJsbad, Pod
gebruikt.
1
2
4
5
3
7 8 6
GEBRUIKERSHANDLEIDING
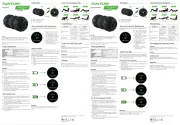
Ice Tub
Support Leg
Air Pump
Hose and
Nozzle
IJsbad
Ondersteuningspoot
Luchtventiel en
Luchtpompmond
IB30 ICE BATH, POD