•Lea con atención las ins-
truccionesantesdeusarla
cafetera por primera vez.
Guárdelas para futuras
•Conéctese únicamente a
la tensión indicada en la
placadecaracterísticas.
•Es recomendable un en-
chufecontomadetierra.
•Este aparato ha sido
diseñado exclusivamente
•No emplee ese aparato
parausosdiferentesdelos
descritosenestemanual.
•Tantoalintroducircomoal
sacarlaclavijadelenchufe,
el selector debe estar en
•Coloquesiempreelaparato
sobreunasuperficielisay
•Evite mover el aparato
durantesufuncionamiento.
•No coloque el aparato
•No introduzca lacafetera
enaguayotroslíquidos.
•No manipule el aparato
Nohagafuncionarelaparato
•No toque las partes
calientes. Manipule la
cafetera por las asas e
•No deje la cafetera
desatendida cuando esté
en funcionamiento, ni en
•Esteaparatopuedenutili-
zarloniñosconedadde8
añosysuperior,ypersonas
con capacidades físicas,
sensorialesomentalesredu-
cidasofaltadeexperiencia
y conocimiento, si se les
ha dado la supervisión o
respectoalusodelapara-
todeunamaneraseguray
comprenden los peligros
•Losniñosnodebenjugar
conelaparato.Lalimpieza
yelmantenimientoarea-
lizar por el usuario no
debenser realizados por
yores de 8 años y bajo
•Mantener el aparato y su
cablefueradelalcancede
•Elaparatonosehadiseña-
doparasuutilizacióncon
un temporizador externo
o un sistema de control
•Desenchufe de la toma
cuandono estéen usoy
•No desconecte tirando
del cable. No deje la
•No deje el aparato cerca
deunafuentedecalorni
permitaqueelcabletoque
•No haga funcionar la
•Asegúresedequelatapa
deldepósitoestácerrada
antesdeponerlacafetera
•Antesdesulimpiezacom-
pruebequeelaparatose
•No ponga en marcha la
cafetera con el cable o
el enchufe dañados, si
o si ha sufrido daños de
•Las reparaciones y cam-
bios de cable deber ser
realizadas exclusivamente
por un Servicio Técnico
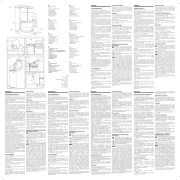
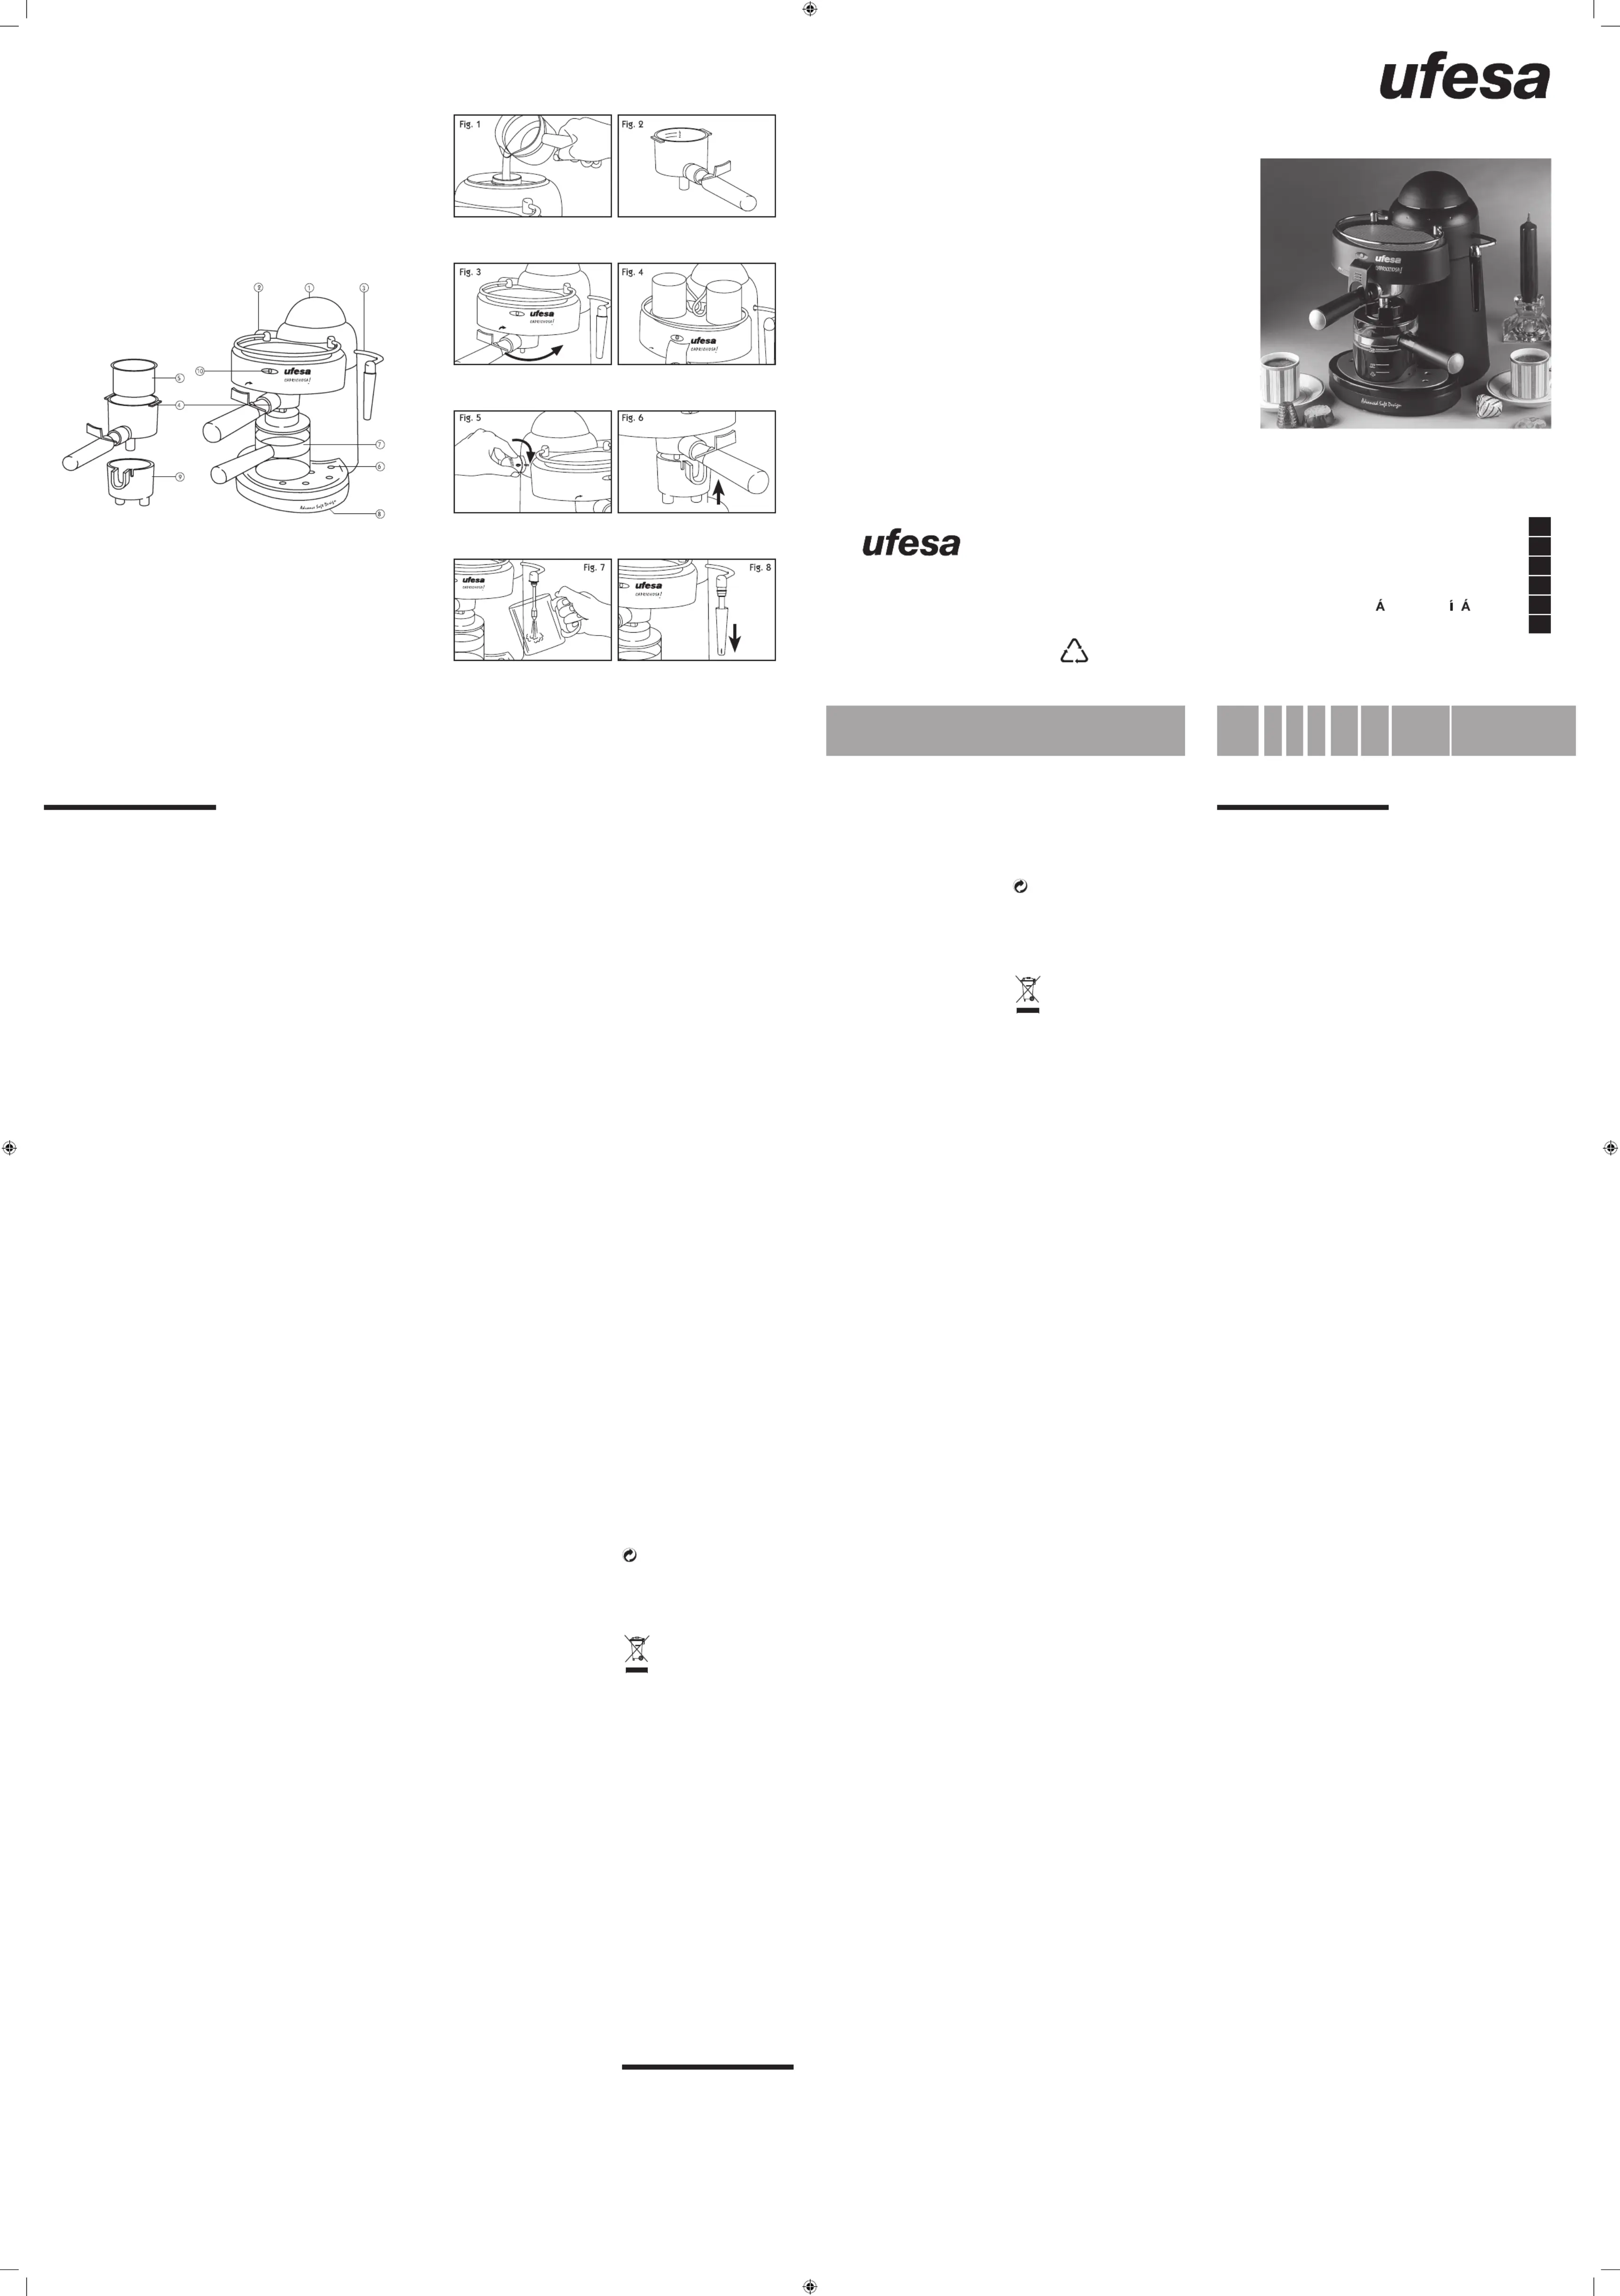
9.Adaptadorparadostazas
Antes del primer uso lave todos lo
accesorios y hágala funcionar una vez
Preparacióndecaféexprés
1.Conecte el aparato a la red y
compruebe que el selector está en
2.Desenrosqueel tapóndel depósito
yviertalacantidaddeaguadeseada.
La jarra indicala cantidad necesaria
paradosocuatrotazas.Gireeltapón
3.Coloqueelfiltroenelportafiltros.Para
ponerelcafé guíeseporlasmarcas
de dos y cuatro tazas del filtro.
Limpieelcaféquepuedaquedaren
elbordedelportafiltros.Importante:
Para obtener un resultado óptimo
con su cafetera de hidropresión,
utiliceuncaféconunmolidogrueso,
tipo cafetera italiana. No prense el
4.Coloque el portafiltros. Coloque
la jarra de manera que la abertura
coincidaconlasalidadecafé.
5.Gire el selector hasta la posición
café.Elpilotoseiluminará.Alcabo
deunosminutoselaguahierveycae
a través del café molido a la jarra.
Cuandoelcaféterminedesalirvuelva
aponerelinterruptorenlaposición
6.Sideseaverterelcafédirectamente
sobrelastazas,coloqueeladaptador
en el portafiltros como muestra la
• Después de preparar café, el
portafiltros debe dejarse enfriar
durantedosminutosantesderetirarlo
1.Siga las instrucciones para hacer
café.Elindicadordeniveldelajarra
marca la cantidad que se precisa
para preparar dos tazas de café y
la espuma de leche. Para preparar
cuatro tazas, llene la jarra hasta la
parteinferiordelabandametálica.
2.Cuando obtenga la cantidad
deseadade café,ponga elselector
en la posición de apagado. Ponga
unajarraconlechefríabajolasalida
de vapor y sitúe el selector en la
3.Para obtener espuma coloque el
tubo de vaporización justo en la
superficie de la leche y mueva la
jarra en sentido circular. Una vez
preparada la espuma suba y baje
ligeramente la jarra para calentar la
leche. Vuelvaa situar elselector en
4.Viertalalecheconespumaenelcafé.
Si lo desea puede espolvorearlo
con canela o chocolate molido
• El depósito sólo puede ser abierto
conseguridadcuando todael agua
ha sido utilizada. Para liberar la
presión,coloqueunajarraconagua
bajoelvaporizadorygireelselector
hasta la posición vapor. Cuando el
vapor deje de salir vuelva a poner
el selector en la posición de
Antes de proceder a la limpieza
desconecteel aparatodela red.Lave
las partes móviles con agua y jabón.
Pase un paño húmedo para limpiar
el cuerpo de la cafetera. La bandeja
recogegotas puede ser desmontada
parafacilitarsulimpieza.
Para limpiar la boquilla, desmonte la
capuchaplásticacomomuestralafigura
8.Lleneeldepósitocomoparauntazay
accioneelvaporizadorsinleche.Cierre
elvaporizador yfroteinmediatamente
laboquillaconunpañohúmedo.Tenga
cuidado al realizar esta operación,
puespodríaestaraúnmuycaliente.
Despuésdecadauso,vacíeeldepósito.
No guarde el portafiltros colocado.
El cable puede recogerse debajo del
La cafetera debe ser regularmente
descalcificada. Vierta en el depósito
una disolución de dos tazas de agua
conunatazadevinagreyhagafuncionar
el aparato sin café veces, incluido el
tubodevapor.Paraeliminarlosrestos
de vinagre, hágalo funcionar sólo con
Para su transporte, nuestras mer-
cancías cuentancon unembalaje
optimizado.Esteconsiste–porprinci-
pio- en materiales no contaminantes
que deberían ser entregados como
materia prima secundaria al servicio
localdeeliminacióndebasuras.
Este producto cumple la
DirectivadelaUE2002/96/CE.
Elsímbolodelcubodebasura
tachadosobreelaparatoindica
que el producto, cuando nalice su
vidaútil,deberá desecharseseparado
delosresiduosdomésticos,llevándolo
a un centro de desecho de residuos
separado para aparatos eléctricos
o electrónicos o devolviéndolo
a su distribuidor cuando compre
otro aparato similar. El usuario es el
responsable de llevar el aparato a
un centro de desecho de residuos
especiales al nalizar su vida útil. De
lo contrario, podrá sersancionado en
virtuddelos reglamentosde desecho
de residuos vigentes. Si el aparato
inutilizado es recogido correctamente
como residuo separado, podrá ser
reciclado, tratado y desechado de
formaecológica;estoevitaunimpacto
negativosobreelmedioambienteyla
salud, y contribuye al reciclaje de los
materiales del producto. Para obtener
más información sobre los servicios
de desecho de residuos disponibles,
contacte con su agencia de desecho
deresiduoslocaloconlatiendadonde
compró el aparato. Los fabricantes e
importadores se hacen responsables
del reciclaje, tratamiento y desecho
ecológico,seadirectamenteoatravés
SuAyuntamientooMunicipioleinformará
sobre posibilidades de deposición/
eliminaciónparalosaparatosendesuso.
Readthroughtheinstructions
carefully before using the
coffee maker for the first
time. Safeguard them for
•Only connect it to the
voltage stated on the
•It is advisable to use an
electrical socket fitted
withanearthconnection.
•This appliance has been
designed exclusively for
•Donotusetheappliance
for uses other than those
•TheOn/Offswitchshould
be in the Off position
when plugging it in or
Alwaysplacetheappliance
onaflat,levelsurface.
Avoidmovingtheappliance
•Donotplacetheappliance
near baths, showers or
•Donotimmersethecoffee
makerinwateroranyother
appliancewithwethands.
appliance with the cable
•Do not touch the hot
surfaces. Handle the coffee
maker by its handles or
•Do not leave the coffee
maker unattendedwhenit
is in use, nor when there
•Thisappliancecanbeused
by children aged from
8 years and above and
physical,sensoryormental
capabilities or lack of
experienceandknowledge
if they have been given
supervision or instruction
concerning use of the
appliance in a safe way
•Childrenshallnotplaywith
the appliance. Cleaning
andusermaintenanceshall
unlesstheyareolderthan
•Keep the appliance and
its cord out of reach of
childrenlessthan8years.
•The apliance is not
intended to be operated
by means of an external
timerorseparateremote-
•Unplug it from the mains
whenitisnotin useand
•Donotunplugitbytugging
on the mains cable. Do
notleavetheplughanging
•Donotleavetheappliance
closetoheatsourcesnor
allow the cable to come
into contact with hot
•Donotoperatethecoffee
•Make sure that the lid
on the tank is closed
•Before cleaning it, make
surethat the applianceis
•Do not switch the coffee
makeronifeitherthecable
orplugaredamaged,ifit
canbedetectedthatitis
not operating correcting,
or if it has suffered any
carried out exclusively by
an Authorised Technical
2.Coffee-steamselector
Beforeusingitforthefirsttimewashall
oftheaccessoriesandoperateitonce
PreparingEspressoCoffee
1.Plug the appliance into the mains
and check that the switch is in the
2.Unscrewthelidonthetankandpour
inthedesiredamountofwater.The
jugshows theamountsrequired for
twoorfourcups.Screwthelidback
onandtightenitsecurely.
3.Placethe filterinto the filterholder.
Usethefilter’stwoorfour-cuplevel
markstogaugetheamountofcoffee
needed. Clean off any coffee that
maybeleft aroundtheedgeof the
filter holder. Important: To get the
best results out of your espresso
coffeemaker,useacoarselyground
coffee,Italianespressotype.Donot
4.Put the filter holder into position.
Place the jug so that the opening
linesupwiththecoffeeoutlet.
5.Turn the selector to the coffee
position. The pilot lamp will come
on. After a few minutes the water
will boil, filter through the coffee
and flow down into the jug. When
thecoffeestopscomingoutturnthe
switchtotheOFFposition.
6.Ifyouwishthecoffeetogodirectly
into the cups, place the adapter
onto the filter holder, as shown in
Aftermakingthecoffee,thefilterholder
shouldbelefttocooldownforafew
minutes before removing it from the
1. Follow the instructions for making
coffee. The level mark on the jug
showstheamountofwaterneeded
to make two cups of coffee with
frothymilk.Ifyouwanttomakefour
cups, fill the jug to just below the
2. When you have made the desired
amountofcoffeeturntheswitchtothe
OFFposition.Placeajugofcoldmilk
underthesteamoutletandthenswitch
theselectortothesteamposition.
3. Toobtainfroth,placethesteampipe
just on the surface of the milk and
movethejugwithacircularmotion.
Oncethefrothisready,movethejug
upanddownslightlytoheatupthe
milk. Turn the selector back to the
4. Pour the frothed-up milk onto the
coffee. If so desired, it can be
sprinkled with powered cinnamon
or gratedchocolate anddecorated
withastickofcinnamon.
The tank can only be opened safely
whenallthewaterhasbeenusedup.
To release the pressure, place a jug
of waterunder the steam sprayerand
turntheselectortothesteamposition.
Whenthesteamstopscomingoutput
theswitchbacktotheOFFposition.
Unplug the appliance from the mains
beforeproceedingtocleanit.Washthe
moving parts with soapy water. Wipe
downthe coffeemaker’s bodywitha
Thedriptraycanberemovedtomake
In order to clean the steam nozzle,
removethe plastichood, asshown in
figure8.fillthetankwithenoughwater
for one cup and use the steam spray
withoutanymilk.Switchoffthesteam
andrubthenozzledownwithadamp
clothimmediatelyafterwards.Takecare
whendoingthisasitmaybeveryhot.
Empty out any water that may be left
overaftereachuse.Donotstoreitaway
with the filterholder fitted. The cable
canbecoiledupundertheappliance.
The coffeemaker shouldbe descaled
regularly. Poura mixof one cupvine-
gar/two cupswater intothetank and
operatetheappliancetwice,including
thesteampipe,butwithoutanycoffee.
Toflush outany vinegarremainsrun it
throughtwicemoreusingjustwater.
Our goods come in optimised
packaging. This basically consists
in using non-contaminating materials
which should be handed over to the
local waste disposal service as
Thisproductcomplieswith EU
Directive2002/96/CE.Thecrossed
wheelie bin symbol shown on
theapplianceindicatesthatwhen
it comes to dispose of the product it
mustnotbeincludedinwithhousehold
refuse. It must be taken to a special
refuse collection point for electric and
electronicappliancesorreturnedtothe
distributor when purchasing a similar
appliance.Undercurrentrefusedisposal
regulations, users who fail to take
discarded appliances tospecial refuse
collection points may be penalised.
Correctdisposalofdiscardedappliances
means that they can be recycled and
processed ecologically, helping the
environmentandallowingmaterialsused
in the product to be reused. For more
information on available waste disposal
schemescontactyourlocalrefuseservice
or the shop where the product was
purchased.Manufacturersandimporters
areresponsibleforecologicalrecycling,
processing and disposal of products,
whetherdirectlyorviaapublicsystem.
Your local town council can provide
you with information about how to
disposeofobsoleteappliances.
•Avant la première utilisa-
tiondecettecafetière,lire
attentivement cesinstruc-
tions et conservez cette
notice pour de futures
•Branchezuniquement àla
tensionindiquéesurlapla-
quedescaractéristiques.
•Ilestrecommandéd’utiliser
•Cet appareil a été conçu
pour une utilisation do-
•Ne pas employer cet
appareil pour des utili-
sations autres que celles
Enbranchantoudébranchant
la prise, le sélecteur doit
se trouver sur la position
•L’appareil doit toujours
reposer sur une surface
•Evitez de faire bouger
•Ne pas placer l’appareil
•Ne pas introduire la
cafetière dans l’eau ni
•Nepastoucherl’appareil,
•Ne pas faire fonctionner
l’appareil avec le cordon
•Nepastoucherlesparties
chaudes de l’appareil,
utiliserlespoignéesetles
•Nepaslaisserfonctionner
l’appareilsanssurveillance,
surtoutenprésenced’enfants.
•Cetappareilpeutêtreutilisé
pardesenfantsdeplusde8
ansetdespersonnesayant
sensorieloumental,oubien
un manque d’expérience
et de connaissances, s’ils
ontreçu des explications
ou des instructions sur la
façon d’utiliser l’appareil
de manière sécurisée et
qu’ilsencomprennentles
•Lesenfantsnedoiventpas
jouer avec l’appareil. Le
nettoyageetl’entretienne
doiventpasêtreeffectués
par des enfants à moins
qu’ilssoientâgésdeplus
•Tenir l’appareil et son
cordon hors de portée
des enfants de moins de
•Cetappareilnefonctionne
ni avec un temporisateur
•Débranchez la cafetière
après utilisation et avant
•Ne pas tirersurle cordon
pourdébrancherl’appareil
etnepaslelaisserpendre.
•La cafetière et le cordon
doiventêtresuffisamment
écartés de toute source
•Nepasfairefonctionnerla
•Avantdemettrelacafetière
en marche, vérifiez si le
BSH Electrodomésticos España, S.A.
C/ Itaroa, n° 1, 31.620 HUARTE (Navarra)
couvercleduréservoirest
•Avantdelenettoyer,vérifiez
sil’appareilestdébranché
•Nejamaisfairefonctionner
la cafetière si le cordon
ousilaprisesontabîmés,
si vous remarquez que
l’appareil ne fonctionne
pas correctement ou s’il
•Lesréparationsetremplace-
ments de cordon doivent
êtreobligatoirementréalisés
par un Service Technique
2.Sélecteurcafé/vapeur
6.Plateaurécupérateurdegouttes
9.Adaptateurpourdeuxtasses
Avantlapremièreutilisation,laveztous
les accessoires et faites fonctionner la
Préparationd’uncaféexpresso
1.Branchez l’appareil au réseau et
vérifiezsilesélecteursetrouvebien
surlaposition“éteinte”.
2.Dévissez le bouchon de remplissage
duréservoiretversezl’eau.Laverseuse
indiquelaquantitéd’eaurequisepour
deuxoupourquatretasses.Tournez
lebouchonetserrezfort.
3.Placez le filtre dans le porte-filtre.
Pour remplir de café, suivez les
marquesindiquées surlefiltre pour
deuxoupourquatretasses.Nettoyez
les restes de café déposés sur le
bordduporte-filtre.Pourobtenirun
excellentrésultataveccettecafetière
à hydropression, utilisez un café
moulu gros, type café italien. Ne
4.Placez le porte-filtre. Placez la ver-
seusedefaçonàcequel’ouverture
du récipientcoïncide avecla sortie
5.Tournez le sélecteur sur la position
café. Le témoin s’allume. Quelques
minutes après l’eau commence à
bouillir et coule, à travers le café
moulu, dans la verseuse. Quand
le café est fait, placez à nouveau
l’interrupteursurlaposition“éteinte”.
6.Pourque le café couledirectement
dans les tasses, placez l’adaptateur
surleporte-filtrecommeindiquésur
Aprèsavoirpréparélecafé,ilfautlais-
ser refroidir pendant deux minutes le
filtreavantdel’enleverdelacafetière.
1.Suivre les mêmes instructions que
pour faire un café. L’indicateur du
niveau de la verseuse signale la
quantitérequisepourpréparerdeux
tasses de café et la crème. Pour
préparer quatre tasses, remplir le
récipient jusqu’à la partie inférieure
2.Après avoir obtenu le café voulu,
placez le sélecteur sur la position
“éteinte”. Mettez un récipient avec
dulaitfroidsouslasortiedevapeur
etplacezlesélecteursurlaposition
3.Pourobtenirdela crème,placezle
tubedevaporisationjusteàlasurface
du lait et faites tourner le récipient.
Aprèsobtention delacrème,levez
etbaissezlerécipientpourchauffer
lelait.Placezànouveaulesélecteur
surlaposition“éteinte”.
4.Versezlelaitainsi quelacrèmesur
le café. Vous pouvez saupoudrez