BSH Electrodomésticos España S.A.
Ronda del Canal Imperial de Aragón, 18-20
LIMPIEZA Y MANTENIMIENTO (B16 - 18)
Desconecte el aparato de la red de alimentación antes de
B16 Lave las piezas movibles con agua jabonosa. La ban-
deja de recuperación de agua y café (15) y la cubierta de
la boquilla pueden retirarse para limpiarse fácilmente. Lim-
pie hacia abajo el cuerpo de la cafetera usando un paño
B17 Es necesario limpiar el tubo de vapor regularmente
para garantizar que no esté tapado. Para limpiar el inte-
rior del tubo de vapor, llene el depósito de agua (7) con
suficiente agua para una taza de café espresso y haga
funcionar la boquilla de vapor sin leche hasta que deje
de emitir vapor. Apague el vapor y frote la boquilla hacia
abajo usando un paño húmedo inmediatamente después.
Tenga cuidado al hacer esto p1-ya que podría estar muy ca-
B18 Después de usarse, verifique que ambos depósitos de
agua (4 y 7) estén completamente vacíos. No almacene
el aparato con el portafiltros del espresso (12) aún dentro.
La cafetera debe descalcificarse regularmente dependien-
do de la dureza del agua y de la frecuencia de uso.
A) Descalcificación del filtro de la cafetera
1. Coloque la jarra de café vacía (3) en la placa de calen-
2. Diluya tres tazas de vinagre en nueve tazas de agua
yllene el depósito (4) con la mezcla.
3. Encienda la cafetera durante un minuto. Apáguela y dé-
jela reposar por media hora.
4. Vuelva a encender la cafetera de modo que salga toda
la solución de agua/vinagre. Elimine esta última y limpie la
5. Para eliminar cualquier rastro de vinagre, ponga a fun-
cionar la cafetera a través de dos ciclos adicionales usan-
B) Descalcificación de la cafetera espresso
1. Antes de inciar la operación descalcificación, retire el
portafiltros (12) y el filtro (13).
2. Retire los restos de cualquier café que pueda estar alre-
dedor de la salida de café usando un paño húmedo.
3. Con la ayuda de las marcas de la jarra del espresso
(14) disuelva una parte de vinagre en tres partes de agua
y vierta la mezcla en el depósito de agua (7). Coloque un
recipiente debajo de la salida de café y otro debajo de bo-
quilla de vapor. Coloque el interruptor ON/OFF en «on».
4. Coloque el selector aroma/vapor (9) en vapor. Gire el
regulador de vapor (10) y deje que el vapor salga durante
aproximadamente treinta segundos.
5. Cierre el regulador de vapor (10) y permita que el resto
de la mezcla fluya hacia fuera a través de cabeza de salida
6. Coloque la cafetera espresso en OFF y deje que se en-
7. Para eliminar cualquier rastro de vinagre, ponga a fun-
cionar la cafetera espresso a través de dos ciclos adiciona-
les usando agua del grifo. Permita que el aparato se enfríe
Elimine el embalaje respetando el medio ambiente.
Nuestros productos van en un embalaje optimiza-
do. Esto consiste, básicamente, en usar materiales no con-
taminantes que se deben entregar al servicio de recogida
de residuos local como materias primas secundarias.
Este aparato está marcado con el símbolo de
cumplimiento con la Directiva Europea
2012/19/UE relativa alos aparatos eléctricos
y electrónicos usados (Residuos de aparatos
eléctricos y electrónicos RAEE). La directiva
proporciona el marco general válido en todo el
ámbito de la Unión Europea para la retirada yla reutiliza-
ción de los residuos de los aparatos eléctricos yelectróni-
cos. Infórmese sobre las vías de eliminación actuales en su
B18 After use, check if both water tanks (4 and 7) are
completely empty. Do not store the appliance with the
espresso filter holder (12) still fitted.
The coee maker should be descaled regularly, depending
on the water hardness and frequency of use.
A) Descaling the filter coee maker
1. Place the empty coee jug (3) on the heating plate (2).
2. Dilute three cups of vinegar in nine cups of water and fill
the tank (4) with the mixture.
3. Switch the coee maker on for one minute. Switch it o
and let it stand for half an hour.
4. Switch the coee maker back on so that all the water/
vinegar solution flows out. Pour this away and clean out the
5. To flush out any traces of vinegar, run the filter coee
maker through two more cycles using clear tap water.
B) Descaling the espresso maker
1. Before beginning the descaling operation, remove the
filter holder (12) and the filter (13).
2. Remove the remains of any coee that might be around
the coee outlet with a damp cloth.
3. With the help of the marks on the espresso jug (14)
dissolve one part vinegar with three parts water and pour
the mixture into the water tank (7). Place one container
below the coee outlet and another one below the steam
nozzle. Switch the ON/OFF switch on.
4. Set the aroma/steam selector (9) on steam. Turn the
steam regulator (10) on and let steam come out for about
5. Close the steam regulator (10) and allow the rest of the
mixture to flow out through the coee outlet head.
6. Switch the espresso maker OFF and leave it to cool
7. To flush out any remaining vinegar, run the espresso
maker through two more cycles using clear tap water. Let
the appliance cool down between each cycle.
Dispose of packaging in an environmentally-
friendly manner. Our goods come in optimised
packaging. This basically consists in using non-
contaminating materials which should be handed over to
the local waste disposal service as secondary raw
This appliance is labelled in accordance with
European Directive 2012/19/EU concerning
used electrical and electronic appliances
(waste electrical and electronic equipment –
WEEE). The guideline determines the
framework for the return and recycling of used
appliances as applicable throughout the EU. Please ask
your specialist retailer about current disposal facilities.
N’utiliser l’appareil que
cution, ne retirez pas le
par l’utilisateur. La ré-
d’utiliser une prise pos-
cette cafetière. Elles ne
Esta cafetera puede usarse para preparar café de filtro
tradicional, así como espresso y cappuccino. Siga las ins-
trucciones otorgadas abajo para garantizar que el aparato
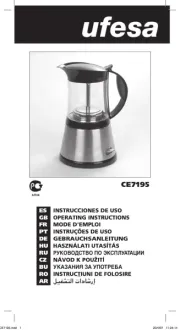
DESCRIPCIÓN DE LA CAFETERA DE
Interruptor ON/OFF iluminado
Jarra de café con tapa e indicador de nivel del agua
DESCRIPCIÓN DE LA CAFETERA
Interruptor ON/OFF iluminado
Selector de aroma – Selector de Café/Vapor
Jarra de café con tapa e indicador de nivel del agua
Bandeja de recuperación de agua y café
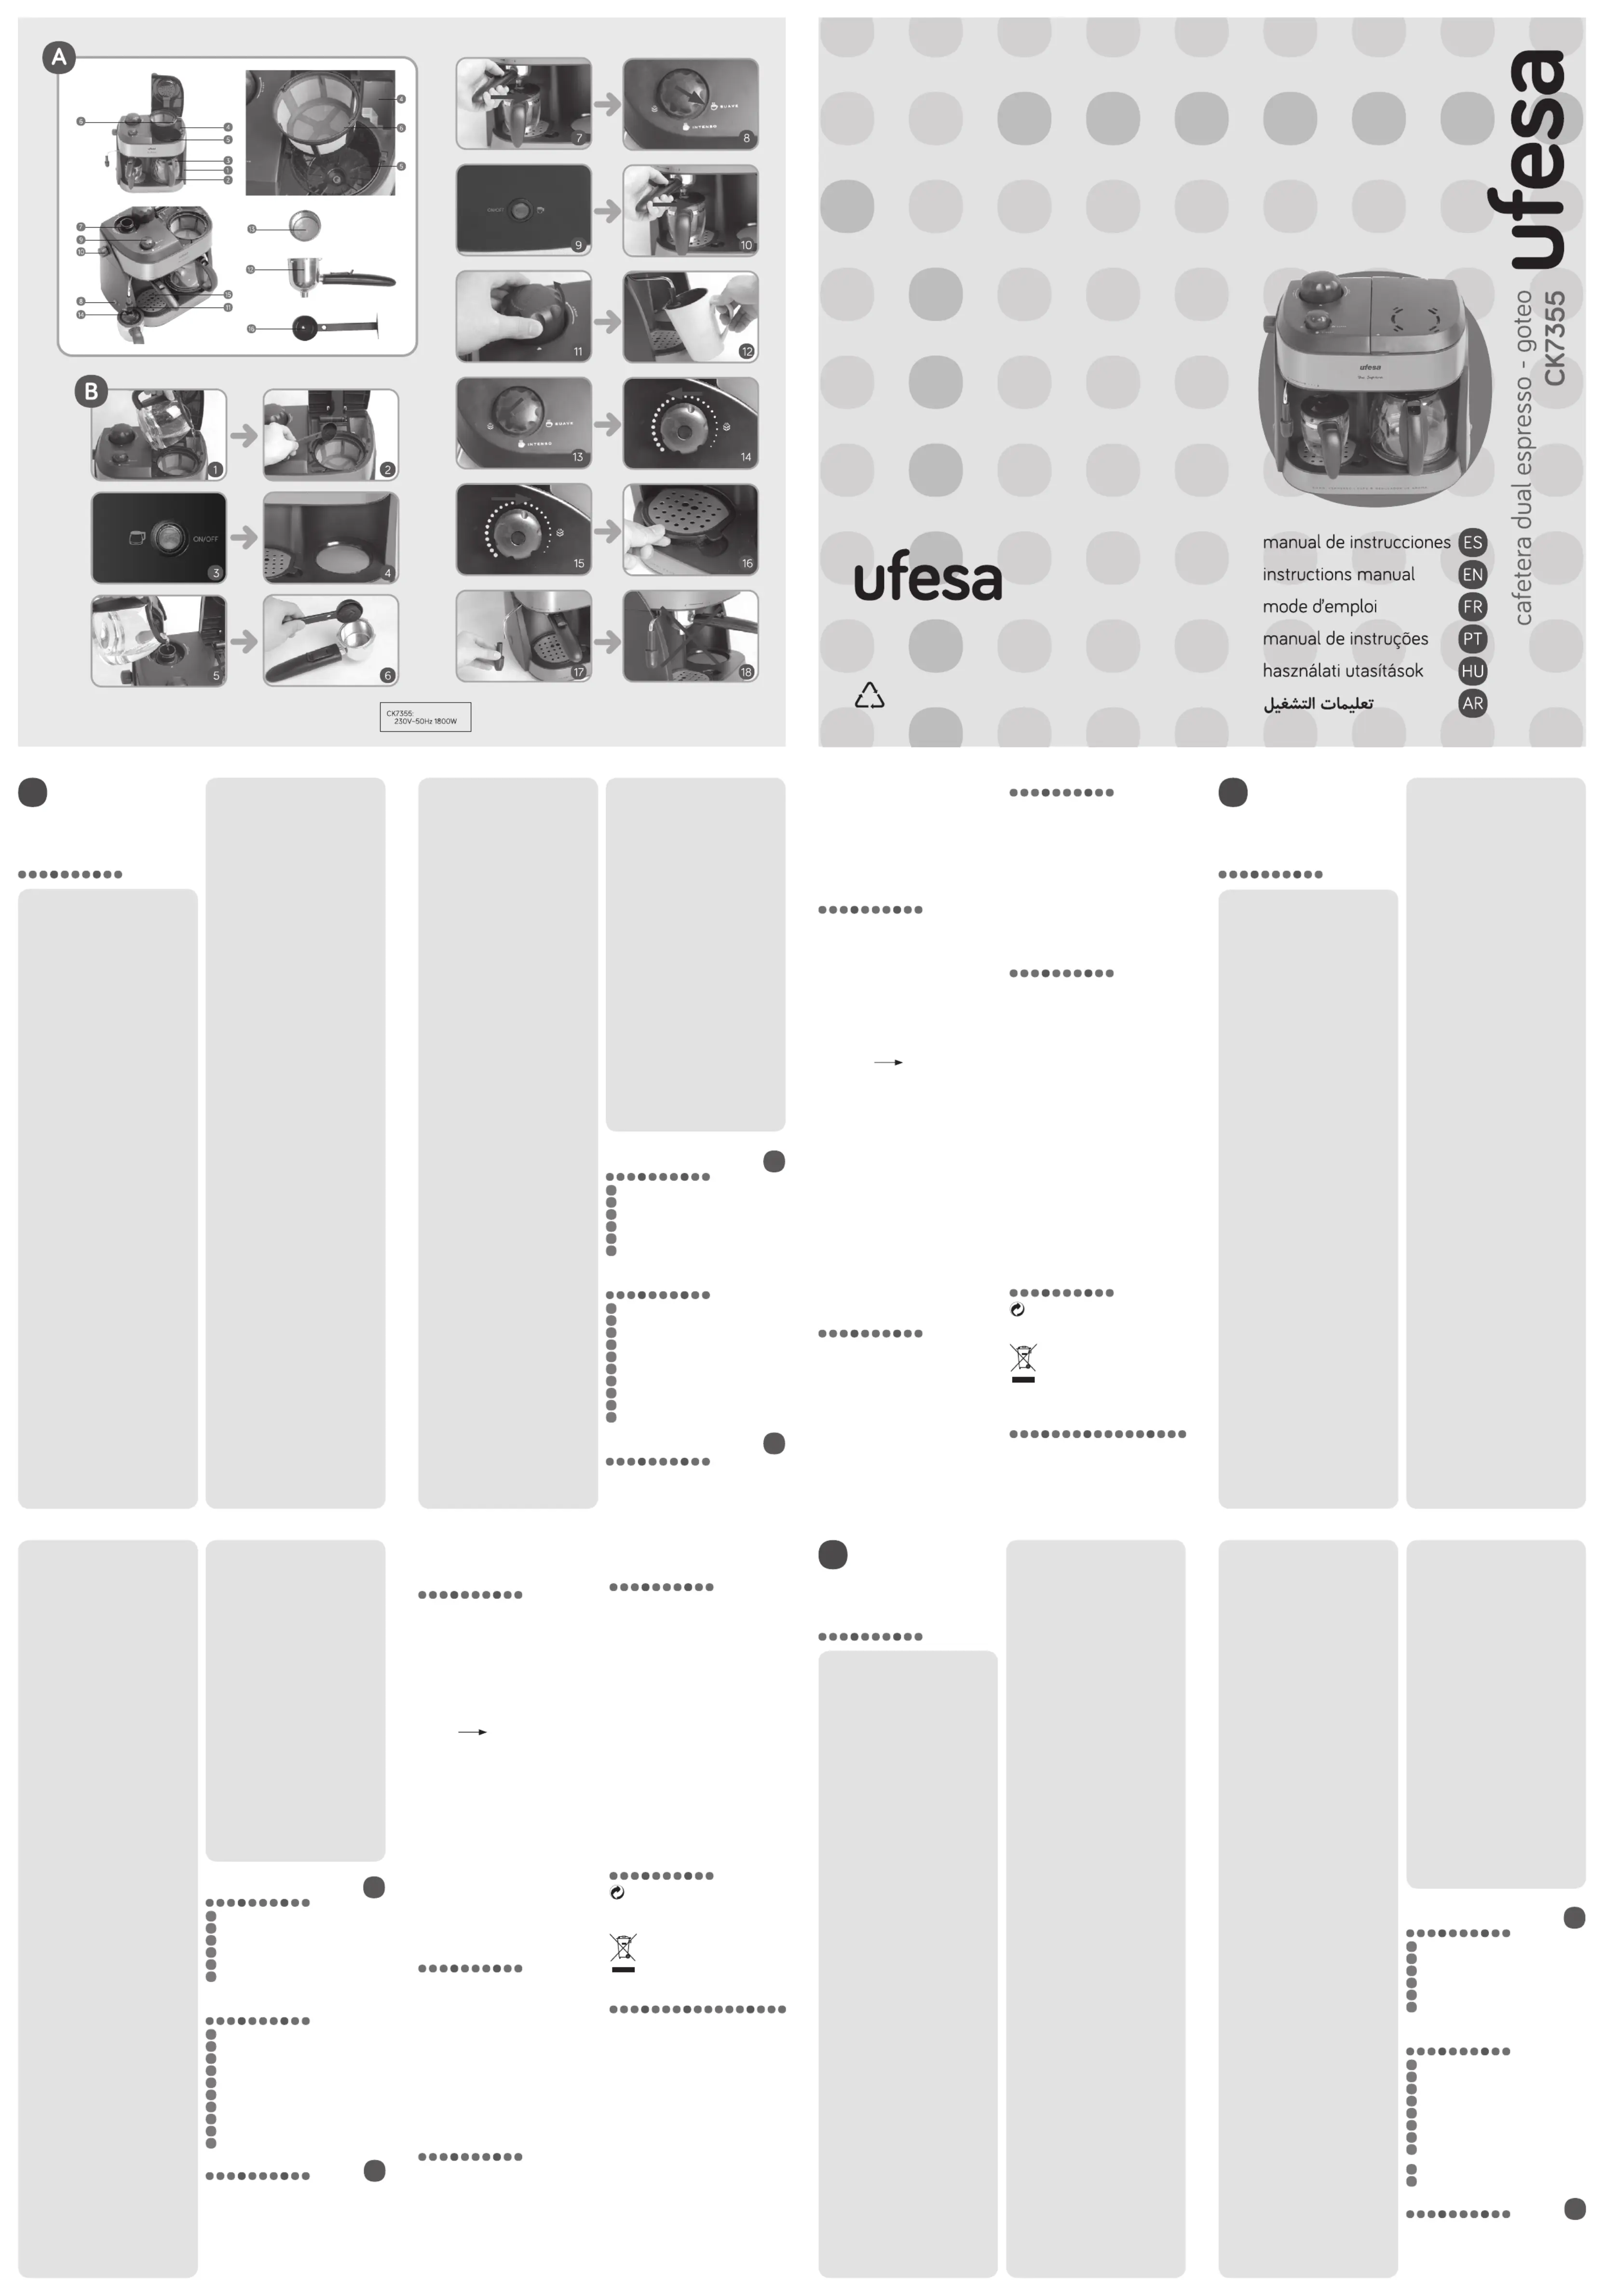
PREPARACIÓN DE CAFÉ DE FILTRO
B1 Llene el depósito (4) con agua fría, usando el indicador
de nivel de agua de la cafetera como medida. No se reco-
mienda una cantidad de menos de dos tazas.
B2 Coloque un filtro adecuado en el portafiltros giratorio(5).
Coloque una cucharada de café por cada taza de agua.
• Para lograr un funcionamiento correcto, no use café
B3 Coloque la jarra de café (3), con su tapa puesta, en la
placa de calentamiento (2), conecte el aparato a la red de
alimentación y pulse el interruptor de Café ON/OFF (1).
El indicador luminoso indica que la cafetera está funcio-
B4 Puede servirse una taza de café antes de que el ciclo
de preparación finalice. Siempre que la jarra se retire de la
placa de calentamiento, el flujo de café se detendrá tem-
Coloque la jarra nuevamente sobre la placa de calenta-
miento al cabo de 20 segundos.
PREPARACIÓN DE ESPRESSO (B5 - 9)
Conecte el aparato a la red y asegúrese de que el interrup-
tor ON/OFF (8) esté apagado. Cierre el regulador de vapor
(9) al girarlo en sentido antihorario.
B5 Desenrosque la tapa del depósito (7) y vierta la can-
tidad de agua deseada. Use la jarra espresso (14) para
medir. Una taza de agua equivale a una taza de espresso.
Vuelva a enroscar la tapa nuevamente y apriétela de ma-
B6 Coloque el filtro (13) en el portafiltros (12). Use las mar-
cas del filtro de dos o cuatro tazas para medir la cantidad
de polvo que se necesita. Para obtener tres tazas llene el
filtro entre la marca de dos tazas y cuatro tazas. Limpie
los restos de café que hayan podido quedar en el borde
Nota: Para lograr mejores resultados, use un café molido
grueso, del tipo espresso italiano.
Para que funcione correctamente, NO USE café molido
fino. No presione el café en polvo hacia abajo demasiado.
B7 Use la guía « » para colocar el portafiltros
ygirarlo hasta que encaje. Coloque la jarra del espresso
(14) debajo de modo que la abertura se alinee con la salida
Asegúrese de que el depósito de agua se haya cerrado
adecuadamente antes de usar la cafetera espresso.
No trate de abrir la tapa del depósito mientras haya pre-
sión dentro todavía (para más información ver a sección
B8 Gire el selector de aroma/vapor (9) hasta la posición
deseada. La posición «suave» produce café normal, mien-
tras que la posición «intenso» produce un café más fuerte.
B9 Pulse el interruptor ON/OFF (8). El indicador luminoso
se encenderá y después de un tiempo breve de calenta-
miento el espresso comenzará salir. Cuando el flujo se
detenga, vuelva a colocar el interruptor en la posición OFF.
• El depósito sólo se podrá abrir de manera segura cuan-
do se haya agotado toda el agua del depósito y no haya
presión dentro. Para asegurarse de que no haya presión
- Cambie el interruptor ON/OFF (8) a OFF y desconecte
- Coloque una jarra llena de agua debajo de la boquilla
- Elija la posición «steam» en el selector de aroma/vapor
(9) y gire el regulador de vapor (10) en sentido antihorario.
- Cuando no salga más vapor, cierre el regulador de va-
por al girarlo en sentido horario.
• Después de usarse el portafiltros debe dejarse enfriar
durante algunos minutos antes de sacarlo.
PREPARACIÓN DE UN CAPPUCCINO
B10 - 11 Siga las instrucciones para hacer el espresso. Use
la marca de la jarra del espresso para medir la cantidad
adecuada de agua. Tan pronto como las primeras gotas de
café se fuercen a través del soporte del filtro usted puede
comenzar a hacer la espuma en la leche.
B12 Coloque la punta de la boquilla de vapor hasta la mi-
tad dentro de la jarra con leche fría.
B13 Gire el selector de vapor (9) hasta la posición
B14 Abra el regulador de vapor (10) al girarlo en sentido
antihorario. El agua en exceso fluirá hacia fuera a través de
la salida del espresso. Una vez la espuma esté lista, mueva
la jarra hacia arriba y hacia debajo de manera ligera para
B15 Para detener el vapor que sale, cierre el regulador de
vapor (10) al girarlo en sentido antihorario.
Vierta la leche con espuma en el café.
No trate de abrir la tapa del depósito mientras haya pre-
sión dentro todavía. Cuando finalice recuerde hacer que
baje la presión al seguir las instrucciones especificadas en
This coee maker can be used to make traditional filter
coee as well as espresso and cappuccino. Follow the
instructions given below to ensure that the appliance
DESCRIPTION OF THE DRIP COFFEE
Illuminated ON/OFF switch
Coee jug with lid and water level indicator
DESCRIPTION OF THE ESPRESSO
Illuminated ON/OFF switch
Aroma selector – Coee/Steam selector
Espresso jug with lid and water level indicator
PREPARING FILTER COFFEE (B1 - 4)
B1 Fill the tank (4) with cold water, using the water level
indicator on the coee pot for measuring. A quantity of less
than two cups is not recommended.
B2 Place a suitable filter into the swing filter holder (5). Put
in one tablespoonful of coee for each cup of water.
• For correct operation, do not use coee with too fine
B3 Place the coee jug (3), with its lid fitted, on to the
heating plate (2), plug the appliance into the mains and
press the Café ON/OFF switch (1). The pilot lamp indicates
that the coee maker is working.
B4 A cup of coee can be served before the brew cycle
has finished. Whenever the jug is removed from the
heating plate, the coee flow will be detained temporarily.
Place the jug back on the heating plate within 20 seconds.
PREPARING ESPRESSO (B5 - 9)
Plug the appliance into the mains and make sure that the
ON/OFF switch (8) is o. Close the steam regulator (9) by
B5 Unscrew the lid on the tank (7) and pour in the desired
amount of water. Use the espresso jug (14) for measuring.
One cup of water equals one cup of espresso. Screw the lid
back on and tighten it securely.
B6 Place the filter (13) into the filter holder (12). Use the
filter’s two or four-cup level marks to measure the amount
of powder needed. For three cups fill the filter between the
two-cup and the four-cup level mark. Clean o any coee
powder that may be left around the edge of the filter holder.
Note: For best results, use a coarsely ground coee,
For correct operation, DO NOT use fine coee powder. DO
NOT pack the coee powder.
B7 Use the “ ” guide mark to fit the filter holder
and turn it to the right until it locks. Place the espresso jug
(14) underneath so that the opening lines up with the outlet
Make sure that the water tank is closed properly before
using the espresso maker.
Do not attempt to open the lid on the tank while there is
still pressure inside (for more info see section “Important”).
B8 Turn the aroma/steam selector (9) to the desired
position. The “suave” position produces normal coee,
whereas the “intenso” position produces stronger coee.
B9 Press the Espresso ON/OFF switch (8). The pilot lamp
will light up and after a short heat-up time the espresso
will begin to flow out. When the flow stops, turn the switch
back to the OFF position.
• The tank can only be opened safely when all the water
has been used up and there is no pressure inside it. To be
certain that there is no pressure inside the tank:
- Switch the ON/OFF switch (8) to OFF and unplug the
- Place a jug full of water below the steam nozzle (11).
- Choose the “steam” position on the aroma/steam
selector (9) and turn the steam regulator (10) anticlockwise.
- When no more steam comes out, close the steam
regulator by turning it clockwise.
• After usage the filter holder should be left to cool down
for a few minutes before taking it out.
PREPARING CAPPUCCINO (B10 - 15)
B10 - 11 Follow the instructions for making espresso. Use
the lever mark on the espresso jug to measure the right
amount of water. As soon as the first few drops of coee
are forced through the filter holder you can start frothing
B12 Place the tip of the steam nozzle half way into the jug
B13 Set the Aroma/steam selector (9) to the “steam”
B14 Open the steam regulator (10) by turning it
anticlockwise. The excess water will flow out through the
espresso outlet. Once the froth is ready, move the jug up
and down slightly to heat up the milk.
B15 To stop the steam coming out, close the steam
regulator (10) by turning it clockwise.
Pour the frothed-up milk onto the coee.
Important: Do not attempt to open the lid on the tank
while there is still pressure inside. When you have finished
remember to bring the pressure down by following the
instructions stated in the previous point.
CLEANING & MAINTENANCE (B16 - 18)
Unplug the appliance from the mains supply before
B16 Wash the moving parts with soapy water. The drip
tray (15) and the nozzle cover can be removed for easy
cleaning. Wipe down the body of the coee maker with
B17 It is necessary to clean the steam pipe regularly to
ensure that it does not get clogged.To clean the inside of
the steam pipe, fill the water tank (7) with enough water for
one cup of espresso coee and operate the steam nozzle
without milk until it stops steaming. Switch o the steam
and rub the nozzle down with a damp cloth immediately
afterwards. Take care when doing this as it may still be
Cette cafetière peut être utilisée pour préparer du café tra-
ditionnel ainsi que des expressos et cappuccinos. Suivez
les instructions fournies ci-dessous afin de vous assurer
que la cafetière fonctionne correctement.
DESCRIPTION DE LA MACHINE
Interrupteur ON/OFF lumineux
Carafe à café avec couvercle et indicateur de niveau d’eau
DESCRIPTION DE LA MACHINE
Interrupteur ON/OFF lumineux
Sélecteur d’arôme – Sélecteur Café / Vapeur
Carafe à Expresso avec couvercle et indicateur de niveau
PREPARER UN CAFE FILTRE (B1 - 4)
B1 Remplissez le réservoir (4) d’eau froide, en vous aidant
de l’indicateur de niveau d’eau situé sur la carafe pour eec-
tuer la mesure. Ajouter l’équivalent de moins de deux tasses
B2 Placez un filtre approprié dans le porte-filtre à ressort
(5). Versez une cuillère une cuillère à soupe de café pour