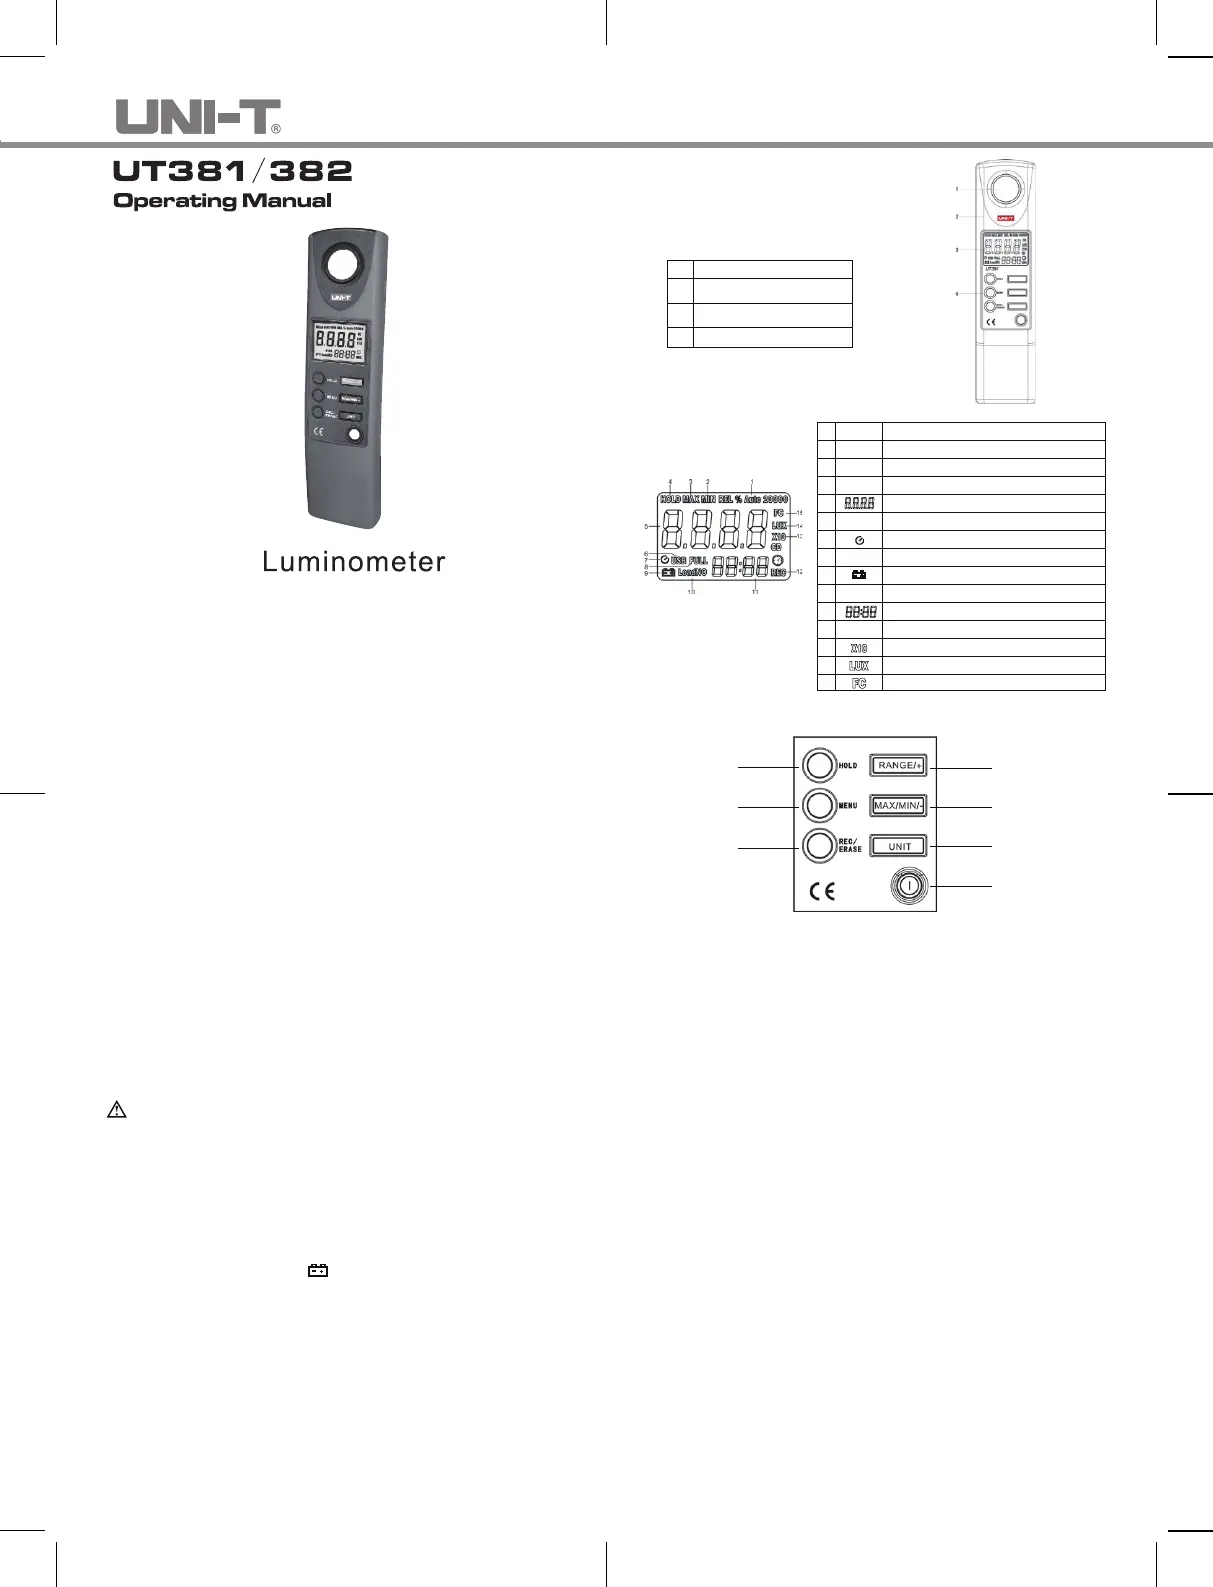
adjustable; long press “ME to enter function selection menu, and then NU”
short press it to select SECREC interface, while the auto memory interval is
displayed on the main display; press “RA GE/+” or “M MI /-” key to adjust N AX/ N
the auto memory interval; press “ME key to enter t function setting or NU” nex
press “H LD” to t function setting. And luminometer will save the updated O exi
settings.
Long press “REC/ERASE” to save data automatically, and “REC” sign ●
on secondary display , and the luminometer will save the flashes
measured data according to the current auto saving interval setting; if the
storage space of luminometer is fully taken up, the system will t auto exi
memory; and “FULL” sign will be displayed on LCD; press “REC/ERASE” key
to t auto data memory function.exi
Manual data memory: in the normal measurement state●, press “REC/ERASE”
once to save one measured data, and “REC” sign displayed on secondary
display once.flashes
When 2044 pieces of data is fully recorded, “FULL” sign will be displayed on ●
LCD, and no data can be saved at this moment.
Under power-off state, press “REC/ERASE” and power on meanwhile, when ●
“CLR” sign is displayed on LCD, all saved data will be cleared.
3. View saved data:
Short press “ME to enter view recorded data function; if there is no ● NU”
data record in the luminometer, “ ” sign will be displayed on both LCD ----
main display and secondary display, and the luminometer will return to normal
measurement state in about 0.5 seconds; If there a certain data records in
the luminometer, the total number of current data records will be displayed on
LCD secondary display, and the value of the last piece of data will be
displayed on the main display.
After entering option of view recorded data, press IT” to view the 1st ● “UN
piece of recorded data; press “RA GE/+” and “M MI /-” keys to view data N AX/ N
records forward or backward; each press on HOLD button to increment by
100 sets, the meter will return to the first record when the maximum number
has been reached.
The luminometer can store up to 2044 records.●
4. Restore to factory defaults:
Long press “ME key to enter function setting, and then short press this ● NU”
key to select and “DEF sign displays on the LCD and "DEF?" option, ?”
, at this moment you can press “H LD” to restore to factory defaults; flashes O
press “ME or “REC/ERASE” NU” to exit.
After restoring to factory defaults, the defaulting state of the system is: USB.0 ●
(no USB transmission); 1 (auto power off); 60s (auto record interval is APO
set up as 60s); clearing all data records.
5.USB data transmission function: (only for UT382, See Figure 4)
Long press “ME to enter USB ● NU”
transmission setting, and “USB.0” or
“USB.1” will be displayed on LCD;
USB.0 means that data can’t be
transmitted; “USB.1” means that data
can be transmitted; press “RA GE/+”N
or “M MI /-” key to switch betweenAX/ N
“USB.0” and “USB.1”.
The meter is set to "USB.0" mode ●
automatically every time it is powered on.
The luminometer (UT382) communicates ●
with PC using USB wire and your PC must
have a USB port. See Figure 4 for the
connection diagram.
When connecting UT382 to the computer, ●
you cannot operate any functional buttons
during transmission. Figure 4
6. Illuminance measurement
In process of measuring illuminance, the sensitive mirror must be ●
perpendicular to the measured illuminating source to ensure accuracy of
measured data..
If distance between measured illuminating source and illuminometer, ●
measuring position, angle or environment is different, then the measured
data will be different; because the intensity of light varies with change of
distance, position, angle and environment.
Make sure there is no scratch or dirt on sensitive mirror of luminometer, or ●
the measured data won’t be accurate.
When the illuminance the measuring range of the luminometer, “ L” ● exceeds O
sign will be displayed.
After completing measuring, cover the sensitive mirror with cap to avoid ●
scratch on sensitive mirror and keep it clean.
VI Spec cationsifi
1. General tionspecifica
Low battery indication:●
Type of sensor: digital visible light sensor●
Sampling rate: 100 times/s●
Power supply: one 1604A 6F22 9V battery●
Battery life: 200 hours for typical battery (alkaline battery)●
Dimensions: 26m● 195mmx 45mmx
Weight: about 185g (including battery)●
2. Environment limit
Indoor use●
Safety standards: E : 2006; ● N61326
E : 1998+A1+A2;N55022
E : 1998+A1+A2N55024
Pollution degree 2●
perating temperature and humidity● O :
0℃-30℃ (no more than 80%RH);
(no more than 75%RH);30℃-40℃
(no more than 45%RH)40℃-50℃
Storage temperature and humidity (no more than 80%RH)●: -20℃-+60℃
3. Electrical tionspecifica
Accuracy tolerance: ± (a%reading +b digits), calibrate once each year ●
Environment temperature: ●23℃±5℃
Environment humidity 80% RH● : ≤
Temperature coef t: 0.1× (accuracy tolerance)/● ficien ℃
Illuminance measurement
Function Range Resolution
Accuracy Tolerance: ± ( a %reading +b digits)
Illuminance
measuring
(LU )X
Illuminance
measuring
(FC)
The accuracy tolerance of FC can
be by unit conversion:verified
FC=10. , if accuracy tolerance 76lux
verification is needed, it can be
achieved by unit conversion.
20Lux
200Lux
2000Lux
20000Lux
2FC
20FC
200FC
2000FC
0.01Lux
0.1Lux
1Lux
10Lux
0.001FC
0.01FC
0.1FC
1FC
± (3% + 20)
± (3% + 8)
± (3% + 8)
± (3% + 8)
VII Maintenance
Warning
During replacing battery or measuring, keep the sensitive mirror from scratch or
dirt to avoid damaging the mirror or the measuring precision; and do influencing
not charge the replaced battery to avoid and safety accident!explosion
1. Battery installation and replacement
When “ ” is displayed on the luminometer, replace the battery immediately.
Replace the battery by following procedures:
Power off●
Loosen the screw of battery cover and take it off. ●
Replace with a new 6LF22 9V 1604A battery, please use battery with the ●
same model, and do not use unauthorized battery.
Pay attention to the anode “+” and the cathode “-”. After completing ●
installation, install the cover and tighten the screw.
2. General maintenance
When the surface of luminometer is dirty, clean with wet cloth and neutral ●
detergent, grinding miller and solvent are forbidden.
When the luminometer is damaged and needs to be repaired, please send it ●
to the designated maintenance center of our company for repair by
professional service man, do not repair it without authorization.
Especially in the process of using, keep the sensitive mirror of luminometer ●
away from scratch or dirt to avoid damaging the mirror or the influencing
measuring precision.
Remove the battery if it won’t be used for a long time.●
Store the luminometer in a place free of moist, high temperature and strong ●
magnetic .field
S tions and other information shown on this instruction manual are subject pecifica
to change without notice
LCD: 3 1/2-bit display, 2000-count.●
ver range display: “ L”● O O
P/N:110401104377X DATE:2018.06.26 REV.5