Wall Mounting (DO NOT Mount on Drywall and/or vaulted ceiling.)
Montaje en pared (NO montar en paredes de yeso y/o techos abovedados.)
Wandmontage (NICHT an Trockenbauwänden und/oder Gewölbedecken montieren).
Montage mural (NE PAS monter sur une cloison sèche et/ou un plafond voûté).
Montaggio a parete (NON montare su pareti a secco e/o soffitti a volta).
壁取り付け(乾式壁や吹き抜け天井には取り付けないでください。)
2A
Brick/Concrete Wall / Pared de ladrillo/hormigón / Ziegel-/Betonmauer
Mur en briques/béton / Muro di mattoni/cemento / レンガ / コンクリート壁
1b
Wall Mounting (DO NOT Mount on Drywall and/or vaulted ceiling.)
Montaje en pared (NO montar en paredes de yeso y/o techos abovedados.)
Wandmontage (NICHT an Trockenbauwänden und/oder Gewölbedecken montieren).
Montage mural (NE PAS monter sur une cloison sèche et/ou un plafond voûté).
Montaggio a parete (NON montare su pareti a secco e/o soffitti a volta).
壁取り付け(乾式壁や吹き抜け天井には取り付けないでください。)
support@walielectric.com
PM-005-B
PM-005-W
INSTALLATION
MANUAL
MANUAL DE INSTALACIÓN
INSTALLATIONSHANDBUCH
MANUEL D'INSTALLATION
MANUALE DI INSTALLAZIONE
インストレーションマニュアル
Projector Mount
EN
Soporte para proyector
ES
Projektor-Halterung
DE
Support pour projecteur
FR
Montaggio del proiettore
IT
プロジェクターマウント
JP
1-844-SATTLER (18447288537)
If you do not understand these directions, or if you have any doubts about the safety of the installation, please call a qualified techn-
ician. Check carefully to make sure there are no missing or defective parts. Improper installation may cause damage or serious injury.
Do not use this product for any purpose that is not explicitly specified in this manual. Do not exceed weight capacity. We cannot be
liable for damage or injury caused by improper mounting, incorrect assembly or inappropriate use.
DO NOT Mount on Drywall and/or
vaulted ceiling.
TIPOVER WARNING
SERIOUS OR FATAL CRUSHING INJURIES CAN OCCUR FROM TIP OVER. TO HELP PREVENT TIP OVER:
USE OF TIPOVER RESTRAINTS MAY ONLY REDUCE, BUT NOT ELIMINATE RISK OF TIP OVER.
SMALL PARTS- NOT FOR CHILDREN UNDER 3 YEARS. ADULT SUPERVISION IS REQUIRED.
● NEVER ALLOW CHILDREN TO CLIMB, STAND, HANG OR PLAY ON ANY PART OF THE MONITOR OR STAND.
● USE TIPOVER RESTRAINT OR ANCHOR STAND TO WALL.
●
DO NOT MOUNT ON DRYWALL AND/OR VAULTED CEILING.
!
WARNING
(EN)
(ES)
(DE)
(FR)
(IT)
(JP)
ADVERTENCIA
Si no comprende estas instrucciones o tiene dudas sobre la seguridad de la instalación, llame a un técnico cualificado. Compruebe
cuidadosamente que no faltan piezas o que no hay piezas defectuosas. Una instalación incorrecta puede causar daños o lesiones
graves. No utilice este producto para ningún fin que no esté explícitamente especificado en este manual. No exceda la capacidad de
peso. No nos hacemos responsables de los daños o lesiones causados por un montaje inadecuado, un ensamblaje incorrecto o un
uso inapropiado.NO Montar en Drywall y / o techo abovedado.
AVISO DE VUELCO
EL VUELCO PUEDE PROVOCAR LESIONES POR APLASTAMIENTO GRAVES O MORTALES. PARA EVITAR EL VUELCO:
EL USO DE SISTEMAS DE RETENCIÓN ANTIVUELCO SÓLO PUEDE REDUCIR, PERO NO ELIMINAR, EL RIESGO DE VUELCO.
PIEZAS PEQUEÑAS- NO APTO PARA MENORES DE 3 AÑOS. SE REQUIERE ES NECESARIA.
● NO PERMITA NUNCA QUE LOS NIÑOS TREPEN, SE PONGAN DE PIE, SE CUELGUEN O JUEGUEN EN NINGUNA PARTE DEL
MONITOR O DEL SOPORTE.
● UTILICE UN DISPOSITIVO DE SUJECIÓN O ANCLE EL SOPORTE A LA PARED.
● NO MONTAR EN PAREDES DE YESO Y/O TECHOS ABOVEDADOS.
!
WARNUNG
Wenn Sie diese Anweisungen nicht verstehen oder Zweifel an der Sicherheit der Installation haben, wenden Sie sich bitte an einen
qualifizierten Techniker. Überprüfen Sie sorgfältig, dass keine Teile fehlen oder defekt sind. Eine unsachgemäße Installation kann zu
Schäden oder schweren Verletzungen führen. Verwenden Sie dieses Produkt nicht für Zwecke, die nicht ausdrücklich in dieser Anleit-
ung angegeben sind. Überschreiten Sie nicht die Gewichtskapazität. Wir übernehmen keine Haftung für Schäden oder Verletzungen,
die durch unsachgemäße Montage, falschen Zusammenbau oder unsachgemäßen Gebrauch verursacht werden.NICHT auf Trocken-
bauwände und/oder Gewölbedecke.
UMKIPPWARNUNG
BEIM UMKIPPEN KÖNNEN SCHWERE ODER TÖDLICHE QUETSCHVERLETZUNGEN AUFTRETEN. UM EIN UMKIPPEN ZU VERHINDERN:
DIE VERWENDUNG VON KIPPSCHUTZVORRICHTUNGEN KANN DIE GEFAHR DES UMKIPPENS NUR VERRINGERN, ABER NICHT AUSSCHLIESSEN.
KLEINTEILE - NICHT FÜR KINDER UNTER 3 JAHREN GEEIGNET. BEAUFSICHTIGUNG DURCH ERWACHSENE IST ERFORDERLICH.
● ERLAUBEN SIE KINDERN NIEMALS, AUF TEILE DES MONITORS ODER DES STÄNDERS ZU KLETTERN, ZU STEHEN, ZU HÄNGEN
ODER ZU SPIELEN.
● KIPPSICHERUNG VERWENDEN ODER STÄNDER AN DER WAND VERANKERN.
● NICHT AN GIPSKARTONWÄNDEN UND/ODER GEWÖLBEDECKEN MONTIEREN.
!
AVERTISSEMENT
Si vous ne comprenez pas ces instructions ou si vous avez des doutes sur la sécurité de l'installation, veuillez appeler un technici-
en qualifié. Vérifiez soigneusement qu'aucune pièce ne manque ou n'est défectueuse. Une installation incorrecte peut entraîner des
dommages ou des blessures graves. N'utilisez pas ce produit à des fins qui ne sont pas explicitement spécifiées dans ce manuel. Ne
pas dépasser la capacité de charge. Nous ne pouvons être tenus responsables des dommages ou blessures causés par un montage
incorrect, un assemblage incorrect ou une utilisation inappropriée.NE PAS monter sur une cloison sèche et/ou un plafond voûté.
plafond voûté.
AVERTISSEMENT DE BASCULEMENT
LE BASCULEMENT PEUT PROVOQUER DES BLESSURES GRAVES OU MORTELLES PAR ÉCRASEMENT. POUR ÉVITER LE BASCULEMENT :
L'UTILISATION DE DISPOSITIFS DE RETENUE EN CAS DE BASCULEMENT NE PEUT QUE RÉDUIRE, MAIS NON ÉLIMINER, LE RISQUE DE BASCULEMENT.
PETITES PIÈCES - PAS POUR LES ENFANTS DE MOINS DE 3 ANS. LA SURVEILLANCE D'UN ADULTE EST REQUISE.
● NE JAMAIS LAISSER LES ENFANTS GRIMPER, SE TENIR, S'ACCROCHER OU JOUER SUR UNE QUELCONQUE PARTIE DU MONITEUR OU DU
SUPPORT.
● UTILISER UN DISPOSITIF DE RETENUE EN CAS DE BASCULEMENT OU ANCRER LE SUPPORT AU MUR.
● NE PAS MONTER SUR DES CLOISONS SÈCHES ET/OU DES PLAFONDS VOÛTÉS.
!
PICCOLE PARTI - NON ADATTO A BAMBINI DI ETÀ INFERIORE A 3 ANNI. LA SUPERVISIONE DI UN ADULTO È NECESSARIA.
ATTENZIONE
Se non si comprendono queste indicazioni o se si hanno dubbi sulla sicurezza dell'installazione, rivolgersi a un tecnico qualificato.
Controllare attentamente che non vi siano parti mancanti o difettose. Un'installazione non corretta può causare danni o lesioni gravi.
Non utilizzare il prodotto per scopi non esplicitamente specificati nel presente manuale. Non superare la capacità di peso. Non poss-
iamo essere ritenuti responsabili di danni o lesioni causati da montaggio improprio, assemblaggio non corretto o uso non appropriato.
NON montare su pareti a secco e/o soffitto a volta.
AVVISO DI RIBALTAMENTO
IL RIBALTAMENTO PUÒ PROVOCARE LESIONI GRAVI O MORTALI DA SCHIACCIAMENTO. PER EVITARE IL RIBALTAMENTO:
L'USO DI SISTEMI DI RITENUTA ANTIRIBALTAMENTO PUÒ SOLO RIDURRE, MA NON ELIMINARE, IL RISCHIO DI RIBALTAMENTO.
● NON PERMETTERE MAI AI BAMBINI DI ARRAMPICARSI, STARE IN PIEDI, APPENDERSI O GIOCARE SU QUALSIASI PARTE DEL
MONITOR O DEL SUPPORTO.
● UTILIZZARE UN SISTEMA DI RITENUTA ANTIRIBALTAMENTO O ANCORARE LO STATIVO ALLA PARETE.
● NON MONTARE SU PARETI A SECCO E/O SOFFITTI A VOLTA.
!
これらの指示を理解できない場合、または設置の安全性について疑問がある場合は、資格のある技術者に連絡してください。欠品
や不良品がないことをよく確認してください。不適切な設置は、破損や重傷の原因になります。本製品を本書で明示されていない目
的に使用しないでください。耐荷重を超えないようにしてください。不適切な取り付け、不適切な組み立て、不適切な使用によって
生じた損害や怪我については、当社は責任を負いかねます。乾式壁や吹き抜け天井には取り付けないでください。アーチ型天井
転倒注意
転倒により、重傷または致命的な圧死が発生する可能性があります。転倒を防止するために
転倒防止用拘束具の使用は、転倒の危険性を低減することはできても、排除することはできません。
3歳未満のお子様には使用しないでください。大人の監視が必要です。
● お子さまがモニターやスタンドの上に登ったり、立ったり、ぶら下がったり、遊んだりしないようにしてください。
● 転倒防止器具を使用するか、スタンドを壁に固定してください。
● 乾式壁や吹き抜け天井には取り付けないでください。
!
警告
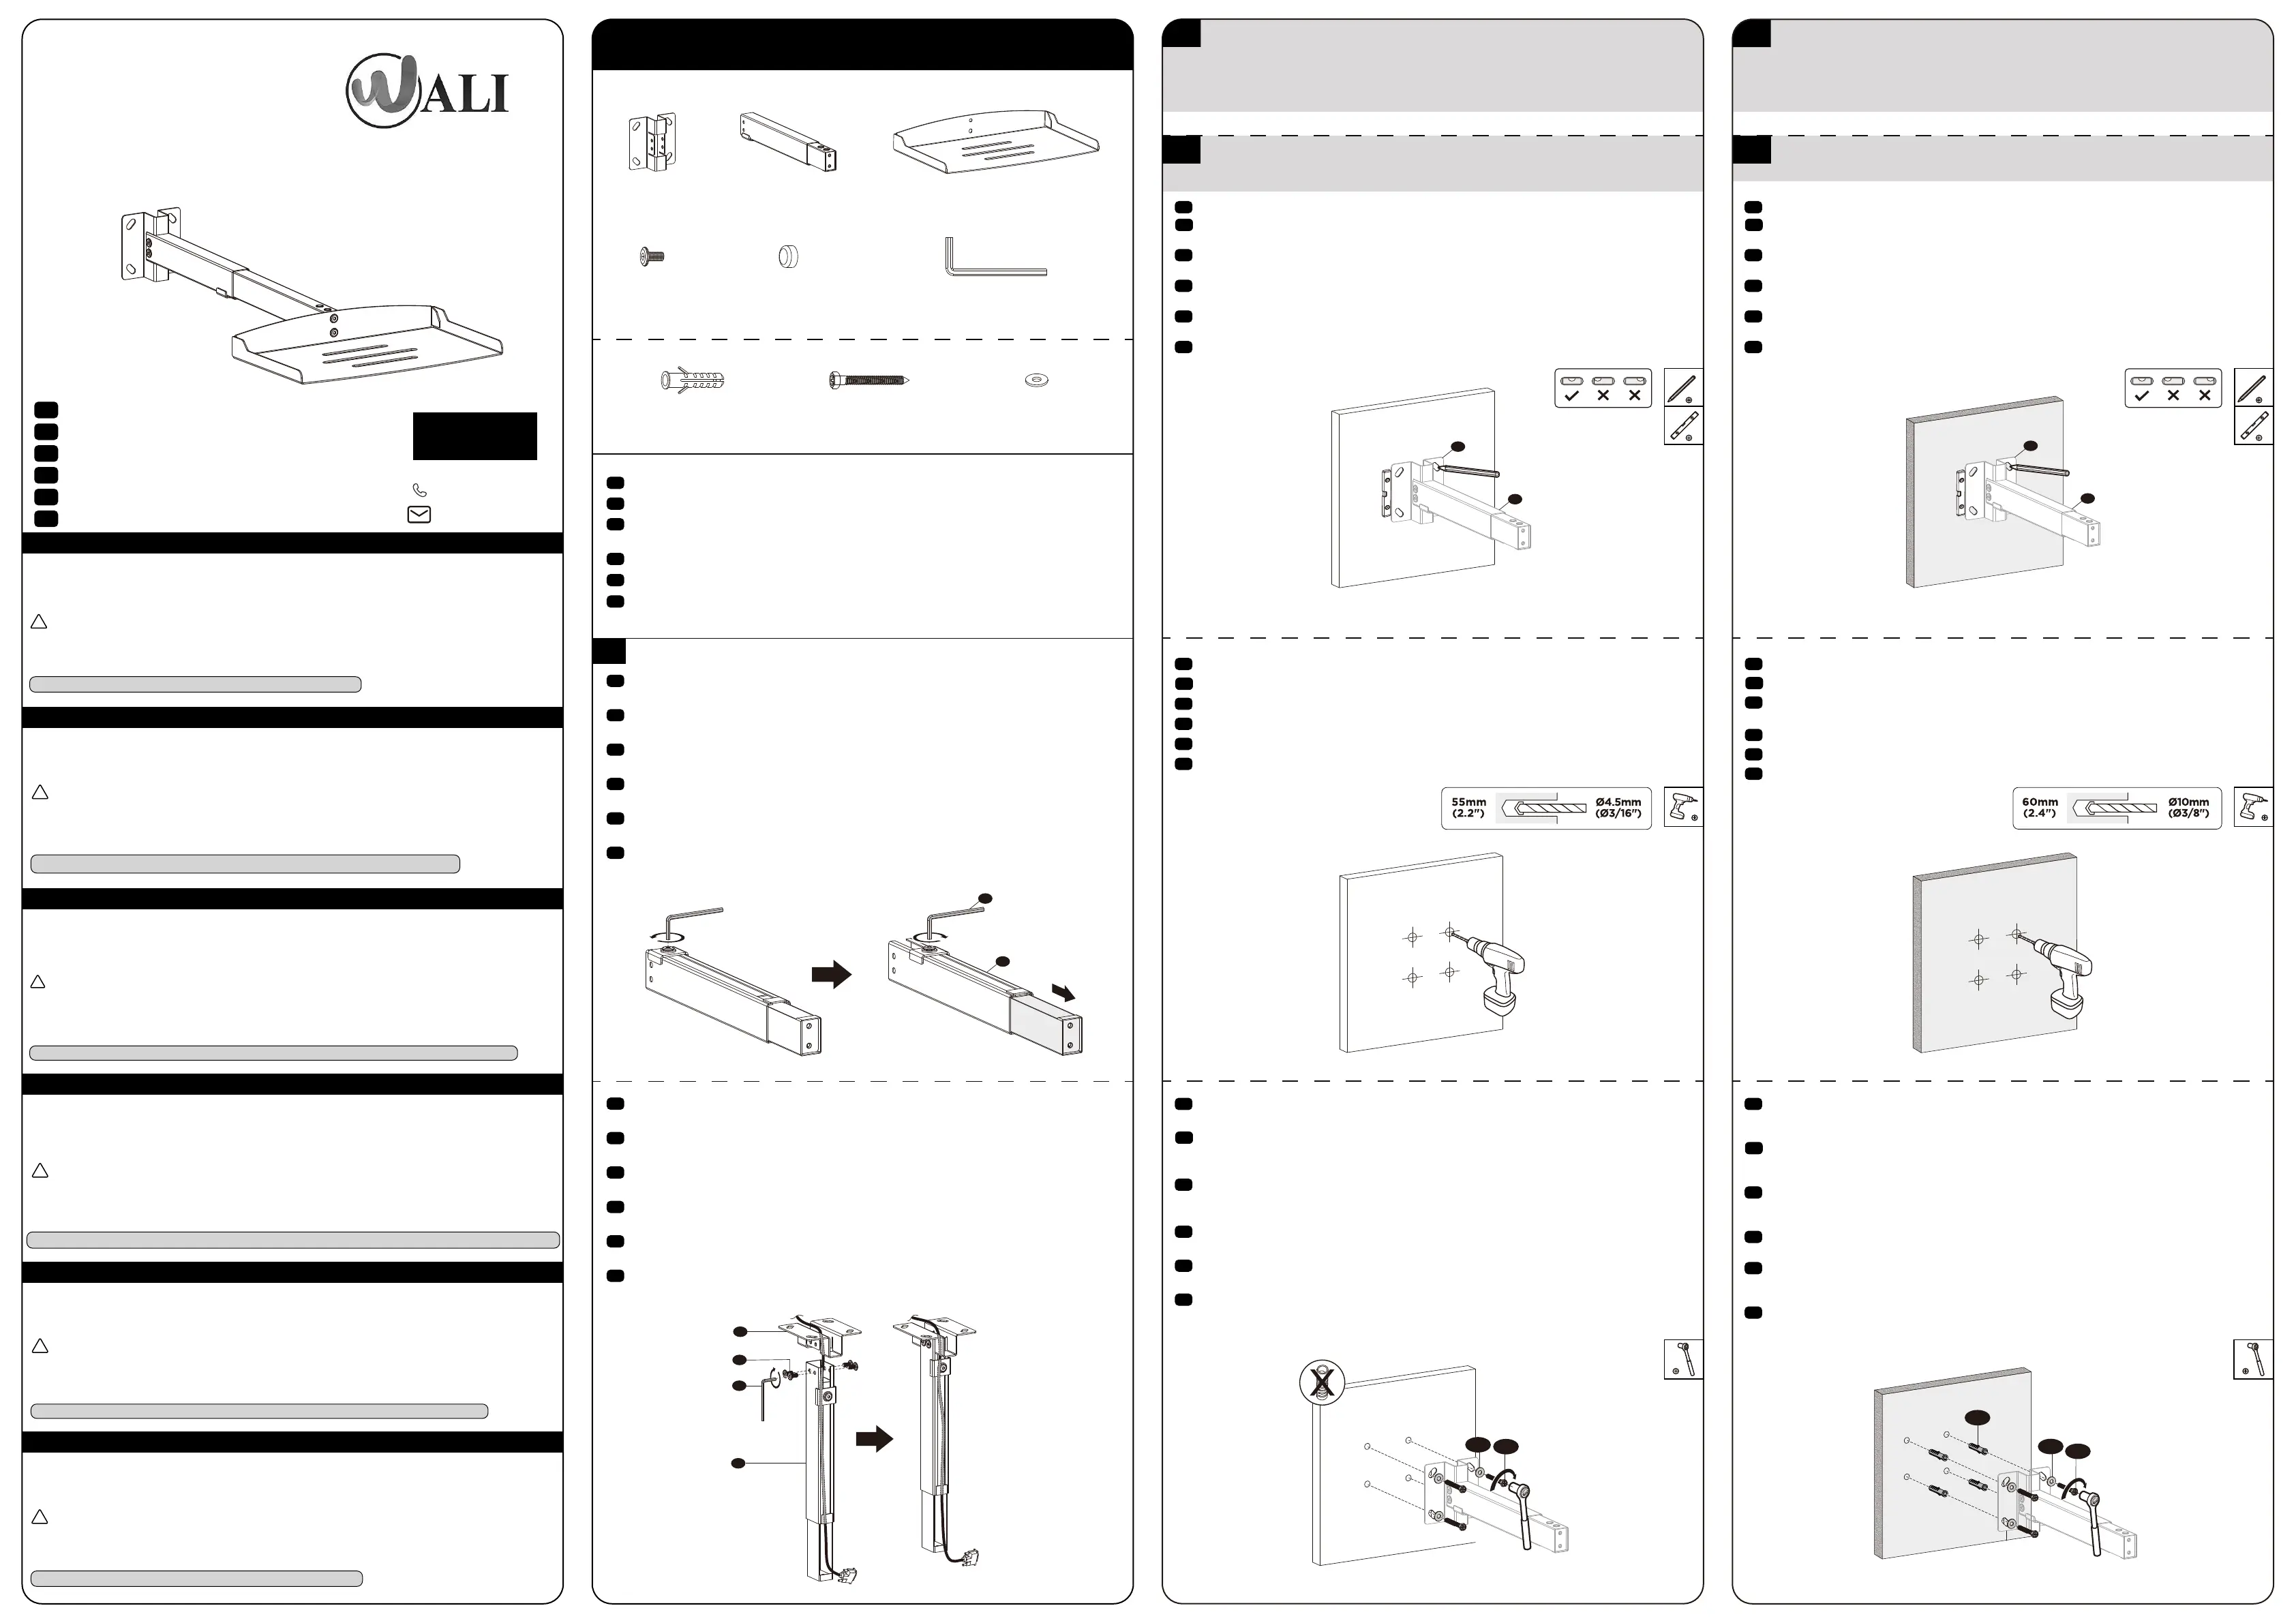
Supplied Parts List / Lista de piezas suministradas / Mitgelieferte Teileliste
Liste des pièces fournies / Elenco delle parti in dotazione / 付属パーツリスト
1-2b
A (x1)
D (x6)
B (x1)
E (x4) F (x1)
C (x1)
W-A (x4) W-B (x4) W-C (x4)
Drill, socket wrench, screwdriver, pencil, bubble level needed, not included
EN
ES
Se necesita taladro, llave de tubo, destornillador, lápiz y nivel de burbuja, no incluidos.
DE
Bohrer, Steckschlüssel, Schraubendreher, Bleistift, Wasserwaage erforderlich, nicht im
Lieferumfang enthalten
FR
Perceuse, clé à douille, tournevis, crayon, niveau à bulle nécessaires, non inclus
JP
ドリル、ソケットレンチ、ドライバー、鉛筆、水準器が必要。
IT
Sono necessari trapano, chiave a bussola, cacciavite, matita, livella a bolla, non inclusi.
1
1. Extend the inner column as shown to leave enough space for routing cable, and then tighten the
screw.
EN
ES
1. Extienda la columna interior como se muestra para dejar espacio suficiente para el cableado y, a
continuación, apriete el tornillo.
DE
1. Ziehen Sie die innere Säule wie gezeigt aus, um genügend Platz für die Kabelführung zu lassen, und
ziehen Sie dann die Schraube fest.
FR
1. Allonger la colonne intérieure comme indiqué pour laisser suffisamment d'espace pour
l'acheminement du câble, puis serrer la vis.
IT
1. Estendere la colonna interna come illustrato per lasciare spazio sufficiente al passaggio del cavo,
quindi serrare la vite.
JP
1. インナー・コラムを図のように伸ばし、ケーブルの配 線に十分なスペースを確保し、ネジを締めます。
B
F
A
D
F
B
2.Connect the Wall Plate (A) with the Column (B) using M6x10 Bolt (D) , and tighten with Allen Key
4mm (F) .
EN
ES
2. Conecte la placa de pared (A) con la columna (B) utilizando un tornillo M6x10 (D) y apriételo con
una llave Allen de 4 mm (F).
DE
Verbinden Sie die Wandplatte (A) mit der Säule (B) mit der Schraube M6x10 (D) und ziehen Sie sie mit
dem Inbusschlüssel 4mm (F) fest.
FR
2) Relier la plaque murale (A) à la colonne (B) à l'aide d'un boulon M6x10 (D) et serrer avec une clé
Allen de 4 mm (F).
IT
2.Collegare la piastra a parete (A) con la colonna (B) utilizzando il bullone M6x10 (D) e serrare con la
chiave a brugola da 4 mm (F).
JP
2.ウォールプレート(A)とコラム(B)をM6x10ボルト(D)で接続し、六角レンチ4mm(F)で締めます。
2A
Wood Stud Wall/Cabinets / Pared de madera/armarios / Holzständerwand/Schränke
Murs/armoires à colombages en bois / Parete a traliccio/armadi in legno
トレリス・ウォール/木製キャビネット
1.Mark the position with Bubble Level & pencil on the wall. (Bubble Level & pencil not included)
EN
ES
1.Marque la posición con un nivel de burbuja y un lápiz en la pared. (Nivel de burbuja y lápiz no
incluidos).
DE
1. markieren Sie die Position mit Wasserwaage und Bleistift an der Wand. (Wasserwaage und Bleistift
nicht enthalten)
FR
1. marquer la position avec un niveau à bulle et un crayon sur le mur. (Niveau à bulle et crayon non
inclus)
IT
1. Segnare la posizione con la livella a bolla e la matita sulla parete. (Livella a bolla e matita non
incluse).
JP
1.壁にバブルレベルと鉛筆で位置をマークします。(バブルレベルと鉛筆は含まれていません)
B
A
1a
2.Drill 3/16”(4.5mm) diameter x 2.2”(55mm) length holes at the marked position.
EN
ES
2.Taladre orificios de 4,5 mm (3/16«) de diámetro x 55 mm (2,2») de longitud en la posición marcada.
DE
2.Bohren Sie an der markierten Stelle Löcher mit 3/16„ (4,5 mm) Durchmesser und 2,2“ (55 mm) Länge.
FR
2. percer des trous de 4,5 mm de diamètre et de 55 mm de longueur à l'endroit indiqué.
IT
2. Praticare fori di 4,5 mm di diametro e 55 mm di lunghezza nella posizione contrassegnata.
JP
2.印の位置に直径3/16「(4.5mm)×長さ2.2」(55mm)の穴を開ける。
3.Attach the bracket to the wall and tighten using Washer (W-C) and Screw (W-B) with a socket wrench
or screwdriver (socket wrench or screwdriver not included).
EN
ES
3.Fije el soporte a la pared y apriételo utilizando la arandela (W-C) y el tornillo (W-B) con una llave de
tubo o un destornillador (llave de tubo o destornillador no incluidos). o destornillador (llave de tubo o
destornillador no incluidos).
DE
3.Befestigen Sie die Halterung an der Wand und ziehen Sie sie mit der Unterlegscheibe (W-C) und der
Schraube (W-B) mit einem Steckschlüssel oder Schraubenzieher fest (Steckschlüssel oder
Schraubenzieher nicht im Lieferumfang enthalten).
FR
3. fixer le support au mur et serrer la rondelle (W-C) et la vis (W-B) à l'aide d'une clé à douille ou d'un
tournevis (clé à douille ou tournevis non inclus).
IT
3.Fissare la staffa alla parete e serrare la rondella (W-C) e la vite (W-B) con una chiave a bussola o un
cacciavite (chiave a bussola o cacciavite non inclusi).
JP
3.ブラケットを壁に取り付け、ワッシャー(W-C)とネジ(W-B)を使ってソケットレンチまたはドライバーで締めま
す(ソケットレンチまたはドライバーは付属していません)。
W-B
W-C
B
A
1.Mark the position with Bubble Level & pencil on the wall. (Bubble Level & pencil not included)
EN
ES
1.Marque la posición con un nivel de burbuja y un lápiz en la pared. (Nivel de burbuja y lápiz no
incluidos).
DE
1. markieren Sie die Position mit Wasserwaage und Bleistift an der Wand. (Wasserwaage und Bleistift
nicht enthalten)
FR
1. marquer la position avec un niveau à bulle et un crayon sur le mur. (Niveau à bulle et crayon non
inclus)
IT
1. Segnare la posizione con la livella a bolla e la matita sulla parete. (Livella a bolla e matita non
incluse).
JP
1.壁にバブルレベルと鉛筆で位置をマークします。(バブルレベルと鉛筆は含まれていません)
2.Drill 3/8”(10mm) diameter x 2.4”(60mm) length holes at the marked position.
EN
ES
2.Taladre agujeros de 3/8«(10mm) de diámetro x 2,4»(60mm) de longitud en la posición marcada.
DE
2.Bohren Sie an der markierten Stelle Löcher mit einem Durchmesser von 3/8„ (10 mm) und einer
Länge von 2,4“ (60 mm).
FR
2. Percez des trous de 10 mm (3/8« ) de diamètre et de 60 mm (2,4 ») de longueur à l'endroit indiqué.
IT
2. Praticare fori da 3/8“ (10 mm) di diametro x 2,4” (60 mm) di lunghezza nella posizione contrassegnata.
JP
2.印の位置に直径3/8「(10mm)×長さ2.4」(60mm)の穴を開ける。
3.Insert the Anchor (W-A) into the mounting holes. Attach the bracket to the wall and tighten using
Washer (W-C) and Screw (W-B) with a socket wrench or screwdriver (socket wrench or screwdriver
not included).
EN
ES
3.Inserte el anclaje (W-A) en los orificios de montaje. Fije el soporte a la pared y apriételo utilizando
arandela (W-C) y el tornillo (W-B) con una llave de tubo o un destornillador (llave de tubo o
destornillador no incluidos).
DE
3.Stecken Sie den Dübel (W-A) in die Befestigungslöcher. Befestigen Sie die Halterung an der Wand
und ziehen Sie sie mit Unterlegscheibe (W-C) und Schraube (W-B) mit einem Steckschlüssel oder
Schraubendreher fest (Steckschlüssel oder Schraubendreher nicht im Lieferumfang enthalten).
FR
3.Insérez la cheville (W-A) dans les trous de montage. Fixez le support au mur et serrez la rondelle
(W-C) et la vis (W-B) à l'aide d'une clé à douille ou d'un tournevis (clé à douille ou tournevis non inclus).
IT
3.Inserire l'ancoraggio (W-A) nei fori di montaggio. Fissare la staffa alla parete e serrare la rondella
(W-C) e la vite (W-B) con una chiave a bussola o un cacciavite (chiave a bussola o cacciavite non
inclusi).
JP
3.アンカー(W-A)を取り付け穴に挿入します。ブラケットを壁に取り付け、ワッシャー(W-C)とネジ(W-B)をソ
ケットレンチまたはドライバー(ソケットレンチまたはドライバーは付属していません)で締めます。
W-B
W-C
W-A