(see at right for options descripti
(see at right for options descripti
(see at right for options descripti
(see at right for options descripti(see at right for options description)
on)
on)
on)on)
CANCEL/OFF BU
CANCEL/OFF BU
CANCEL/OFF BU
CANCEL/OFF BUCANCEL/OFF BUTTON
TTON
TTON
TTONTTON
Push this button to switch off the control panel.
If pressed when a program is running it cancels the
program ongoing draining water for 1 minute.
If pressed when the dishwasher is switched off it
drains any possible liquids from dishwasher
(1 minute process).
If the indicator flashes repeatedly, see page 6 -
chapter “What to do if...”.
ST
ST
ST
STSTART/RESUME BUTTON
ART/RESUME BUTTON
ART/RESUME BUTTON
ART/RESUME BUTTONART/RESUME BUTTON
Push this button to start the selected program:
the indicator lights up and goes off at the end of the
program. When the door is opened during a
washing cycle, the cycle is temporarily paused:
the Start indicator blinks. To resume the cycle
close the door and push Start button again.
PROGRAM SELE
PROGRAM SELE
PROGRAM SELE
PROGRAM SELEPROGRAM SELECTION
CTION
CTION
CTION CTION
BUTTON
BUTTON
BUTTON
BUTTONBUTTON
Push “Programs” button
(repeatedly) until the indicator
of the required program lights
up (see “Table of programs”
below).
1)
1)
1)
1)1) Program dat
Program dat
Program dat
Program datProgram data obtained in confor
a obtained in confor
a obtained in confor
a obtained in confora obtained in conformity with Europea
mity with Europea
mity with Europea
mity with Europeamity with European standard EN 50242, obta
n standard EN 50242, obta
n standard EN 50242, obta
n standard EN 50242, obtan standard EN 50242, obtained under normal
ined under normal
ined under normal
ined under normalined under normal conditions (without any op
conditions (without any op
conditions (without any op
conditions (without any op conditions (without any options) a
tions) a
tions) a
tions) ations) and ma
nd ma
nd ma
nd mand may vary depending on
y vary depending on
y vary depending on
y vary depending on y vary depending on
conditions. Di
conditions. Di
conditions. Di
conditions. Diconditions. Differences of u
fferences of u
fferences of u
fferences of ufferences of up to 20 minutes are poss
p to 20 minutes are poss
p to 20 minutes are poss
p to 20 minutes are possp to 20 minutes are possible with sensor
ible with sensor
ible with sensor
ible with sensorible with sensor programs as a resul
programs as a resul
programs as a resul
programs as a resul programs as a result of the appliance’
t of the appliance’
t of the appliance’
t of the appliance’t of the appliance’s automatic cali
s automatic cali
s automatic cali
s automatic calis automatic calibrat
brat
brat
bratbration s
ion s
ion s
ion sion system.
ystem.
ystem.
ystem.ystem.
2)
2)
2)
2)2) Refer
Refer
Refer
ReferReference progra
ence progra
ence progra
ence prograence program for energy l
m for energy l
m for energy l
m for energy lm for energy label in com
abel in com
abel in com
abel in comabel in compliance wi
pliance wi
pliance wi
pliance wipliance with EN 50242 regu
th EN 50242 regu
th EN 50242 regu
th EN 50242 reguth EN 50242 regulation
lation
lation
lationlations. - Note for
s. - Note for
s. - Note for
s. - Note fors. - Note for T
T
T
T T
esting Inst
esting Inst
esting Inst
esting Instesting Institutes: for
itutes: for
itutes: for
itutes: foritutes: for detailed i
detailed i
detailed i
detailed i detailed infor
nfor
nfor
nfornforma
ma
ma
mamation
tion
tion
tiontion on the
on the
on the
on the on the
EN/Standard loading c
EN/Standard loading c
EN/Standard loading c
EN/Standard loading cEN/Standard loading comparison test and other
omparison test and other
omparison test and other
omparison test and otheromparison test and other tests, contact the
tests, contact the
tests, contact the
tests, contact the tests, contact the following address:
following address:
following address:
following address: following address: “contact@whirlpool
“contact@whirlpool
“contact@whirlpool
“contact@whirlpool “contact@whirlpool.com”.
.com”.
.com”.
.com”..com”.
3)
3)
3)
3)3) The
The
The
The The antibacterial action has been tested
antibacterial action has been tested
antibacterial action has been tested
antibacterial action has been testedantibacterial action has been tested by the Institut Past
by the Institut Past
by the Institut Past
by the Institut Past by the Institut Pasteur of Lille (Franc
eur of Lille (Franc
eur of Lille (Franc
eur of Lille (Franceur of Lille (France), based on the NF EN 13697 standard of Nove
e), based on the NF EN 13697 standard of Nove
e), based on the NF EN 13697 standard of Nove
e), based on the NF EN 13697 standard of Novee), based on the NF EN 13697 standard of November 2001.
mber 2001.
mber 2001.
mber 2001.mber 2001.
* Po
* Po
* Po
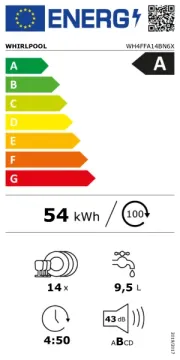
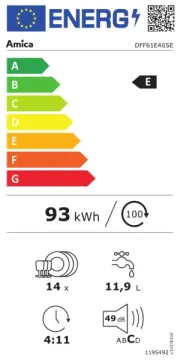
* Po* Power consumption in:
wer consumption in:
wer consumption in:
wer consumption in:wer consumption in: Left-on mode: 0.70 W / Off-mode: 0.
Left-on mode: 0.70 W / Off-mode: 0.
Left-on mode: 0.70 W / Off-mode: 0.
Left-on mode: 0.70 W / Off-mode: 0. Left-on mode: 0.70 W / Off-mode: 0.40 W
40 W
40 W
40 W40 W.
.
.
..
T
T
T
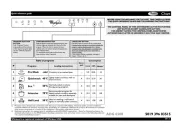
TTable of programs
able of programs
able of programs
able of programsable of programs
Deter-
Deter-
Deter-
Deter-Deter-
gent
gent
gent
gentgent
Consumption
Consumption
Consumption
ConsumptionConsumption
Drying
Drying
Drying
DryingDrying
Phase
Phase
Phase
PhasePhase
P
P
P
PP Programs
Programs
Programs
ProgramsPrograms Available
Available
Available
AvailableAvailable
options
options
options
optionsoptions Loading i
Loading i
Loading i
Loading iLoading instruct
nstruct
nstruct
nstructnstructions
ions
ions
ionsions
Litres
Litres
Litres
LitresLitres kWh
kWh
kWh
kWhkWh Minutes
Minutes
Minutes
MinutesMinutes1)
1)
1)
1)1)
1
1
1
11
Auto Sensor
Auto Sensor
Auto Sensor
Auto SensorAuto Sensor 50°-65°C
50°-65°C
50°-65°C
50°-65°C50°-65°C Delay
Antibacterial
rinse
Recommended program for
routine washes, with dried-on
food (e.g. EN 50242). X 7-15 1.00-1.70 70-172 Full
2
2
2
22
Pre-
Pre-
Pre-
Pre-Pre-W
W
W
WWash
ash
ash
ashash cold
cold
cold
coldcold Delay Crockery to be washed later. — 4.0 0.01 14-16 NO
3
3
3
33
Rapi
Rapi
Rapi
RapiRapid
d
d
dd 45°C
45°C
45°C
45°C45°C Delay Lightly soiled crockery, with no
dried-on food. X 11.0 0.85 30-50 NO
4
4
4
44 Eco
Eco
Eco
EcoEco2)
2)
2)
2)2) 50°C
50°C
50°C
50°C50°C Delay
Antibacterial
rinse
Normally soiled crockery.
Standard program the most
efficient in terms of its combined
energy and water consumption .
X 12.0 1.02 170 Full
5
5
5
55
Intensi
Intensi
Intensi
IntensiIntensive
ve
ve
veve 65°C
65°C
65°C
65°C65°C Delay
Antibacterial
rinse
Recommended program for
heavily soiled crockery, especially
suitable for pans and saucepans. X 15.0 1.60 165-175 Full
5019 300 00740
5019 300 00740
5019 300 00740
5019 300 007405019 300 00740
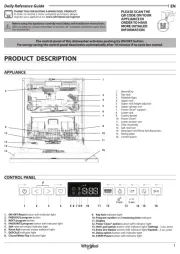
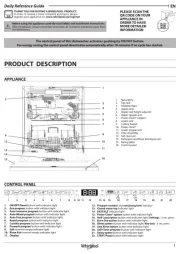
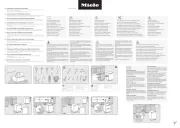
BEFORE USING THE APPLIANCE FOR THE
BEFORE USING THE APPLIANCE FOR THE
BEFORE USING THE APPLIANCE FOR THE
BEFORE USING THE APPLIANCE FOR THE BEFORE USING THE APPLIANCE FOR THE FIRST TIME CAREFULL
FIRST TIME CAREFULL
FIRST TIME CAREFULL
FIRST TIME CAREFULLFIRST TIME CAREFULLY READ THIS
Y READ THIS
Y READ THIS
Y READ THIS Y READ THIS
QUICK REFERENCE GUIDE AND THE ASSEMBL
QUICK REFERENCE GUIDE AND THE ASSEMBL
QUICK REFERENCE GUIDE AND THE ASSEMBL
QUICK REFERENCE GUIDE AND THE ASSEMBLQUICK REFERENCE GUIDE AND THE ASSEMBLY INSTRUCTIONS!
Y INSTRUCTIONS!
Y INSTRUCTIONS!
Y INSTRUCTIONS!Y INSTRUCTIONS!
Options and display description
SAL
SAL
SAL
SALSALT INDICA
T INDICA
T INDICA
T INDICAT INDICATO
TO
TO
TOTOR
R
R
RR
When lit (at the end of the
cycle), the salt reservoir
needs to be refilled.
DELA
DELA
DELA
DELADELAYED ST
YED ST
YED ST
YED STYED START
ART
ART
ART ART
BUTTON
BUTTON
BUTTON
BUTTONBUTTON
The wash cycle can be
programmed to start
after 2, 4 or 8 hours.
Then press the Start
button. The wash
program will start after
the set time.
RINSE AID INDICA
RINSE AID INDICA
RINSE AID INDICA
RINSE AID INDICARINSE AID INDICATOR
TOR
TOR
TORTOR
When lit (at the end of the
cycle), the rinse aid
dispenser needs to be
refilled.
THE CONTROL P
THE CONTROL P
THE CONTROL P
THE CONTROL PTHE CONTROL PANEL OF THIS DISHW
ANEL OF THIS DISHW
ANEL OF THIS DISHW
ANEL OF THIS DISHWANEL OF THIS DISHWASHER ACTIV
ASHER ACTIV
ASHER ACTIV
ASHER ACTIVASHER ACTIVA
A
A
AATES PUSHING ANY
TES PUSHING ANY
TES PUSHING ANY
TES PUSHING ANY TES PUSHING ANY
BUTTON EXC
BUTTON EXC
BUTTON EXC
BUTTON EXCBUTTON EXCEPT CANCEL/OFF BUTTON.
EPT CANCEL/OFF BUTTON.
EPT CANCEL/OFF BUTTON.
EPT CANCEL/OFF BUTTON.EPT CANCEL/OFF BUTTON.
FOR ENERGY SA
FOR ENERGY SA
FOR ENERGY SA
FOR ENERGY SAFOR ENERGY SAVING THE CONTROL P
VING THE CONTROL P
VING THE CONTROL P
VING THE CONTROL PVING THE CONTROL PANEL DEACTIV
ANEL DEACTIV
ANEL DEACTIV
ANEL DEACTIVANEL DEACTIVA
A
A
AATES
TES
TES
TES TES
AUTOMA
AUTOMA
AUTOMA
AUTOMAAUTOMATICALL
TICALL
TICALL
TICALLTICALLY AFTER 30 SECONDS IF NO CYCLE HAS ST
Y AFTER 30 SECONDS IF NO CYCLE HAS ST
Y AFTER 30 SECONDS IF NO CYCLE HAS ST
Y AFTER 30 SECONDS IF NO CYCLE HAS STY AFTER 30 SECONDS IF NO CYCLE HAS STARTED.
ARTED.
ARTED.
ARTED.ARTED.
ANTIBACTERIAL RINSE
ANTIBACTERIAL RINSE
ANTIBACTERIAL RINSE
ANTIBACTERIAL RINSEANTIBACTERIAL RINSE 3)
3)
3)
3)3)
This function activates an
antibacterial rinse at the end
of the wash cycle,
guaranteeing a further
reduction of bacteria. Press
the button to activate or
deactivate the function. This
function can be used with
the programs indicated in
the table of programs. The
dishwasher door must be
kept shut for the entire
duration of the program in
order to guarantee
reduction of bacteria. If the
door is opened the indicator
lamp starts flashing.
T
T
T
TTA
A
A
AABLET SETTIN
BLET SETTIN
BLET SETTIN
BLET SETTINBLET SETTING
G
G
GG
This setting allows to optimize the cycle performances
according the type of detergent used.
Push the Tablet button for 3 seconds (until the indicator
lights up) if you are using the combined detergents in
tablet (rinse aid, salt and detergent in 1 dose).
If you are using powder detergent or liquid detergent,
the Tablet indicator on the control panel has to be off.
Quick reference guide
Quick reference guide
Quick reference guide
Quick reference guideQuick reference guide
Whirlpool is a registered trademark of Whirlpool USA
Whirlpool is a registered trademark of Whirlpool USA
Whirlpool is a registered trademark of Whirlpool USA
Whirlpool is a registered trademark of Whirlpool USAWhirlpool is a registered trademark of Whirlpool USA