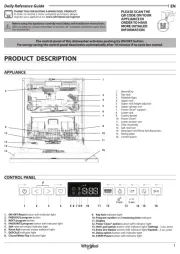
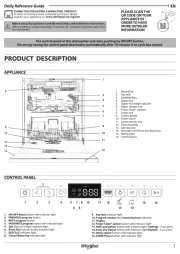
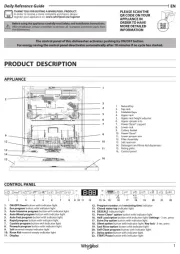
Whirlpool W7F HP43 X Manual


Læs gratis den danske manual til Whirlpool W7F HP43 X (6 sider) i kategorien Opvaskemaskine. Denne vejledning er vurderet som hjælpsom af 20 personer og har en gennemsnitlig bedømmelse på 3.9 stjerner ud af 10.5 anmeldelser. Har du et spørgsmål om Whirlpool W7F HP43 X, eller vil du spørge andre brugere om produktet?

Side 1/6
ENDaily Reference Guide
1
THANK YOU FOR BUYING A WHIRLPOOL PRODUCT.
In order to receive a more complete assistance, please
register your appliance on: www.whirlpool.eu/register
1. ON-OFF/Reset button
with indicator light
2. PREVIOUS program button
3. NEXT program button
4. FAVOURITE program button with indicator light
5. Salt reservoir empty indicator light
6. Rinse Aid reservoir empty indicator light
7. DESCALE indicator light
8. Closed Water Tap indicator light
9. Key lock indicator light
10. Program number remaining time and indicator
11. Display
12. Power Clean® option button with indicator light
FIRST TIME USE
1 2 3 4 11 12 13 14 155 6 7 8 9 10 16
13. Half Load option Settings button with indicator light/ - 3 sec. press
14. Extra Dry Option button with indicator light - 3 sec. press/ Keylock
15. Delay option button with indicator light
16. START/Pause button with indicator light
Before using the appliance carefully read
Safety and Installation Instructions. More information about your
product available on website: docs.whirlpool.eu
After installation, please remember to remove all transport protection
parts from the dishwasher.
SETTING MENU
1. Switch on the appliance by pressing the button.ON-OFF
2. Hold the Settings (Half Load ) button for 3 seconds, until you hear
a beep and the display shows SEt.
3. After one second therst available setting (letter h) will be displayed.
4. Press PREVIOUS /NEXT to scroll through the list of available settings
(see table below), then press START/Pause to view and change the
value of the currently selected setting.
5. Press PREVIOUS /NEXT to change the value, then press START/Pause
to save the new value and return to the main menu.
6. To change another setting, repeat points 4 and 5.
7. Press or wait 30 seconds to exit the menu.ON-OFF
FILLING THE SALT RESERVOIR
The use of salt prevents the formation of LIMESCALE on the dishes and on
the machine’s functional components.
The salt reservoir is located in the lower part of the dishwasher (under the
lower rack on the left side).
It is mandatory that the salt reservoir never be empty.
It is important to set the water hardness.
Salt must be lled when the SALT REFILL indicator light on the con-
trol panel is lit.1. Remove the lower rack and unscrew the reservoir cap
(anticlockwise).
2. Position the funnel and ll the salt reservoir (see gure)
right up to its edge (approximately 0,5 kg); it is not un-
usual for a little water to leak out.
3. Only the rst time you do this: ll the salt reservoir
with water.
4. Remove the funnel and wipe any salt residue away from the opening.
Make sure the cap is screwed on tightly so that no detergent can get into
the container during the wash program (this could damage the water
softener beyond repair).
Run a program every time as soon as you completed relling the salt
reservoir to avoid corrosion.
Setting the water hardness
To allow the water softener to work in a perfect way, it is essential that the water
hardness setting is based on the actual water hardness in your house. This infor-
mation can be obtained from your local water supplier. The factory setting is 3.
See WATER HARDNESS TABLE.
To change, follow instructions in section “SETTING MENU”.
Only use salt that has been specically designed for dishwashers.
After the salt has been poured into the machine, the SALT REFILL indicator
light switches o.
If the salt container is not lled, the water softener and the heating
element may be damaged as a result of limescale accumulation.
Use of salt is recommended with any type of dishwasher detergent.
WATER SOFTENING SYSTEM
Water softener automatically reduces water hardness, consequently pre-
venting scale buildup on the heater, contributing also to better clean-
ing eciency. This system regenerates itself with salt, therefore it is
required to rell the salt container when empty. The frequency of re-
generation depends on the water hardness level setting - regeneration
takes place once per Eco cycles with the water hardness level set to 4-6 3.
The regeneration process occurs at the beginning of the cycle with addi-
tional fresh water.
Single regeneration consumes: ~3L of water;
Takes up to 5 additional minutes for the cycle;
Consumes below 0.005kWh of energy.
FILLING THE RINSE AID DISPENSER
Rinse aid makes dish DRYING easier. The rinse aid dispenser should be A
lled when the RINSE AID REFILL indicator light in the control panel is lit.
1. Open the dispenser B by
pressing and pulling up the
tab on the lid.
2. Pour in the rinse aid (max.110
ml), making sure it does not
overow from the dispenser.
If this happens, clean the spill
immediately with a dry cloth.
3. Press the lid down until you hear a click to close it.
NEVER pour the rinse aid directly into the appliance tub..
Adjusting the dosage of rinse aid
If you are not completely satised with the drying results, you can adjust
the quantity of rinse aid used.
To change, follow instructions in the section SETTING MENU.
If the rinse aid level is set to ZERO, no rinse aid will be supplied. The LOW
RINSE AID indicator light will not be lit if you run out of rinse aid.
A maximum of levels can be set according to the dishwasher model. 6
If you see bluish streaks on the dishes, set a low number (0-3).
If there are drops of water or limescale marks on the dishes, set
a mid-range number (4-5).
FILLING THE DETERGENT DISPENSER
To open the detergent dispenser use the opening device C. Introduce
the detergent into the dry dispenser D only. Place the amount of
detergent for pre-washing directly inside the tub.
1. When measuring out the detergent refer to the
mentioned earlier information to add the proper
quantity. Inside the dispenser there are indicaD, -
tions to help the detergent dosing.
2. Remove detergent residues from the edges of the
dispenser and close the cover until it clicks.
3. Close the lid of the detergent dispenser by pulling
it up until the closing device is secured in place.
The detergent dispenser automatically opens up at the right time accord-
ing to the program.
Usage of detergent not designed for dishwashers may cause
malfunction or damage to the appliance.
A
B
D
C
LETTER SETTING VALUES
(Default - )in bold
Water Hardness Level
(see “SETTING THE WATER HARDNESS”
and “WATER HARDNESS TABLE”) 1 | 2 | | 4 | 53
Rinse Aid Level
(see ADJUSTING THE DOSAGE OF RINSE AID) 0 | 1 | 2 | 3 | 4 | 5
NaturalDry (see “OPTIONS AND FUNCTIONS”)
“1” = On, 0” = O 1 | 0
Sound
“1” = On, 0” = O 1 | 0
Factory Settings
Press START/Pause to restore to the factory
default all the values of the settings included in
the settings menu.
-
Water Hardness Table
Level °dH
German degrees
°fH
French degrees
°Clark
English degrees
1 (soft) 0 - 6 0 - 10 0 - 7
2 (medium) 7 - 11 11 - 20 8 - 14
3 (average) 12 - 16 21 - 29 15 - 20
4 (hard) 17 - 34 30 - 60 21 - 42
5 (very hard) 35 - 50 61 - 90 43 - 62
CONTROL PANEL
EN
2
1. CHECK WATER CONNECTION
Check that the dishwasher is connected to the water supply and that
the tap is open.
2. SWITCH ON THE DISHWASHER
Press the button.ON/OFF
3. LOAD THE RACKS (see LOADING THE RACKS).
4. FILL THE DETERGENT DISPENSER
5. CHOOSE THE PROGRAM AND CUSTOMISE THE CYCLE
Select the most appropriate program in accordance with the type of
crockery and its soiling level (see PROGRAMS DESCRIPTION) by pressing
the PREVIOUS/NEXT buttons.
Select the desired options . Not all (see OPTIONS AND FUNCTIONS)
options are compatible with all programs.
6. START
Start the wash cycle by closing the door and pressing START/Pause
button (led is lit). When the program starts you hear a single beep.
7. END OF WASH CYCLE
The end of the wash cycle is indicated by sound and the display shows
END. Switch o the appliance by pressing the button and ON/OFF
opening the door.
Wait for a few minutes before removing the crockery - to avoid burns.
Unload the racks, beginning with the lower one.
MODIFYING A RUNNING PROGRAM
If a wrong program was selected, it is possible to change it, provided that
it has only just begun. the machine: press and hold theRESET ON/OFF
button for more than 3. sec., and the machine will switch o. The dashboard
will show “0:01”. Wait until drain cycle ends (around 1 minute). Switch the
machine back on using the button and select the new wash cycle ON/OFF
and any desired options. Start the cycle by pressing the START/Pause button.
ADDING EXTRA CROCKERY
Without switching o the machine, open the door rst slightly to avoid wa-
ter splashing out (START/Pause Caution!: Hot steam! led starts blinking) ( )
and place the crockery inside the dishwasher. Close the door and press the
START/Pause button, the cycle will resume from the point at which it was
interrupted.
ACCIDENTAL INTERRUPTIONS
If the door is opened during the wash cycle, or if there is a power cut, the
cycle stops. Close the door and ONLY IF YOU PRESS START/Pause the
button the cycle will resume from the point at which it was interrupted.
TIPS
Before loading the baskets, remove all food residues from the crockery
and
empty the glasses. You do not need to rinse beforehand under running
water.
Arrange the crockery so that it is held in place rmly and does not tip over;
and arrange the containers with the openings facing downwards and the
concave/convex parts placed obliquely, thus allowing the water to reach
every surface and ow freely.
Warning: lids, handles, trays and frying pans should not prevent the
sprayer arms from rotating.
Place any small items in the cutlery basket.
Very soiled dishes and pans should be placed in the lower basket because
in this sector the water sprays are stronger and allow a higher washing
performance.
After loading the appliance, make sure that the sprayer arms can rotate
freely.
UNSUITABLE CROCKERY
Wooden crockery and cutlery.
Delicately decorated glasses, artistic handicrafts and antique crockery.
Their decorations are not resistant.
Parts in synthetic material which do not withstand high temperatures.
Copper and tin crockery.
Crockery soiled with ash, wax, lubricating grease or ink.
The colours of glass decorations and aluminium/silver pieces can change
and fade during the washing process. Some types of glass (e.g. crystal
objects) can become opaque after a number of wash cycles too.
DAMAGE TO GLASS AND CROCKERY
Only use glasses and porcelain guaranteed by the manufacturer as
dishwasher safe.
Use a delicate detergent suitable for crockery
Collect glasses and cutlery from the dishwasher as soon as the wash
cycle is over.
TIPS ON ENERGY SAVING
When the household dishwasher is used according to the manufactur-
ers instructions, washing tableware in a dishwasher usually con-
sumes less energy and water than hand dishwashing.
In order to maximize dishwasher eciency, it is recommended to
initiate the wash cycle once the dishwasher is fully loaded. Loading
the household dishwasher up to the capacity indicated by the manu-
facturer will contribute to energy and water savings. Information on the
correct loading of tableware can be found in the Loading chapter.
In case of partial loading, it is recommended to use a dedicated wash op-
tions if available (Half load/ Zone Wash/ Multizone), lling up only select-
ed racks. Incorrect loading or overloading of the dishwasher may increase
resources usage (such as water, energy and time, as well as increase noise
level), reducing cleaning and drying performance.
Manual pre-rinsing of tableware items leads to increased water and
energy consumption and is not recommended.
HYGIENE
To avoid odour and sediment which can be accumulated in the dishwash-
er please run a high-temperature program at least once a month.
Use a teaspoon of detergent and run it without loading to clean your
appliance.
RESISTANCE TO FROST
If the appliance is placed in surroundings exposed to the risk of frost, it
must be drained completely. Turn o the water tap, remove the inlet and
outlet hoses, and let all the water drain away. Make sure that the water
softener is full of dissolved regeneration salt in the salt container, to
protect the appliance from temperatures of up to -20°C.
If the appliance was stored in frost conditions the appliance must remain at
an ambient temperature of min. 5°C for before therst run.at least 24 hours
ADVICE AND TIPS
DAILY USE


Produkt Specifikationer

Mærke: Whirlpool
Kategori: Opvaskemaskine
Model: W7F HP43 X

Har du brug for hjælp?

Hvis du har brug for hjælp til Whirlpool W7F HP43 X stil et spørgsmål nedenfor, og andre brugere vil svare dig