Whirlpool W7F HS31 S Manual
Whirlpool
Opvaskemaskine
W7F HS31 S

| Mærke: | Whirlpool |
| Kategori: | Opvaskemaskine |
| Model: | W7F HS31 S |
| Vekselstrømsindgangsspænding: | 220-240 V |
| Vekselstrømsindgangsfrekvens: | 50 Hz |
| Bredde: | 600 mm |
| Dybde: | 590 mm |
| Højde: | 850 mm |
| Vægt: | 50000 g |
| Indbygget skærm: | Ja |
| Strøm: | 10 A |
| Ledningslængde: | 1.3 m |
| Pakkevægt: | 52500 g |
| Placering af apparat: | Fritstående |
| Tilsluttet belastning: | 1900 W |
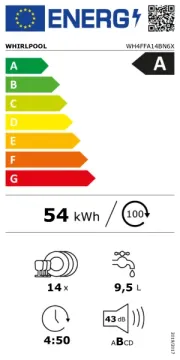
| Støjniveau: | 41 dB |
| Tilløbsslange, længde: | 1.55 m |
| Antal vaskeprogrammer: | 8 |
| Forsinket start-timer: | Ja |
| Børnesikring: | Ja |
| Dør farve: | Sølv |
| Vandforbrug pr. cyklus: | 9.5 L |
| Antal kuverter: | 15 kuverter |
| Cyklustid: | 210 min. |
| Forsinket start (maks.): | 24 t |
| Opvaskeprogrammer: | Auto, Auto-Mixed, Crystal 45°C, Eco 50°C, Intensive 65°C, Pre-wash, Quick 45°C, Self-Clean 65°C |
| Halv belastning: | Ja |
| Indikator for afspændingsmiddel: | Ja |
| Energieffektivitetsskala: | A til G |
| Selvrensende: | Ja |
| Indikator for resterende tid: | Ja |
| Udøsslange længde: | 1.5 m |
| Produktstørrelse: | Fuld størrelse (60 cm) |
| Overløbsbeskyttelse: | Ja |
| Støjemissionsklasse: | B |
| Energieffektivitetsklasse: | D |
| Energiforbrug pr. 100 cyklusser: | 86 kWh |
| Brugerdefineret panel klar: | Ingen |
| Temperatur (maks): | 65 °C |
| Saltindikator: | Ja |
| Øverste kurv indstillelig højde: | Ja |
| Ekstra tørt: | Ja |
| Maksimal varmtvandsforsyning temperatur: | 60 °C |
Har du brug for hjælp?
Hvis du har brug for hjælp til Whirlpool W7F HS31 S stil et spørgsmål nedenfor, og andre brugere vil svare dig
Opvaskemaskine Whirlpool Manualer
8 Oktober 2025
8 Oktober 2025
8 Oktober 2025
8 Oktober 2025
7 Oktober 2025
20 September 2025

12 September 2025
5 September 2025
5 September 2025

1 September 2025
Opvaskemaskine Manualer
- Jolly
- RCA
- Arctic Cooling
- Eta
- Cecotec
- Trieste
- Vedette
- Elektro Helios
- Zerowatt
- Junker
- Element
- Duronic
- Infiniton
- Exquisit
- BLANCO
Nyeste Opvaskemaskine Manualer

30 Oktober 2025
30 Oktober 2025

30 Oktober 2025

29 Oktober 2025
29 Oktober 2025
29 Oktober 2025

29 Oktober 2025

29 Oktober 2025

29 Oktober 2025

29 Oktober 2025