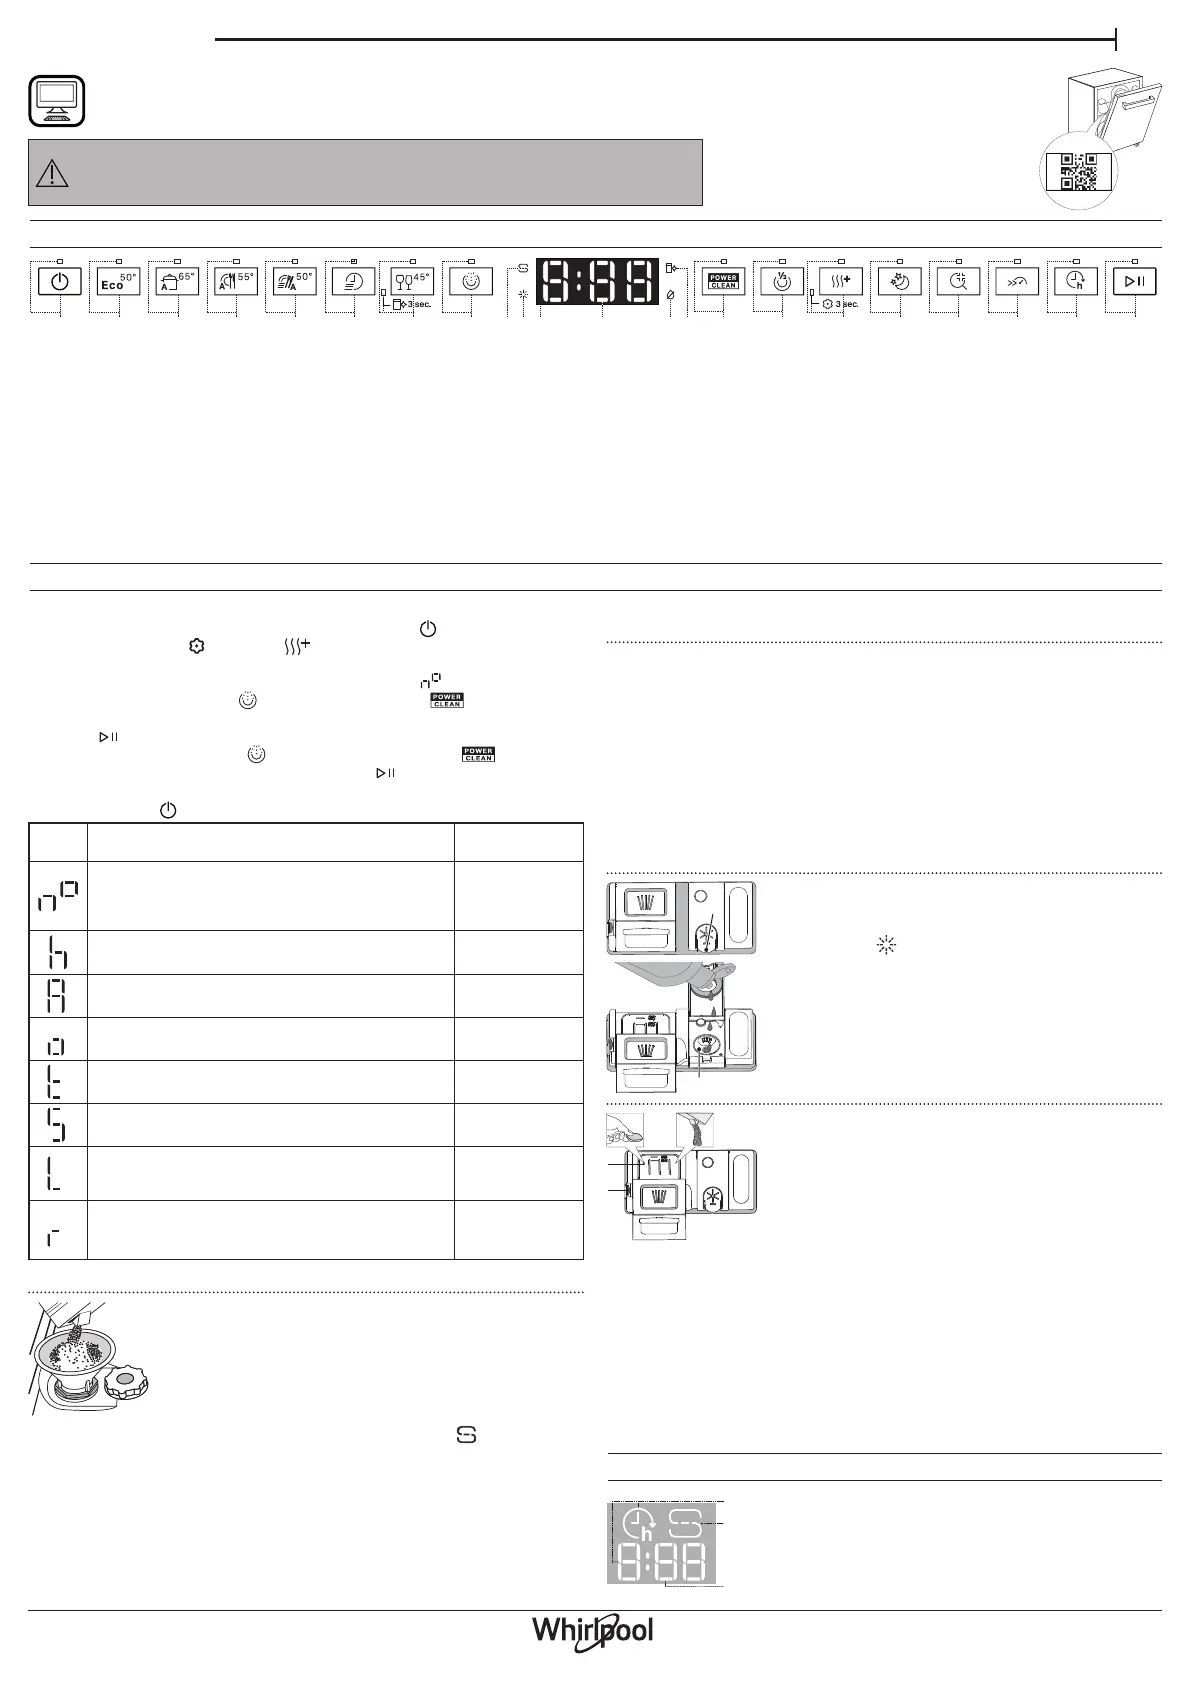
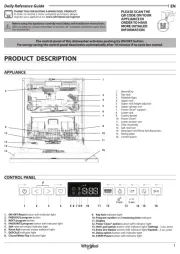
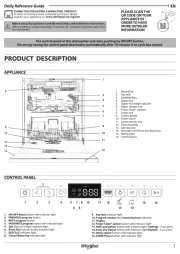
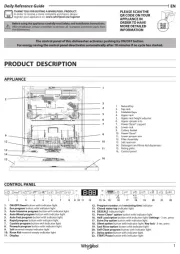
Whirlpool WH8IA15AM3TUCH0 Manual

Whirlpool Opvaskemaskine WH8IA15AM3TUCH0

Læs gratis den danske manual til Whirlpool WH8IA15AM3TUCH0 (36 sider) i kategorien Opvaskemaskine. Denne vejledning er vurderet som hjælpsom af 13 personer og har en gennemsnitlig bedømmelse på 4.5 stjerner ud af 7 anmeldelser. Har du et spørgsmål om Whirlpool WH8IA15AM3TUCH0, eller vil du spørge andre brugere om produktet?

Side 1/36
EN
Quick Guide
1
4 5 6 7 8 9 10 13 14 1511 12 16 17 18 191 2 3 20 21 22
1. ON-OFF/Reset button with indicator light
2. Eco program button with indicator light
3. Auto Intensive program button with indicator light
4. Auto Mixed program button with indicator light
5. Auto Fast program button with indicator light
6. Rapid program button with indicator light
7. Crystals program button with indicator light/ Self-Clean program -
3sec. press
8. Prewash program button with indicator light
9. Salt reservoir empty indicator light
10. Rinse Aid reservoir empty indicator light
11. Display
12. Program number and remaining time indicator
13. Closed water tap indicator light
14. DESCALE indicator light
15. Power Clean® option button with indicator light
16. Half Load option button with indicator light
17. Extra Dry option button with indicator light/ Settings - 3 sec. press
18. Silent option button with indicator light
19. Sani Rinse option button with indicator light
20. Turbo option button with indicator light
21. Delay option button with indicator light
22. START/Pause button with indicator light
SETTING MENU
1. Switch on the appliance by pressing the ON-OFF button.
2. Hold the Settings (Extra Dry ) button for 3 seconds, until you hear
abeep and the display shows SEt”.
3. After one second the rst available setting (letter ”) will be displayed.
4. Press Prewash prograam / Power Clean® option buttons to scroll
through the list of available settings (see table below), then press START/
Pause to view or change the value of currently selected setting.
5. Press Prewash program / Power Clean® option buttons to
change the value, then press START/Pause to save the new value.
6. To change another setting, repeat points 2 and 5.
7. Press ON-OFF or wait 30 seconds to exit the menu.
LETTER
SETTING
VALUES
(Default - in bold)*
Cycle Counter - number of washing cycles
carried out by the dishwasher.
Eg. 25 cycles: 25;
Eg. 13.947 cycles:
13_947
(scrolling
for 3 times)
Water Hardness Level (see “SETTING THE WA-
TER HARDNESS” and “WATER HARDNESS TABLE”)
1 | 2 | 3 | 4 | 5
Rinse Aid Level
(see “ADJUSTING THE DOSAGE OF RINSE AID”)
0 | 1 | 2 | 3 | 4 | 5
NaturalDry (see “OPTIONS AND FUNCTIONS”)
“1” = On, “0” = O
1 | 0
Time on the oor (see “OPTIONS AND FUNCTIONS”)
“1” = On, “0” = O
1 | 0
Sound
“1” = On, “0” = O
1 | 0
Internal Lights (see “OPTIONS AND
FUNCTIONS”)
“1” = On, “0” = O
1 | 0
Factory Settings - press START/Pause to re-
store to the factory default all the values of the
settings included in the settings menu.
-
*) The default value does not apply to the Cycle Counter.
FILLING THE SALT RESERVOIR
The use of salt prevents the formation of LIMESCALE on
the dishes and on the machine’s functional components.
The salt reservoir is located in the lower part of the dish-
washer (under the lower rack on the left side).
It is mandatory that the salt reservoir never be empty.
It is important to set the water hardness.
Salt must be lled when the SALT REFILL indicator light on the control
panel is lit.
1. Remove the lower rack and unscrew the reservoir cap (anticlockwise).
2. Position the funnel (see gure) and ll the salt reservoir right up to its
edge (approximately 0,5 kg); it is not unusual for alittle water to leak out.
3. Only the rst time you do this: ll the salt reservoir with water.
4. Remove the funnel and wipe any salt residue away from the opening.
Make sure the cap is screwed on tightly so that no detergent can get into
the container during the wash program (this could damage the water sof-
tener beyond repair).
Run aprogram every time as soon as you completed relling the salt
reservoir to avoid corrosion.
WATER SOFTENING SYSTEM
Water softener automatically reduces water hardness, consequently pre-
venting scale buildup on the heater, contributing also to better cleaning ef-
ciency. This system regenerates itself with salt, therefore it is required
to rell the salt container when empty.
The frequency of regeneration depends on the water hardness level setting
- regeneration takes place once per 4-6 Eco cycles with the water hardness
level set to 3. The regeneration process occurs at the beginning of the cycle
with additional fresh water.
Single regeneration consumes ~3 L of water;
Takes up to 5 additional minutes for the cycle;
Consumes below 0.005kWh of energy.
A
B
FILLING THE RINSE AID DISPENSER
Rinse aid makes dish DRYING easier. The rinse aid dis-
penser Ashould be lled when the RINSE AID REFILL
indicator light in the control panel is lit.
1. Open the dispenser B by pressing and pulling up
the tab on the lid.
2. Pour in the rinse aid (max. 110 ml), making sure it
does not overow from the dispenser. If this hap-
pens, clean the spill immediately with adry cloth.
3. Press the lid down until you hear aclick to close it.
NEVER pour the rinse aid directly into the appli-
ance tub.
D
C
FILLING THE DETERGENT DISPENSER
To open the detergent dispenser use the opening
device C. Introduce the detergent into the dry dis-
penser D only. Place the amount of detergent for
pre-washing directly inside the tub.
1. When measuring out the detergent refer to the
mentioned earlier information to add the proper
quantity. Inside the dispenser D, there are indica-
tions to help the detergent dosing.
2. Remove detergent residues from the edges of the dispenser and close
the cover until it clicks.
3. Close the lid of the detergent dispenser by pulling it up until the closing
device is secured in place.
The detergent dispenser automatically opens up at the right time accord-
ing to the program.
Usage of detergent not designed for dishwashers may cause malfunc-
tion or damage to the appliance.
CONTROL PANEL
FIRST TIME USE
More information in the Daily Reference Guide on website.
THANK YOU FOR BUYING AWHIRLPOOL PRODUCT.
In order to receive amore complete assistance, please
register your appliance on: www.whirlpool.eu/register
PLEASE SCAN THE
QR CODE ON YOUR
APPLIANCE IN
ORDER TO HAVE
MORE DETAILED
INFORMATION
Before using the appliance carefully read Safety and Installation Instructions.
After installation, please remember to remove all transport protection parts from
the dishwasher.
1
3
2
1. Delay Time on the oor - indicator of the time left
to the start of the cycle, when the Delay option is set
2. Salt reservoir empty - indicator light on the oor
3. Remaining Time on the oor - indicator of the time
left to the end of the cycle
DISPLAY ON THE FLOOR


Produkt Specifikationer

Mærke: Whirlpool
Kategori: Opvaskemaskine
Model: WH8IA15AM3TUCH0

Har du brug for hjælp?

Hvis du har brug for hjælp til Whirlpool WH8IA15AM3TUCH0 stil et spørgsmål nedenfor, og andre brugere vil svare dig


Opvaskemaskine Whirlpool Manualer

Opvaskemaskine Manualer

Nyeste Opvaskemaskine Manualer