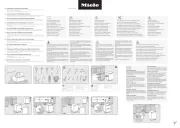
Whirlpool WIO 3T133 PE 6.5 Manual
Læs gratis den danske manual til Whirlpool WIO 3T133 PE 6.5 (56 sider) i kategorien Opvaskemaskine. Denne vejledning er vurderet som hjælpsom af 14 personer og har en gennemsnitlig bedømmelse på 5.0 stjerner ud af 7.5 anmeldelser.
Har du et spørgsmål om Whirlpool WIO 3T133 PE 6.5, eller vil du spørge andre brugere om produktet?

Produkt Specifikationer
| Mærke: | Whirlpool |
| Kategori: | Opvaskemaskine |
| Model: | WIO 3T133 PE 6.5 |
| Vekselstrømsindgangsspænding: | 220 - 240 V |
| Vekselstrømsindgangsfrekvens: | 50 Hz |
| Bredde: | 595 mm |
| Dybde: | 555 mm |
| Højde: | 820 mm |
| Vægt: | 35500 g |
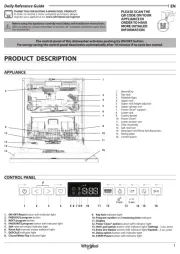
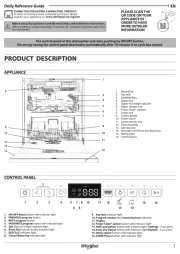
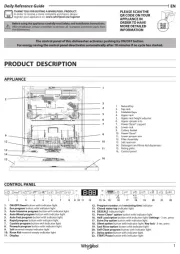
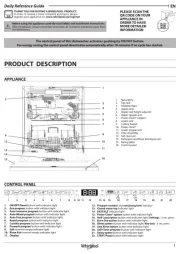
| Kontroltype: | Knapper |
| Indbygget skærm: | Ja |
| Skærmtype: | TFT |
| Strøm: | 10 A |
| Ledningslængde: | 1.3 m |
| Pakkevægt: | 37500 g |
| Pakkedybde: | 675 mm |
| Pakkebredde: | 625 mm |
| Pakkehøjde: | 910 mm |
| Placering af apparat: | Fuldt indbygget |
| Installationsrum bredde: | 600 mm |
| Installationsrum dybde: | 560 mm |
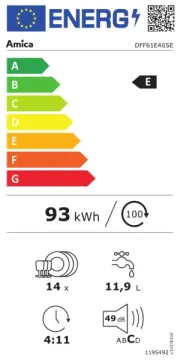
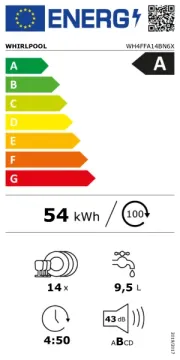
| Støjniveau: | 43 dB |
| Tilløbsslange, længde: | 1.55 m |
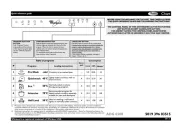
| Antal vaskeprogrammer: | 10 |
| Forsinket start-timer: | Ja |
| Justerbare fødder: | Ja |
| Dør farve: | Ikke anvendelig |
| Vandforbrug pr. cyklus: | 6.5 L |
| Farve på kontrolpanel: | Grå |
| Antal kuverter: | 14 kuverter |
| Cyklustid: | 190 min. |
| Forsinket start (maks.): | 12 t |
| Opvaskeprogrammer: | Eco, Glass/delicate, Intensive, Intensive 60°C, Pre-wash, Quick |
| Energiforbrug pr. cyklus: | 0.85 kWh |
| Energieffektivitetsskala: | A til G |
| Antal temperaturindstillinger: | 3 |
| AquaStop funktion: | Ja |
| Installationsrum højde (min.): | 820 mm |
| Udøsslange længde: | 1.5 m |
| Produktstørrelse: | Fuld størrelse (60 cm) |
| Vandpåfyldning: | Kold |
| Overløbsbeskyttelse: | Ja |
| Støjemissionsklasse: | B |
| Energieffektivitetsklasse: | D |
| Energiforbrug pr. 100 cyklusser: | 85 kWh |
| Brugerdefineret panel klar: | Ja |
| Temperatur (maks): | 60 °C |
| Saltindikator: | Ja |
| Øverste kurv indstillelig højde: | Ja |
| Kurves indstillelige placering: | Øvre |
| Tørresystem: | Naturlig |
| Selvbalancerende hængsel: | Ja |
Har du brug for hjælp?
Hvis du har brug for hjælp til Whirlpool WIO 3T133 PE 6.5 stil et spørgsmål nedenfor, og andre brugere vil svare dig
Opvaskemaskine Whirlpool Manualer


Opvaskemaskine Manualer
- Saivod
- Miele
- Matrix
- Esatto
- Kucht
- Husqvarna
- Neff
- Bompani
- Vestfrost
- Fisher Paykel
- Hoover
- Veripart
- Kernau
- Frigidaire
- Kenwood
Nyeste Opvaskemaskine Manualer