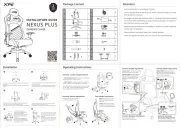
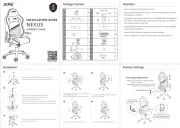
Package Content Attention
Installation Position Settings
•Clear a workspace for assembling the chair.
•Lay out all parts listed in the Parts List. A clear workspace helps you verify
that all pieces are present.
•We suggest to place the protective foam or cardboard from the packaging
on the floor while assembling to avoid accidental damage or scratches to
both the floor and your new chair.
•Keep all packing materials until assembly is complete to avoid misplacing
smaller parts or hardware.
•Keep small parts and pieces away from children and pets.
•Check and tighten all screws one more time on the chair before use.
•Raise: Lean forward, lift the right-side handle,
•Lower: While seated, lift the handle and use your
weight to lower the chair. Release to stop.
•Rotate the armrest surface
left or right by applying gentle
force for optimal positioning.
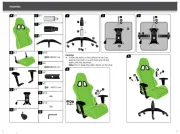
• Insert the 5 casters (A) into the star base (B) until they click into place.
• Insert the gas lift (C) into the star base (B) and attach the gas lift cover (D).
Align the Back Cushion (G) with the Seat Cushion (F) and side
rails of the Recliner Mechanism.
Secure with 4x M8*20mm Screws (K) using the Allen Key (N).
Attach the Recliner Mechanism Cover (I) and secure it with
M5*8 Screws (L) on each side.
Attach the Cover Studs (M) to conceal the screw holes. Place the Head Pillow (J) for added neck support.
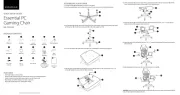
• Place the assembled Seat Cushion (F) with Seat Plate (E) onto the Gas Lift (C) and
press down until it clicks into place.
• Align the 4 holes on the Seat Plate (E) with the Seat Cushion (F).
• Secure with 4x M8*20mm Screws (K) using the Allen Key (N).
• Ensure the "FRONT" marking faces forward.
• Ensure the armrests face forward and are aligned to the correct side (Left/Right).
• Secure the Arms (HR & HL) to the Seat Cushion (F) with 8x M8*20mm Screws (K).