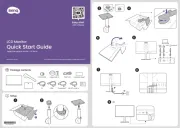
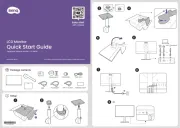
After mounting an IP camera, use the
Camera Installation Kit to power up the
camera via Power-over-Ethernet (PoE).
1. Switch the device POWER On then press
and hold for 3 seconds.
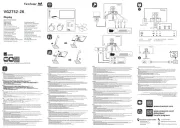
After the device boot up process, the main menu screen appears. Tap the screen with
the bundled stylus or use the Navigation Keys to move through the menu.
1. Tap PoE ON to use the device power to power on the camera.
This button turns to to indicate PoE is already enabled.
2. Tap IP Camera .
3. Tap Connect .
The camera Live View appears. The functions displayed on the screen may vary
depending on the type of camera connected.
• To adjust focus manually, press or . Or, to set to auto focus, press and at
the same time.
• To zoom image in our out one step at a time, press or .
• To zoom to maximum zoom view, tap
Zoom
.
• When zoomed, tap
Z & F
to switch to Pan & Tilt mode.
• In
P & T
mode, press or to pan and tilt the view.
• Tap
REC
to start or stop recording.
REC
indicates recording is in progress.
Zoom Cameras
Fixed or Vari-focal Cameras
• To zoom to maximum digital zoom view, tap
Zoom
.
• In
P & T
mode, press or to pan and tilt the view.
• Tap
REC
to start or stop recording.
REC
indicates recording is in progress.
Speed Dome Cameras
• To zoom image in our out one step at a time,
press or .
• To zoom to maximum zoom view, tap
Zoom
.
• To pan and tilt the view, press or .
• Tap
REC
to start or stop recording.
REC
indicates recording is in progress.
To view the camera Live View screen, perform the following:
IMPORTANT: To ensure optimum performance of cameras needing more than 6W
power, it is recommended to connect the device to either one of the following:
• Connect the device to an external power outlet using the DC 12V power adapter.
• Connect a PoE switch or injector to the LAN / PSE IN port of the Camera Installation
Kit and switch on Power Bank. Refer to the Product Manual downloadable from the
website for detailed instructions.
Power Bank Switch
Power Switch
Note: The boot up process may take a while to complete.
2. Make sure the Power Bank switch is Off.
3. Connect one end of the network cable to the camera and
the other end to the LAN / POE OUT port of the device.
Quick Installation Guide
V.2015.04.08
CAMERA INSTALLATION KIT
2
3
1
Step 5: Connect the Camera
Step 6: View the Camera
Step 7: Operate the Device