USER'S GUIDE
E130 / E130 Duo / Trio
E190 / E190 Duo / Trio
Charging batteries for the first time
Before you start to use your telephone make sure that all batteries are
fully charged for 15 hours.
Important note: This telephone is not designed for Emergency calls
when the mains power fails.
For Emergency calls you should have a basic phone that operates
without mains power, connected to your line so that you can make calls
during a power failure.
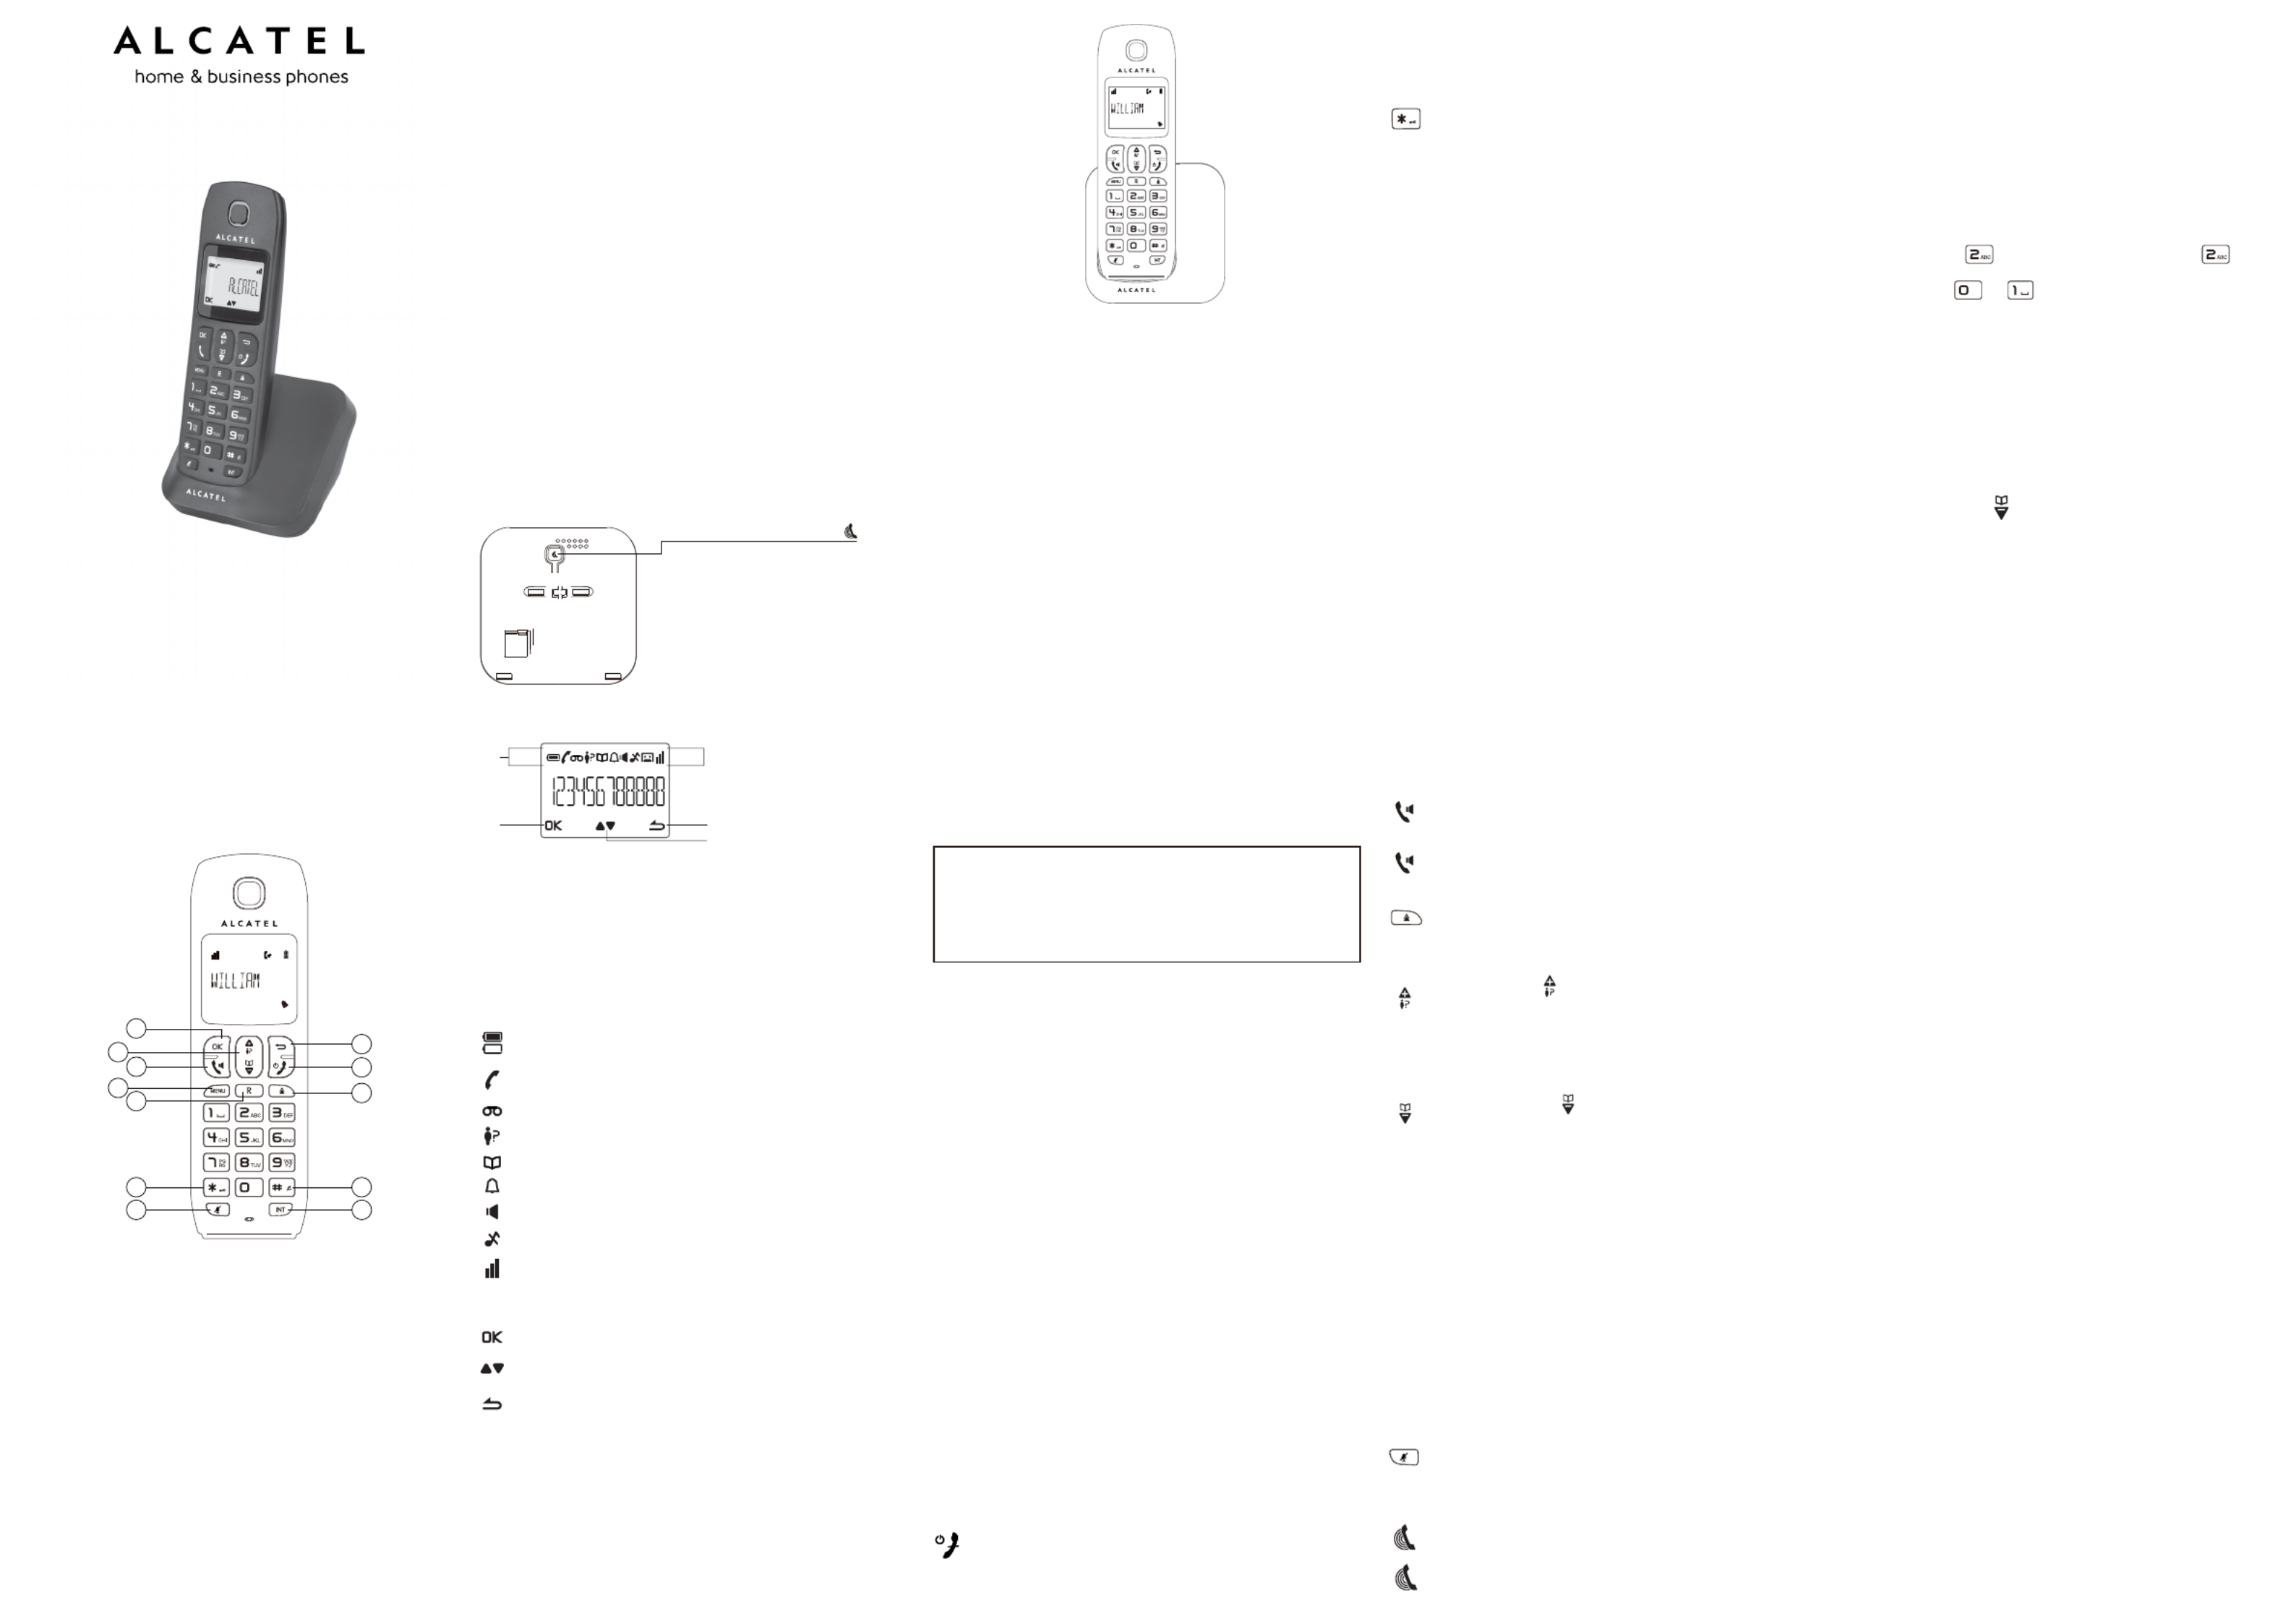
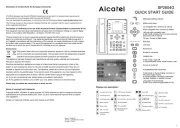
Phone Function Keys
2
1
4
6
3
12
5
8
10
9
11
7
1 OK key
Press to select the function displayed on the handset screen directly
above it.
2 Back/clear key
Press to delete a digit/a character in editing mode.
Press to return to idle mode.
Press and hold to change the handset idle display between handset
name and date/time.
3 Navigation key
Press UP to access the call log* and press DOWN to access the
phonebook when in idle mode.
Press UP/DOWN to increase or decrease earpiece volume during a call.
Press UP/DOWN to increase or decrease handsfree volume (E190 only).
Scroll up/down a list.
4 Talk key
Handsfree (E190 only).
5 Hang-up/Exit key
Press and hold to switch the handset power on/off.
Press to end a call.
Press to return to idle mode in other menus.
6 Recall (Flash) key
Access to operator services*
7 Menu key
Press to access the main menu.
8 Redial key
Press to access the Redial list.
9 Star key
Press and hold to lock/unlock keypad.
Press and hold to toggle between the external and internal calls when
both are set up.
10 Hash key
Press and hold to insert a pause during a call.
Press and hold to turn the ringer on/off.
11 Mute key
Press to mute / unmute the handset microphone.
12 Call transfer/Intercom key
Press to initiate an internal call.
Press to hold the line and page another handset during a call.
Press and hold to initiate a conference call.
*Subject to subscritption and availability of the service from the fixed
line operator.
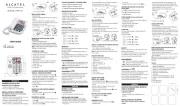
HANDSET LOCATOR button
Press to page handsets.
Press and hold to start registration
procedure.
Base station
D
C
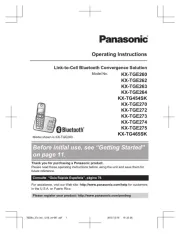
What’s on the display?
A
B
A Display Icons
B Displays when in menu mode to confirm your selection.
C Indicates that more options are available.
Use the UP / DOWN keys to scroll up/down.
D Displays when in menu mode.
Select BACK to return to the previous menu level.
Select BACK to delete the last digit / character entered.
Read First Before Use
Choosing a site for the base unit and charger pod
If you have a Broadband line
If you connect your telephone to a line with a broadband connection,
you will need to insert a microfilter between the telephone and the
telephone line, otherwise you may get interference between the
telephone and the broadband, which could cause problems.
The base unit and charger pod(s) should be placed on a level surface,
in a position where:
• the mains adapter plug will reach an easily accessible 230-V AC
switched mains supply socket - never try to lengthen the mains
power cable
• the base unit’s telephone line cable will reach you telephone line
socket or extension socket (the charger pod does not have a
telephone line connection)
• it is not close to another telephone - this can cause radio interference
• it is not close to a sink, bath or shower, or anywhere else where it
might get wet
• it is not close to other electrical equipment - fridges, washing
machines, microwave ovens, fluorescent lights, televisions etc.
• it is away from hot, humid conditions and strong sunlight
Radio signals between handset and base unit
To use your handset and base unit together, you must be able to
maintain a radio link between them. Be aware that any large metal
objects, like a refrigerator, a mirror, filing cabinet, etc, between the
handset and the base unit may block the radio signal. Other solid
structures, like walls, may reduce the signal strength.
Mains power connection
IMPORTANT - The base unit and charger pod must be used with the
mains adapters supplied with the unit.
Using any other adapter will result in non-compliance with EN60950,
and will invalidate any approval given to this apparatus.
Battery safety - CAUTION
ONLY use the rechargeable batteries supplied with the handset.
DO NOT use non-rechargeable batteries - they may explode and
cause damage to your telephone.
Installation and Set-up
Fit the rechargeable batteries in each handset
1. Install the AAA batteries (Brand name: CORUN, Capacity: Ni-MH
1.2V/300mAH, or Brand name GREPOW, Capacity: Ni-MH
1.2/300mAH) into
Handset in accordance with the polarity marked in the battery
compartment.
2. Close the battery compartment cover, sliding it into place and
pressing firmly to make sure it is secure.
Connecting AC (electrical) power
1. Plug the base adaptor cord into the power jack on rear panel of the
base and the other end into a 100-240Vac 50-60Hz electrical outlet.
2. Connect telephone line cord into the phone jack on rear panel of the
base and the other end into a main socket.
3. In case of twin or triple system, plug the charger power adaptor cord
into the power jack on rear panel of charger and the other end into a
100-240Vac 50-60Hz electrical outlet.
Before you use the cordless handset for the first time, it’s important
to charge the batteries fully.
Leave the handset on the charging cradle for 15 hours.
CAUTION: Use only the power supply that came with this unit. Using
other power supplies may damage the unit.
Base and charger power adaptor :
Base: S003GV0600050
Charger: S003GV0600015
Input: 100-240V / 50-60Hz
Output: 6V DC / 500mA(Base)
6V DC / 150mA(Charger)
Your Telephone Operations
Switching on/off
Press and hold the HANG-UP/EXIT key for more than 2
seconds to switch on/off the handset in idle mode.
Note: When the handset is OFF, it cannot be used for making
calls including emergency calls. There will be no ringing
Make and answer calls
Make a call
Predialling
Dial the number (maximum 24 digits) and then press TALK key.
Direct dialling
Press TALK key to take the line and then dial the number
(maximum 24 digits).
Call from redial list
Press REDIAL key in idle mode.
Press the Navigation key to an entry in the redial list and then
press TALK key.
Call from the call log
Press CALL LOG key in idle mode.
Press the Navigation key to an entry in the call list and then
press TALK key.
Note: You need to subscribe to Caller Line Identification service to be
able to see the caller’s number or name in the call log.
Call from the phonebook
Press PHONEBOOK key in idle mode.
Press the Navigation key to an entry in the phonebook and then
press TALK key.
Answer and end a call
1. When the phone rings, press TALK key.
2. To end a conversation, press HANG-UP/EXIT key.
IMPORTANT NOTE: You can simply place the handset back on its
base station or charger pod to end the call.
Use handsfree (only for E190)
Press TALK key at any moment in normal talk mode to talk in
handsfree mode.To deactivate the handsfree mode, press again the
TALK key to talk in normal talk mode.
Adjust the earpiece volume
During a call, press the Navigation key to select from VOLUME 1 to
VOLUME 5.
Mute/unmute microphone
When the microphone is muted, the handset displays , and MUTE ON
your caller cannot hear you.
During a call, press the MUTE key to turn on/off the microphone.
Paging
The paging feature enables you to locate a missing handset if the
handset is in range and contains charged batteries.
Press HANDSET LOCATOR key located at the back of the
base station. All the registered handsets start to ring.
Once retrieved, press any key on the handset or the HANDSET
LOCATOR key again to end the paging.
CAUTION
RISK OF EXPLOSION IF BATTERY IS REPLACED BY AN
INCORRECT TYPE.
DISPOSE OF USED BATTERIES ACCORDING TO THE
INSTRUCTIONS.
What the icons mean?
Indicates battery is fully charged.
Indicates battery is fully discharged.
Indicates that an external call is connected or held.
Icon blinks when receiving an incoming call.
Indicates you have a new Voice Mail message.
Indicates you have new missed calls, or the call log is being viewed.
Displays when the phonebook is accessed.
Displays when the alarm clock is activated.
Displays when handsfree is activated (E190 only).
Displays when ringer volume is turned off.
Displays when in menu mode to confirm your selection.
Indicates that more options are available.
Use the UP / DOWN keys to scroll up/down.
Indicates that the handset is registered and within range of the
base station.
Icon blinks when the handset is out of range or is searching for a
base.
Displays when in menu mode.
Select BACK to return to the previous menu level.
during an incoming call. To answer a call, you will need to
switch it back on. It may take some time for the handset to
re-establish a radio link with the base unit.
To lock/unlock the keypad
Press and hold the STAR key for 1 second to lock /
unlock the keypad in idle mode.
Note: Incoming calls can still be answered even if the keypad was locked.
Set time and date
Note: If you subscribe to the Caller Display service, the time and date
will be set automatically when you receive a call, but you may still need
to set the correct year.
1. Press MENU key to enter menu selection.
2. Press the Navigation key to select and then press CLOCK&ALARM
OK key to select.
3. Press OK key to select . The last stored date is displayed.DATE/TIME
Enter the current date (YY-MM-DD), press OK, then enter the time
(HH-MM).
4. Press the Navigation key to select or (if the time is in 12 AM PM
HOURS format) and then press OK key to confirm. A confirmation
beep is played.
Change the display language
1. Press MENU key to enter menu selection.
2. Press the Navigation key to select and then press PERSONAL SET
OK key to select.
3. Press the Navigation key to select and then HANDSET NAME
press OK key to select. The current handset name is displayed.
4. Press BACK/CLEAR key to delete the characters one by one.
Enter the new name (maximum 10 characters) and press OK key to
confirm.
A confirmation beep is played.
Change the display language
1. Press MENU key to enter menu selection.
2. Press the Navigation key to select and then press PERSONAL SET
OK key to select.
3. Press the Navigation key to select and then press OK LANGUAGE
key to select.
4. Press the Navigation key to your desired language and press OK
key to confirm. A confirmation beep is played.
Note : Once the display language is set, the option menus on the
handset will switch to display in the selected language immediately.
Call waiting
If you have subscribed to Call Waiting service, the earpiece will emit a
beep tone to inform you that there is a second incoming call. The
number or name of the second caller will also be displayed on your
phone if you have subscribed to Caller Line Identification service (CLI).
Please contact your network provider for more information on this
service.
Using your phonebook
Your phone can store up to 50 phonebook memories.
How to enter characters?
When you select a field in which you can enter text, you can enter the
letters that are printed on the keys by pressing the relevant key once or
several times.
For example, press once to insert the letter ‘A’, press twice
to insert the letter B, and so on... Spaces and other symbols can be
entered using the or key.
Store a contact in the phonebook
1. Press MENU key to enter menu selection.
2. Press the Navigation key to select and then press PHONEBOOK
OK key to select.
3. Press OK key again to enter .NEW ENTRY
4. Enter the name of the contact (maximum 12 characters). To edit,
press BACK/CLEAR key to delete the last character entered. Press
OK key to confirm the name entry.
5. Enter the number of the contact (maximum 24 digits) and then
press OK key to confirm. A confirmation beep is played.
Access phonebook
1. Press PHONEBOOK key in idle mode to browse the
phonebook entries. Alternatively, you can press the MENU key, to
display PHONEBOOK and then press OK key to select.
2. Press the Navigation key to select and then press OK key to LIST
confirm. The phonebook entries will be listed in alphabetical order,
and you can press Navigation key to scroll through the stored entries.
3. Press OK key to view the details of the selected entry.
Note : Instead of pressing the Navigation key to browse the phonebook
entries, you can press the numeric key corresponding to the first letter
of the entry you wish to locate.
Modify a phonebook entry
1. Press MENU key to enter menu selection.
2. Press the Navigation key to select and then press PHONEBOOK
OK key to select.
3. Press the Navigation key to select and then press OK EDIT ENTRY
key to select.
4. Press the Navigation key to select an entry to edit and then press
OK key. The current name is displayed. Edit the name and then
press OK key to confirm.
5. Edit the number and then press OK key to confirm. A confirmation
beep is played.
Delete a phonebook entry
1. Press MENU key to enter menu selection.
2. Press the Navigation key to select and then press PHONEBOOK
OK key to select.
3. Press the Navigation key to select and then press OK key DELETE
to select.
4. Press the Navigation key to select an entry to delete and then press
OK key.
5. Press OK key again to confirm. A confirmation beep is played.
Delete all entries from the phonebook list
1. Press MENU key to enter menu selection.
2. Press the Navigation key to select and then press PHONEBOOK
OK key to select.
3. Press the Navigation key to select and then press OK DELETE ALL
key to select.
4. Press OK key again to confirm. A confirmation beep is played.
Direct access memory
There are 2 direct access memories (Keys 1 & 2) in addition to the
phonebook memory. A long press on the keys in idle mode will
automatically dial the stored phone number.
Add/edit direct access memory
1. Press MENU key to enter menu selection.
2. Press the Navigation key to select and then press PHONEBOOK
OK key to select.
3. Press the Navigation key to select . and then press DIRECT MEM
OK key to select.
4. Press the Navigation key to select or and then press KEY 1 KEY 2
OK key. The stored name is displayed, or if it is NO NUMBER
empty. If there is no number stored for the selected key or if you
want to change the name or number currently stored, press MENU
key to enter direct memory menu to add/edit the name or number.
5. Press the Navigation key to select and then press EDIT NUMBER
OK key to select. The display shows the currently stored name, or
if there is no number stored. Edit or enter the name ENTER NAME
you want and then press OK key. The display shows the currently
stored number, or if there is no number stored. ENTER NUMBER
Edit or enter the number you want and then press OK key to
confirm. A confirmation beep is played.